2025/4/22 15:49:10
You are visiting the United States site,
you can switch to other countries/regions.
Intro to Max/MSP
TourBox introduces new native integrations for Max/MSP (hereinafter referred to as Max), the graphical programming software for music and multimedia applications. You could now assign our new built-in functions on the buttons and knobs, and send digital signals to Max through TourBox.
Download User Manual
Manual
Intro to Max/MSP
TourBox introduces new native integrations for Max/MSP (hereinafter referred to as Max), the graphical programming software for music and multimedia applications. You could now assign our new built-in functions on the buttons and knobs, and send digital signals to Max through TourBox.

TourBox buttons and the Max built-in functions

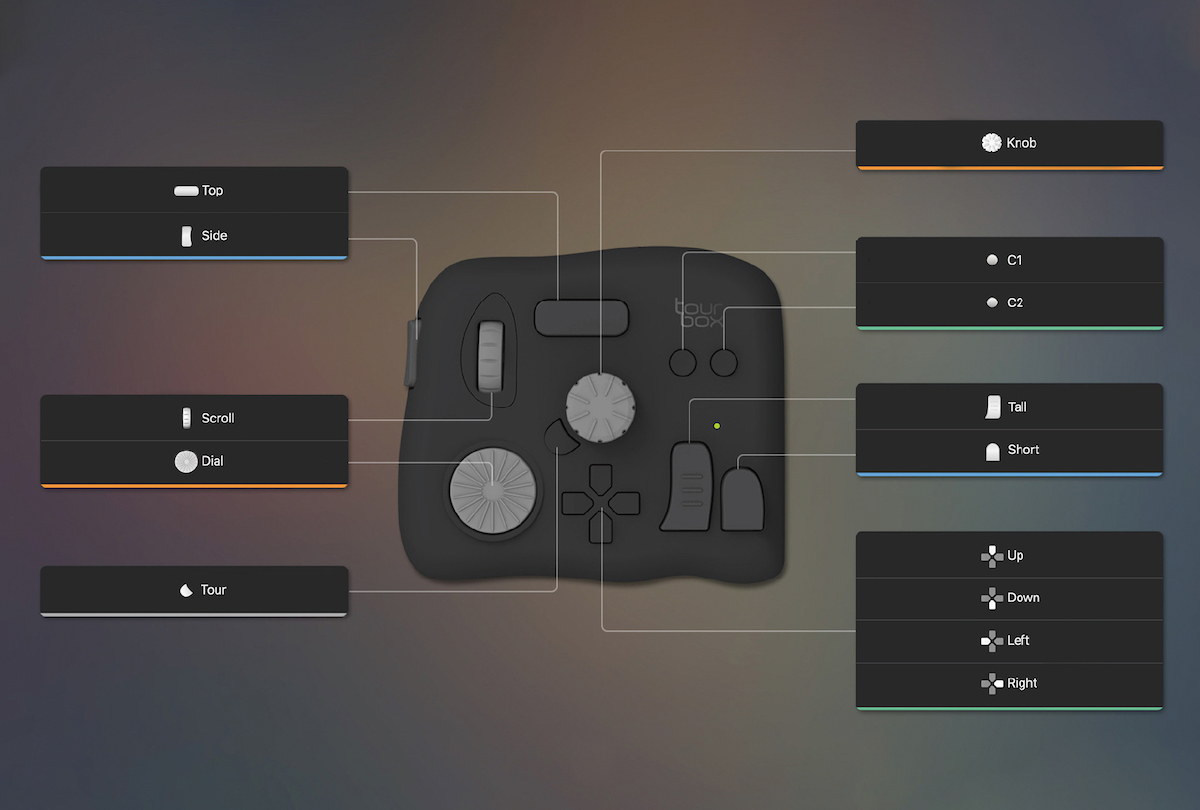
There are a total of 14 buttons and knobs on the TourBox, which include:

  1. The rotary ones: Knob, Scroll,
  2. The buttons: Tall, Short, Top, Side, kit-section (Up/Down/Left/Right arrow), Tour, C1, and C2.

After mapping the built-in function on any button through TourBox Console, you may send a specific value to Max when clicking the corresponding button.

Different types of button actions output different values. These actions include pressing/releasing a button, turning the dial/knob clockwise/counter-clockwise, and scrolling the wheel up or down. See attached table for the fixed values in Max.

Create and custom your Max presets

On TourBox Console, find the preset list section, click  at its top right to create a blank Max preset, and custom it to your workflow.

Here’s an example. If we want to output the value of 2 when pressing the Top button and output the value of 130 when releasing it, we could assign the built-in function of “press [2]/ release [130]” to the Top button. Here’s how.

  1. In the Max preset, find the Top button and click it to enter the custom panel.
  2. In the pop-up window, under “General”, go to “Built-in Functions” on the right, find「Max/Msp」, unfold the list, choose “press [2]/ release [130]” and click OK.
  3. Now you have done assigning the built-in function you want onto the Top button.

Using TourBox in Max

  1. Download the support and sample files.

Click here to download the zip folder TourBox_MaxMsp.zip  and unzip it into your working directory. This folder includes two files - startSevies.js, which is the support file, and max_project.maxpat, which is the example file for running Max.


Please be noted that,

  • The support file has to be in the same directory as the Max project file.
  • Please do not change the support file.


  1. How to start or end data interaction between Max and

TourBox handles the data interaction with Max through the Socket service. To enable the Socket service, open the sample file max_project.maxpat and click [ script start ]. When you see a green prompt that says "Process Running" (inside the [ Debug Tool ] window on the right), that means the TourBox and Max are successfully connected.

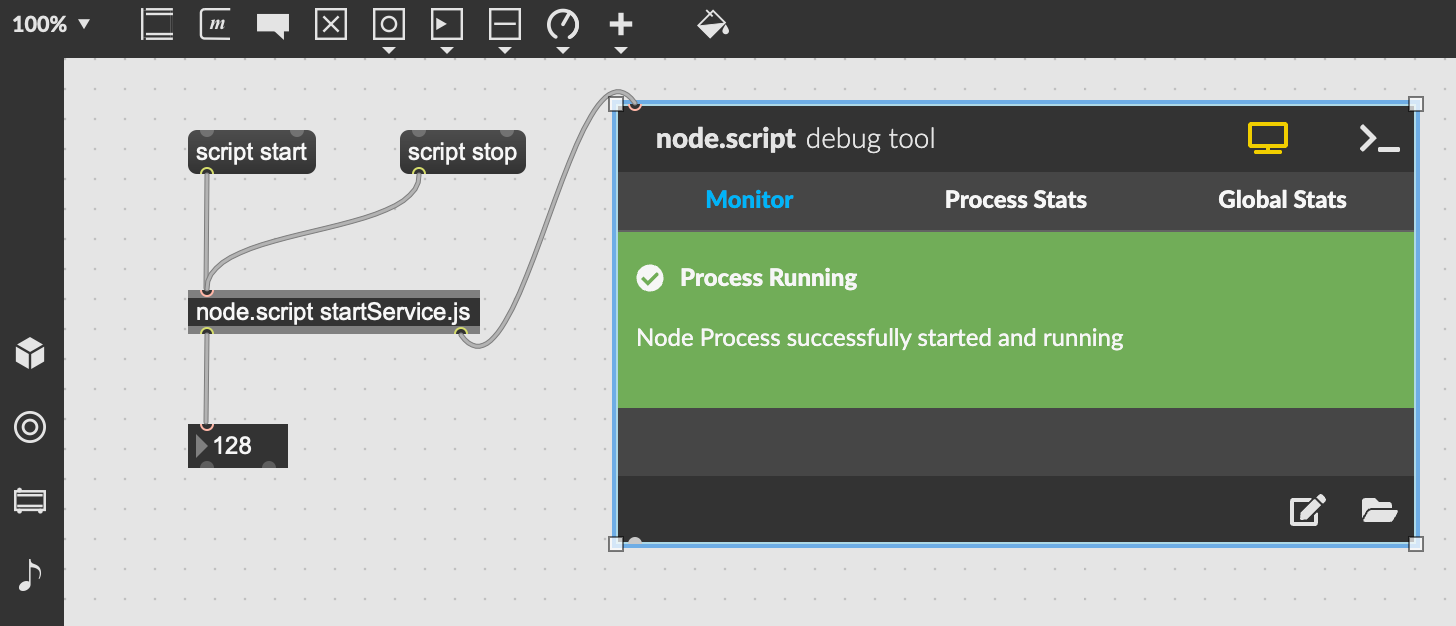
When you click the corresponding button on the TourBox, you may view the output in [Number Object] in the sample file. Click [ script stop ] to end data interaction between TourBox and Max.


  1. Using built-in functions in the Max project

To apply built-in functions in the newly-created Max project through TourBox, simply copy [script start], [script stop], [node.script startService.js] and [number object (output ) ] to the new Max project interface.


Please be noted that,

  • The new Max project file must be stored in the same file directory as the support file js.
  • TourBox can only handle instant data interaction with one Max project. To use the TourBox in another project, please make sure to click the [script stop] command in the previous project first, and then click the [script start] command of this second

Supplementary notes on the Max built-in functions

  1. At this stage, button combinations are not supported for the Max built-in function For example, you could assign the built-in function on the Top button. But the built-in function won’t work if mapped on a combination of the Top and the Tall button.
  2. Pressing and releasing the button will lead to different value outputs, and thus the [UP] mode (send commands after the key is released) and the [REP] mode (press and hold the button to send continuous commands) will be inapplicable in Max. For example, pressing the Top key means outputting the value of 2 in Max, while releasing the pressed Top key will output the value of 130.
  3. Currently, the TourMenu (a menu that can be activated and displayed on the screen by pressing the corresponding key on TourBox) is not supported in

Attached table: Max fixed value and the corresponding buttons


Clockwise spinning or scrolling up

Anti-clockwise spinning or scrolling down

Knob

196

132

Scroll

201

137

Dial

207

143


Press

Release

Knob

55

183

Scroll

10

138

Dial

56

184

Tall

0

128

Short

3

131

Top

2

130

Side

1

129

Up

16

144

Down

17

145

Left

18

146

Right

19

147

Tour

42

170

C1

34

162

C2

35

163

If the tutorials above do not answer all the questions you have, please contact support@tourboxtech.com