Aurora Photography Guide: Simple Tips to Capture the Northern Lights
Seeing and photographing the aurora in person is a dream for any landscape photographer. While shooting the aurora isn't as mysterious as it once was, you can still run into challenges.
In this guide, we'll share simple tips to help you quickly master the core skills of aurora photography.

In this article, you will learn:
What Is the Aurora?
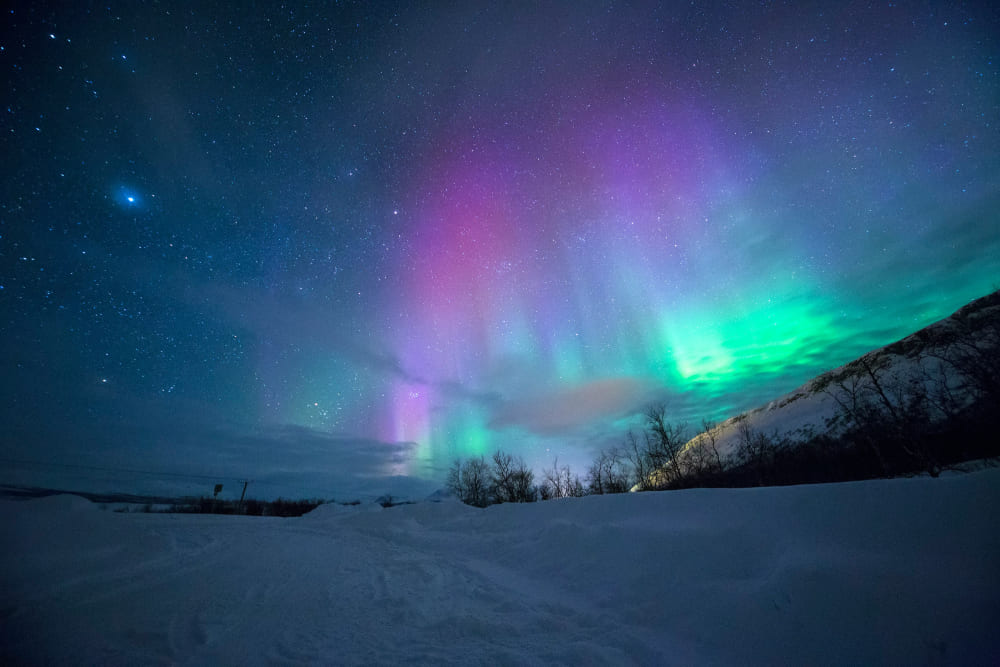
The aurora, also called the northern and southern lights, is a bright, colorful glow you see near Earth's magnetic poles at night. It's one of nature's most magical shows.
Words almost fail when we try to describe it. No phrase really captures its beauty and power. Anyone who loves the outdoors dreams of seeing the aurora in person.
For centuries, people have puzzled over this glowing sky near the far north and south. It stayed a mystery until modern science explained it.
Here's how it works: a solar storm sends charged particles toward Earth. Those particles ride along our planet's magnetic field lines down to the poles. When they hit atoms in the upper atmosphere, they make those atoms light up — and that's the aurora.
How to Photograph the Aurora?
This aurora photography guide covers four key areas:
- Best Locations
- Viewing Conditions
- Gear
- Shooting Techniques
1. Best Locations
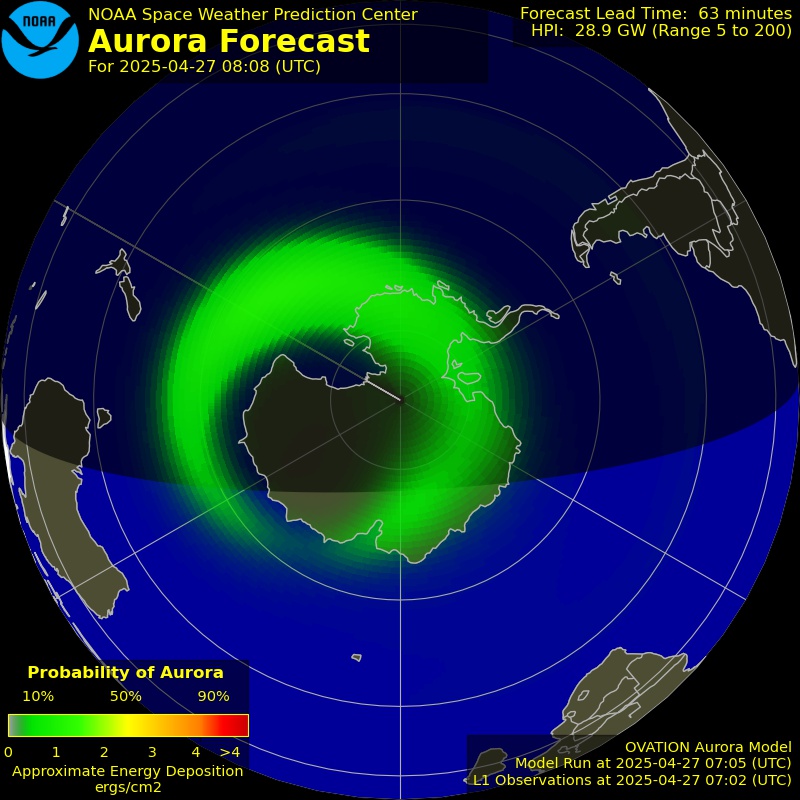
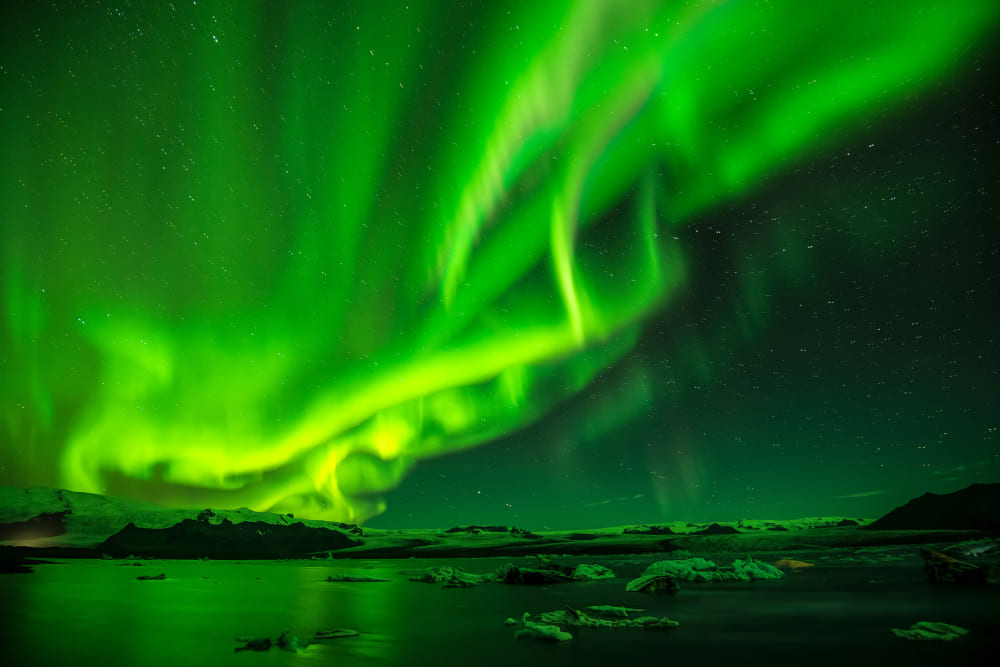
The aurora appears in two ring-shaped zones around 67° north and south latitudes. To see it, stay inside the Arctic or Antarctic Circles. Closer to the poles doesn't mean brighter lights — it's the oval zone that matters most.
In the Southern Hemisphere, most auroras happen over Antarctica. You might catch a glimpse of New Zealand's South Island or Tasmania, but they're usually faint and rare.
Because reaching Antarctica is tough and conditions are harsh, most people focus on the northern lights instead.
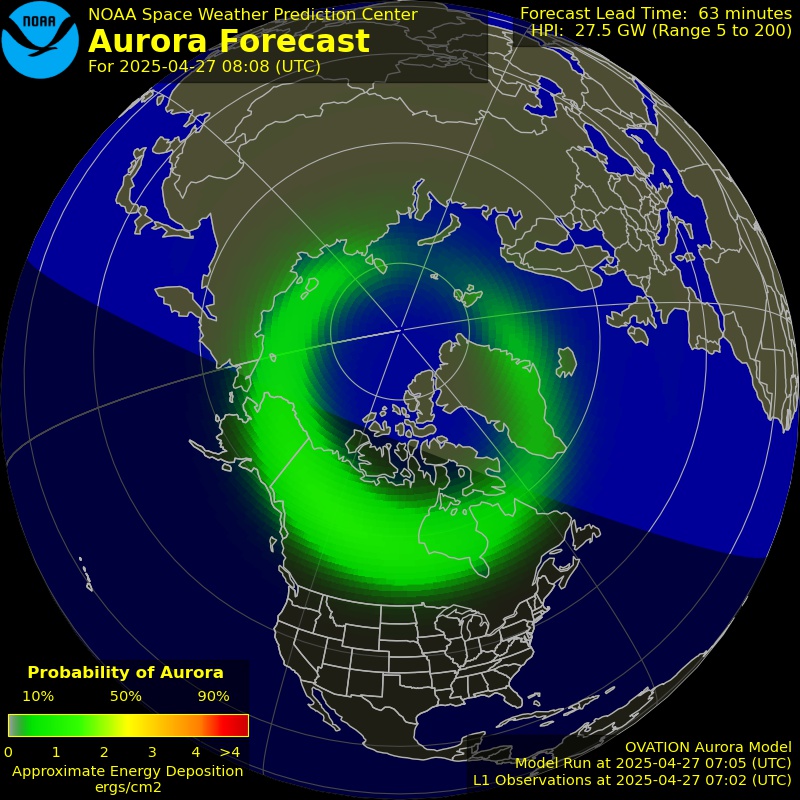
The northern lights light up skies over Alaska, northern Canada, Siberia, Greenland, and parts of northern Europe, like Iceland, Norway, Finland, and Sweden.
Sometimes, during a big solar storm, they even reach Mohe in China's Heilongjiang Province, but that's very rare.
Parts of northern Europe are milder than North America's -22°F winters. Iceland sits fully under the aurora zone and sees winter lows around 28°F, making it a bit more comfortable.
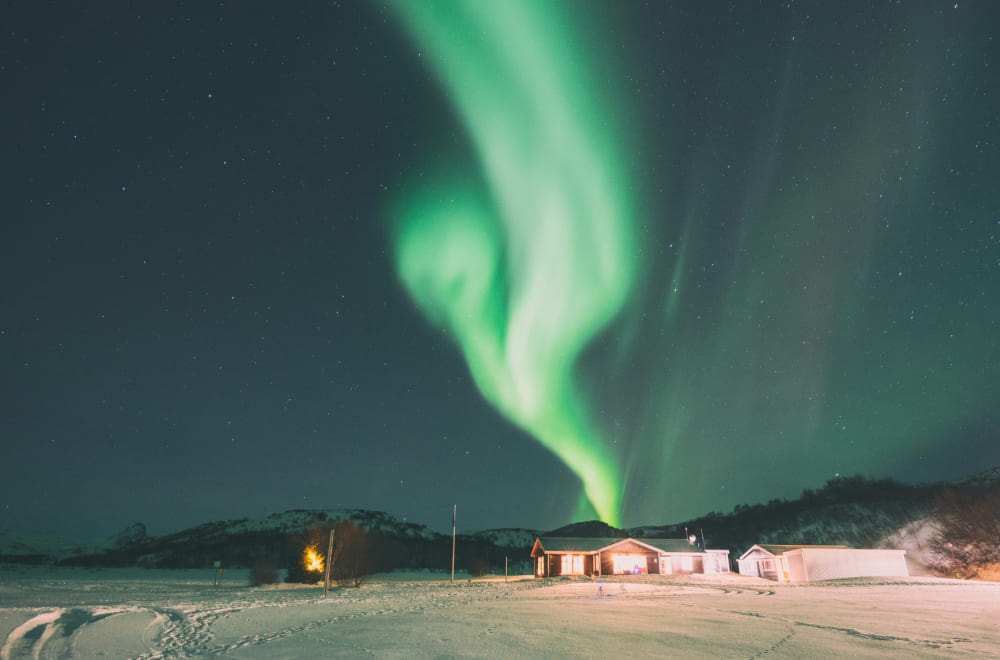
Northern Norway's Tromsø is the largest city inside the Arctic Circle aurora belt. It has great viewing facilities and is one of the best spots to shoot the northern lights.
2. Viewing Conditions
Even if you're in the aurora zone, you might not see the lights. Three things matter most: season, the KP index, and the weather.
The aurora can happen any time of year. But in summer, there's almost no real night, so your chances drop.
October through March is the best season. Every now and then, you'll get lucky. Once, Iceland saw a big display in August, but that's rare.
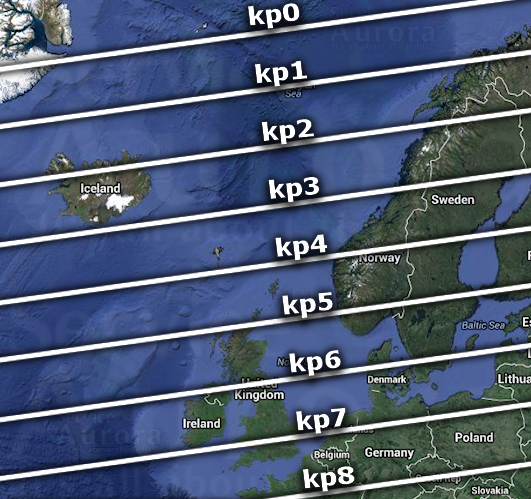
The prime viewing window is usually 9 PM to 2 AM. Before you go out, check the KP index (0–9 scale). A KP of 9 means very strong lights over a wide area. A KP of 0 means the lights are weak and hard to spot. In general, KP 3 or higher is needed for a clear naked-eye show.
In Europe, different KP levels matter by location. In Iceland, KP 2–3 often works. In northern Norway, Sweden, and Finland, KP 2–3 is enough, but you may need KP 3–5 farther south. If you head even farther south, you'll need a rare KP 7–8 storm to see anything.
For updates, check sites like NOAA's Space Weather or aurora-service.eu. Local news sites often post 3-day and 1-hour forecasts. You can also use apps like My Aurora Forecast or Aurora Now.
Also, Clear skies are a must. Clouds, rain, or snow will hide the lights entirely.
Aurora chasing often means long, cold waits. You might stand in blowing snow, wondering how much longer. Then, without warning, pale green curtains swirl above you like ghostly ribbons. That sudden, breathtaking moment makes all the waiting worth it.
3. Gear
The gear for shooting the aurora is just like what you'd use for night-sky photos:
- Camera: Full-frame with good high-ISO performance
- Lens: Fast, super wide-angle
- Extras: Sturdy tripod, remote shutter release, headlamp, spare batteries, warm layers, etc.
Cold drains batteries fast, so bring extras. When the beautiful aurora appears in the night sky, but your camera battery dies, you can only look up and sigh with regret.
Also, dress warmly. Good, warm clothes help you stay out longer in the freezing cold.
4. Shooting Techniques
(1). Parameters
There's no one perfect setting. Your numbers will change with the sky brightness and the aurora's strength. Maybe a good starting point is:
- High ISO (800–6400, depending on how bright your scene is)
- Wide aperture (f/2.8 or as low as your lens goes)
- Shutter speed from 1 to 30 seconds, but usually under 10 seconds, to capture the aurora's shape.
If the KP index is below 3, the lights move slowly. You can use a longer exposure, up to 10–20 seconds.
At KP 5 or higher, the aurora jumps and shifts every few seconds. Try a 2–5 second shutter to freeze those shapes.
At KP 7 or above, it's like fireworks in the sky. Go for 1–2 seconds so you don't blur the patterns.
(2). Focusing
Your camera won't autofocus in the dark, so switch to manual focus:
- Turn on live view and zoom in on a bright star or distant light.
- Twist the focus ring until the image looks sharp.
- If you can't see enough detail, use a headlamp to light up a rock or tree in the distance, then focus on that.
For close foreground shots with a wide aperture, you might need more depth of field than one shot gives. In that case:
- Take one frame focused on the sky and another on the foreground.
- In Photoshop, stack or blend them so both are sharp.
(3). Composition
What's on the ground matters as much as the lights above. A lone aurora shot looks like a snapshot. You wouldn't want to photograph the aurora like this.
You want a scene that tells a story. Use whatever you have around you:
Mountains, waterfalls, rocks, trees, or cabins can all make strong foregrounds.
The aurora can pop up anywhere in the sky and change fast. So, scout your location in daylight. Find at least two or three spots with different views so you're ready when the lights appear.
(4). Noise Reduction in Post-Processing
Because the aurora moves, you can't stack many images to clean up the sky. Instead:
- Use Noise Reduction in Lightroom or Adobe Camera Raw.
- If you need more, add a Photoshop plugin for fine-tuned noise control.
Further Reading:
How to Reduce Noise in Images: Tips for Shooting and Editing
For the ground, if you're stuck at a higher ISO, you can shoot 4–8 frames and do an average-stack in Photoshop on just the foreground. This cuts noise and keeps your detail.
In addition to the shooting tips above, we'd like to recommend the TourBox creative console for your editing workflow.

After you've shot hundreds of aurora photos, sorting and managing them one by one can get exhausting. TourBox makes it easy to browse, tag, delete, and rate your images in a flash.
When you're color grading in post, TourBox lets you control settings right away. For example, you can tweak the noise-reduction slider by +1 or –1 with just one hand on the TourBox.
Using TourBox feels as direct and satisfying as playing a video game with a controller. If you're interested, head over to our photo editing page to learn more.

In Summary
So, here's a quick reference guide to aurora photography:
- Use an aurora-forecast app before your shoot and make a plan.
- Since the lights can pop up anywhere, scout your shooting site in daylight and pick out several foreground spots.
- Choose your settings based on the ambient light and how strong the aurora is. When the lights are intense, watch how fast they move and pick a shutter speed that captures their shape.
- Treat the aurora like any other element in your shot. It's part of the scene, so compose it with your foreground.
Imagine this: You've stood three hours in the freezing cold, your body growing stiff. Just as hope fades, you glance up at the mountain ridge and see a faint glow. It sharpens into a ribbon of color, a beautiful aurora dancing above.
In the silent, snow-covered field, the shifting aurora feels both unreal and real. Every shiver and every minute of waiting becomes your ticket to that once-in-a-lifetime shot — nature's reward for your patience.