How to Change Frame Rates in DaVinci Resolve: A Complete Guide
Many editors and editing enthusiasts have faced challenges with frame rates in DaVinci Resolve. Incorrect selection and settings of frame rates during the initial stages often result in the need for laborious frame rate conversions when delivering the final footage.
In this tutorial, we will provide a comprehensive breakdown of frame rate settings in DaVinci Resolve. We will cover topics such as setting frame rates in DaVinci Resolve, changing frame rates in DaVinci Resolve, and outputting at different frame rates.
If you've encountered any related issues, you're sure to find answers here. Without further ado, let's dive right in!

In this article, you will learn:
- What Is the Frame Rate?
- What Frame Rate Settings Are Available in DaVinci Resolve?
- How to Change Project Frame Rate in DaVinci Resolve?
- How to Change Timeline Frame Rate in DaVinci Resolve?
- How to Change Specific Clip Frame Rate in DaVinci Resolve?
- Imported Clip Frame Rate Doesn't Match Project Timeline Frame Rate
- What Is the DaVinci Resolve Playback Frame Rate?
- How to Choose Frame Rates in DaVinci Resolve?
- Does DaVinci Resolve Support Variable Frame Rates?
- Final Thoughts About DaVinci Resolve Frame Rate
What Is the Frame Rate?
Strictly speaking, choosing the correct frame rate should start even before capturing the first footage with a camera. Whether it's a mirrorless camera, DSLR, drone, GoPro, smartphone, or even screen recording software like OBS Studio, frame rate considerations come into play.
Even if you're not involved in the shooting process and simply using DaVinci Resolve, it's still important to understand frame rates. Before importing your footage into DaVinci Resolve, you should have a clear understanding of what frame rate is and select a consistent frame rate setting.
With all that being said, what exactly is the frame rate? We can provide a simple definition:
Frame rate refers to the number of images (frames) captured by a camera within one second. So, when you capture and play back a video with 24 frames per second, you'll see 24 static images rapidly displayed in one second, creating the illusion of dynamic motion in the video.
Understanding the meaning of frame rate is crucial because the frame rate you choose for your video will impact its appearance and the experience it delivers to viewers. Different frame rates create different viewing experiences. For example:
- Lower frame rates can make motion appear choppy and give it a fast-motion effect.
- Higher frame rates (such as 60 or 120 fps) make motion look smoother, capture more detail, and provide a more immersive viewing experience.
What Frame Rate Settings Are Available in DaVinci Resolve?
In DaVinci Resolve, you have the flexibility to set or change frame rates at three different levels:
- Project Level: At the project level, you can establish the overall frame rate for your entire project. This sets the standard for all the timelines and clips within the project.
- Timeline Level: Within each timeline, you can adjust the frame rate to suit specific sequences or scenes. This allows you to have different frame rates within the same project, which can be useful for incorporating footage shot at different speeds or creating specific visual effects.
- Clip Level: At the clip level, you can modify the frame rate for individual clips. This provides the flexibility to work with footage shot at different frame rates.
How to Change Project Frame Rate in DaVinci Resolve?
The project frame rate refers to the frame rate of all timelines within a specific project. Your project can have one or multiple timelines, depending on your needs.
Note:
The project frame rate in DaVinci Resolve can only be changed before importing any media into the media pool.
Here's how you can set the project frame rate in DaVinci Resolve:
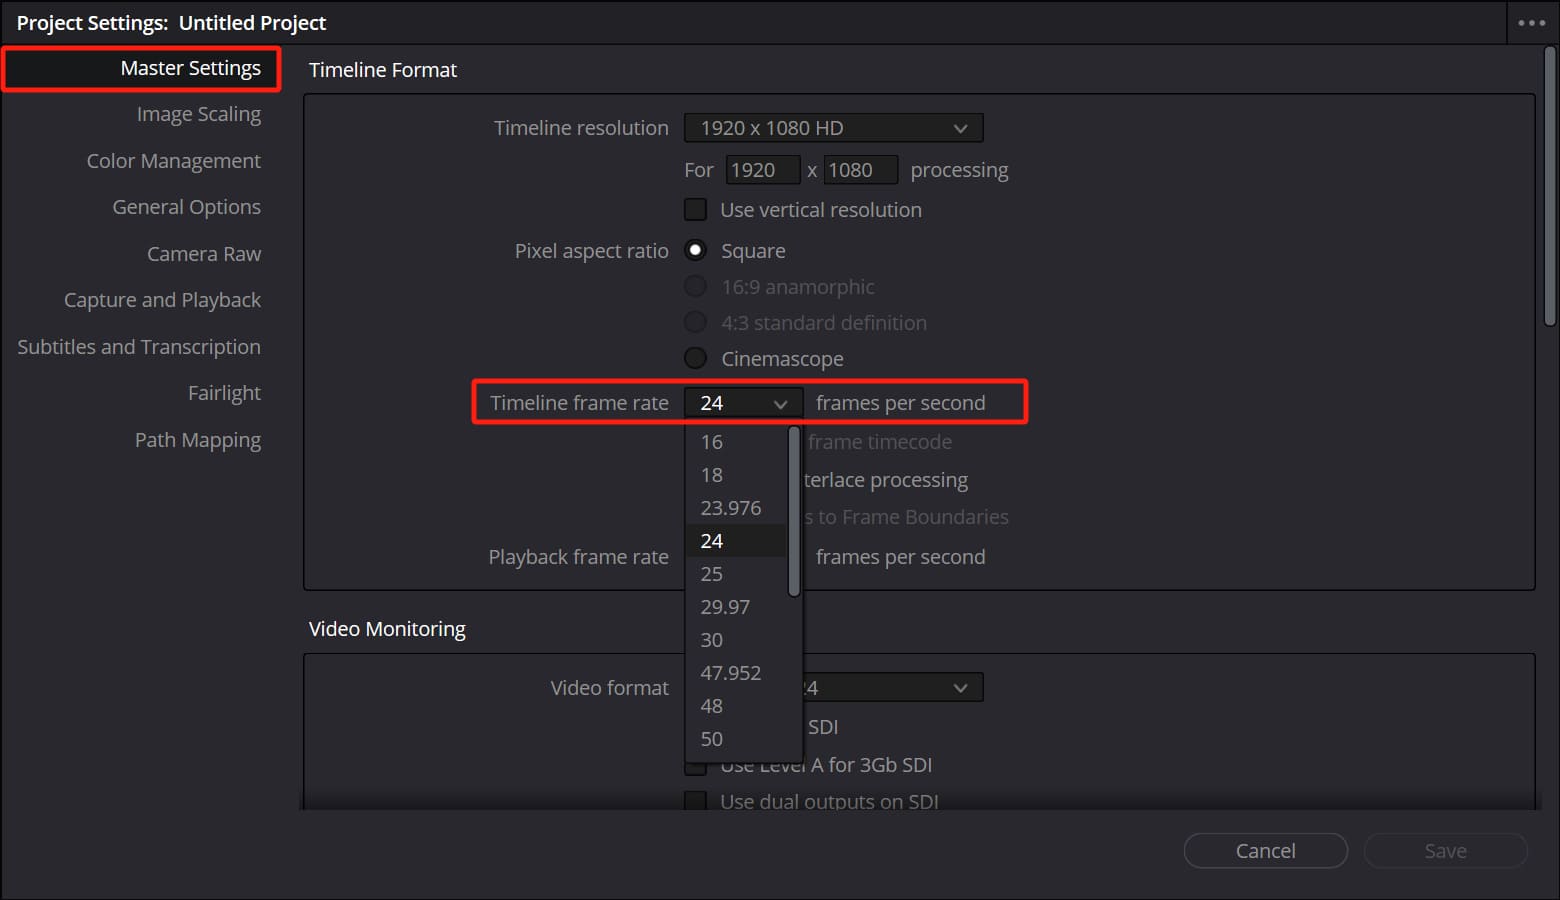
- In the menu bar at the top of the DaVinci Resolve interface, locate the "File" dropdown menu and click on "Project Settings."
- In the Project Settings panel that appears, select "Master Settings." Under "Timeline Format," you'll find a dropdown menu for "Timeline frame rate."
- Choose the desired frame rate from the dropdown menu, such as 24 FPS, and click "Save."
Now, the project timeline frame rate has been set to the desired value. You can proceed to import your desired media. After importing one or more clips, you may notice that the Timeline frame rate, which was previously changeable, is now grayed out and locked.
Why Can't You Change the Project Timeline Frame Rate after Importing Media?
When you import media into the media pool, the timeline frame rate becomes disabled or grayed out, preventing you from changing it. This is how DaVinci Resolve operates.
Therefore, it's crucial to know your target frame rate in advance and set it accordingly. This is why we emphasize the importance of selecting the correct frame rate before importing any media into the media pool.
How to Change Timeline Frame Rate in DaVinci Resolve?
If, for various reasons, you want to change the frame rate of a timeline in DaVinci Resolve during the editing process, but you're unable to change the frame rate of the existing timeline, what should you do?
You can create a new timeline and set it to the desired frame rate, then copy all the clips from the existing timeline to the new one.
On the Edit page, right-click on a space in the Media Pool panel. From the pop-up menu, select "Timelines" and then "Create New Timeline" (shortcut: Ctrl + N or Cmd + N).
Enter an appropriate name for the new timeline. Uncheck the "Use Project Settings" option. This will reveal additional tab options such as "General," "Format," "Monitor," "Output," etc.
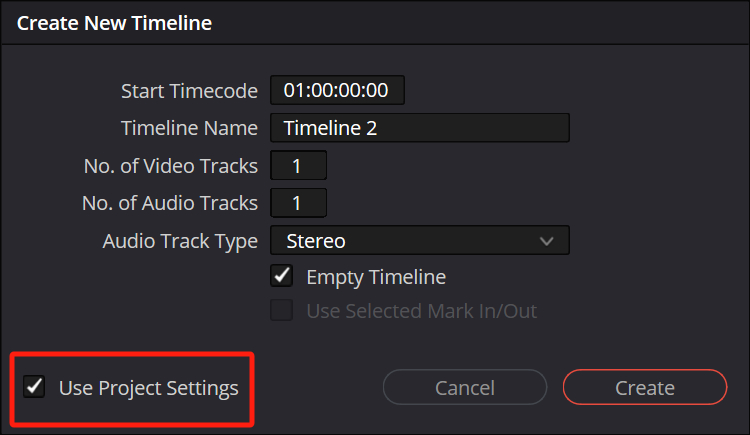
Click on the "Format" tab and select your desired frames per second (FPS) from the "Timeline frame rate" dropdown menu. Click "Create" to create the new timeline with the desired frame rate.

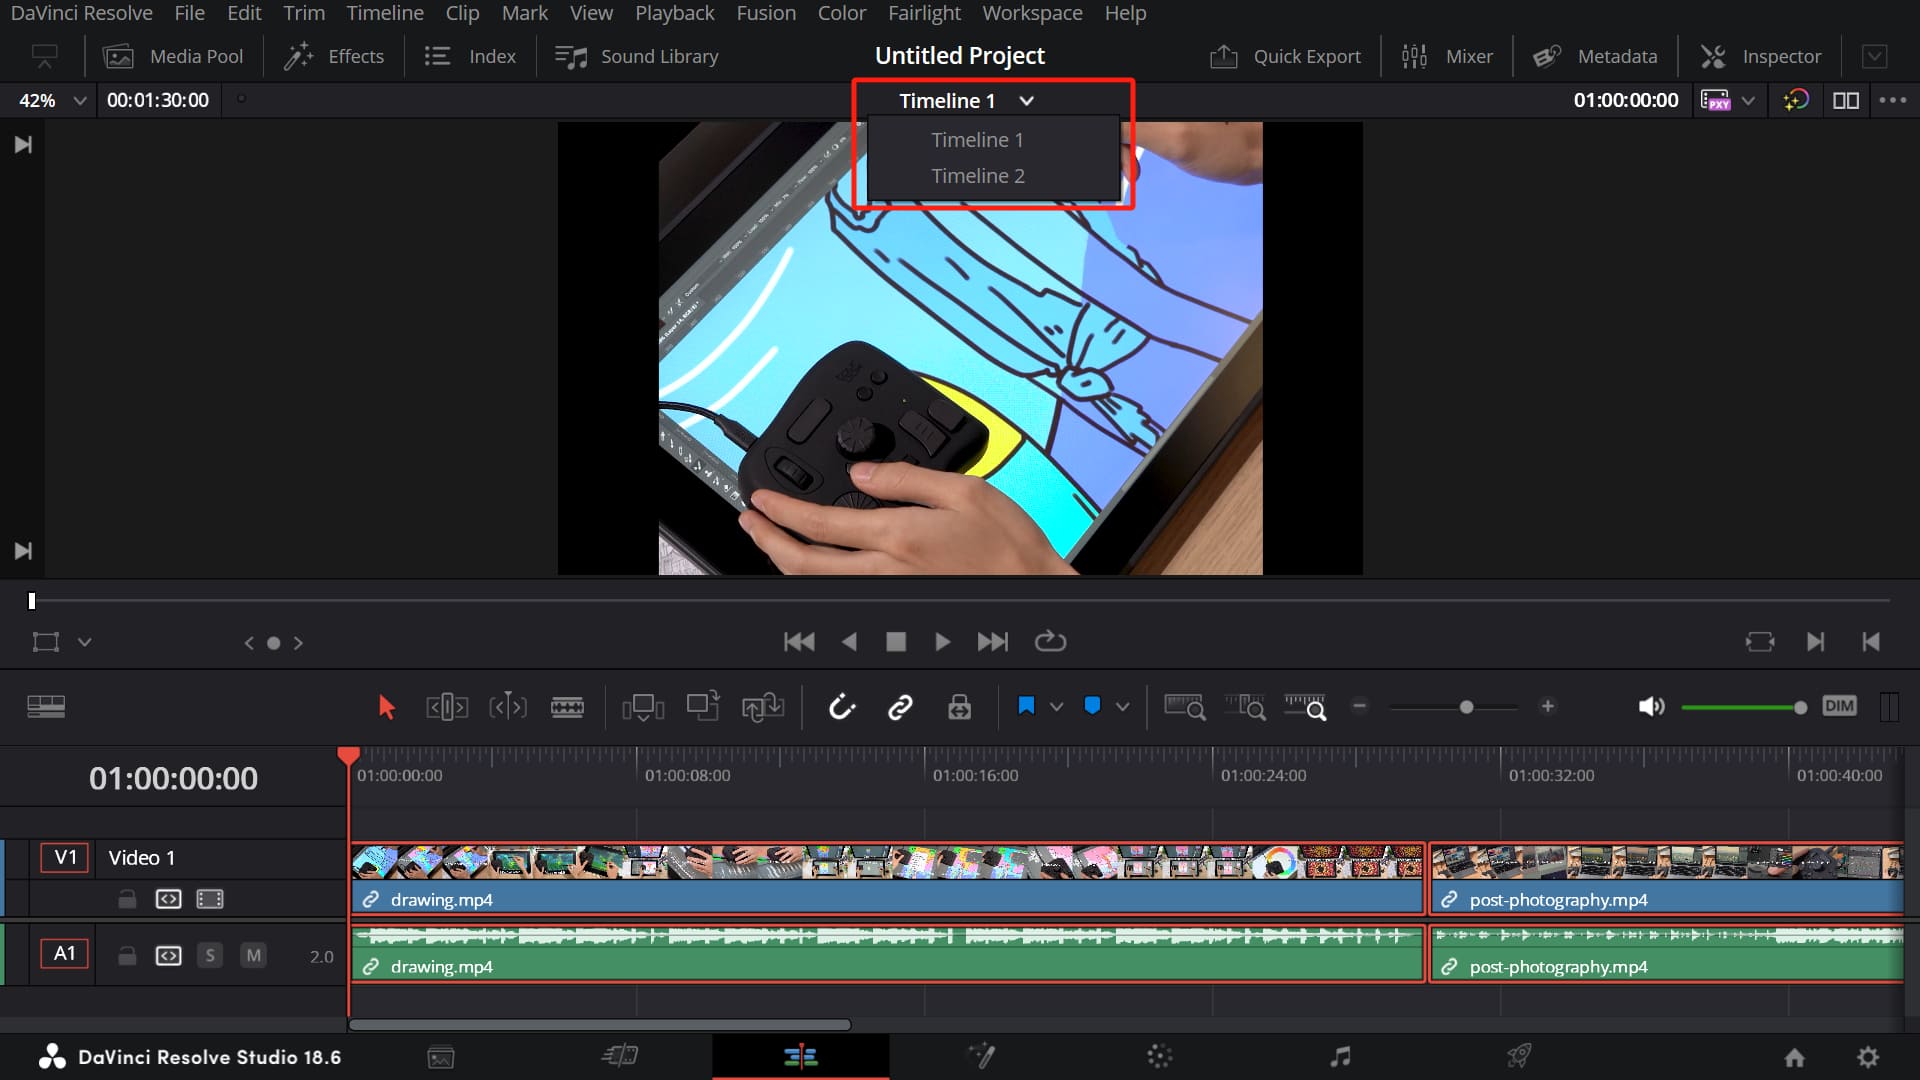
Now, you have created a new empty timeline with a different frame rate. You can use the timeline drop-down menu at the top of the Viewer panel to switch between different timelines.
Switch back to your original timeline and press the shortcut "Ctrl + A" or "Cmd + A" to select all the clips on the timeline. Then, press "Ctrl + C" or "Cmd + C" to copy these clips. (You can also right-click on the clips on the timeline and perform the same actions.)
Next, switch to the new empty timeline using the timeline drop-down menu in the Viewer. Press "Ctrl + V" or "Cmd + V" to paste. All the clip segments will now be copied to the new timeline with your new frame rate.
Note:
The new frame rate only applies to this specific timeline. The project timeline frame rate is still the grayed-out one (not the new frame rate you set when creating the new timeline). Any newly created timelines will still follow the frame rate of the project timeline unless you manually override it as discussed above.
So far, we have discussed how to change the frame rate of the project timeline and individual timelines. Next, let's see how to change the frame rate of a specific clip.
How to Change Specific Clip Frame Rate in DaVinci Resolve?
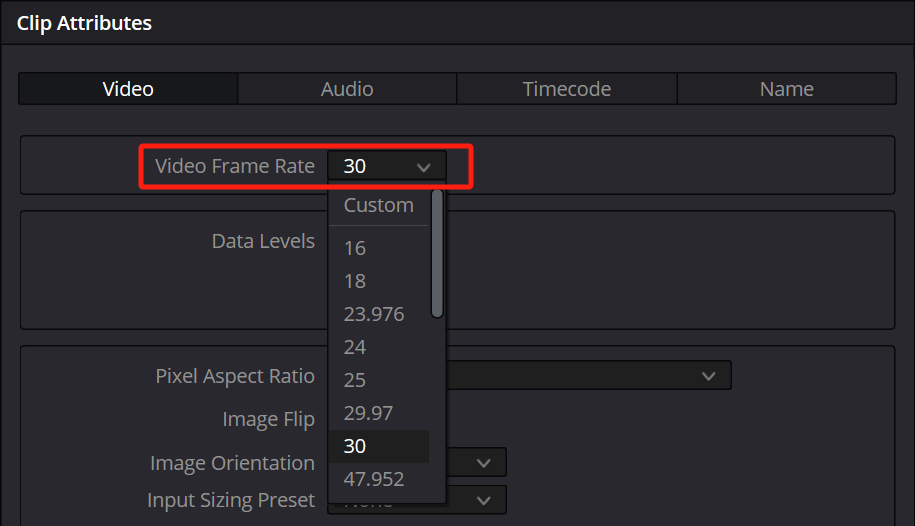
On the "Edit" page, click on the "Media Pool" tab. Select the clip you want to modify (or use "Ctrl"/"Cmd" to select multiple clips). Right-click on the selected clip and click on "Clip Attributes".
In the Clip Attributes panel, click on the "Video" tab. Under "Video Frame Rate", choose the desired frame rate and click "OK". The clip will now be updated with the new frame rate.
You can also perform the same action on the timeline. Just select the clip you want to modify and choose "Clip Attributes".
When you update the frame rate in the clip attributes, DaVinci Resolve will re-interpret the clip with the new frame rate. Changing the frame rate of a clip may also affect its duration. However, the audio of the clip will remain unaffected (which may result in audio sync issues).
Imported Clip Frame Rate Doesn't Match Project Timeline Frame Rate
After creating a new project, if you import a clip with a frame rate that doesn't match the frame rate defined in "Project Settings" -> "Master Settings" for the project timeline, you will receive a warning box like the one shown in the image below.
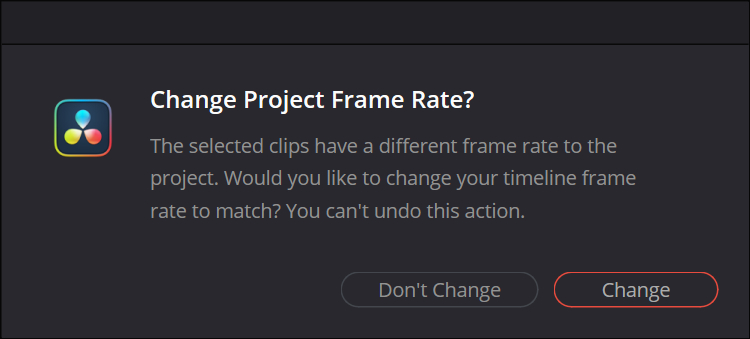
Here are the differences between the two options:
- Clicking "Change" will update the project timeline's frame rate setting to match the frame rate of the clip.
- Clicking "Don't Change" will keep the project timeline's frame rate unchanged and import the clip as is.
If you are certain and want to export the final project at the frame rate of the clip, click "Change". Once selected, the frame rate of your project timeline will be locked and grayed out.
In the future, even if you import media with different frame rates, you will no longer receive this warning. These clips will be imported based on the frame rate of the first clip you imported, and the project frame rate will also be changed to match the frame rate of the first imported clip.
What Is the DaVinci Resolve Playback Frame Rate?
When you go to "Master Settings," you may notice an option called "Playback frame rate." So, what does this mean?
The playback frame rate is the speed at which frames are shown on your external display. It doesn't impact the frame rate of your timeline or footage, but it affects how smoothly the visuals appear on external monitors.
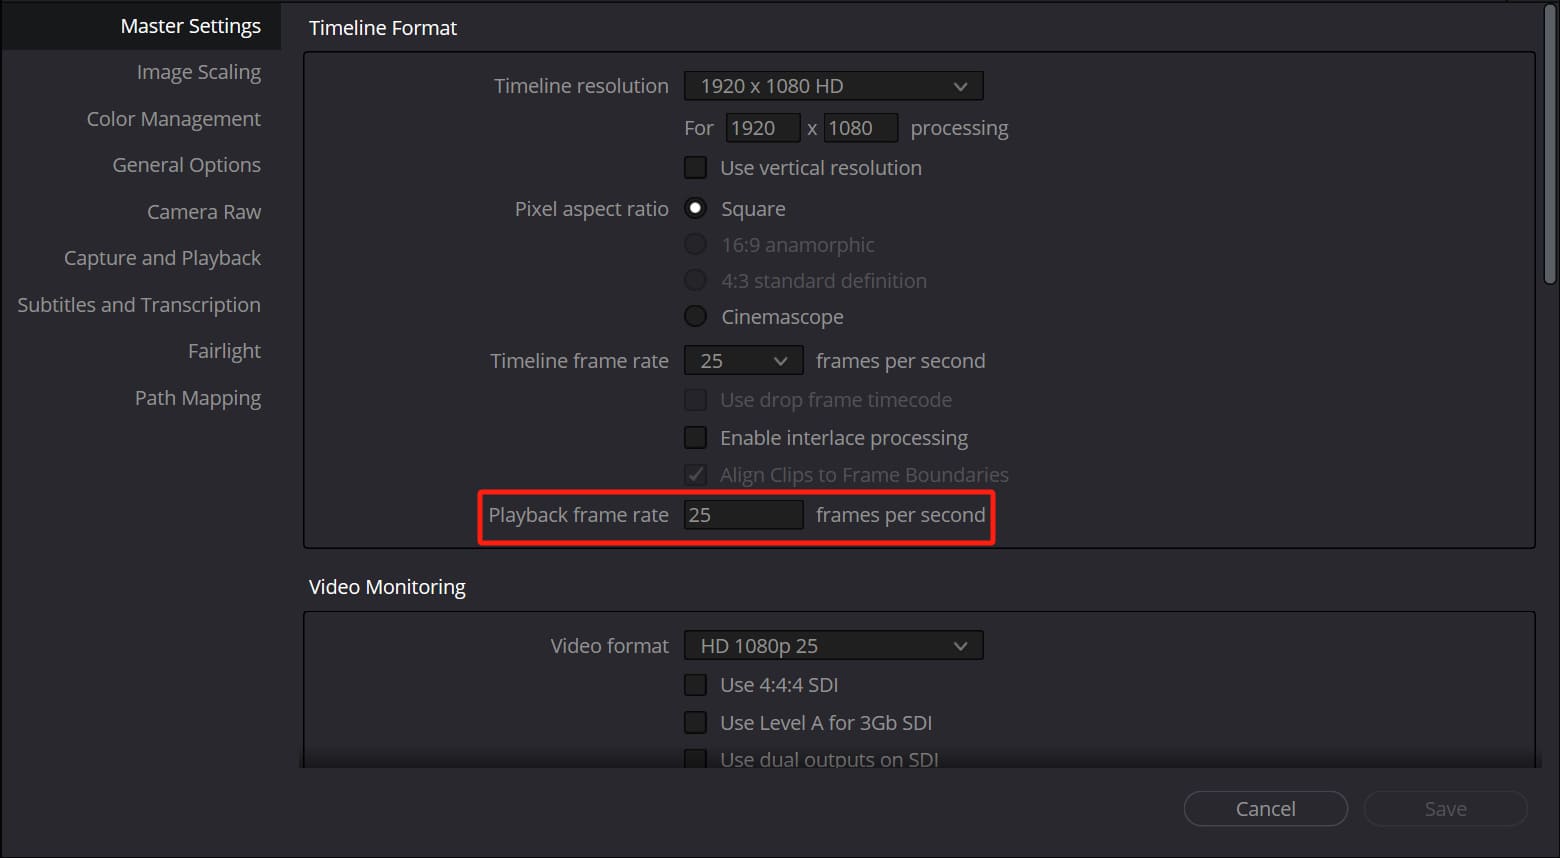
So, what is the difference between the timeline frame rate and the playback frame rate:
- The timeline frame rate represents the number of frames per second at which your clips are presented in the timeline to meet your final delivery requirements.
- The playback frame rate refers to how many frames per second your clips are shown on the screen, and it's determined by the refresh rate of your display device.
For example, let's say you have a 4K timeline with a frame rate of 24 FPS. If you are using a 1080p display with a refresh rate of 60 hertz, it can smoothly display the 24 frames without any issues.
In fact, even if the frame rate exceeds 60 frames, it can still be displayed on a 60 Hz monitor. Anything beyond the refresh rate will result in what is known as "screen tearing," but the monitor will still display what it can handle.
Once files are imported into the timeline, the timeline frame rate cannot be changed. However, you have the flexibility to adjust the playback frame rate to suit your external display requirements.
Extra Tip:
If you find the technical concepts above a bit dry, let's simplify it: Just keep your playback frame rate the same as your timeline frame rate! If you are familiar with DaVinci Resolve or any video editing software, you will intuitively understand the difference by gaining experience with how they work.
How to Choose Frame Rates in DaVinci Resolve?
To select the right frame rate for the video you're creating, you may need to consider various factors such as how realistic you want it to look, how much motion is involved, and how you intend to deliver it through different media, all depending on the type of effect you want to achieve in your video.
Here are some factors to consider when choosing the appropriate frame rate:
- Choose your desired effect: The frame rate of your video has a significant impact on its appearance and feel, ultimately affecting how realistic it looks. For example, if you want something to appear lifelike, you may need to choose a frame rate that gives you the most authentic look, with 24 fps or 30 fps being the ideal choice.
- Determine the amount of motion: While 24 fps is sufficient for regular motion, if your visual effects involve fast-paced scenes like sports or video games, you may need a higher frame rate (such as 60 fps) to capture the details.
- Consider the type of video: Different media platforms, such as TV shows, movies, or YouTube, require videos to be shot at different frame rates. For example, the ideal frame rate for movies is 24 fps, as it provides the most cinematic look and is compatible with movie projectors.
- Consider file size and export time: Choosing a higher frame rate means dealing with more information, which will take longer to export and increase the file size. While a higher frame rate means higher quality, it also means that it requires better computer hardware and a strong internet connection for smooth online playback.
If you find the concepts mentioned above too complex and overwhelming with too many factors to consider, then how should you choose the timeline frame rate when you have multiple frame rates in your DaVinci Resolve project?
Here's a suggested approach:
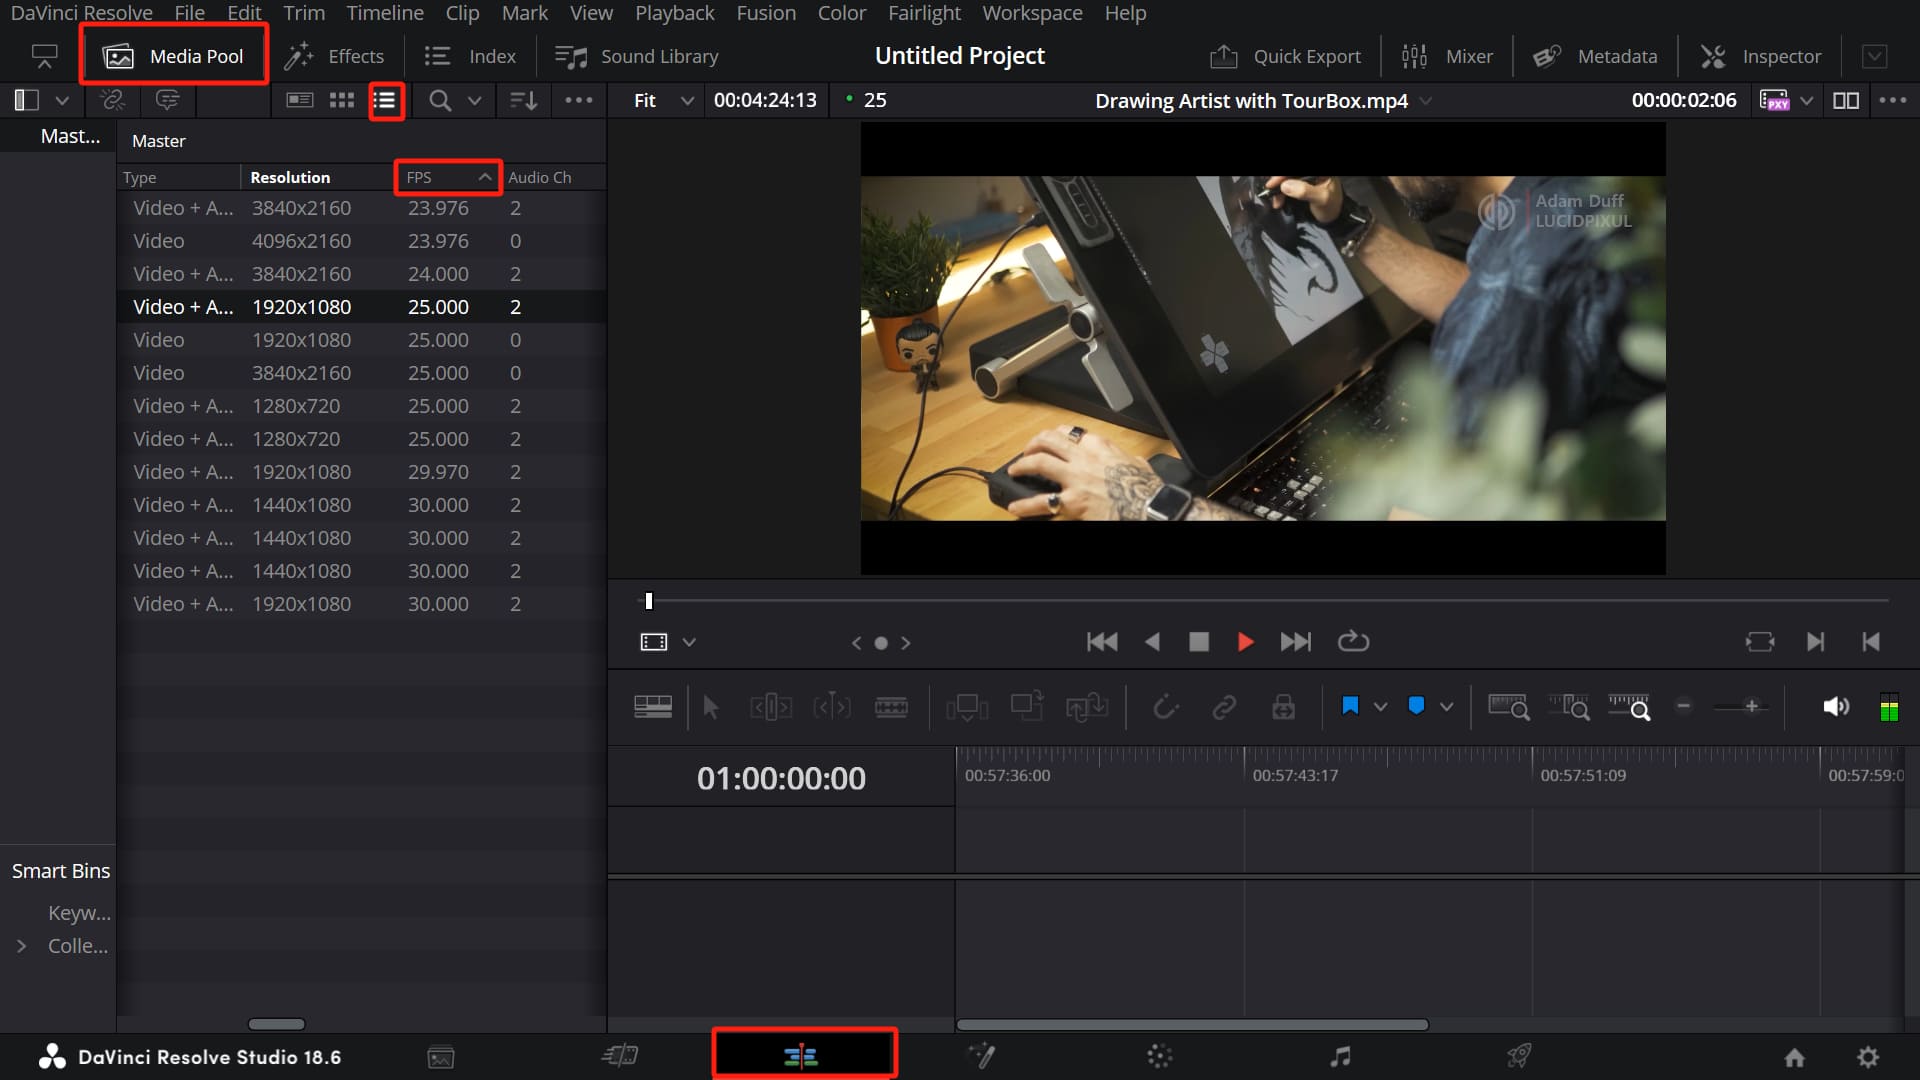
- Go to the "Media Pool" panel on the Edit page and import all your footage.
- Click the "List" button at the top to display your footage in list view. Scroll to the right until you see the "FPS" column. Click on the "FPS" header to sort in ascending or descending order.
- Scroll through the list of footage and if the majority of your clips are 24 frames and you want the final render to be at 24 frames, then set the frame rate of your project timeline to 24 frames.
However, for some high frame rate footage, if you simply place them on the timeline, they may not give you the desired effect. Typically, shooting at higher frame rates (60 or 120) is done to achieve a stylized slow-motion effect.
If this applies to your situation, you'll need to interpret the 60 or 120 frame rate clips as 24 frames using the "Clip Attributes" settings (as mentioned earlier). Then, when you place them on the timeline, they will play at 24 frames per second, resulting in smooth slow-motion effects.
Does DaVinci Resolve Support Variable Frame Rates?
Variable frame rate footage is typically captured using smartphones or screen recording software like OBS Studio. However, as a post-production software that operates on a frame-by-frame basis, DaVinci Resolve does not support footage with variable frame rates.
When you try to import footage with variable frame rates, DaVinci Resolve will display media offline errors or may cause audio and video synchronization issues.
For more information, feel free to check out our article on how to resolve media offline issues in DaVinci Resolve, which includes a tutorial on converting variable frame rate footage to a constant frame rate.
Final Thoughts About DaVinci Resolve Frame Rate
In the final section of our DaVinci Resolve frame rate tutorial, we'd like to share some best practices for working with frame rates in DaVinci Resolve:
- To ensure a smooth workflow, it's best to determine your project's frame rate before starting to edit your video in DaVinci Resolve.
- Let's take a real-world example where you shot most of your footage at 24 frames per second (fps) but also captured some slow-motion shots in 60, 120, or 240 fps.
- In this case, when you begin editing, you can set the frame rate of your project timeline to 24 fps. Then, using the "Clip Attributes" feature, you can interpret the 60, 120, or 240 fps footage as 24 fps to achieve the desired slow-motion effect.
Product Recommendation:
If you're looking to elevate your DaVinci Resolve experience and optimize your editing workflow, we highly recommend considering the TourBox as an essential tool in your creative arsenal.

The TourBox is a versatile and intuitive creative controller designed specifically for video editing and other creative tasks. With its ergonomic design and customizable buttons and dials, it can greatly streamline your workflow in DaVinci Resolve.

You no longer need to memorize any keyboard shortcuts or rely on traditional keyboard and mouse operations. With the TourBox, you can simply assign specific functions to its buttons and dials, and then use your fingers to quickly execute any command in DaVinci Resolve.
And with that, we conclude our tutorial on frame rates in DaVinci Resolve. We hope it has been helpful on your creative journey.