Creating Cyberpunk Color Grading in Photoshop: A Step-by-Step Guide
Welcome to our tutorial on creating a Cyberpunk-inspired photo in post-processing! Get ready to dive into the futuristic world of vibrant neon lights, gritty urban landscapes, and electrifying colors.
In this guide, we'll walk you through transforming an ordinary photo into an eye-catching piece of Cyberpunk art. So let's embark on this thrilling journey together!

In this article, you will learn:
- What Is Cyberpunk Style?
- How to Capture Cyberpunk Photos?
- How to Achieve Cyberpunk Colors in Photoshop?
- Final Thoughts About Cyberpunk Color Photos
What Is Cyberpunk Style?
Before we dive into our tutorial, let's first understand what the Cyberpunk visual style is all about.
The Cyberpunk style accidentally originated from the film "Blade Runner" (1982). Back then, there was no advanced CGI technology, so all the scenes were meticulously crafted by hand.
To hide imperfections on the surfaces of the models, the filmmakers used dim lighting instead of bright lights, creating a darker ambiance that suited the movie's atmosphere.
To depict a futuristic feel, the film incorporated various neon elements into the cityscape, along with rainy weather to enhance the gloomy scenes. This fortuitous combination gave birth to what we now know as the visual art style of Cyberpunk.
The key characteristics of the Cyberpunk style include a sci-fi and futuristic atmosphere, with a dominant color palette of cyan and magenta. The scenes are often associated with nighttime, rain, and architectural elements, collectively creating a unique visual effect.
Creating the Cyberpunk style is primarily achieved through post-processing, but if you enjoy capturing the moment you like, the pre-production phase of shooting is also crucial. We will cover all the necessary steps in detail below.
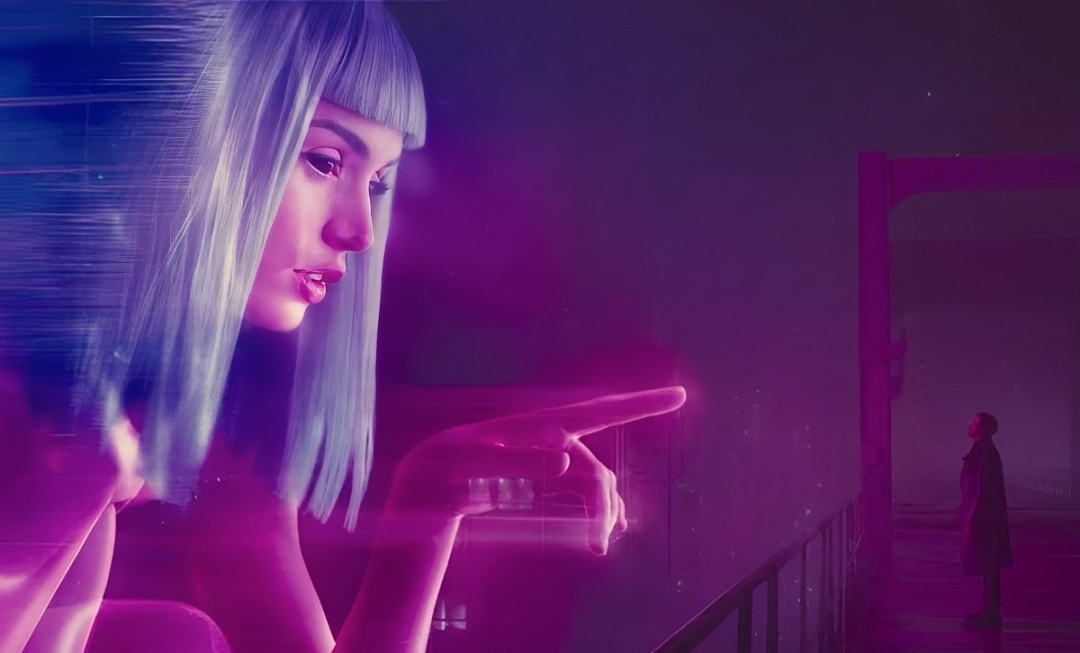
The stills from "Blade Runner 2049"
How to Capture Cyberpunk Photos?
To capture a Cyberpunk-style photo, focus on the following key points:
- Choose well-lit urban streets with plenty of neon lights, street lamps, and illuminated signs.
- Look for scenes with a strong sense of depth, where buildings have varying sizes and distances from each other, creating a three-dimensional effect instead of a flat layout.
- If possible, consider shooting during rainy weather to enhance the atmosphere.
- Shoot in RAW format to have more flexibility in post-processing.
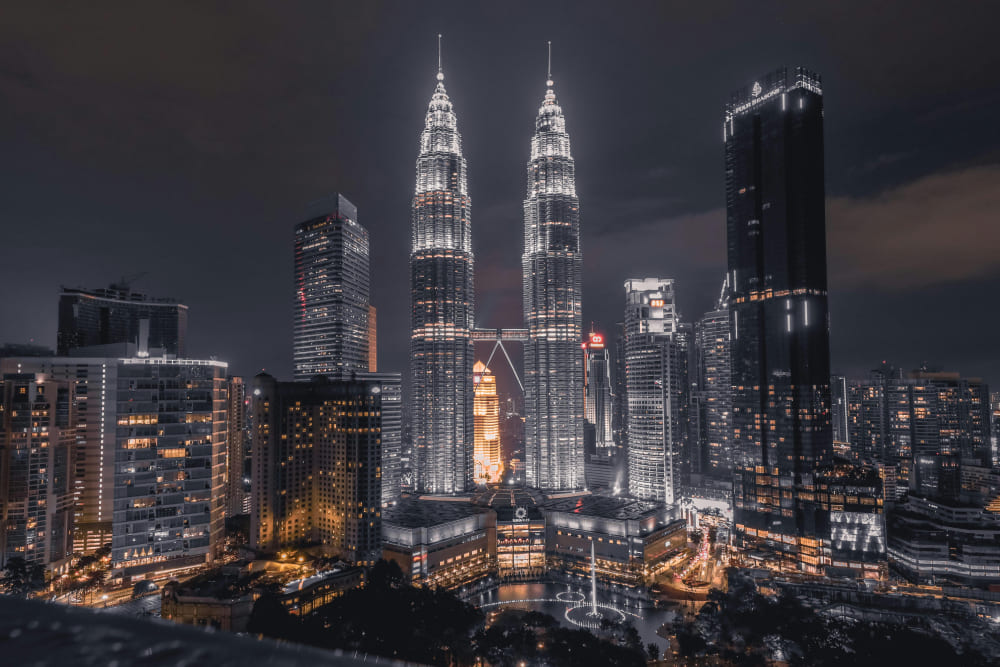
The other steps involved in capturing a Cyberpunk photo are similar to shooting a typical nighttime cityscape. An example photo like the one shown below would be suitable:
However, achieving a perfect Cyberpunk-style photo solely through photography can be quite challenging. The most crucial aspect lies in the post-processing of the image. In the following section, we will share how to transform a nighttime street photo into a Cyberpunk-style image using Photoshop.
How to Achieve Cyberpunk Colors in Photoshop?
First, it's important to note that not all images are suitable for achieving the Cyberpunk style in post-processing. Typically, this style is applied to photos taken at night, featuring colorful lights in urban city streets. So, please ensure that your photo meets these criteria.
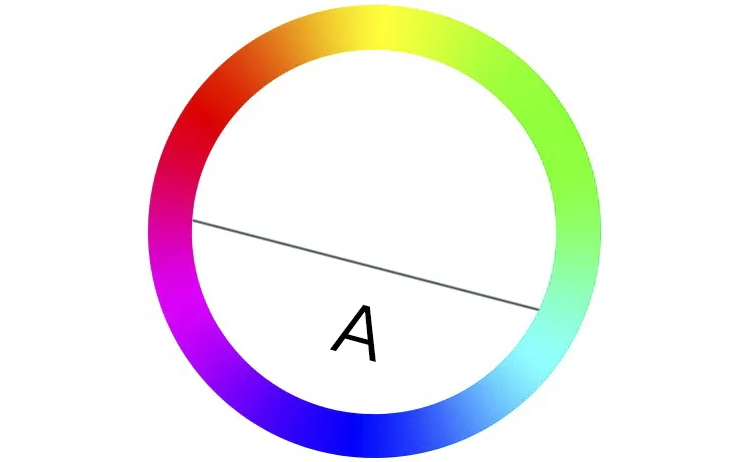
To transform your photo into Cyberpunk colors, the key direction in post-processing is hue shifting. This means adjusting the colors in the image to fall within the range of cyan and magenta, as shown in Area A in the example below:
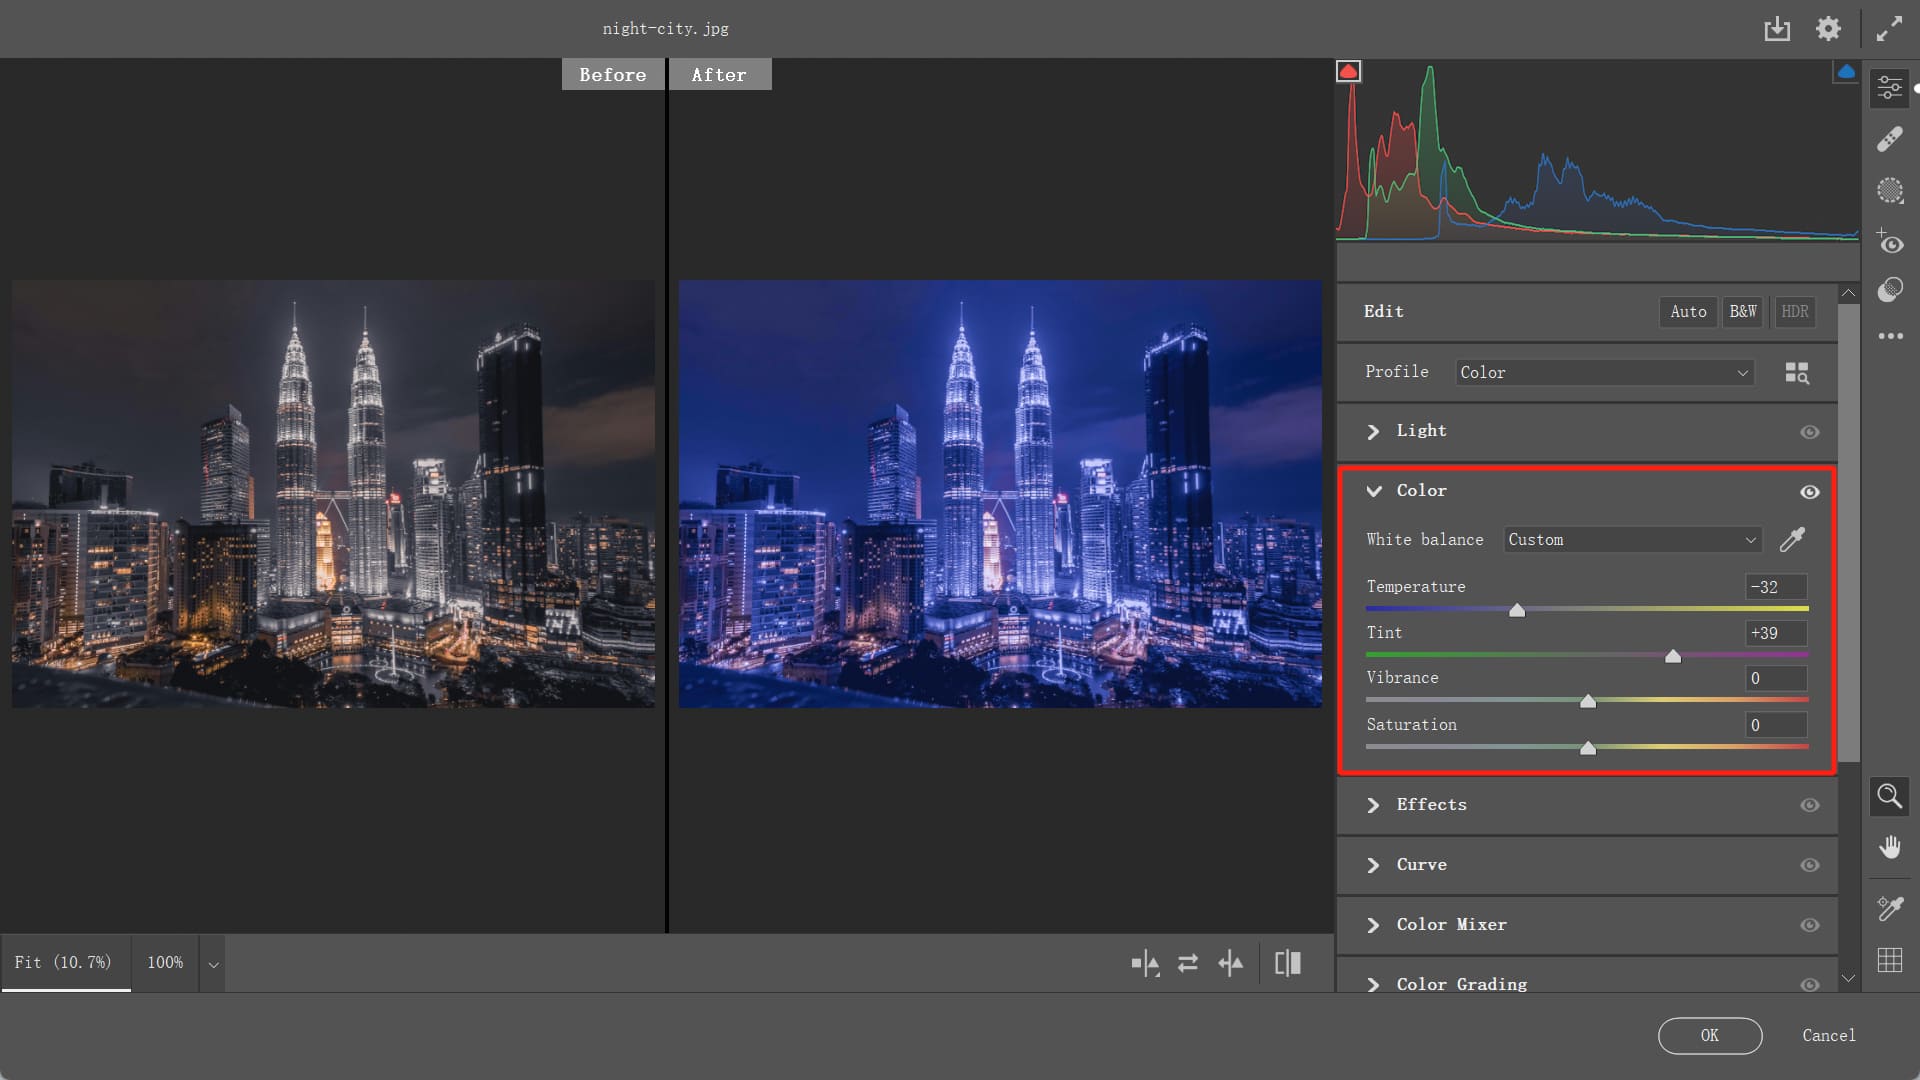
Open Photoshop and import the photo you captured. Convert it to a smart object, and then open the Camera Raw filter.
Let's use our photo as an example. Cyberpunk-style photos tend to have a blue and magenta overall tone, so we'll adjust the Temperature towards the blue side and the Tint towards the magenta.
With this simple color adjustment, you will start to see the emergence of the Cyberpunk color atmosphere in your photo.
However, since the photo may have various and chaotic colors, further refinement using the HSL is necessary.
- Hue: We can observe that the dominant colors in the image are purple, blue, and magenta, with minimal presence of green, cyan, and other colors. Therefore, we need to harmonize the colors in the image. Adjust red towards magenta, light green towards cyan, blue towards cyan, purple towards magenta, and magenta towards purple.
- Saturation: Increase the saturation of the main colors in the image and decrease the saturation of undesired colors. Boost the saturation of yellow, blue, and purple, while reducing the saturation of green to -100.
- Luminance: Decrease the brightness of red and orange. Since the lighting is predominantly blue, we need to enhance the brightness of the blue color.

After completing the adjustments in HSL, we may still need to calibrate the primary colors of the photo. Here's how:
- Move the Red Primary Color towards magenta.
- Shift the Green Primary Color towards yellow.
- Adjust the Blue Primary Color towards cyan.
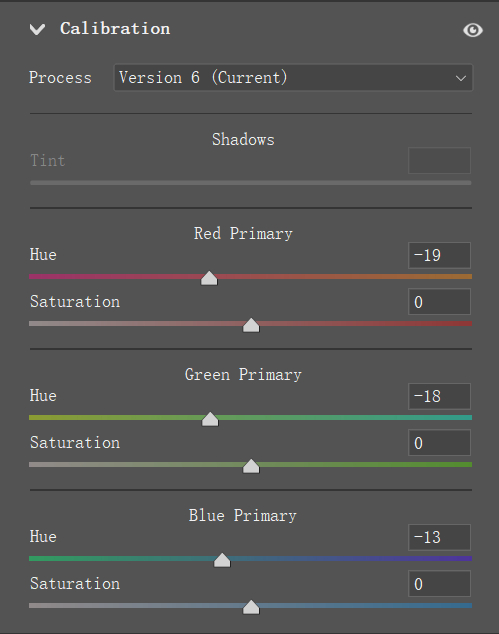
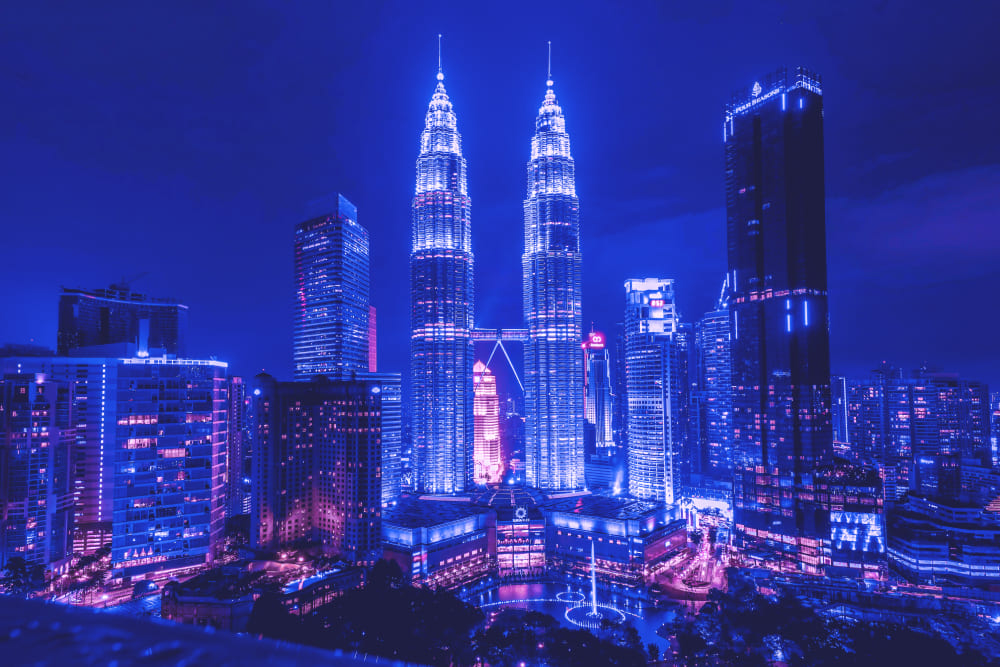
At this point, the overall Cyberpunk color tone has been achieved. Here is the resulting adjusted image:
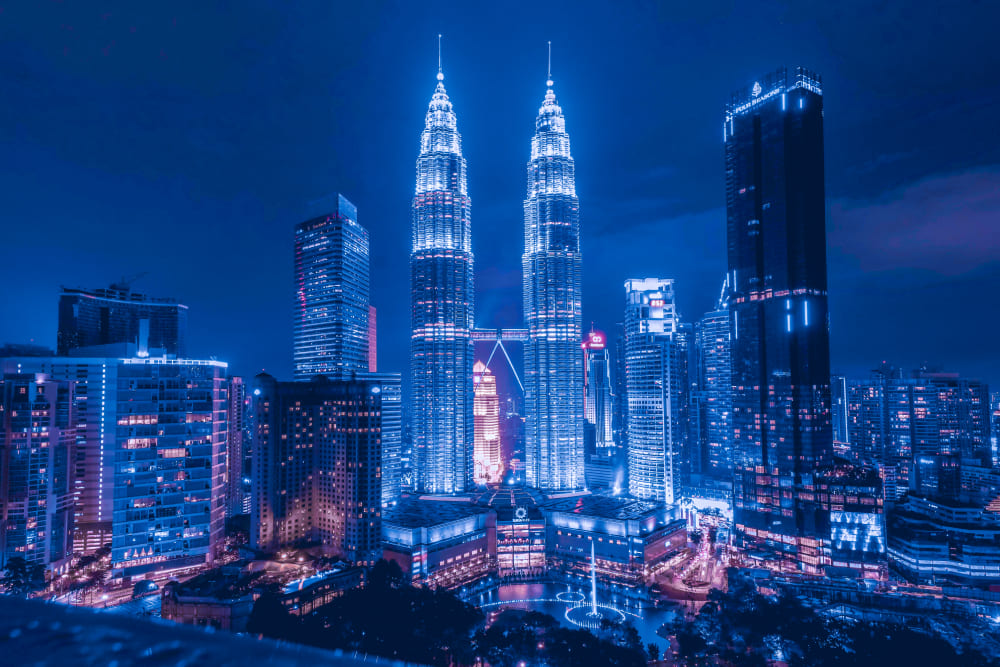
However, our work isn't done yet. In Cyberpunk-style photos, the overall color palette tends to lean towards blue and magenta. Specifically, the darker areas like the sky and ground have a colder blue tone, while the highlights from the lights have a magenta hue.
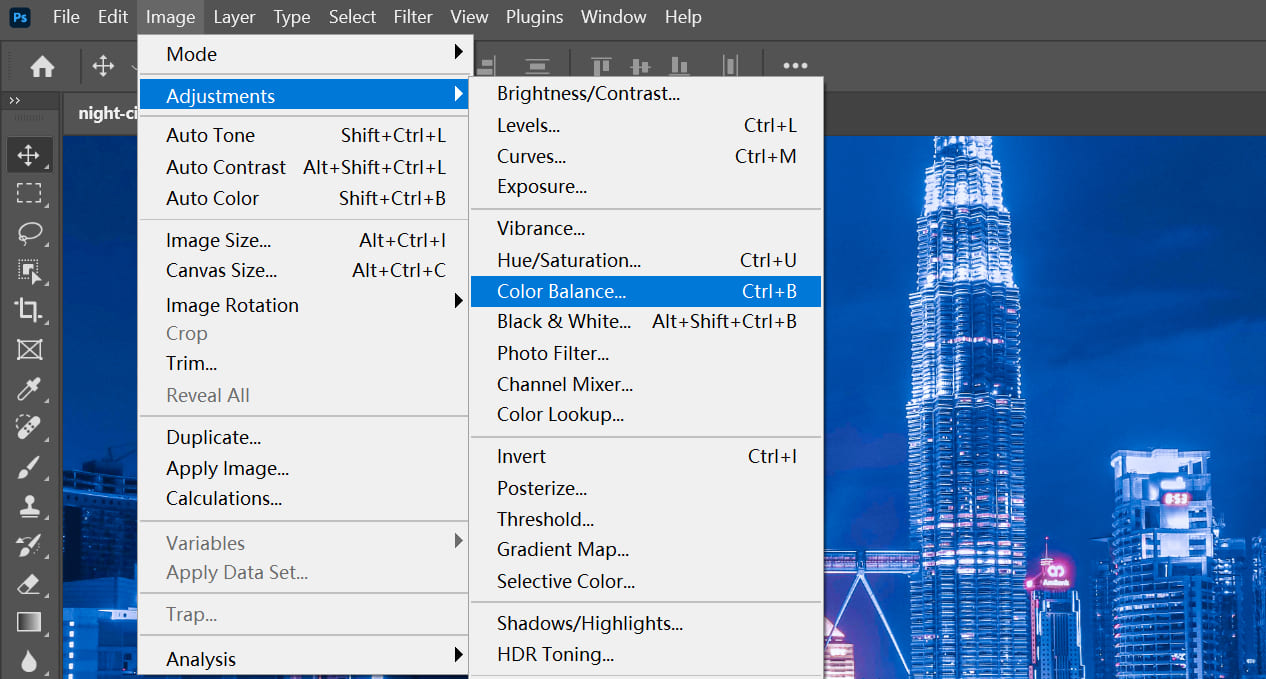
Therefore, we still need to make adjustments to the shadows and highlights. In the Photoshop interface, navigate to the Color Balance tool to achieve our desired effect of bluish shadows and magenta highlights.
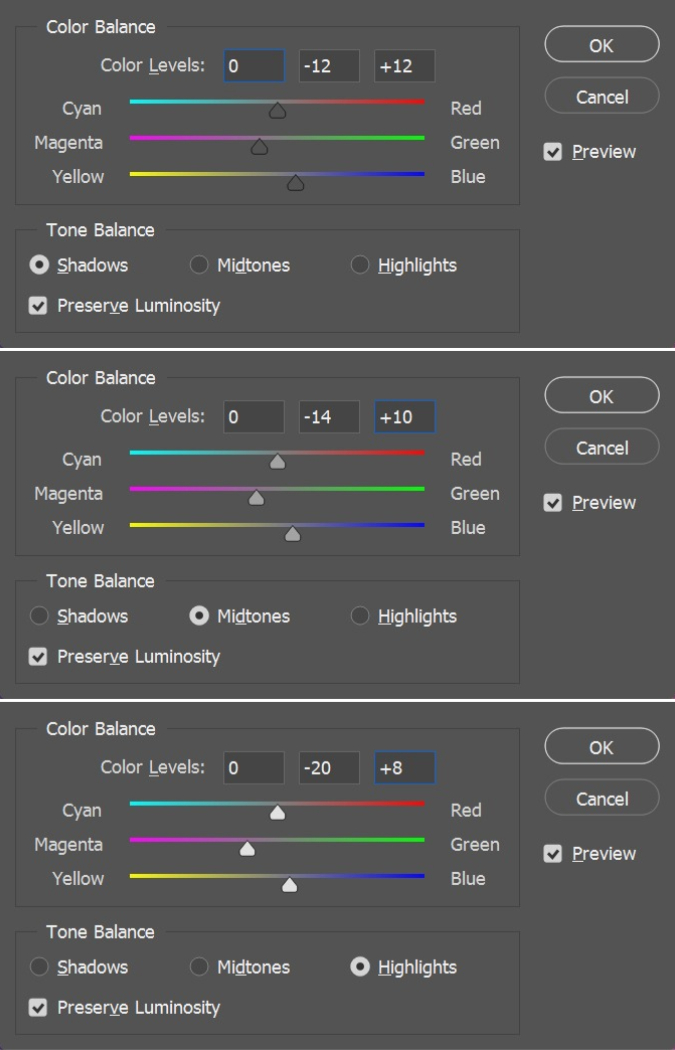
Here's how you can do it:
- Shadows: While there might already be some blue tones in the shadows, we want to enhance this effect. So, add more blue to the shadows, as well as a touch of magenta.
- Midtones: Similarly, introduce magenta and blue tones to the midtones.
- Highlights: Since the highlights are lacking in magenta, we need to add more of it. Additionally, introduce some blue tones to the highlights as well.
Finally, use the Curves tool to enhance the contrast and bring out hidden details in the darker areas of the image. This step adds depth and richness to the overall composition, giving it a more film-like quality.
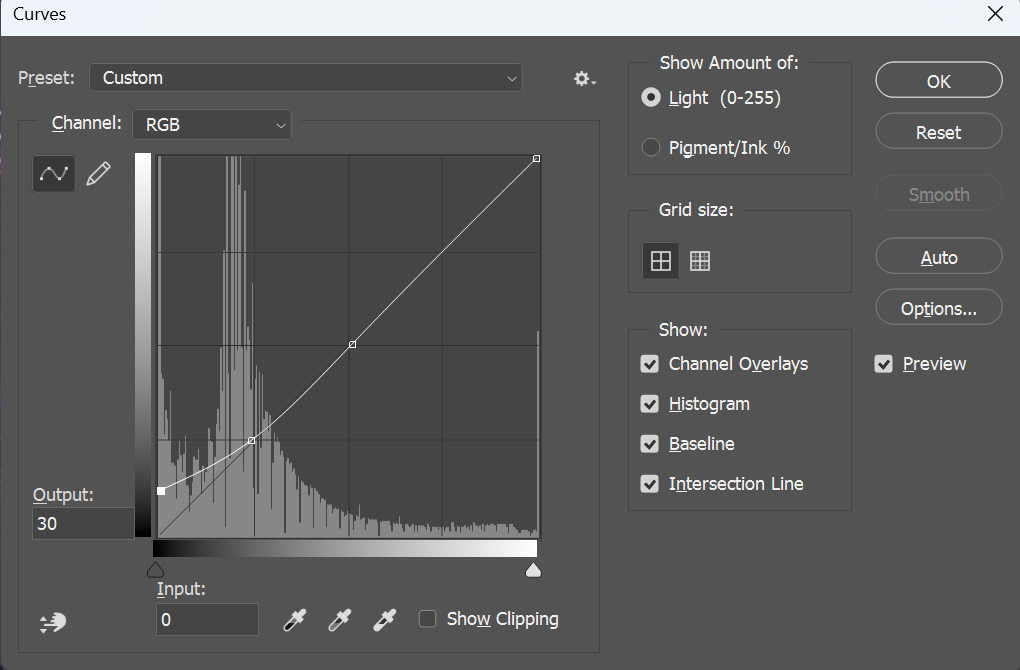
At this point, you have completed all the necessary steps to achieve the Cyberpunk color grading for your photo. Now, let's take a look at the final result.
Final Thoughts About Cyberpunk Color Photos
The Cyberpunk style is characterized by a strong dystopian atmosphere and a sense of pessimism, which embodies the "punk" aspect of Cyberpunk.
It is often depicted with continuous rainy weather, dark and damp wastelands, rampant drug use, epidemics, and violence. The streets are shrouded in fog, as seen in the iconic visual scenes of "Blade Runner."
Therefore, during the initial stages of composition, it is important to emphasize the chaos, while human figures can serve as references for scale and don't need to be clearly visible.
The composition has been determined in the shooting, but during post-processing, it is necessary to heavily emphasize the Cyberpunk lighting and colors, aiming for a more chaotic and blurred boundary between reality and the imaginary.
One important point to note is that the Cyberpunk aesthetic is not achieved by simply adding a blue, cyan, and purple color grade to a nighttime photo.
Without capturing some of the formal elements that represent the Cyberpunk characteristics in the initial stages, a heavy blue, cyan, and purple color grade alone can make the image appear strange and out of place.
In summary, it is crucial to capture the essence of the Cyberpunk style in the composition stage and then enhance it further through post-processing, creating a visually captivating and authentic Cyberpunk atmosphere.
Product Recommendation:
In this tutorial, we've explored how to transform your photos into captivating Cyberpunk masterpieces using Photoshop. Now, let's introduce you to TourBox, an incredible tool that can enhance your creative process and streamline your workflow.

TourBox is a powerful creative controller designed for artists, photographers, and designers. It seamlessly integrates with Photoshop, offering an efficient and immersive editing experience.
Imagine this: no more tedious color grading adjustments that require constant use of a traditional keyboard and mouse. With just one hand controlling TourBox, you can effortlessly adjust parameters without the need to hunt for sliders and master color grading with ease for stunning results every time.

TourBox's intuitive controls and customizable shortcuts boost your productivity. Switching between tools, adjusting parameters, and toggling layer properties becomes seamless, enabling you to experiment and create unique Cyberpunk effects efficiently.