DaVinci Resolve Color Wheels Explained: Primary, HDR & Log
If you are new to color grading in DaVinci Resolve, have you ever wondered: when watching videos by professional colorists, why sometimes they use the Primary Wheels to grade, sometimes the HDR Wheels, and yet you rarely see anyone use the Log Wheels?
These color wheels in DaVinci Resolve look the same except for their names, and they seem to work the same. For beginners, this can be really confusing. When it's time to grade on your own, you may end up just copying their moves from memory without knowing why they picked a certain wheel.
So in this article, we'll simply talk about how these three DaVinci Resolve color wheels differ.

In this article, you will learn:
Differences Between DaVinci Resolve Color Wheels
We roughly know that the main difference between the three types of color wheels in DaVinci Resolve is the area they control. But exactly which areas are different can feel vague.
So, to make it clearer, we use the grayscale image below as an example. We apply the same parameter changes to each wheel and watch the subtle differences.

1. Primary Color Wheels
First, we run three tests. We change the Lift, Gamma, and Gain wheels separately. For each test, we adjust the green and blue values only. All other settings stay the same.
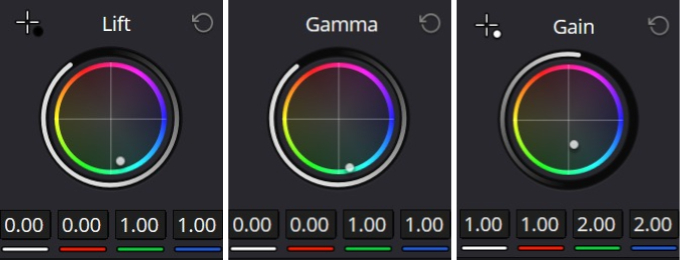
Then we put the three grayscale results together for comparison.
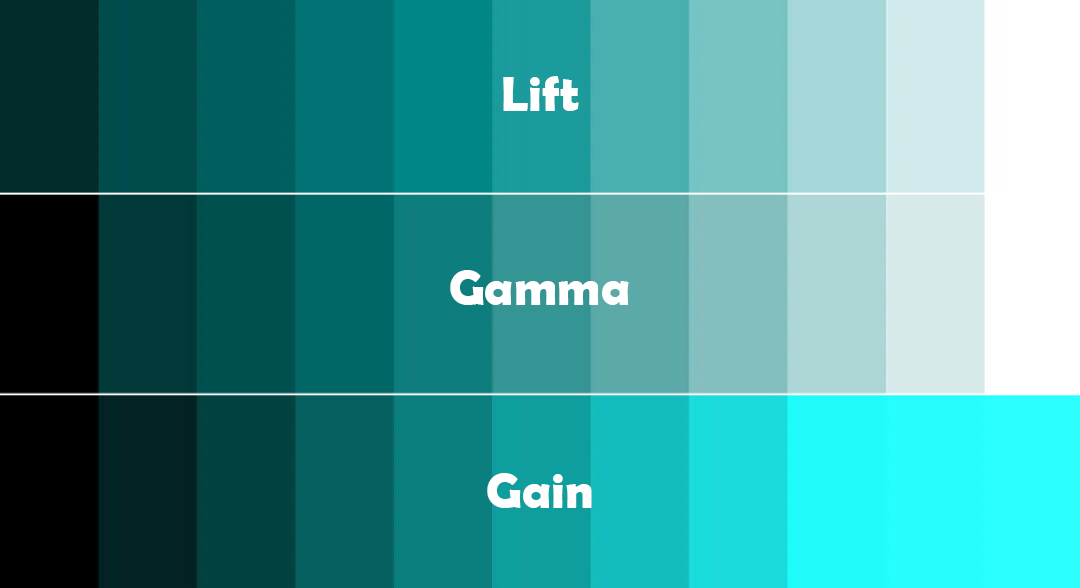
Seeing them side by side is very direct. When you grade with the Primary Wheels, the three wheels overlap a lot.
The main difference between the Lift (shadow) wheel and the Gamma (midtone) wheel is that the Lift wheel affects dark areas more, but it also affects other areas except the highlights. The difference between the Gamma wheel and the Gain (highlight) wheel is that the Gain wheel affects bright and highlight areas more, but it also affects everything except the black parts.
In short, each of the three wheels affects a large area. Only a small portion of the image is affected differently by each wheel.
2. HDR Color Wheels
Next up: the HDR Wheels. We do the same tests. We change the same parameters and compare the grayscale shapes.
Here are the comparison results.

With the default selection, each wheel in the HDR set affects a much smaller range. In other words, grading can be more precise and more flexible.
As the name implies, these are HDR Wheels. Because our test monitor can't display HDR, the Black and Specular wheels don't show changes on the screen even when we adjust them. Also, the colors for the highlight areas of the Light and Highlight wheels look blended together. That's also due to the monitor; it can't show finer color differences there.
But at least we can see the range each wheel affects. Compared to the Primary Wheels, the HDR Wheels control smaller, more precise areas. The areas they control are clearer and more distinct.
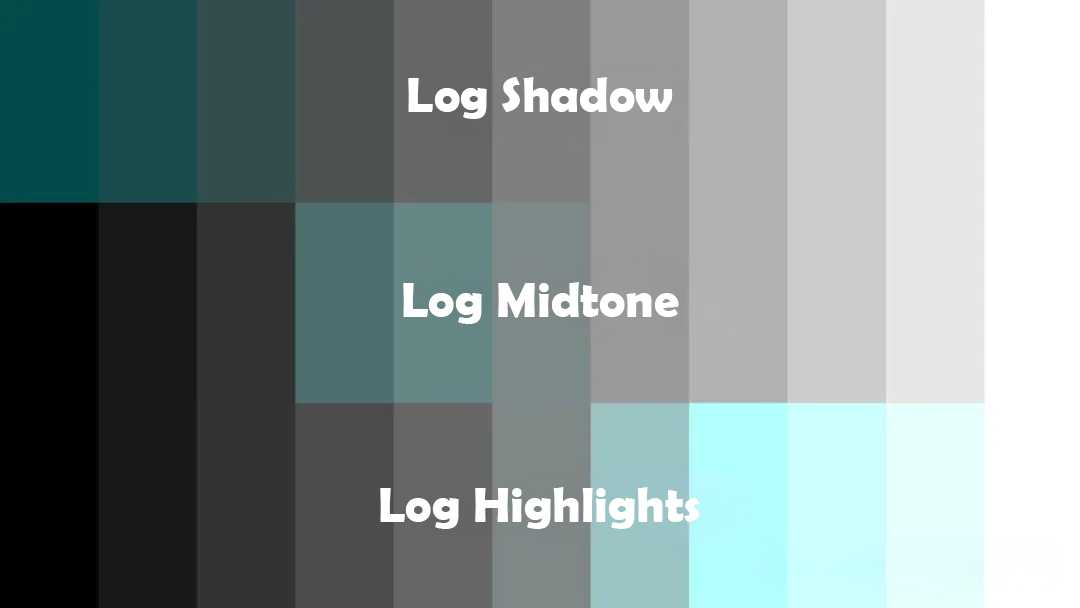
3. Log Color Wheels
Finally, it's the Log Wheels' turn. We change the same parameters and look at the comparison results.
The areas each Log wheel affects don't overlap much. Where they do overlap is very small, and each wheel mostly works inside its own range. Compared with the Primary Wheels, the Log Wheels are more restrained and have less overall impact. Compared with the HDR Wheels, they're a bit rougher and not as fine.
What's the Conclusion
From the simple example above, the differences between the Primary, HDR, and Log wheels should be clear. No wonder professional colorists often choose between the Primary Wheels and the HDR Wheels.
Primary Wheels affect large areas and are convenient for overall grading. HDR Wheels affect smaller areas and are good for precise grading. Log Wheels sit in the middle — not as strong as Primary Wheels, not as fine as HDR Wheels — so fewer people use them.
Also, besides color, some wheels can adjust exposure, saturation, and so on. Their effect ranges follow the same pattern above. Now you can feel more confident when you grade.
Let's finish with a concrete conclusion for these three wheel sets:
- Primary Wheels: Basic control for large tonal blocks. Lift adjusts shadows, Gamma adjusts midtones, Gain adjusts highlights, and Offset shifts the whole image. Good for quick overall color and exposure fixes.
- HDR Wheels: Split brightness into more bands (for example: highlight, light, dark, shadows). They let you adjust very bright or very dark areas precisely without changing other parts. Good for HDR output or when you need local brightness control.
- Log Wheels: Work in a logarithmic color space and respond more subtly. They are friendly for fine midtone and color tweaks. But they don't do overall changes as well as the Primary Wheels, and they aren't as precise as the HDR Wheels. They sit in an awkward middle ground, so they are used less often.
One last quick ad. If you're thinking about buying an editing keyboard or controller to speed up your color grading and improve your experience in DaVinci Resolve, take a look at our TourBox. It gives you an excellent grading control experience at a more affordable price.

TourBox is more than a shortcut mapper. Mapping more shortcuts has never been our goal. TourBox includes many built-in features for major creative apps. For example, in a DaVinci Resolve grading workflow, you can use our HoverAdjust feature to change grading values with a physical knob instead of the mouse.
If you only use the mouse wheel or type numbers, it's hard to control curve slopes precisely. Also, when you drag curves, wheels, or other controls with the mouse, the value can jump or drift after you release the button, which makes it hard to set exact numbers.

If you use TourBox, those problems disappear. If you're interested in TourBox, feel free to click our DaVinci Resolve page to learn more.