DaVinci Resolve Composite Mode: A Beginner's Guide
In DaVinci Resolve's color grading and compositing work, composite modes are an underrated, powerful feature. They are more than a simple stacking tool — they are a core technique that can boost an image's look and texture, create creative effects, and enable precise local color adjustments.
Whether you're a beginner editor or an advanced colorist, fully mastering composite modes can directly raise the quality of your work.
But many people find DaVinci Resolve's composite mode confusing, hard to read, or don't know how to use it. You don't need to memorize all the theory — just learn the core modes and common use cases, and you can handle them easily.
In this article, we'll explain how to use DaVinci Resolve's composite mode so every tip is practical and ready to apply. No more talk — let's get started.

In this article, you will learn:
- What Exactly Are DaVinci Resolve Composite Modes?
- How to Set DaVinci Resolve Composite Mode?
- Composite Modes You Should Focus on and When to Use Them
- How to Better Use Composite Mode in Real Projects?
- Composite Mode Tips Every Beginner Should See
- Conclusion
What Exactly Are DaVinci Resolve Composite Modes?
DaVinci Resolve's composite modes are similar to Photoshop's layer blend modes. At their core, they define how the pixels of the top image and the bottom image are combined.
Simply put, when you change the composite mode of the top clip, it will merge with the clip underneath in different ways. Some modes darken the image, some lift highlights and shadows, some boost color, and some increase contrast.
Used together with opacity, masks, and nodes, you can precisely control where the effect applies and how strong it is.
How to Set DaVinci Resolve Composite Mode?
You can set the composite mode on both the Edit page and the Color page.
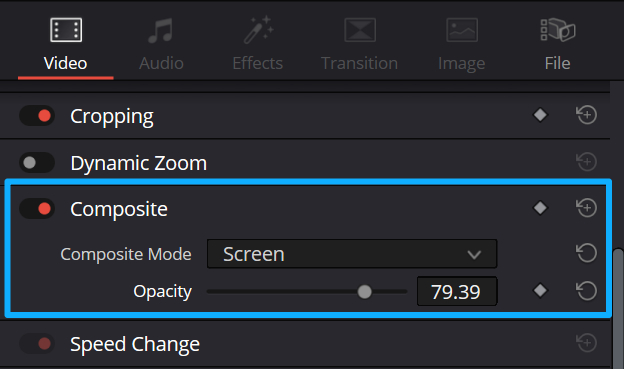
On the Edit page: select the top clip on the timeline → open the Inspector on the right → find Composite → use the dropdown to pick a blend mode.
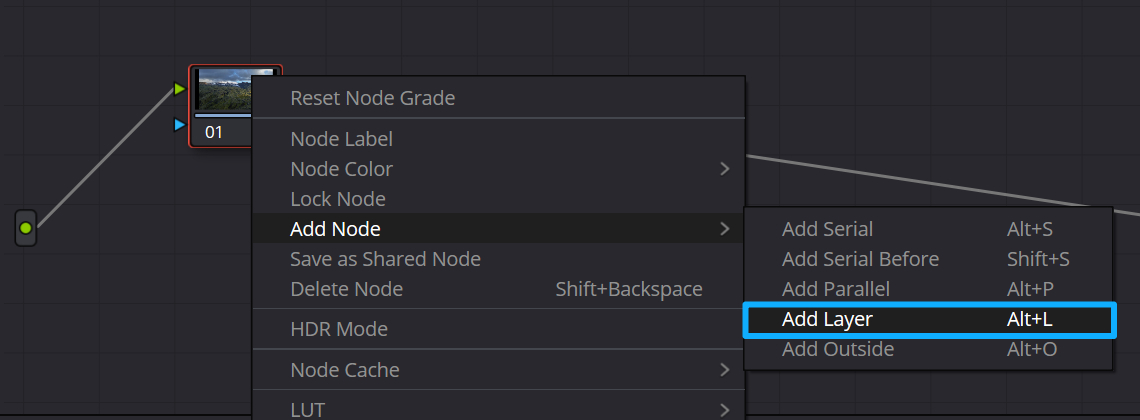
On the Color page: select an existing node, then right-click and choose Add Node → Add Layer (shortcut: Alt/Opt + L).
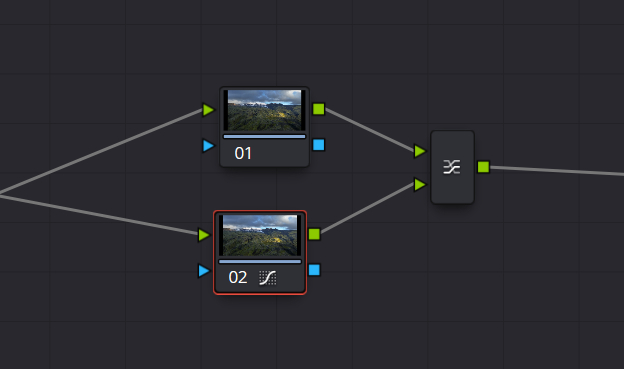
Note: layer node order is the opposite of Photoshop — the lower nodes are higher in layer hierarchy, so the bottom node appears on top.
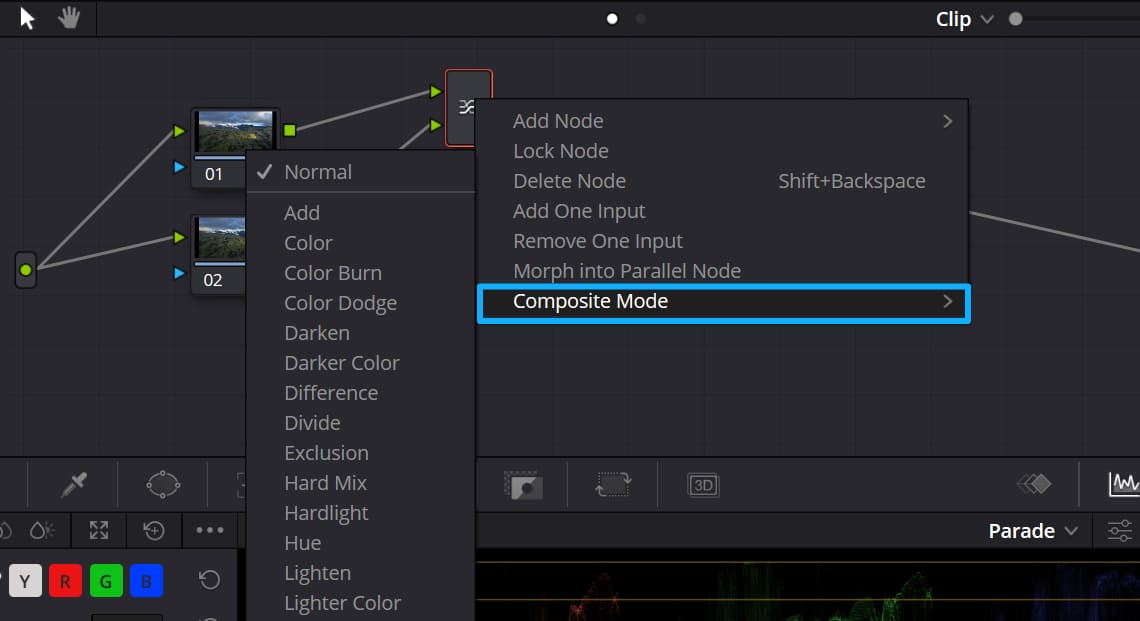
You can grade the top-layer node. Then right-click the Layer Mixer node, find the compositelay mode option, and choose the blend mode from the dropdown.
A single Layer Mixer node can use only one mode. If you need multiple composite effects, chain several Layer Mixer nodes in series.
Composite Modes You Should Focus on and When to Use Them
DaVinci Resolve has many composite modes — as many as 27. But for most video editors and creators, only a few are used in everyday grading and compositing.
Here we sort them by "functional scenarios." Each one shows the core use and the effect. Learn these, and you'll cover about 90% of your needs. They're ordered from high to low priority. Beginners only need to master these few.
1. Darkening Types | Only Darken, Don't Change the Original Hue (Most Used: Multiply)
The top layer keeps its dark areas and makes its bright areas transparent. After blending, the whole image gets darker. Shadow detail becomes more visible. Color saturation rises slightly, and the color won't shift.
Versatile uses:
- Locally darken bright highlights: for example, an overexposed sky or bright lights. Use Multiply with a darker layer to darken precisely without affecting other areas.
- Add shadows or texture: film grain, dark textures, or ink masks. Blending them in instantly makes the image feel heavier and richer.
- Mask control: put a black-and-white mask on the top layer and set it to Multiply. Black hides, white shows. This makes local masking and transitions easy.
2. Brightening Types | Only Brighten, Great for Atmosphere (Two Common Modes: Screen / Add)
This is the most-used category in DaVinci Resolve. Master these two, and you can handle most light effects, clarity, and creative composites:
- Screen: The top layer keeps its light areas and makes its dark areas transparent. The result brightens the image overall. Highlights are soft, not harsh. Colors look clearer, and contrast drops slightly.
- Add: Similar to Screen but stronger. It brightens more and makes highlights look like they glow. Good for strong light effects. Downside: it can lose shadow detail if overdone. Use opacity to control it.
Versatile uses:
- Double-exposure effect: put your main subject on the bottom and a landscape or silhouette on top. Use Screen or Add and lower opacity to 40%–60% for a strong mood.
- Light effects: flares, light leaks, lens halos, sun rays. When blended, dark parts disappear, and only the light remains. Soften edges with blur for a natural look.
- Make the image more transparent: add a bright layer over a dark or flat image with Screen. The image becomes clearer instantly. Works for skin tones and landscapes.
3. Contrast Types | Strengthen Depth, Double the Texture (3 Common Modes: Overlay / Soft Light / Hard Light)
This group of composite modes is the soul of color grading. They don't change the overall light or dark of the image. They only boost midtone contrast. That makes light and shadow more distinct and details more three-dimensional.
These modes are the core for "texture grading." The three differ only in strength. Pick the one you need:
- Overlay: the most balanced, all-round option. It raises midtone contrast. Highlights get brighter and shadows get darker. The image stays clear and natural. Color saturation rises too. Works well for portraits, landscapes, and product shots. Good choice for beginners.
- Soft Light: weaker contrast than Overlay. The result is gentler. Use it to raise subtle layers of detail, like skin tones or still life textures. It won't create harsh color blocks. The look stays natural.
- Hard Light: the strongest contrast. Highlights get a sharp glow and shadows become dense. Use it to push metal shine, strong shadow edges, or sharpened detail. Be careful with portraits — it can make skin look dirty.
Versatile uses:
- Overall texture boost: after you set the base tone, add a high-contrast copy of the image on top and set it to Overlay. The light and shadow depth jumps instantly.
- Local push: for example, add depth to facial features, cloud layers, or product metal shine. Use a mask to limit the area. The details will pop.
- Sharpening aid: pair with a sharpen node. Use Soft Light or Overlay to make sharpening look finer and avoid jagged edges.
4. Color Types | Change Color or Light Only, Keep the Image Structure Intact (Essential for Precise Grading)
This group is a pro colorist's go-to. The key feature is that it separates an image's color from its brightness. You change one and keep the other fully. That way, the image won't accidentally get brighter or darker. It's perfect for unifying tones, matching light, and color correction. You need both modes.
- Color: keeps only the top layer's color information. It fully inherits the bottom layer's brightness and light/shadow.
- Luminosity: keeps only the top layer's brightness and light/shadow. It fully inherits the bottom layer's color.
Versatile uses:
- Unify overall tone: when several clips are joined, and their colors don't match, lay a tone layer on top and use Color mode to make the whole piece look consistent.
- Portrait skin-tone correction: keep the subject's original light and shadow, and only replace the skin color. Skin looks clearer and more even.
- Match lighting for composites: for a keyed or composited subject, use Luminosity mode with a background light layer so the subject's light and shadow match the background. This removes that "floating" look.
How to Better Use Composite Mode in Real Projects?
All theory is for practice. Below are 8 high-frequency, must-have use cases we collected. Each one has fixed modes + parameter suggestions. No need to guess — follow them, and you'll get results!
1. Double-Exposure Creative Effect
- Operation: Put the main subject video/photo on the bottom, and a landscape/silhouette/texture on the top → set the top to Screen (or Add) → set opacity to 40%–60%.
- Advanced: Use a mask to select the subject outline and apply the double exposure only inside the outline. The result looks cleaner and less busy.
2. Add Texture / Film Look
- Operation: Place film grain, paper texture, or scratch assets on the top layer → set to Overlay or Soft Light → set opacity to 15%–30%.
- Tip: After blending, pull a little contrast with a Curve. The texture feels stronger, and the image won't look flat.
3. Light Effects / Bokeh / Light Leaks
- Operation: Put light assets (bokeh, lens flares, sun leaks) on the top → use Screen for soft light or Add for stronger glow → soften edges with a Blur node.
- Advanced: Use Resolve's tracker so the light follows moving subjects (like a person or car). The effect feels more real.
4. Local, Precise Color Grading
- Operation: In the Color page, add a Layer Mixer node → do local grading on the top layer (e.g., brighten skin, darken sky, boost landscape colors) → set to Overlay or Soft Light → use a Power Window to limit the grade area.
- Benefit: You only change the areas you want. Everything else stays untouched. This gives very precise control—for example, brighten skin without changing the background.
5. Metal / Light Sheen
- Operation: duplicate the base image to the top layer → apply high-contrast blur + brighten highlights on the top → set to Add → lower opacity to 20%–40%.
- Effect: metal reflections and lights gain a natural glow. The texture and sheen improve instantly. Good for product and night videos.
6. Masked Wipe / Transition
- Operation: at the cut between two clips, add a black-and-white gradient mask on its own layer → set the mask layer to Multiply → animate the mask show/hide with keyframes.
- Effect: you get a smooth gradient wipe or a custom erase transition. It looks more natural than built-in transitions, and you can shape it freely.
7. Make Portrait Skin Tones Clearer
- Operation: duplicate the portrait layer to the top → brighten skin and slightly remove yellow on the top layer → set to Soft Light → set opacity to 30%–50% → mask the face with a Power Window.
- Effect: skin becomes clearer and more even while keeping texture. It won't look like heavy skin-smoothing.
8. Match Light and Shadow for Keyed Footage
- Operation: put the keyed (chroma-keyed) subject on the top and the background below → duplicate the background and place that copy above the keyed subject → convert the copied background to black & white → set it to Luminosity → lower opacity to 30%–40%.
- Effect: the keyed subject inherits the background's light and shadow. The composite blends perfectly and no longer looks like a cut-out.
Composite Mode Tips Every Beginner Should See
If you understand the content above, you can already handle composite mode easily. But there are a few fine points where beginners often make mistakes. Remember these tips, and your composite mode results will look more natural and more precise. You'll avoid harsh effects, color shifts, and messy images.
- Order Determines the Result: Always do the base grading on the bottom layer first, then add the top layer and apply the blend mode. If you do it the other way around, you can get serious color shifts and a dirty-looking image.
- Control Strength with Opacity: Don't use 100% opacity for mix modes. In most cases 10%–80% opacity works best. Lower opacity makes the effect softer and more natural.
- Masks Are the Key: The power of blend modes is in local control. Learn to use Power Windows and curve masks to limit where the blend applies. This keeps the image clean and precise.
- Stack Modes with Nodes: One Layer Mixer node can only use one mode. If you need multiple effects, chain several Layer Mixer nodes in series. The node order does not change the final result.
- Start Simple, Then Add: Beginners should not stack many blend modes at once. Start with one mode plus a mask and get that right. Once you're comfortable, add other modes slowly to avoid a messy look.
Quick ad break. If you often color grade video in DaVinci Resolve, consider buying an editing keyboard or controller. Blackmagic Design's Speed Editor is a good option. But if you want a more affordable controller that works with many creative apps, consider our TourBox.

TourBox is a more budget-friendly, flexible alternative. It can map Resolve's shortcuts and functions, and it includes features like HoverAdjust that help with color grading. That lets you get a workflow similar to an editing keyboard — or even a grading console — at a much friendlier price.

Conclusion
Finally, we've compiled all the core composite modes, uses, and suggested settings above. You can use this list directly while grading. Refer to it anytime.
- Multiply: darken highlights, add texture, mask overlays | Opacity: 20%–50%
- Screen: double exposure, light effects, brighten and clear | Opacity: 40%–60%
- Add: strong light-effect overlays, glow boost | Opacity: 20%–40%
- Overlay: overall texture boost, stronger contrast | Opacity: 15%–30%
- Soft Light: subtle layering, portrait skin-tone improvement | Opacity: 30%–50%
- Color: unify tones, color correction | Opacity: 50%–80%
- Luminosity: match light and shadow, keep color | Opacity: 30%–50%
DaVinci Resolve's composite blend modes are not just extra features. They are core skills that can truly raise your work and expand your creative options.
The learning curve is not steep. You don't need to memorize complex pixel math. Just remember which mode fits each scene, and use masks and opacity to control the effect. You can make impressive looks with ease.
Start with the basics — Screen, Multiply, and Overlay — and practice. As you gain experience, you'll find many effects that once needed plugins can be done easily with Resolve's built-in composite modes.