How to Fix the DaVinci Resolve Media Offline Issue?
"Media Offline" is one of the most common issues new DaVinci Resolve users run into. A clip may be unlinked, the file may be encoded in a format Resolve does not like, or the frame rate may not match.
Whatever the cause, it can be frustrating to deal with, especially when you are trying to get back to editing quickly.
In this tutorial, we will walk through the most common reasons why media goes offline in DaVinci Resolve and show you how to fix each one step by step. Whether you are just getting started or have been using Resolve for a while, this guide will help you find the problem faster and get your footage back online.

In this article, you will learn:
- Scenario 1: Source Material Has Been Moved or Deleted
- Scenario 2: Media Goes Offline Right After Import
- Scenario 3: Random Frames Go Offline or Flicker
- Scenario 4: Audio Sync Issues During Playback
- The Best All-Purpose Fix
- Final Checklist for the Media Offline Issue
Scenario 1: Source Material Has Been Moved or Deleted
"Media Offline" issues can happen in DaVinci Resolve when the clips you imported lose their link to the original source files on your drive. This usually happens when the source files have been moved to a different folder or drive without you realizing it.
This is one of the most common causes of the "Media Offline" problem in DaVinci Resolve. So when you see "Media Offline," the first thing to check is whether any source files have been moved or deleted.
The fix is simple:
- Go to the Media Pool in the Cut page, and select all offline clips.
- Right-click any of the clips, then choose Relink Selected Clips.
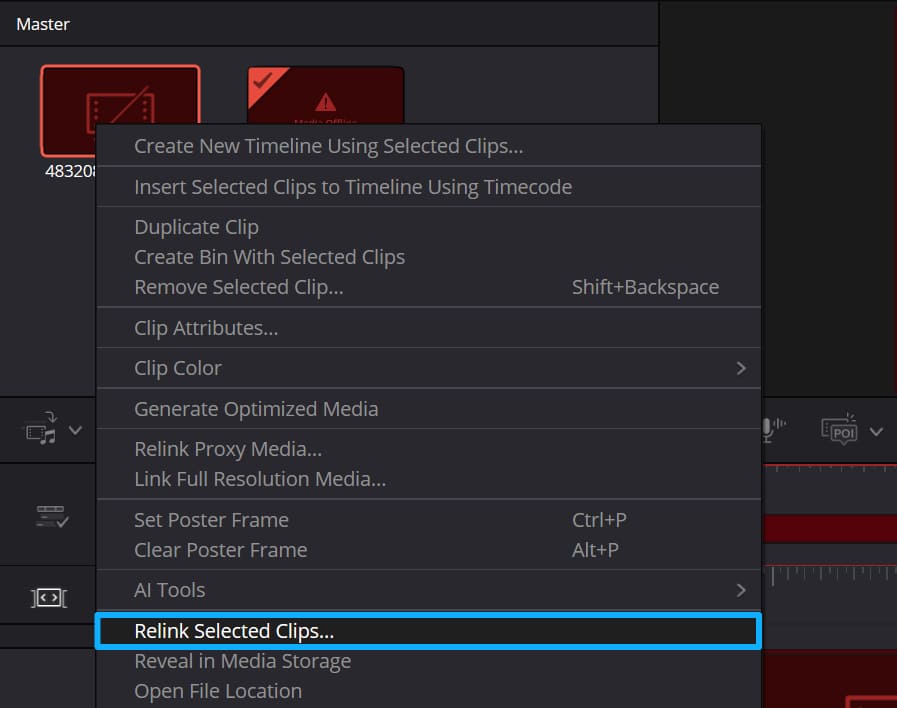
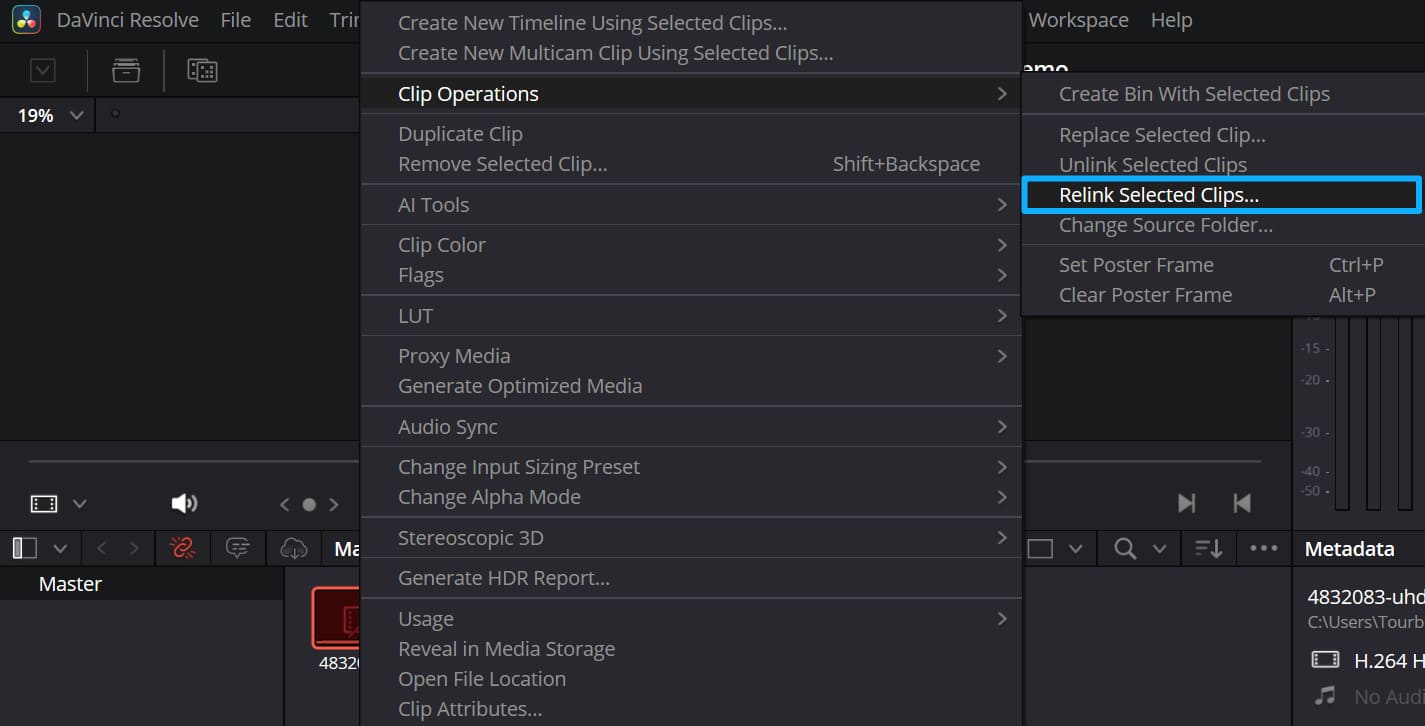
- Or, in the Media or Edit page, right-click the offline clips and choose Clip Operations > Relink Selected Clips from the menu.
- In the dialog box that appears, browse to the folder that contains the original media, then click Select Folder.
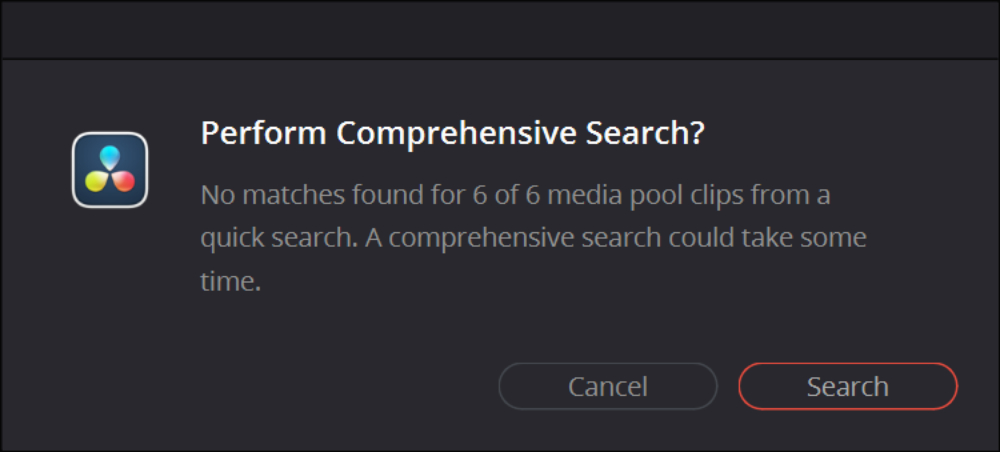
If Resolve still cannot relink some clips, it may ask you to run a Comprehensive Search in the next dialog box.
If a few clips are still offline, try widening the search area by selecting the parent folder or, if needed, the entire drive.
When you unintentionally move or delete any source material, it's highly likely that you haven't properly managed your media in DaVinci Resolve. Don't underestimate the importance of organizing your media clips.
However, organizing assets effectively in DaVinci Resolve is not an easy task, especially when your project has a multitude of chaotic media clips. This is where TourBox, the creative tool, can come in handy.

Compared with the traditional mouse-and-keyboard setup, TourBox helps you organize and manage your media more efficiently, and you can also use it in video editing and color grading to streamline your workflow. Beyond the boost in efficiency, TourBox also delivers a level of hands-on control that a keyboard and mouse simply cannot match.
If you are interested, click through to our DaVinci Resolve page to learn more.
Scenario 2: Media Goes Offline Right After Import
Sometimes, your media imports normally but shows up as offline right away. If you place it on the timeline and try to play it, you may notice that the video is offline while the audio still plays.
This issue is often related to H.265 (HEVC) encoding. If you shoot with action cameras or drones, you have likely run into this before.
Devices like GoPro cameras and the DJI Mavic series often record high-resolution, high-frame-rate footage — such as 4K at 60 fps — using highly compressed H.265. Mirrorless cameras like the Fujifilm X-T3, Fujifilm X-T4, and Sony a7S III also use H.265 in some of their higher-quality recording modes.
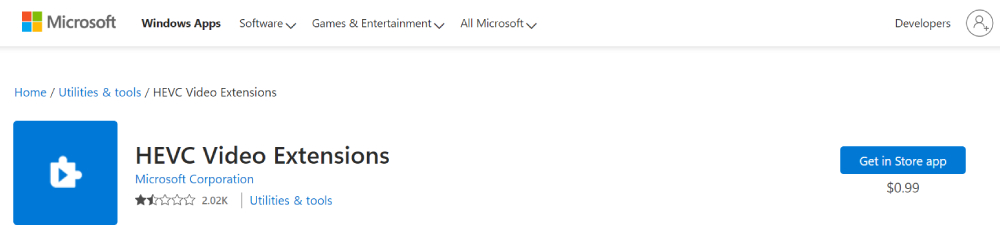
On Windows, this usually happens because the system does not have the proper HEVC codec installed. As a result, DaVinci Resolve cannot decode the footage correctly.
The fix is simple:
- Go to the Microsoft Store and search for the HEVC extension, then click on 'Buy' (yes, it's paid, and although it's not expensive at just $0.99, it's quite frustrating, which is why you'll see a barrage of negative reviews).
- Download and install the extension, restart your computer, and then open DaVinci Resolve. You should be able to decode H.265 videos now.
One thing to keep in mind: both the free and Studio versions of DaVinci Resolve support H.265 decoding, but GPU acceleration is only available in the Studio version.
So if your system is powerful but H.265 playback is still slow, upgrading to DaVinci Resolve Studio may help improve performance.
Scenario 3: Random Frames Go Offline or Flicker
Sometimes, after importing H.265 clips, you may see random frames — not the entire clip — show a "Media Offline" error when you scrub the timeline or play it back.
This issue often happens with H.265 footage shot on mobile phones, such as iPhones, especially 4K 60 fps video.
This problem does not usually affect the free version of DaVinci Resolve. However, users of DaVinci Resolve Studio may run into it because of compatibility issues related to GPU acceleration.
The fix is simple:
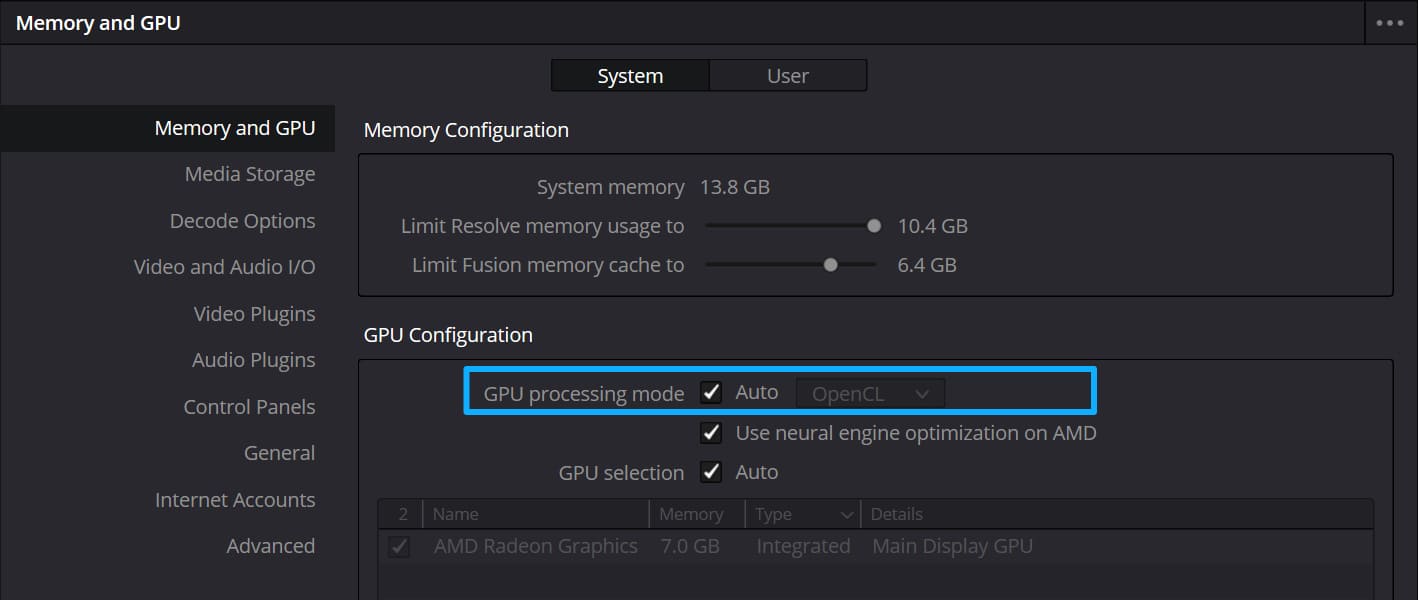
- In DaVinci Resolve Studio, go to Preferences > System > Memory and GPU. Under GPU Processing Mode, do not choose CUDA or OpenCL. Instead, select Auto.
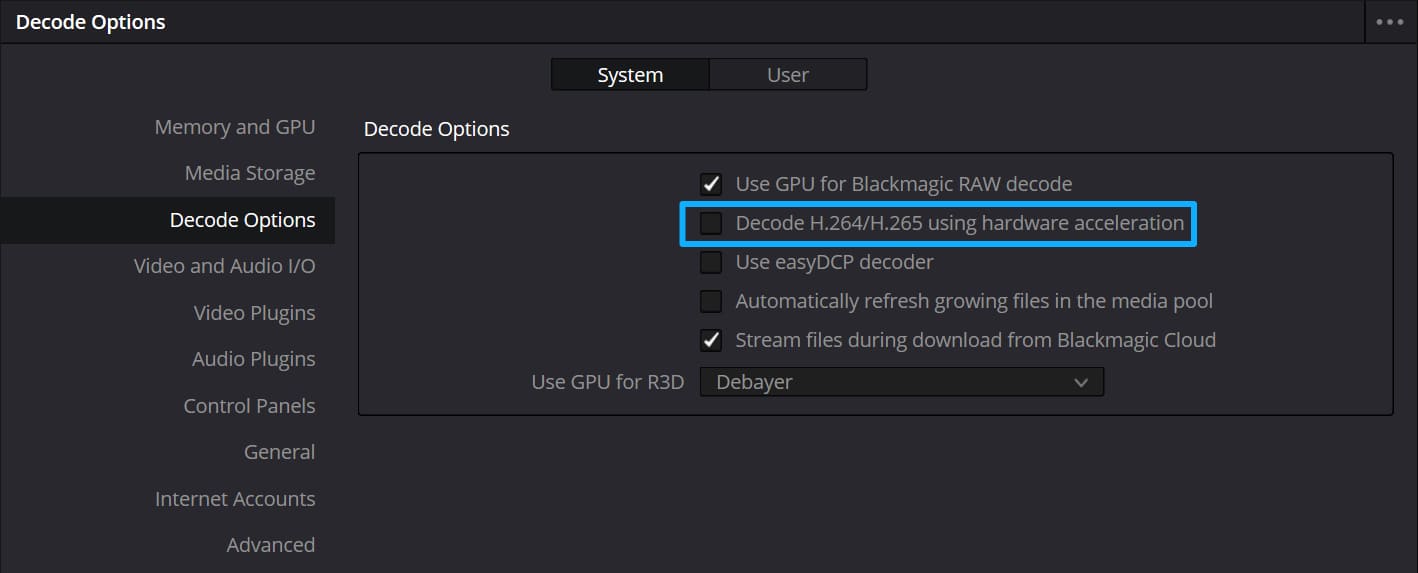
- Then open the Decode Options page and make sure Decode H.264/H.265 using hardware acceleration is turned off.
- Restart DaVinci Resolve Studio, then check the timeline again to see whether the footage displays correctly.
In addition to these steps, we still recommend updating DaVinci Resolve and your GPU drivers to the latest versions. This issue may also be fixed in a future DaVinci Resolve update.
Scenario 4: Audio Sync Issues During Playback
Sometimes, imported clips may go offline right away, but the audio still plays normally. This is the same issue described in Scenario 2. In other cases, the video may import fine, but the audio drifts out of sync during playback. This can be confusing.
In many cases, the root cause is Variable Frame Rate (VFR) footage. Smartphones, as well as screen recording tools like OBS and NVIDIA ShadowPlay, often record video in VFR. By contrast, DSLRs, mirrorless cameras, and professional camcorders usually record at a constant frame rate.
Most post-production software, including DaVinci Resolve and Premiere Pro, works best with constant frame rate footage.
So the basic solution is to convert VFR footage to constant frame rate footage. This usually involves two steps:
- First, check whether the footage is VFR.
- Then, use software to convert it.
For this, we will use two tools: MediaInfo, which lets you check the frame rate type, and HandBrake, which can convert VFR footage to constant frame rate footage.
How to Check the Frame Rate:
- Download MediaInfo. It is a very handy free tool that can display a lot of metadata.
- Open MediaInfo, click View, and switch from Basic to Tree.
- Select the file you want to check from the sidebar, or simply drag and drop it into the window to view the metadata.
- Find the Frame Rate Mode section, and you can clearly see whether the video is CFR (Constant Frame Rate) or VFR (Variable Frame Rate).

How to Convert Frame Rate:
- Download and install HandBrake. Open it, then select the file from the sidebar or simply drag and drop it into the window.
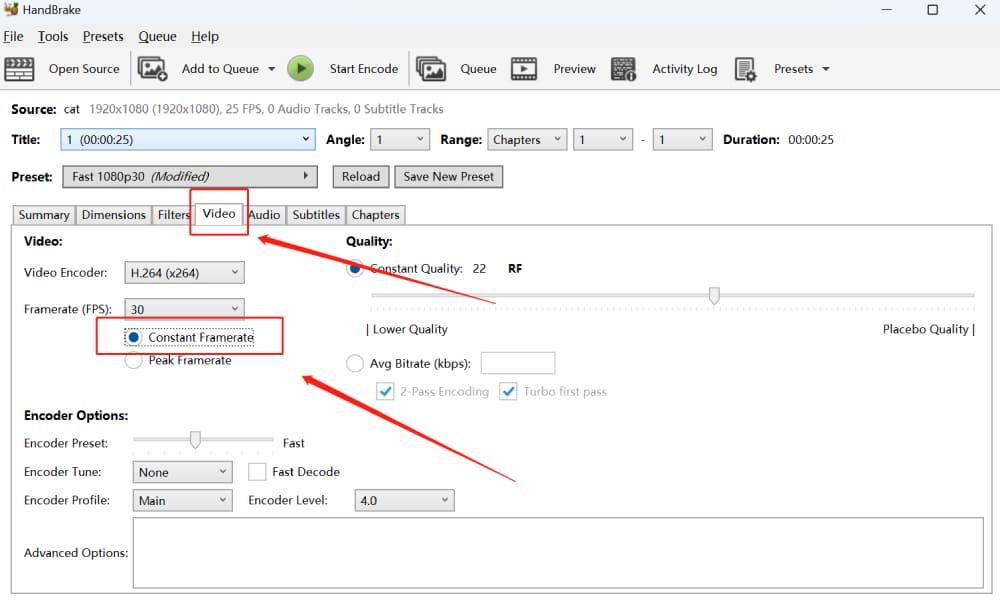
- Choose the resolution and frame rate preset you need. Then, in the Video tab, confirm the frame rate and select Constant Frame Rate.
- Click Start Encode at the top to begin creating the new video file.
- After the re-encoding is complete, open MediaInfo again to check the frame rate mode. It should now be set to a constant frame rate.
However, some videos may still keep variable frame rate behavior even after re-encoding. In that case, try encoding again with a different frame rate.
For example:
- For a 30 fps video, try re-encoding at 29.97 fps to see whether it becomes constant.
- For a 60 fps video, try a different constant frame rate preset as well.
The steps above should solve most variable frame rate issues. Once we re-import the re-encoded footage into DaVinci Resolve, we should no longer run into audio sync problems or random offline frames.
The most important point is that if we catch this issue early and set our recording devices to use a constant frame rate, we can save a lot of time and avoid these problems in post-production.
The Best All-Purpose Fix
If none of the steps above solved your media offline issue, the most reliable solution is to transcode the files.
You can use any transcoding tool to re-encode the clips that are showing as offline. In general, the output formats fall into two categories:
- One category includes highly compressed, widely compatible formats such as H.264 and MPEG-4. These formats are efficient, but they can be harder for your computer to decode.
- The other category includes formats that are better suited for post-production, such as DNxHD for Windows and ProRes for Mac. They take up more disk space, but they are much easier to edit and color grade.
We recommend using the open-source command-line tool FFmpeg. If that feels too technical, you can also try other transcoding tools.
Final Checklist for the Media Offline Issue
These are all the fixes covered in this guide for the DaVinci Resolve "Media Offline" issue. If you run into offline clips, here are the first things to check:
- Whether DaVinci Resolve is updated to the latest version, since this can fix some codec-related issues.
- Whether the latest GPU driver is installed and compatible with DaVinci Resolve, preferably the Studio version.
- The codec and file format of your footage, such as H.265, H.264, .mp4, or .mkv.
- Whether the video was recorded with a smartphone or screen recording software, since these often create variable frame rate files.
- Whether the footage can play correctly in media players like VLC.
Taking into account all of the above information can help you quickly find the root cause of the media offline issue, allowing you to utilize the various solutions discussed in this article.