How to Solve DaVinci Resolve Playback Lagging Issue?
When working on a complex color grading project in DaVinci Resolve, suppose your computer has lower specs. In that case, you might experience frame drops or lag when playing back or dragging the timeline. This can also happen when dealing with high-resolution, highly compressed formats like 4K H.264.
If you're wondering why DaVinci Resolve replay is laggy and causing trouble, this article will provide some methods to improve playback performance.
By employing these handy tips effectively, you should be able to achieve smooth playback even with intricate projects in DaVinci Resolve.

In this article, you will learn:
- Method 1: Enable Performance Mode
- Method 2: Set the Project Timeline to a Lower Resolution
- Method 3: Render in Place
- Method 4: Timeline Proxy Resolution
- Method 5: Render Cache
- Other Methods to Optimize DaVinci Resolve Playback
- Final Thoughts About DaVinci Resolve Playback Lagging
Method 1: Enable Performance Mode
In the "User" tab of Preferences, there is an option called "Performance Mode," which is set to "Auto" by default.
It analyzes your computer's specs (CPU, GPU, video interfaces, etc.) and automatically adjusts DaVinci Resolve's backend image processing settings to provide the best user experience.
To access this feature, click on the top menu bar and select "Preferences" under "DaVinci Resolve". In the settings panel that appears, choose the "User" tab, then select "Playback Setting" on the left to find the Performance Mode option.
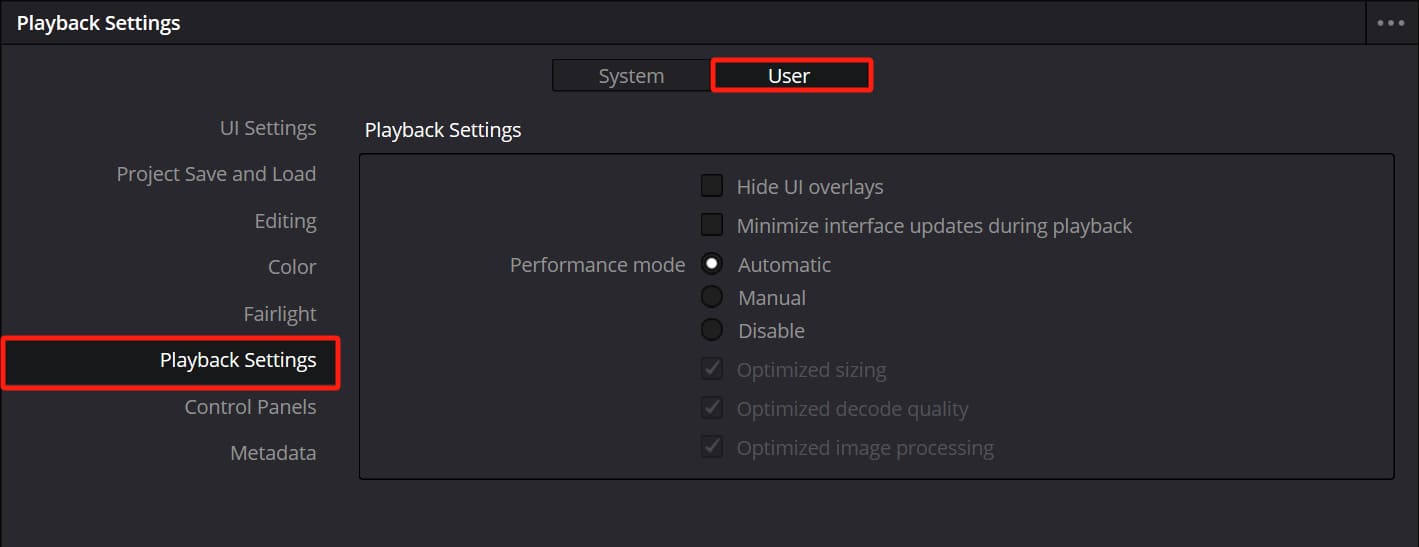
Enabling Performance Mode significantly improves the editing, mixing, and color grading experience on computers with lower performance capabilities. Moreover, activating Performance Mode won't affect the quality of your image processing and video output.
If you require high-quality visuals on your monitor while using DaVinci Resolve, you can choose to disable Performance Mode. Alternatively, you can select "Manual" and adjust the three checkboxes below as needed.
However, better image quality comes at the cost of reduced replay performance. Opting for higher image quality might lead to a laggy feeling while using DaVinci Resolve.
Method 2: Set the Project Timeline to a Lower Resolution
These days, there are more and more projects in 4K or 8K resolutions. However, it's often unnecessary to edit or color grade at these high resolutions.
In DaVinci Resolve, you can start by setting your project timeline to a lower resolution like 1080p or 720p. After completing your work, you can switch back to the original resolution for high-quality rendering output.
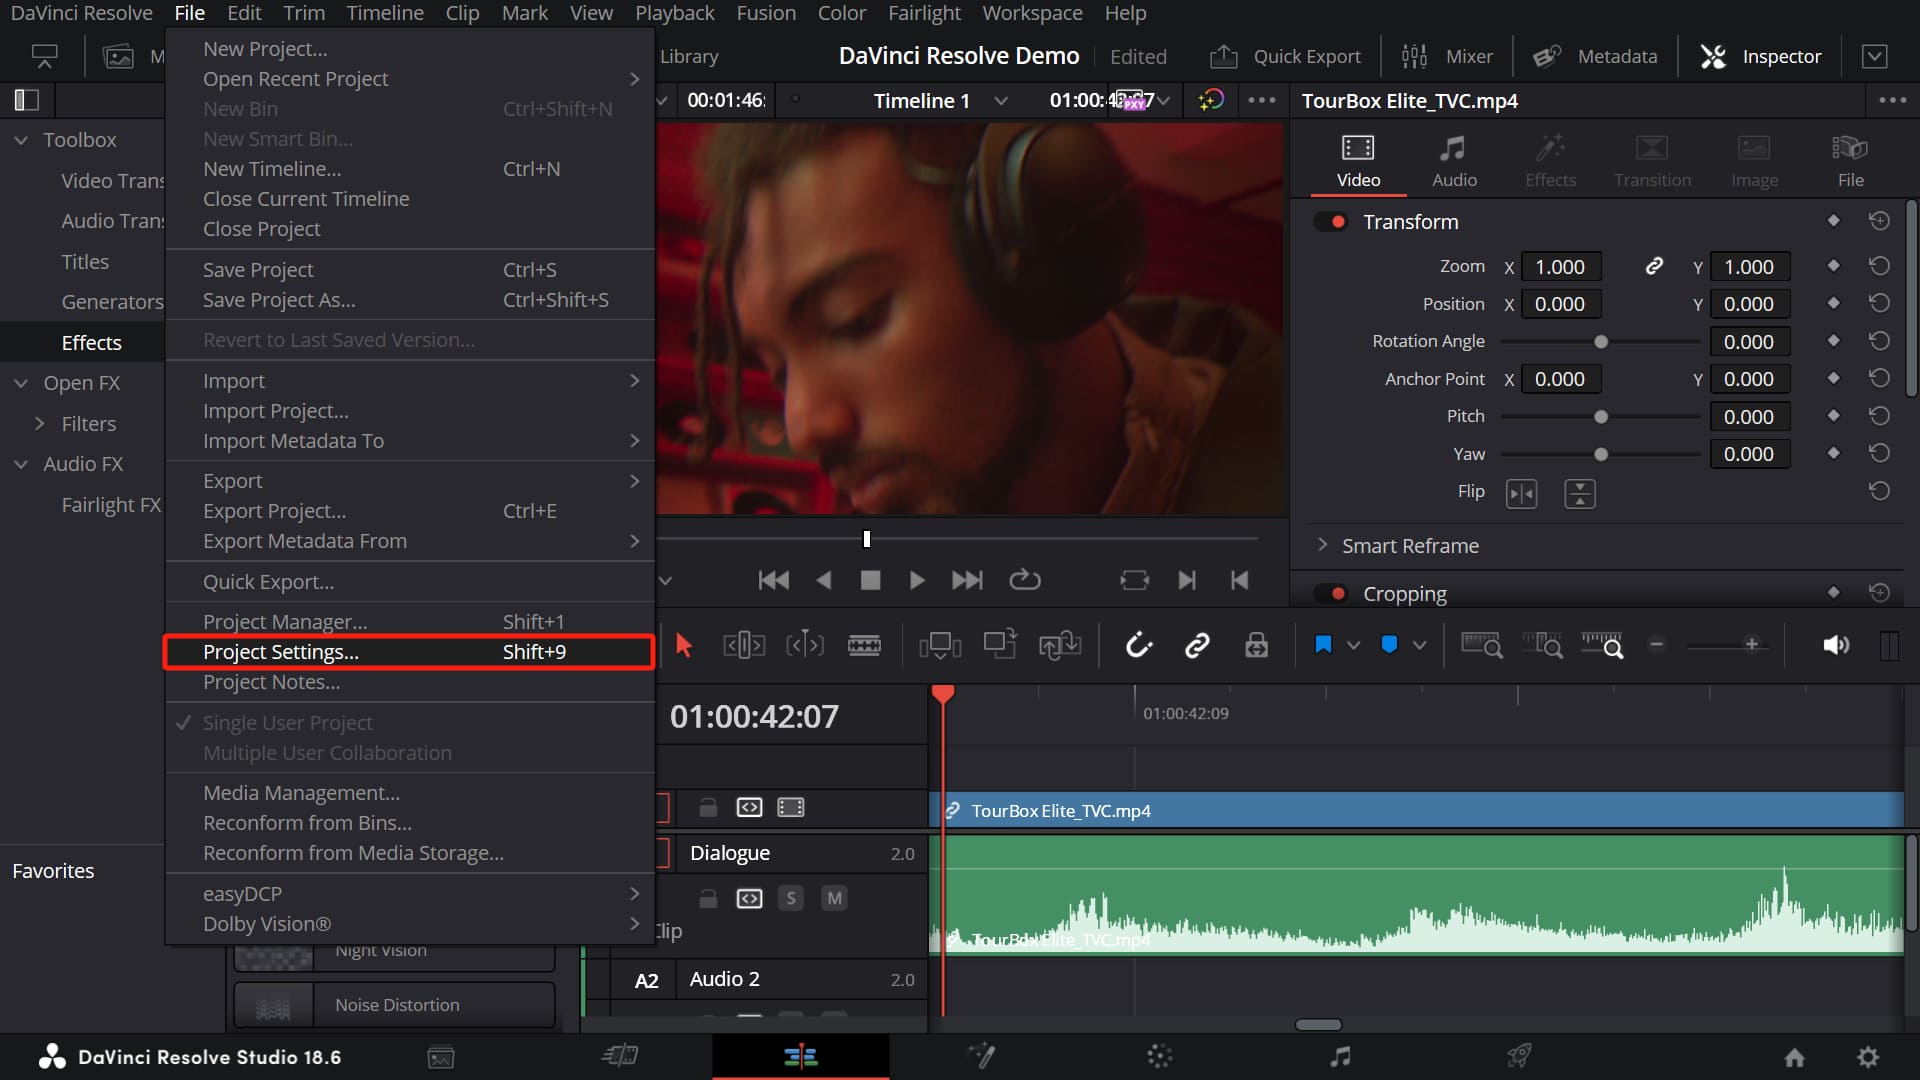
To do this, click on "File" in the top menu bar, then select "Project Settings" to access the Project Settings panel.
Lower the resolution of your project timeline as needed. Rest assured, these changes won't affect the original resolution of your media.
There's a quicker way to select the project resolution. Click on the timeline resolution options button in the top right corner of the Cut page, where you'll find several common preset resolutions.

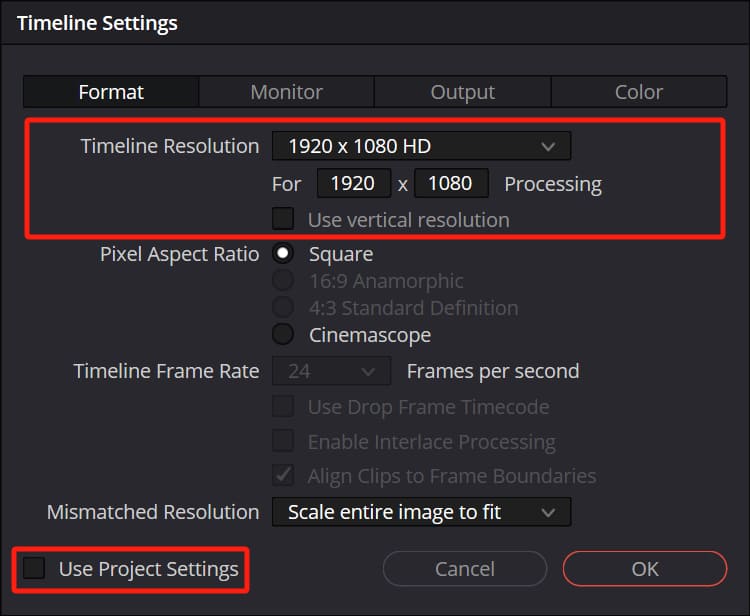
Alternatively, you can customize the timeline settings. In the timeline settings panel that appears, uncheck "Use Project Setting" and adjust the timeline resolution accordingly.
Method 3: Render in Place
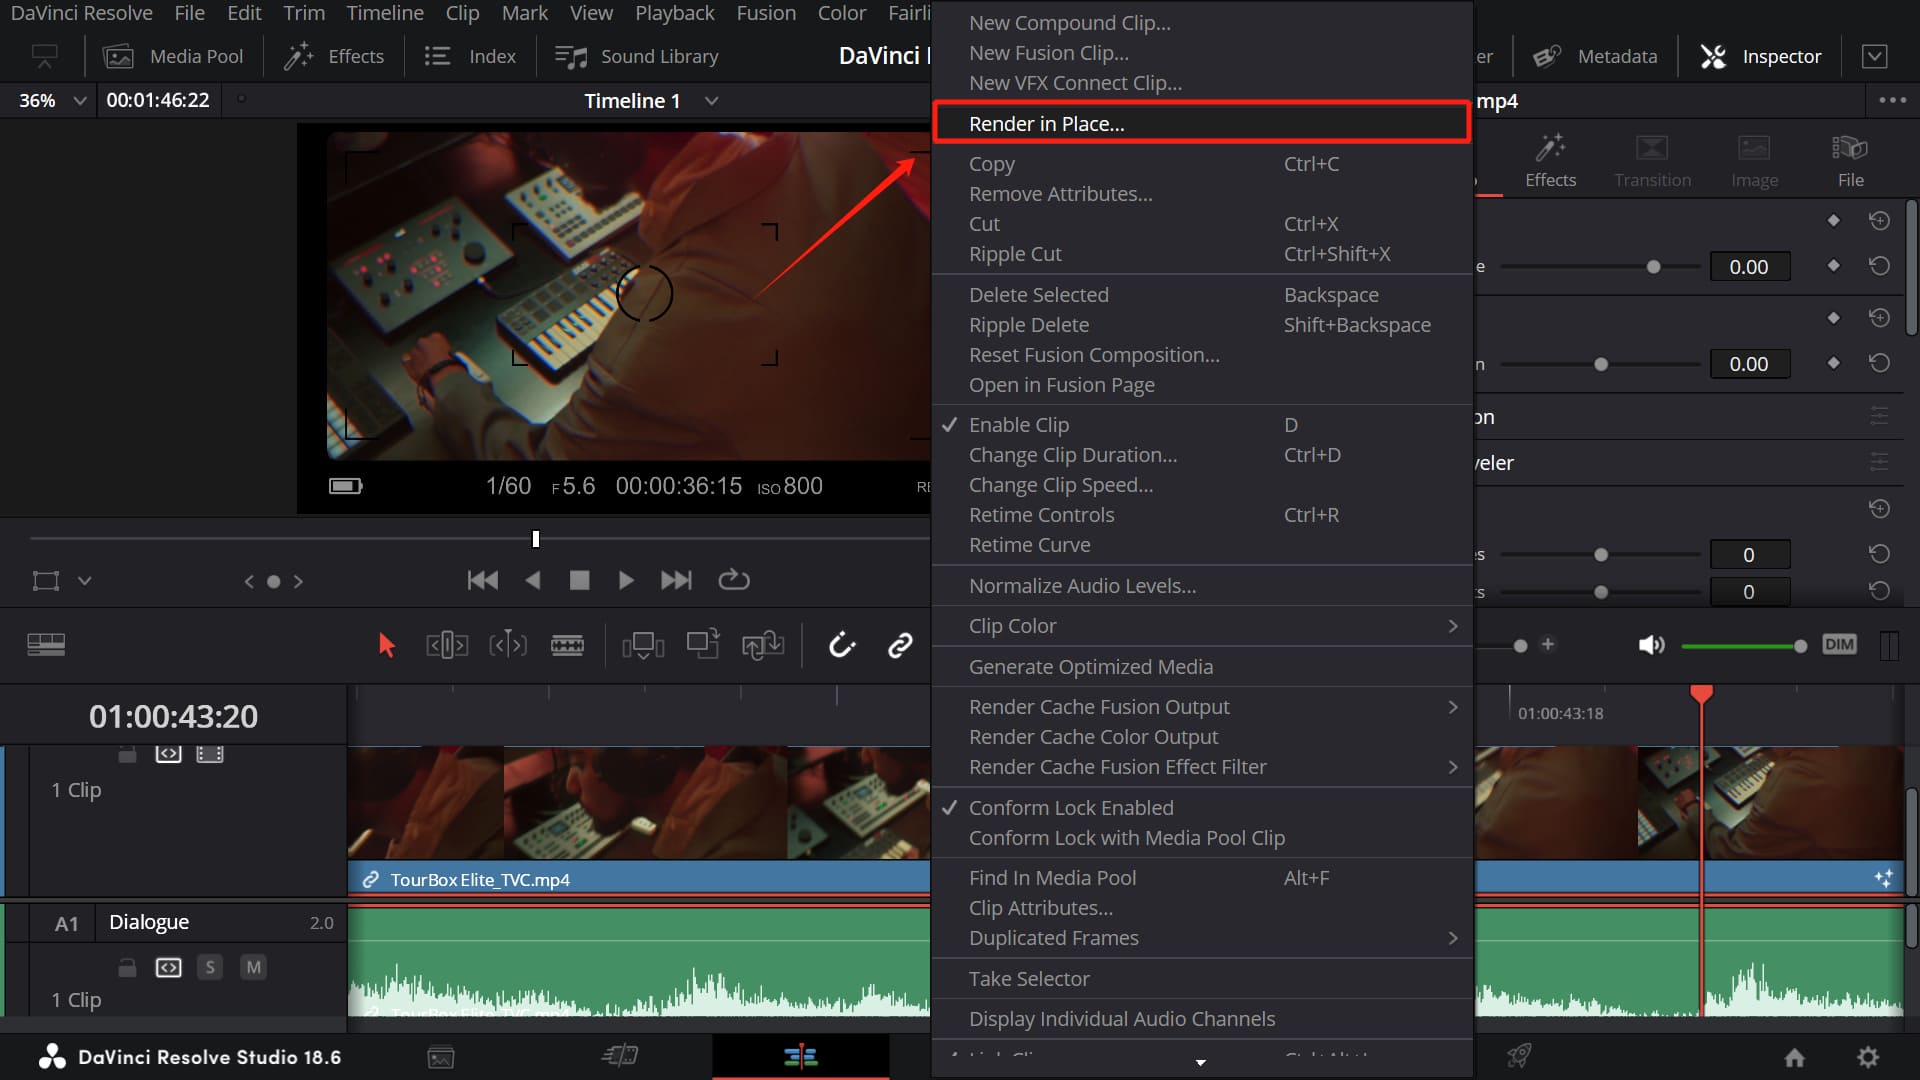
If you have a clip with a lot of effects causing playback lagging issues, you can right-click on the clip and choose "Render in Place."
DaVinci Resolve will then render this clip, applying all effects to the newly rendered clip. Subsequently, DaVinci Resolve will replace the original clip on the timeline with the newly rendered one, ensuring smooth playback.
However, rendering a clip in place takes some processing time, so you'll need to wait a bit.
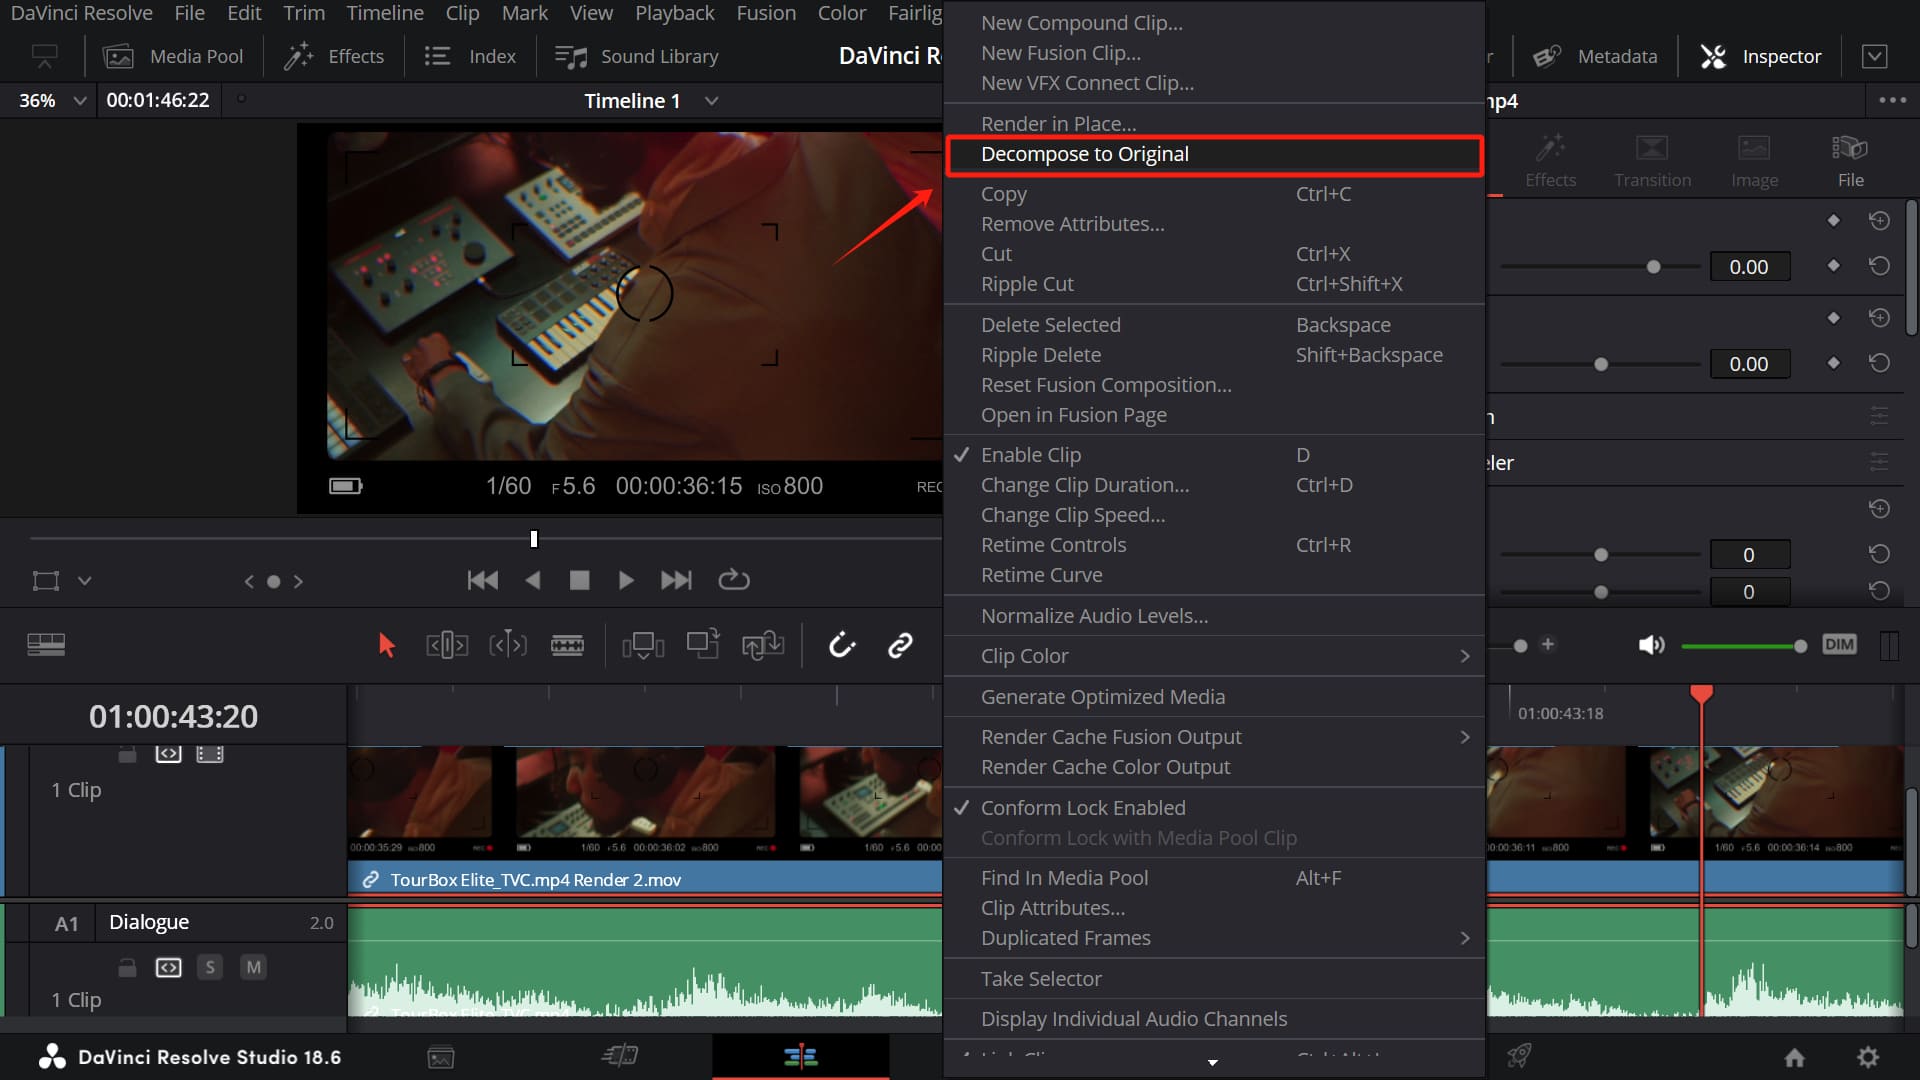
If you need to make edits to the clip again or change its effects, you can right-click on the clip once more and select "Decompose to Original."
DaVinci Resolve will replace the newly rendered clip with the original clip, retaining all the effects you applied to it.
The "Render in Place" feature is particularly useful for complex Fusion nodes.
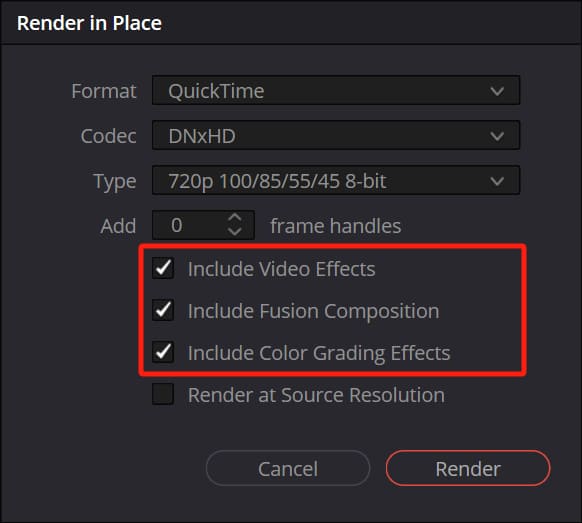
Additionally, you can specify the specific content that the "Render in Place" feature needs to render. For example, if you only want to render color effects, you can just check "Include Color Grading Effects."
Method 4: Timeline Proxy Resolution
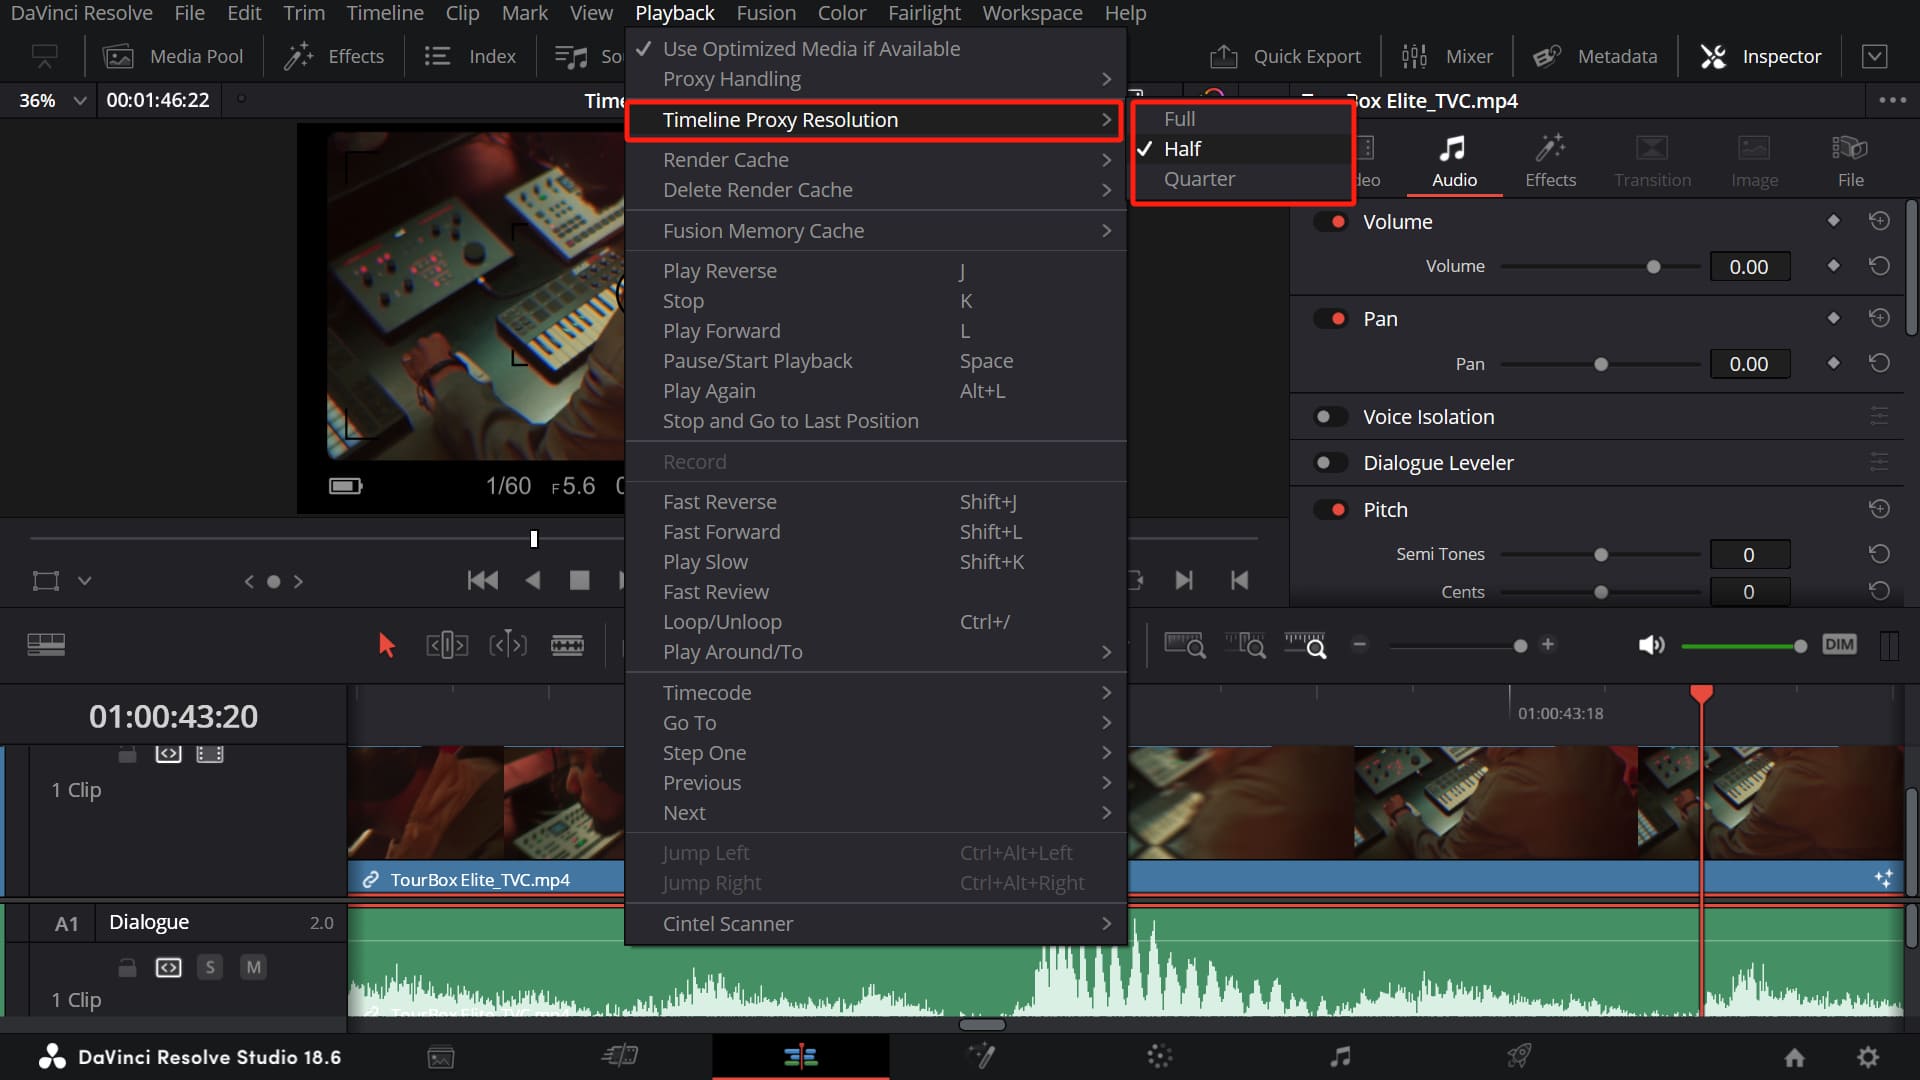
Timeline Proxy Resolution is another commonly used method to ensure smooth operation in DaVinci Resolve. Particularly helpful when working with high-resolution timelines, the timeline proxy mode swiftly addresses playback lag issues.
You can reduce the playback resolution to half (Half Resolution) or one-fourth (Quarter Resolution).
By combining Timeline Proxy Resolution with the method we shared earlier of lowering the project timeline resolution, working within a 1080p or 720p project timeline setting, and adjusting Timeline Proxy Resolution to further lighten the computer's processing load, you can almost entirely avoid playback lag problems.
This approach, which enhances real-time performance by reducing computational demands, doesn't compromise the final video quality. DaVinci Resolve correctly upscales the low-resolution footage to the resolution specified in the Project Settings.
It's advisable to try the other methods first and then use adjusting Timeline Proxy Resolution as an additional solution if needed.
Method 5: Render Cache
Another culprit behind dropped frames and playback lagging in DaVinci Resolve is the hefty computational demands of complex effects and color grading operations.
No matter how powerful your computer is, as you pile on effects and color grading, your system may struggle to keep up with the increasing computational load.
While "Render in Place" is handy for completed processed clips, Render Cache comes to the aid of clips you're actively working on, constantly tweaking—less suited for "Render in Place."
In Render Cache mode, you can work and render simultaneously. When you activate Render Cache mode, DaVinci Resolve quietly renders the clips you're currently working on during idle moments.
Essentially, DaVinci Resolve covertly renders these effected clips in the background into media files that it can easily playback.
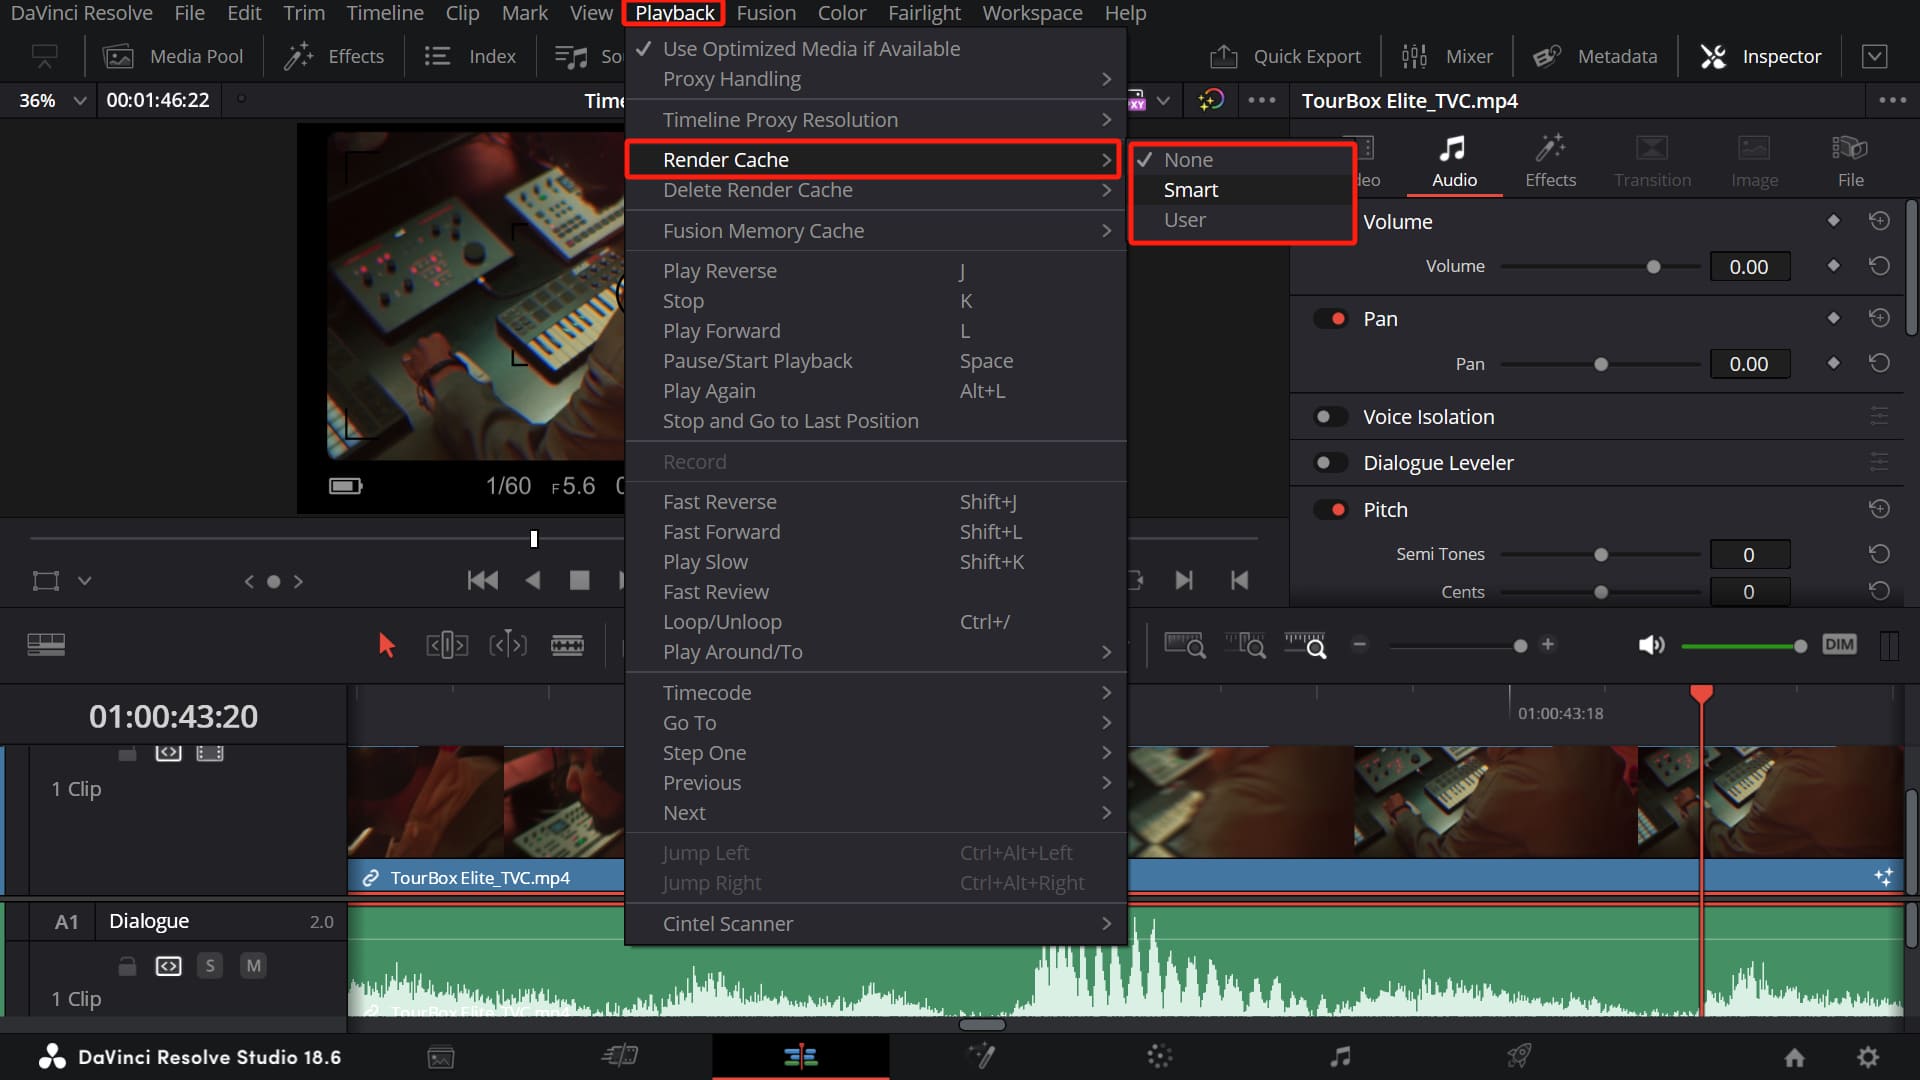
Under the Render Cache option in the top Playback menu of DaVinci Resolve, you can choose between Smart or User modes to define caching.
Smart
Smart mode instructs DaVinci Resolve to automatically render clips that exceed your GPU's real-time playback capacity while still allowing you to manually choose clips to cache.
User
In User mode, you inform DaVinci Resolve to render only the clips you manually select by right-clicking and choosing "Render Cache Color Output."
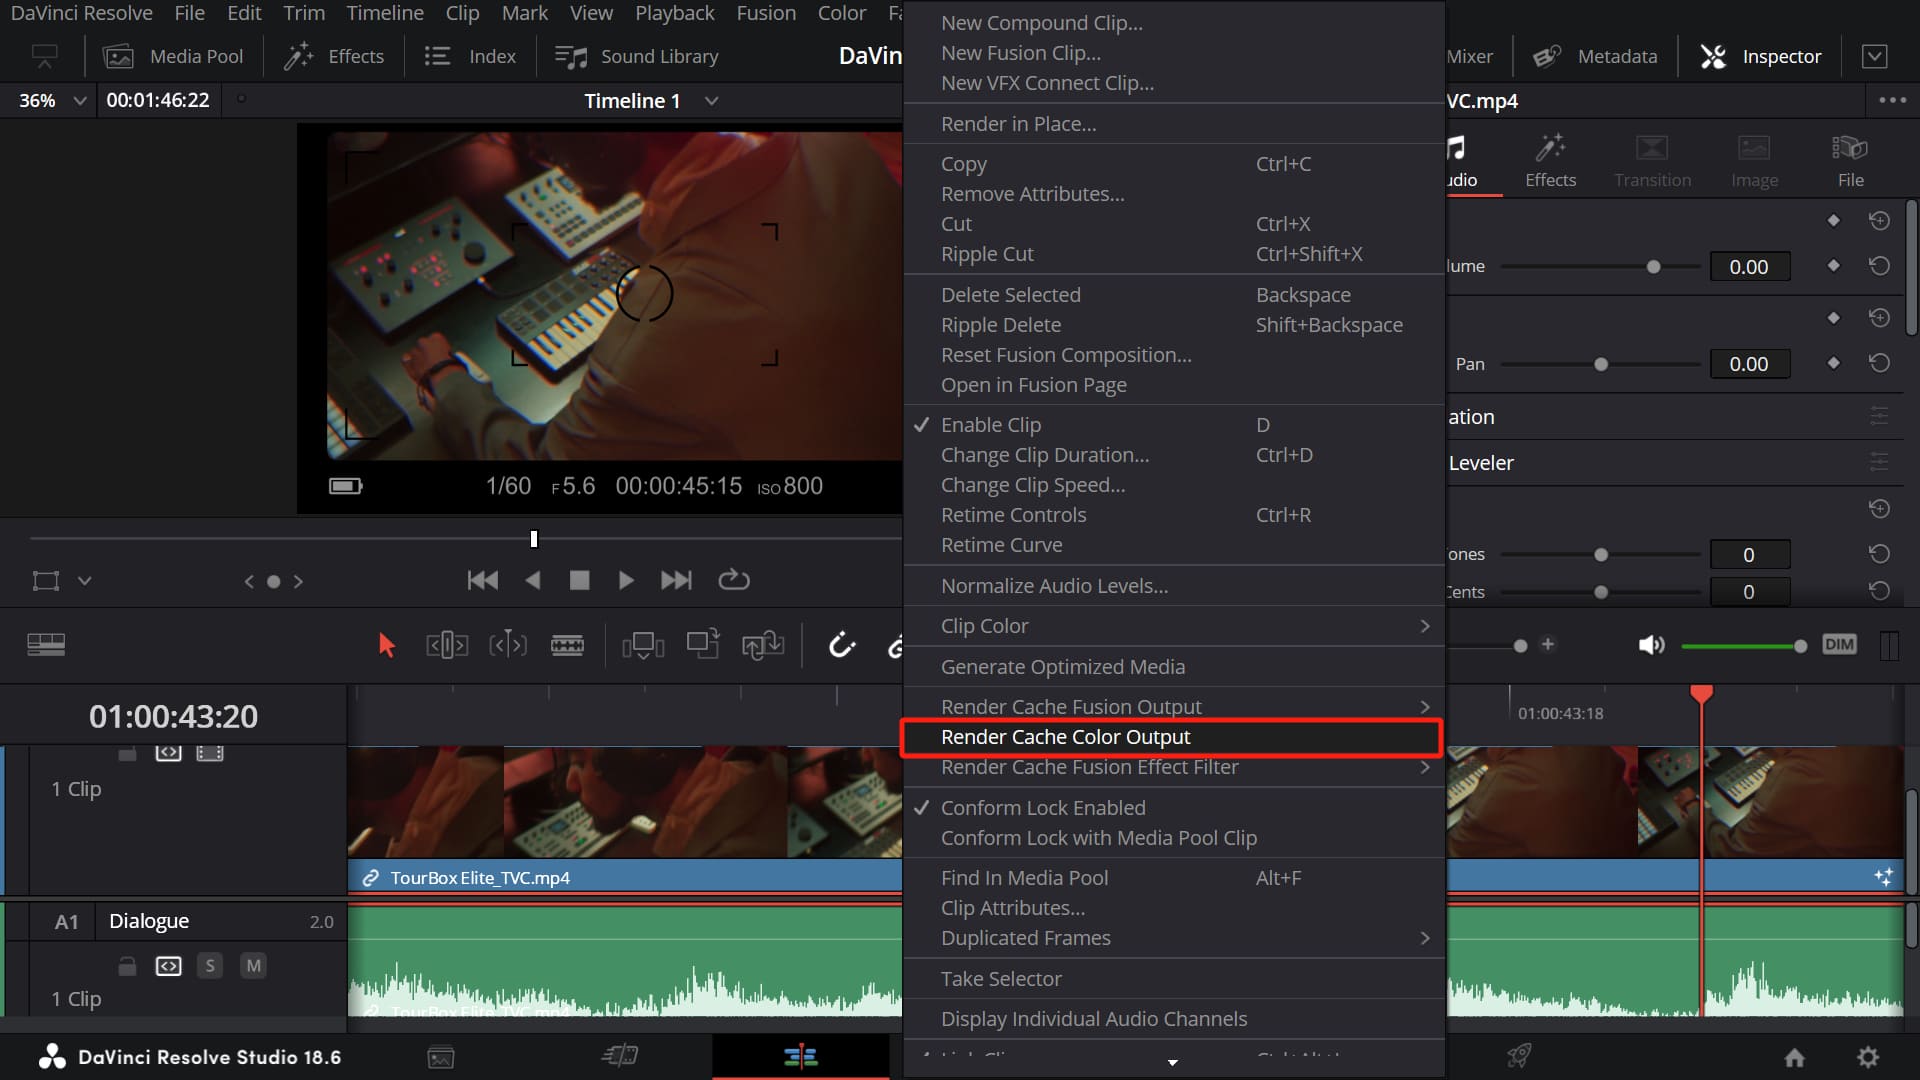
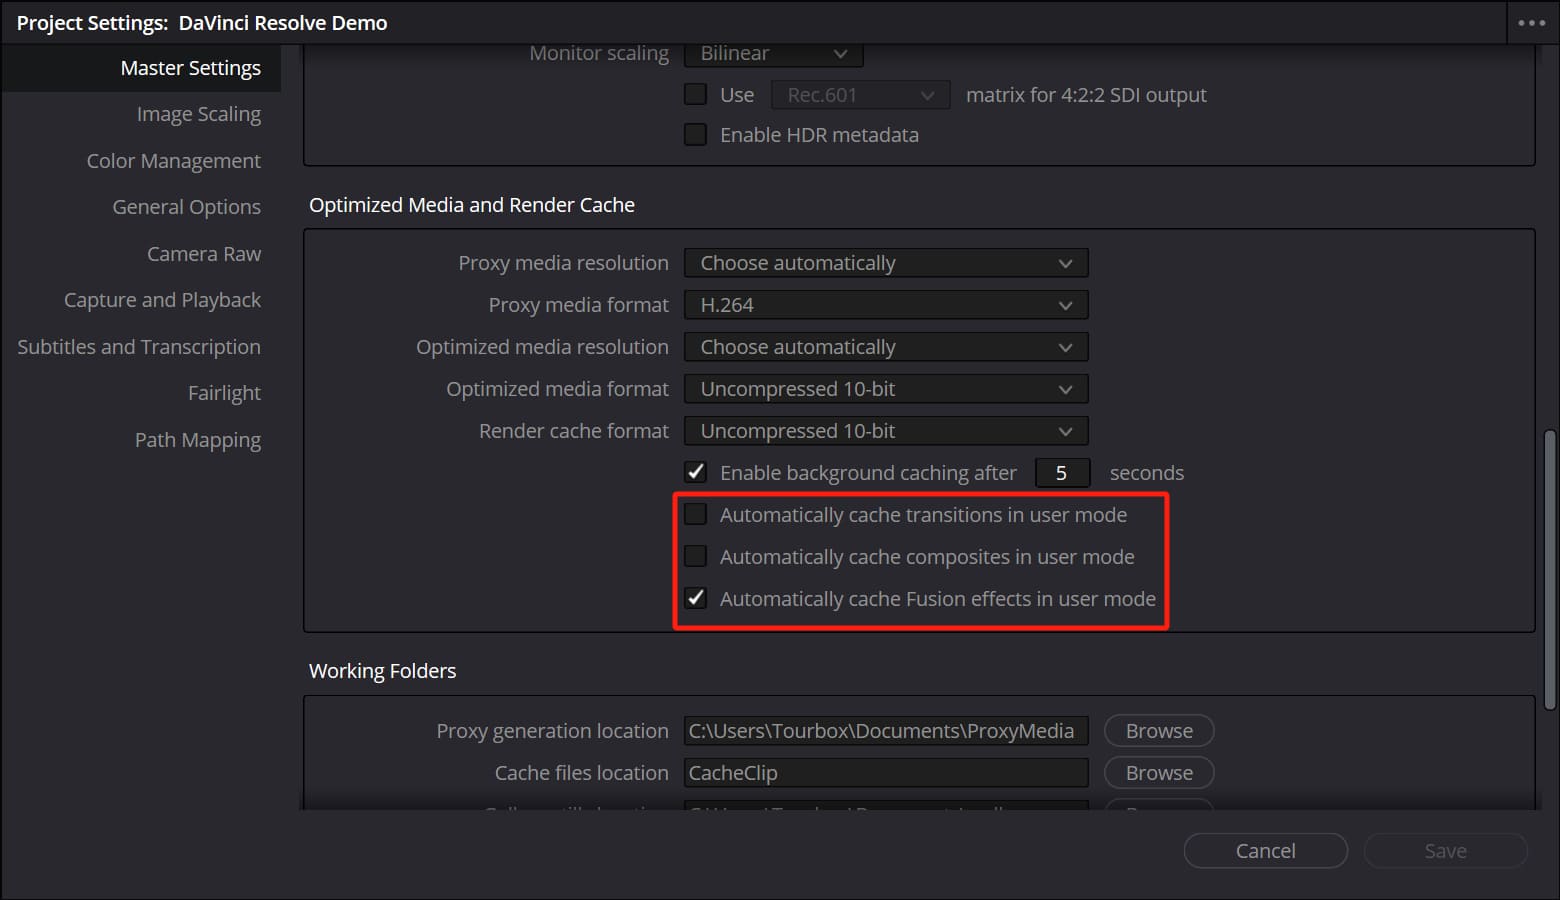
Additionally, it automatically renders transitions, compositions, and Fusion effects specified in the checkboxes under the "Optimize Media and Render Cache" in the Master Settings.
If your computer boasts strong performance and can smoothly handle most of the materials you work with, this mode is a suitable choice.
Furthermore, you can set the quality and resolution of the render cache files in the Project Settings panel, saving your computer's storage space.
Upon enabling Render Cache, once you pause your work, clips needing rendering (either auto-selected by DaVinci Resolve or manually chosen by the user) will be automatically rendered when replayed on the timeline.
They are stored in the location specified in your Project Settings panel.
Additional Tip:
Render cache media files persist unless deleted. Clear out unnecessary render cache media files to free up disk space and improve DaVinci Resolve's playback performance. You can do this by using the "Delete Render Cache" command under the top Playback menu.
Other Methods to Optimize DaVinci Resolve Playback
The methods we discussed above are the primary ways to make DaVinci Resolve playback smoother during project work.
However, there are also some other methods to reduce the strain on your computer when running DaVinci Resolve before starting a project. This can also help prevent lagging in your DaVinci Resolve project during playback.
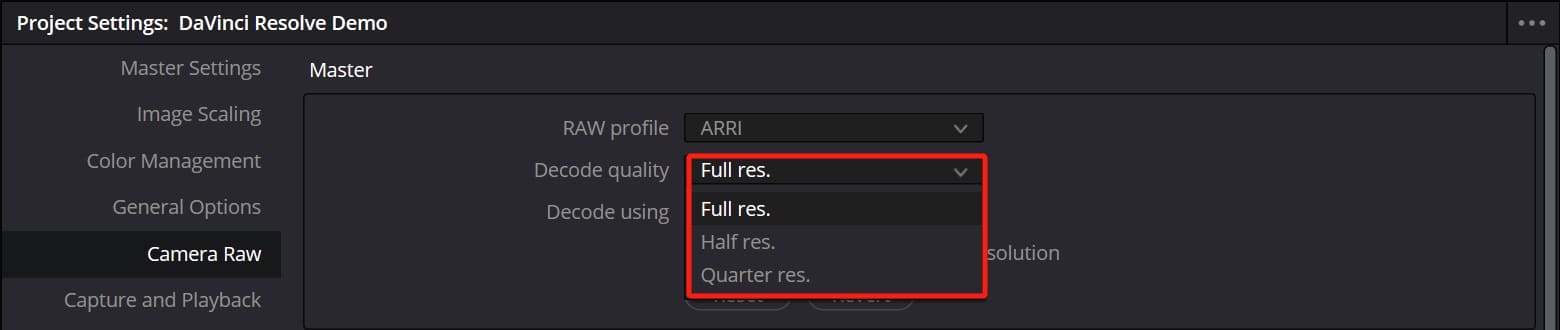
1. Raw File Decoding Settings
For RAW media, you can enhance playback performance significantly by setting a lower decode quality for raw files in the Camera Raw section of the Project Settings panel.
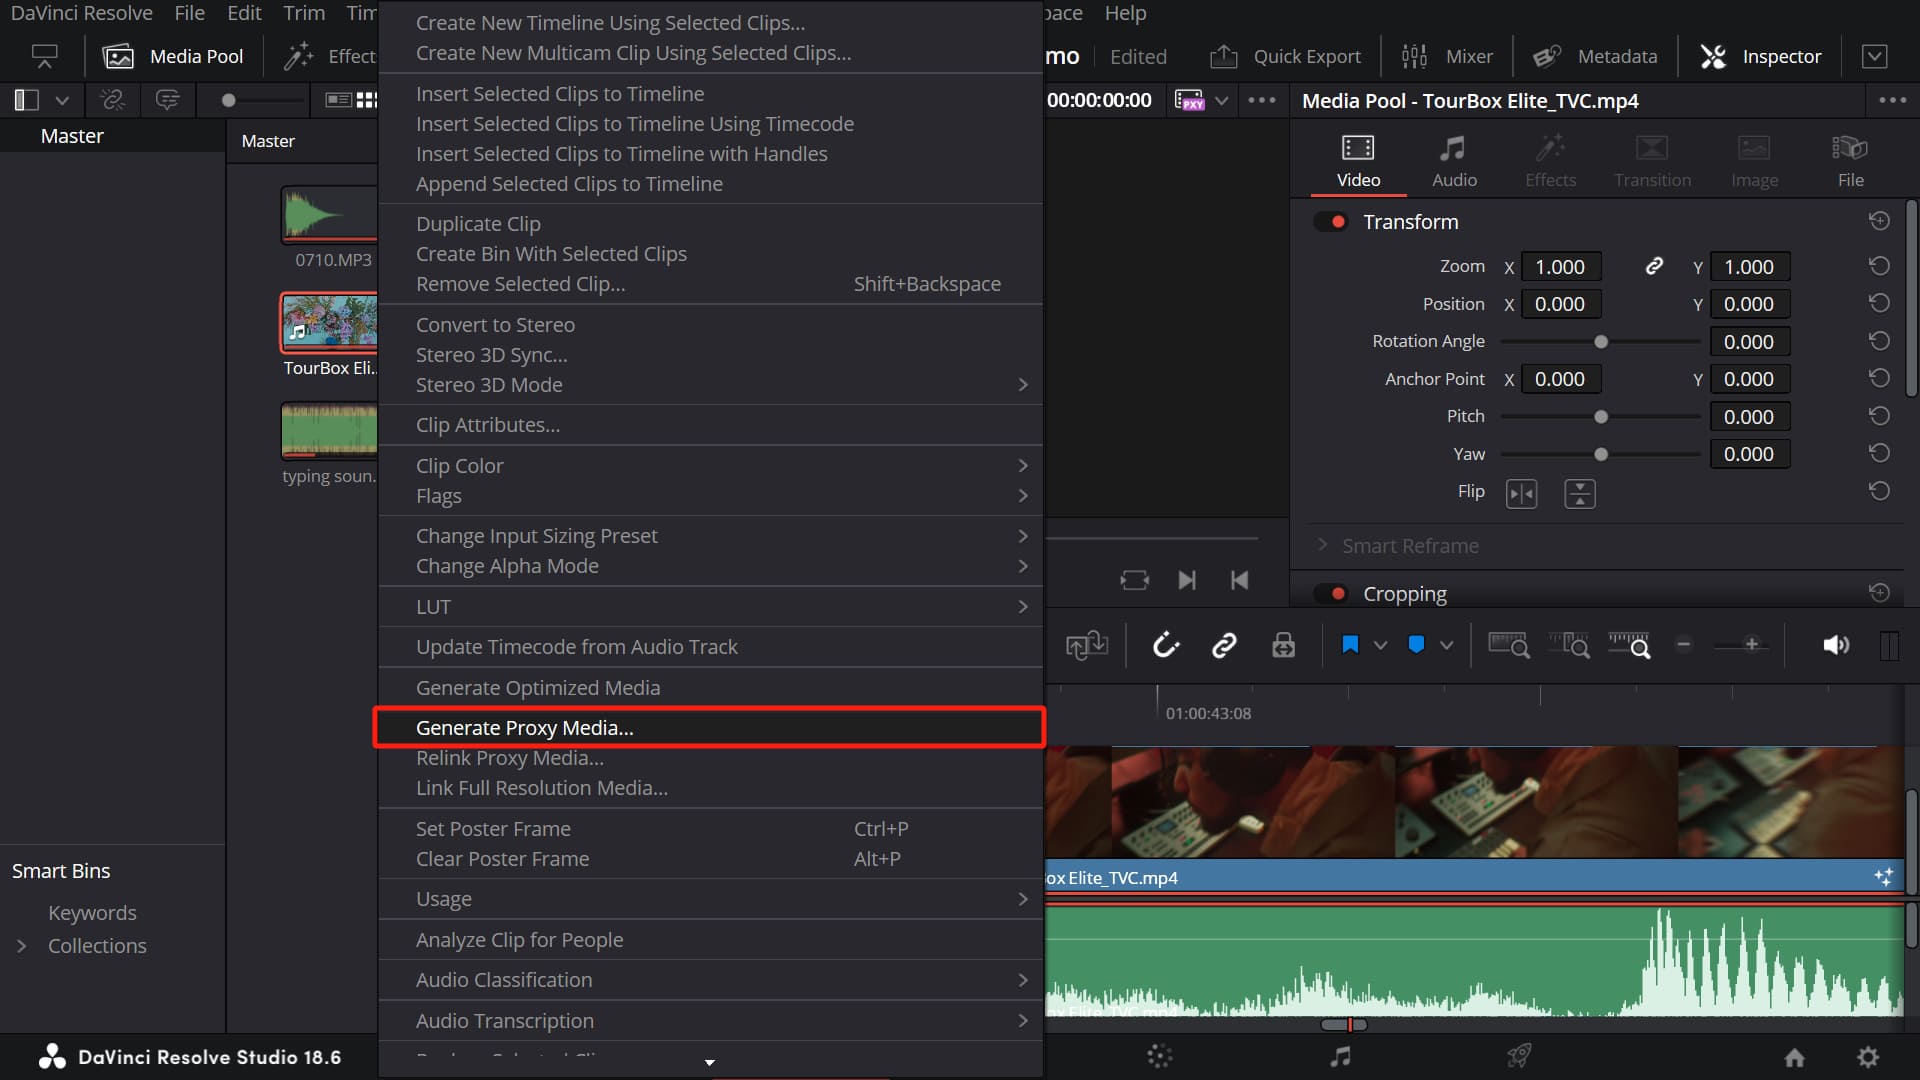
2. Proxy Media Files
If your computer's performance isn't up to par, when working with H.264, RAW, or high-resolution media files, you can first transcode these files into easily manageable formats (proxy files).
This process may take some time and will require extra storage space on your hard drive. You can choose to render only the proxy files for the clips you actually use in your edit.
What's the Difference Between Proxy Media and Optimized Media?
Proxy media acts as a stand-in. You can efficiently work with these stand-ins. When it comes to exporting, DaVinci Resolve automatically switches to the original media files for high-quality output.
Optimized media involves beneficial modifications to the materials (such as standardizing file encoding and bitrate). It replaces the original files, and during export, the optimized files are directly utilized in the computation.
Optimization doesn't necessarily speed up performance but can enhance the stability of project operations and video quality.
Final Thoughts About DaVinci Resolve Playback Lagging
The various methods discussed above to enhance DaVinci Resolve's playback performance can be used in combination, not limited to choosing just one.
By employing these techniques, even older computers can smoothly handle high-resolution, highly compressed formats like 4K H.264.
If you can't stand the lagging playback in DaVinci Resolve, you probably can't tolerate an inefficient video creation workflow either. You might find the TourBox, a beloved creative controller among digital artists and content creators, to be a solution.

With TourBox, you no longer need to memorize keyboard shortcuts or search through lengthy command menus. It simplifies every step of your video editing process, requiring fewer actions than the cumbersome "keyboard + mouse" approach.
What's great about TourBox is its exceptional operational feedback experience. Imagine using a game controller to edit clips, adjust timelines, and color grading.

Check out our video editing page to see how TourBox can revolutionize your workflow.
This concludes our article on solving DaVinci Resolve playback lagging. We believe the shared methods should help address the issues you are facing.