DaVinci Resolve Proxy Media: What It Is and How to Use It
If your computer has only average performance and your footage often stutters when you play it in DaVinci Resolve, making proxy media to improve real-time playback is a common step.
So what is proxy media, how do you generate proxy media, and when should you use it? Curious? Read the article to see exactly how proxy media works and how to make it.

In this article, you will learn:
- What Is Proxy Media in DaVinci Resolve?
- How to Set the Resolution and Format for Proxy Media?
- How to Generate Proxy Media in DaVinci Resolve?
- How to Enable Proxy Media in DaVinci Resolve?
- Will the Export Use the Original Resolution When Using Proxy Media?
- Why Does Generating Proxy Media Fail?
- Conclusion
What Is Proxy Media in DaVinci Resolve?
Proxy media are low-resolution files made by transcoding your original footage. They help playback run smoothly during editing and make it easier to move files around.
Most digital cameras, drones, and action cameras shoot at high resolutions and high frame rates (for example, 4K at 60/120 FPS or 1080p at 120/240 FPS). To save storage, these videos are usually compressed with codecs like H.265 (HEVC) or H.264.
Because of the high resolution and the heavy compression, the computer's processing load goes up. Playing these files inside DaVinci Resolve often causes stuttering. This happens especially when you add many effects to the clips, and your computer can even freeze.
To solve this, DaVinci Resolve offers an option to generate proxy media.
Proxy media work by greatly lowering the resolution so playback becomes much smoother. The most obvious change is that the Viewer looks blurrier, but the clips play without stuttering. You just can't see fine details.
So proxy media are only suitable for the editing stage. They are not good for color grading because you can't see the image clearly. If you use proxy media for editing, switch back to optimized or original media before color grading. If your computer is powerful enough, you can use the original media throughout.
Extra Tip: Optimized media sits between original media and proxy media. If your computer is not too weak, Resolve can pre-render optimized media in the background, ensuring smooth playback. Optimized media is not compressed as much as proxy media, though.
How to Set the Resolution and Format for Proxy Media?
Before you generate proxy media, set the proxy resolution first. In other words, change DaVinci Resolve's default proxy settings to match your needs.
Click the gear icon (Project Settings) at the bottom right of the screen (shortcut: Shift + 9). Click Master Settings, then scroll down to find Optimized Media and Render Cache.
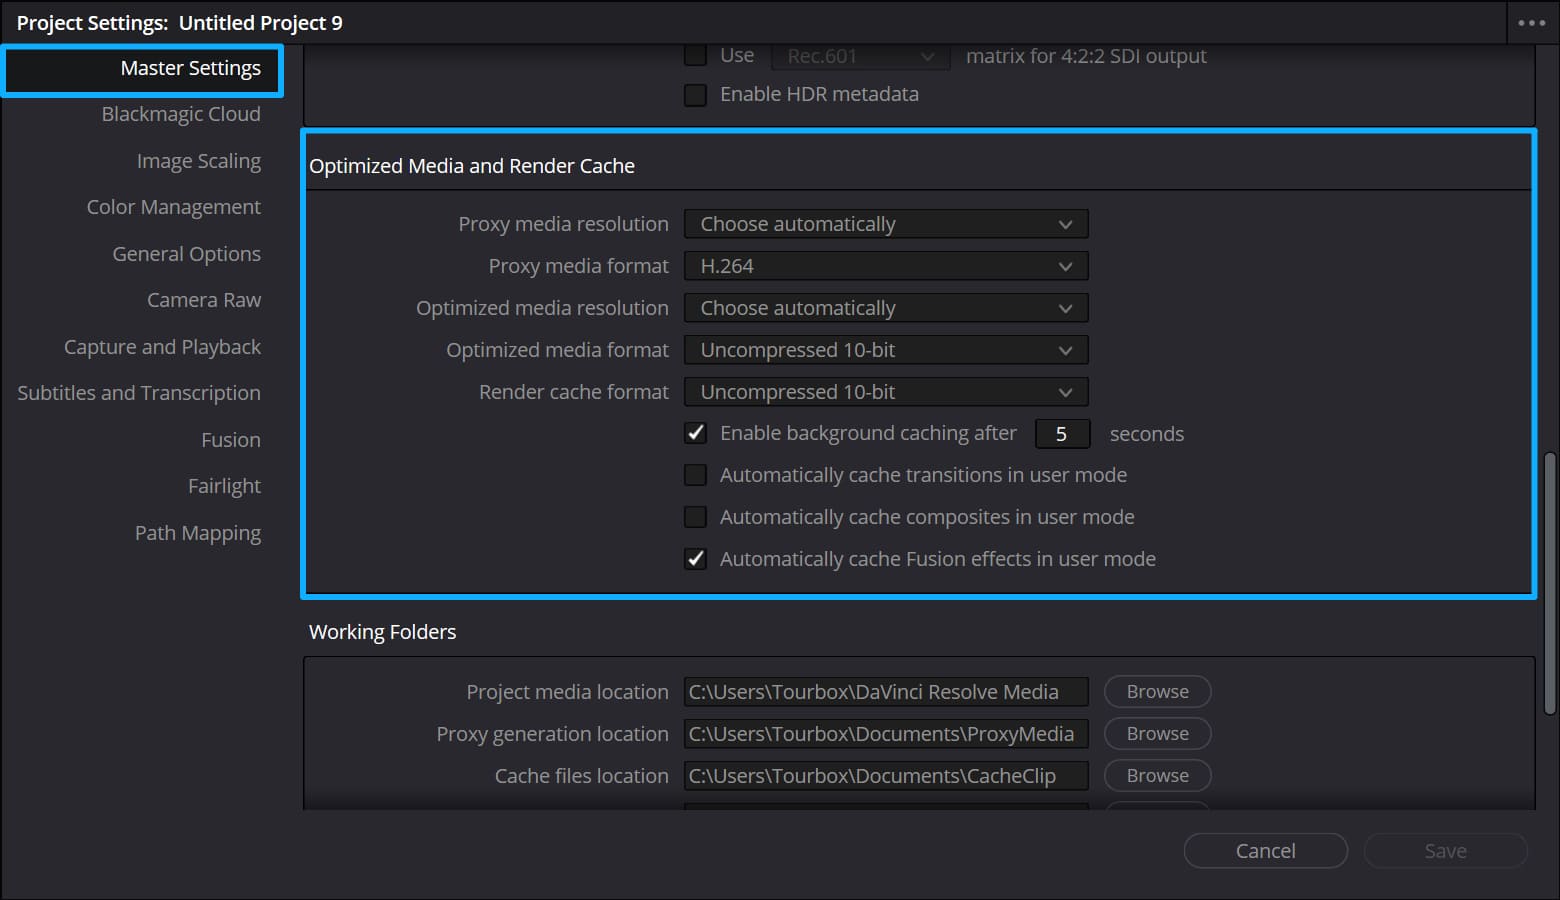
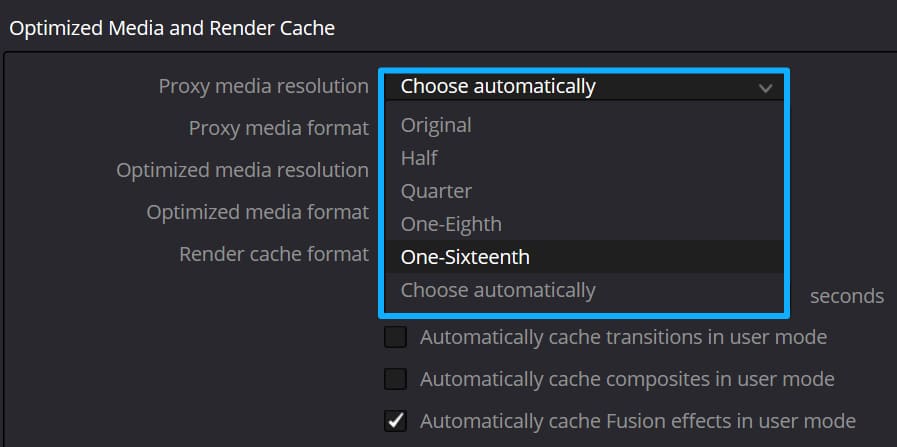
For Proxy Resolution, you can choose Original, 1/2, 1/4, 1/8, or 1/16. Pick the level you need. If your computer is very weak, choose a lower resolution like 1/8 or 1/16 to get smoother playback.
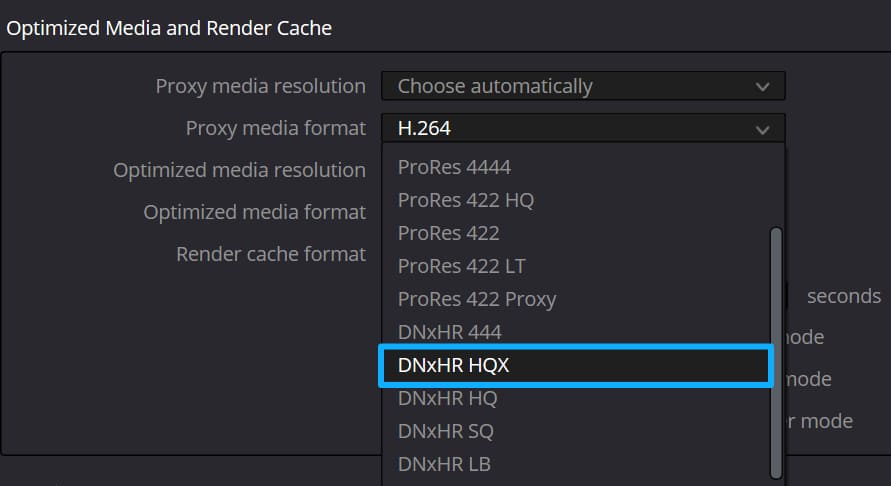
For proxy media format, on Windows, DNxHR works best. On Mac, use ProRes. If you have little storage, pick a low-resolution, low-bitrate option such as DNxHR LB (Windows) or ProRes 422 LT (Mac). These take up less space.
If storage isn't a problem and you want slightly better proxy quality, go with DNxHR HQX (Windows) or ProRes 422 HQ (Mac).
In the same panel, you can also find the Working Folders area. Use it to set or change where proxy files are created.
How to Generate Proxy Media in DaVinci Resolve?
First, start DaVinci Resolve, open your project, and go to the Edit page.
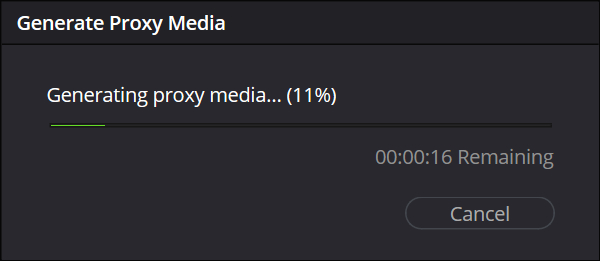
In the Media Pool, select all the source files you want to convert to proxy media. Right-click and choose Generate Proxy Media.
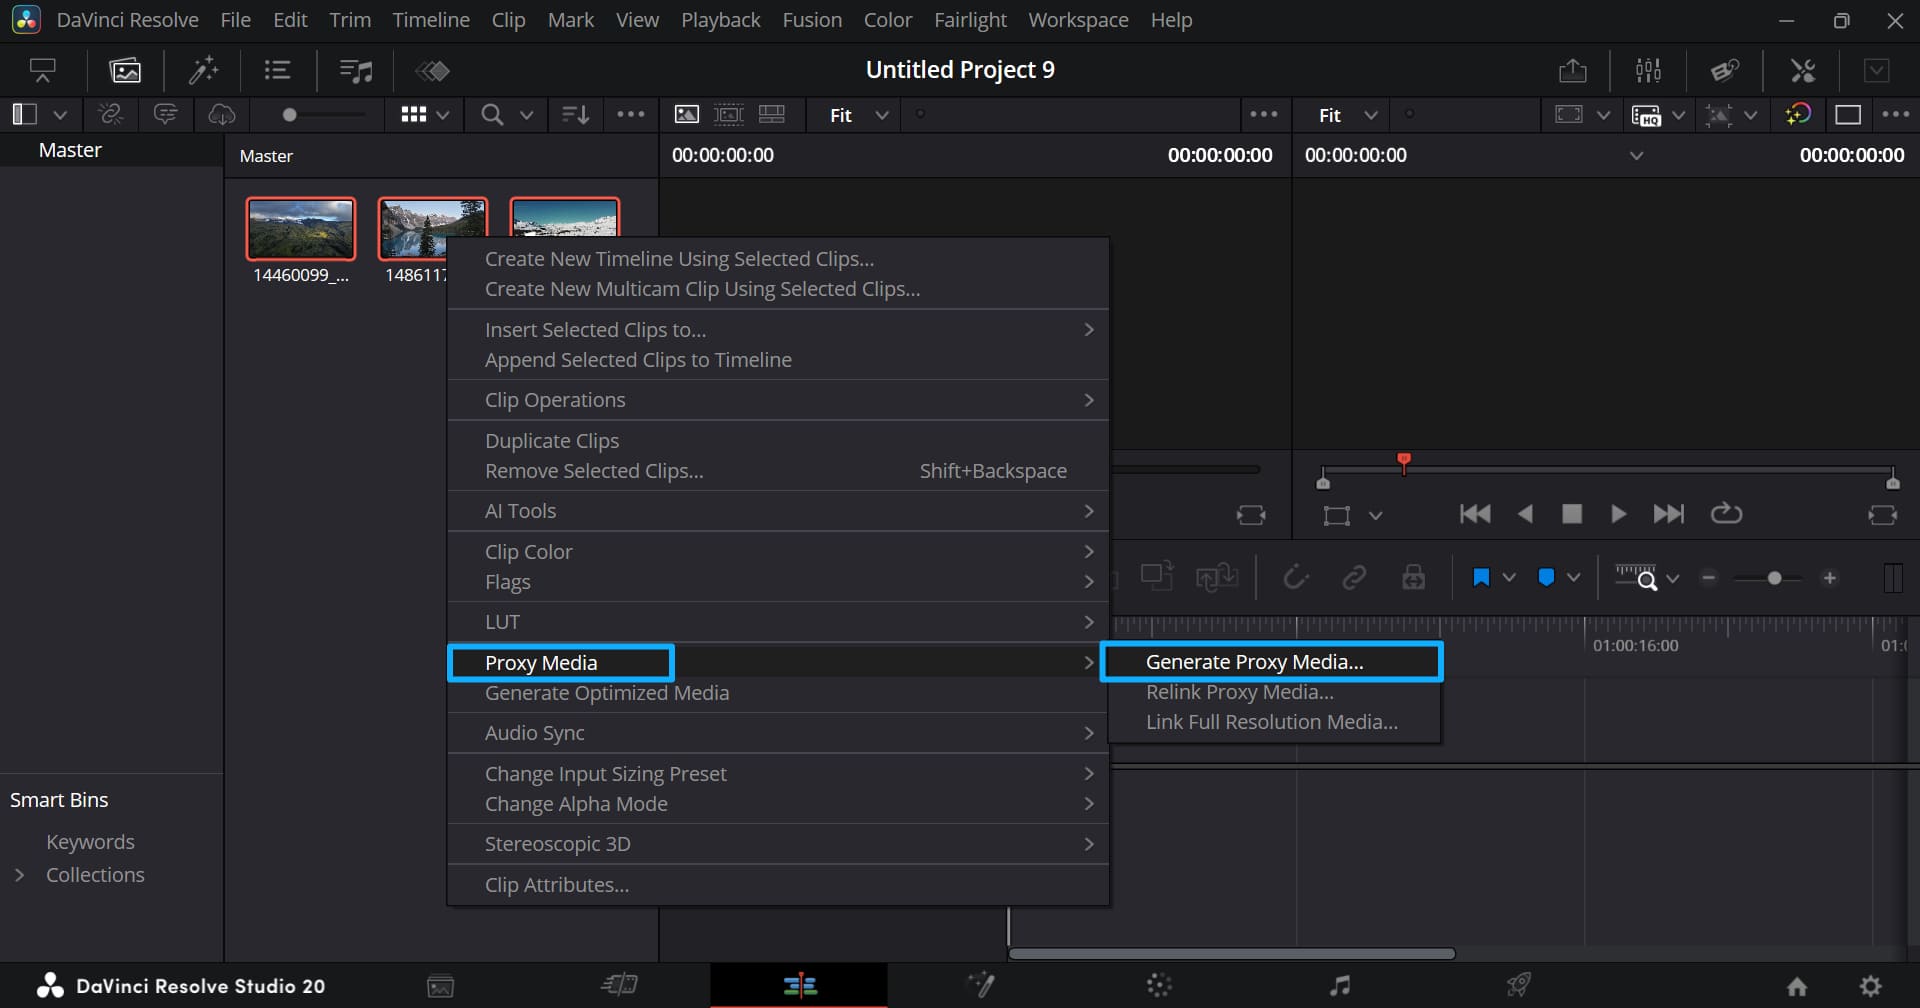
DaVinci Resolve will pop up a Generate Proxy Media window. It shows the generation progress and the Remaining Time. When the generation finishes, the window will close.
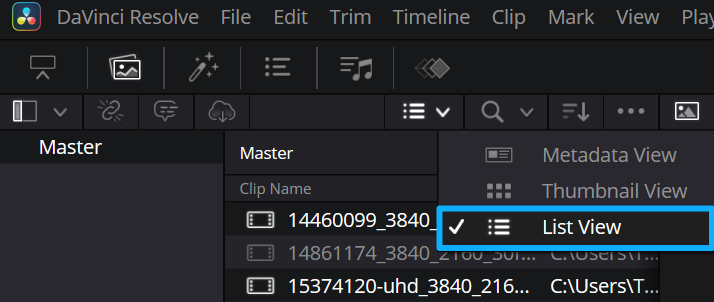
Now the proxy files are ready. Before doing any other work, we first check them as follows.
On the Edit page, first switch the Media Pool view to List View, as shown below.
Then right-click any column header at the top, like Clip Name, and check Proxy and Proxy Media Path, as shown below.
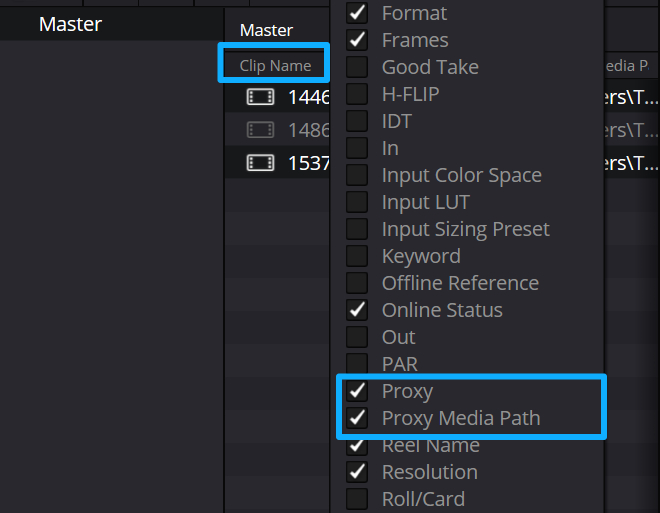
These two columns show:
- Proxy = the actual proxy resolution that was generated.
- Proxy Media Path = the location where the proxy files were created.
This is very handy. It lets you quickly see whether proxy files have been generated and what their status is.
The proxy files are now generated. The next question is, how do you enable the generated proxy media?
How to Enable Proxy Media in DaVinci Resolve?
To make Resolve use proxy files, click the top menu bar > Playback > Proxy Handling > Prefer Proxies. After you enable this, DaVinci Resolve will choose the proxy file version instead of the original file.
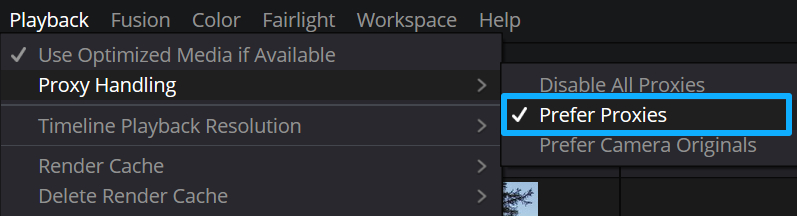
In Proxy Handling, you will see three options:
- Disable All Proxies
- Prefer Proxies
- Prefer Camera Originals
As the names say: one disables all proxies, one prefers proxy files, and one prefers the camera originals.
If you need smoother playback while editing, switch here to Prefer Proxies. If you are grading and need to see the full-quality original files, switch to Prefer Camera Originals.
You can also unlink proxy media from the original files at any time, and you can relink them later. When you generate proxy media, Resolve creates the proxy files in your chosen working folder.
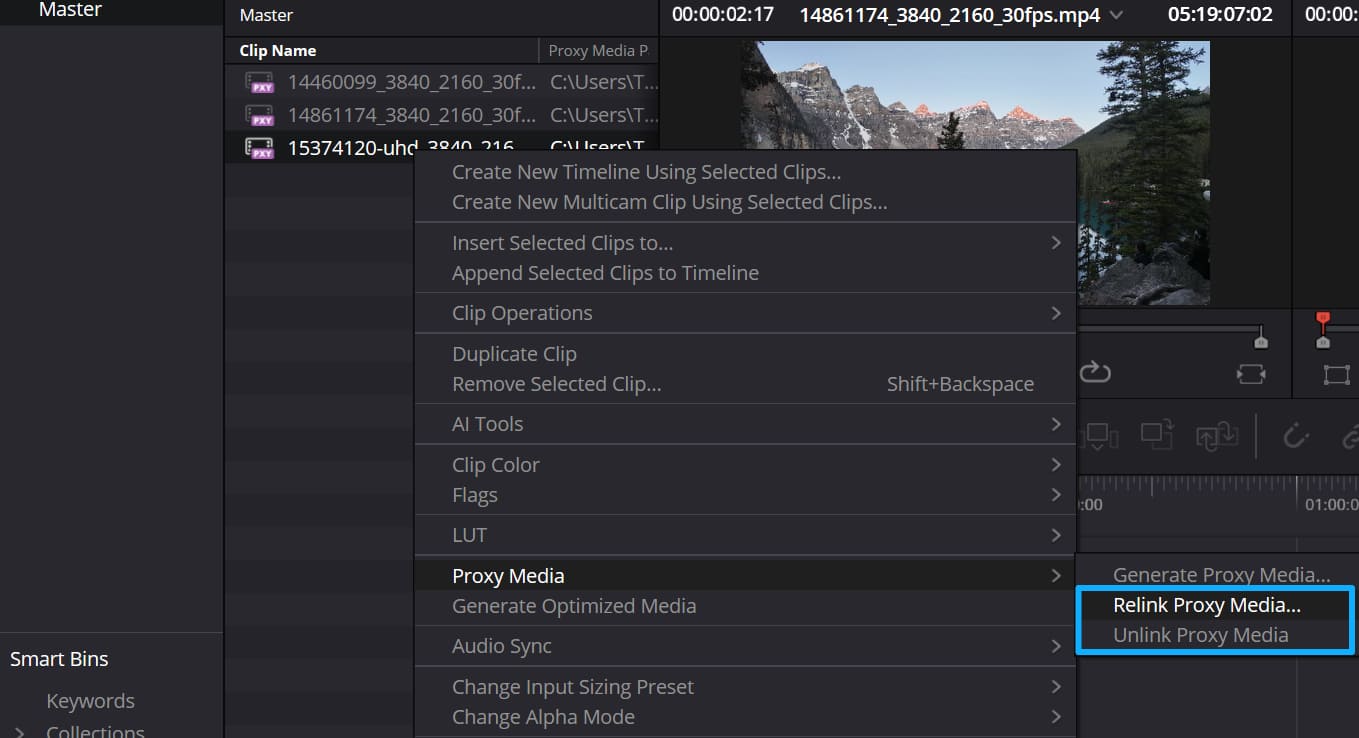
Proxy files are movable. You can transfer them between computers or over a network. You can also delete them. But before you delete proxies, unlink them first and make sure you have a backup if you might need them later.
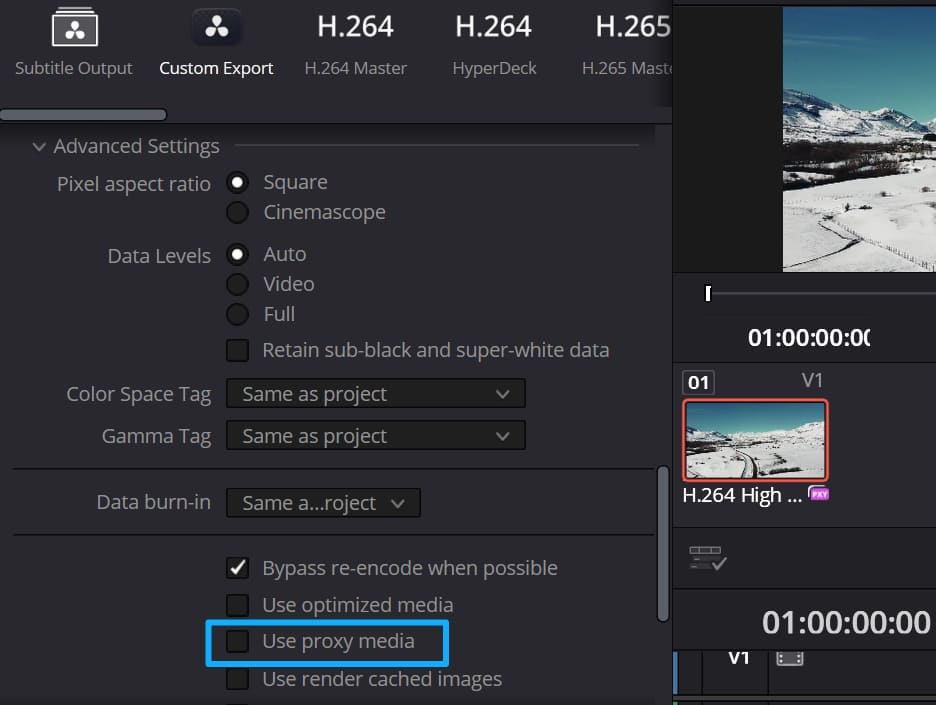
Will the Export Use the Original Resolution When Using Proxy Media?
By default, when you export a timeline that contains proxy media, DaVinci Resolve will switch back to the original high-resolution files and export those. You don't need to do anything extra.
However, if you only want the proxy version, go to the Deliver page. Under the Video tab, click Advanced Settings and check Use Proxy Media. The export will then be the proxy version.
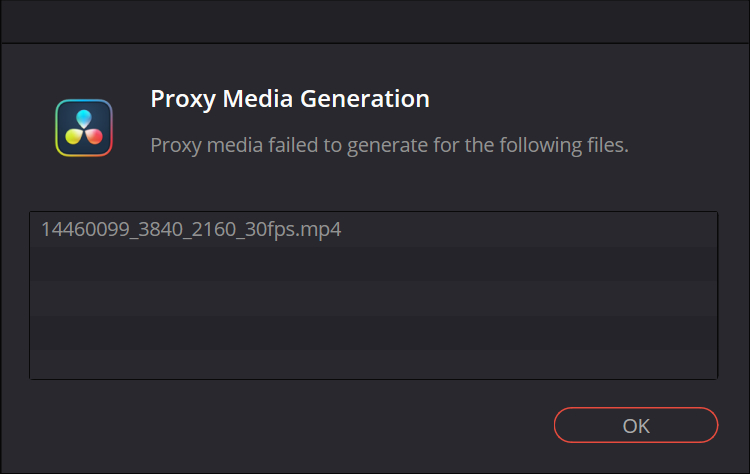
Why Does Generating Proxy Media Fail?
If an error pops up saying the proxy media could not be generated, DaVinci Resolve won't tell you why. Most likely, it's a proxy resolution issue. Generating proxies at 1/16 or 1/8 of the original resolution can make the width or height drop below 256 pixels, which may cause problems.
The fix is to change the proxy resolution and try again. For example, if 1/16 fails, try generating proxies at 1/8.
It could also be a DaVinci Resolve version issue. Make sure you are using a stable release, not a beta or test build.
Conclusion
In this article, we explained what proxy media in DaVinci Resolve is and how to use it. If your computer is powerful enough, you may not need proxy media. But if you want smoother real-time playback — especially when working with highly compressed codecs like H.264 or H.265 (HEVC) — switching to proxy media is the best choice.
One quick ad before we finish. If DaVinci Resolve is your go-to editing and grading software, you may have thought about buying a controller or an editing keyboard to speed up your workflow and improve your creative experience.

Check out our TourBox. It gives you great control for editing and color grading at a more affordable price. It's more than a simple hotkey mapper. We built useful functions for popular software, and its wide range of customization options gives you a new level of control.

For example, our HoverAdjust feature for DaVinci Resolve lets you use TourBox's physical knob to control color wheels, curves, Color Warper, and other grading tools. If you're interested, click the link to our DaVinci Resolve Page to learn more.