How to Render Cache in DaVinci Resolve?
No matter how powerful our computer is, adding many color grading nodes, OpenFX plugins, transitions, speed changes, and layer blends to a DaVinci Resolve clip will likely slow things down, and we often have to do this.
That's when DaVinci Resolve's Render Cache becomes our lifesaver. With several rounds of improvements, the Render Cache has become a key way to boost playback performance.
Let's get right to it and check out the step-by-step guide for using Render Cache in DaVinci Resolve.

In this article, you will learn:
- What Is DaVinci Resolve Render Cache?
- How to Quickly Enable Render Cache in DaVinci Resolve?
- How to Manually Render Cache in DaVinci Resolve?
- The Best Format for DaVinci Resolve Render Cache
- How to Change the Auto-Start Time for Render Cache in DaVinci Resolve?
- Where Is DaVinci Resolve Render Cache Stored?
- How to Disable Render Cache in DaVinci Resolve?
- How to Use Render in Place in DaVinci Resolve?
- Optimized Media vs Render Cache in DaVinci Resolve
- Conclusion
What Is DaVinci Resolve Render Cache?
DaVinci Resolve's render cache works by pre-rendering parts of your timeline. When effects are applied, the program bakes them in ahead of time.
This way, DaVinci Resolve can play the rendered clips as smoothly as if it were playing the original footage. It avoids having to compute heavy effects in real time.
There are three important settings for render cache in DaVinci Resolve:
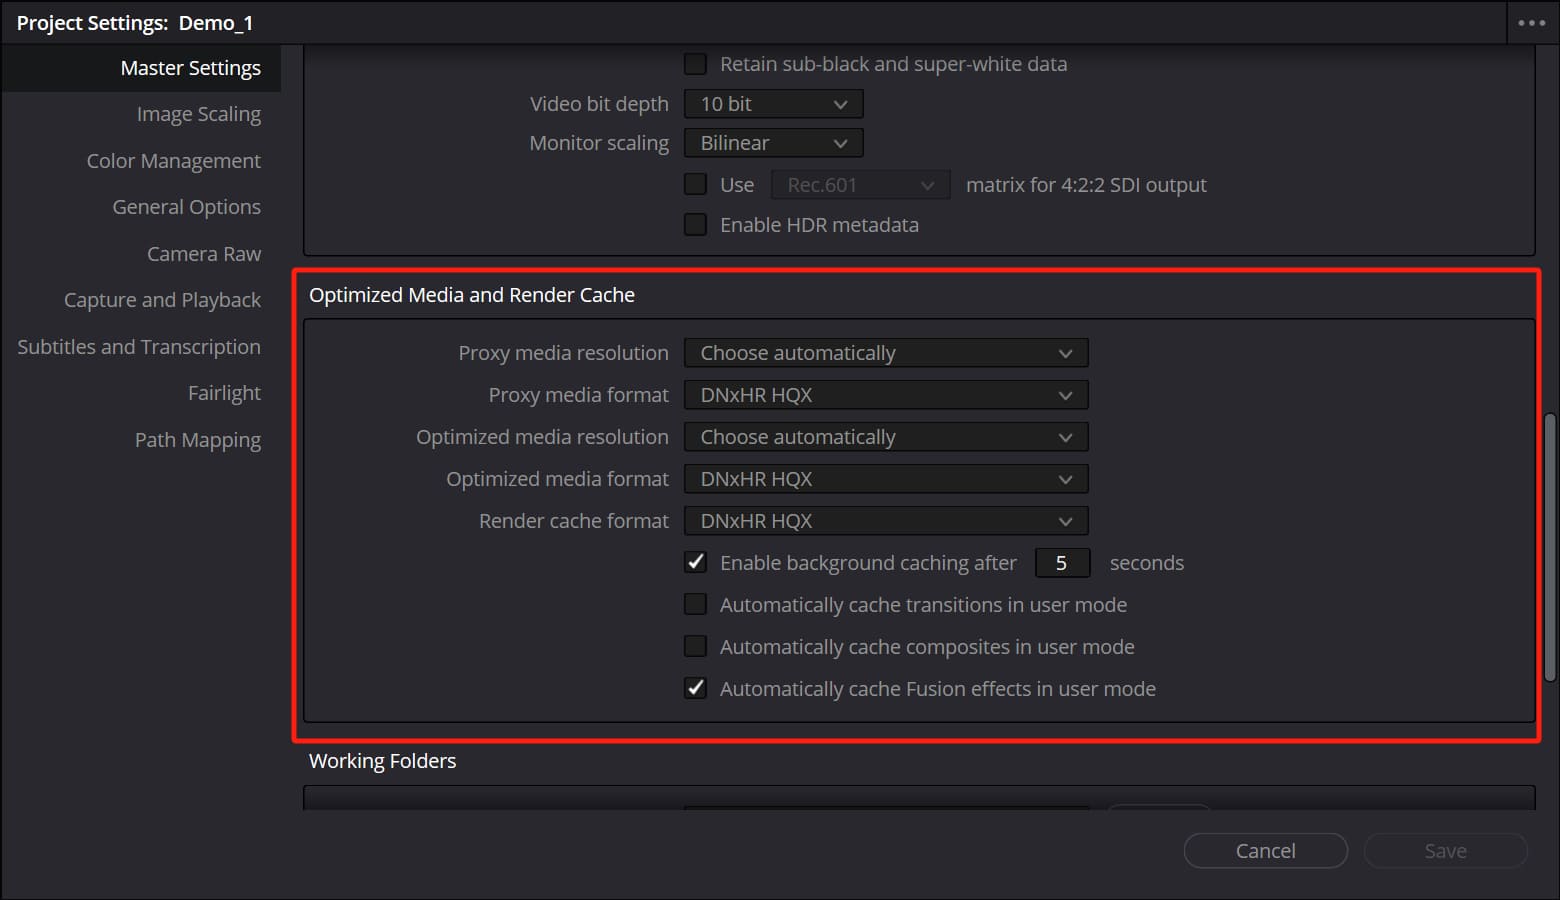
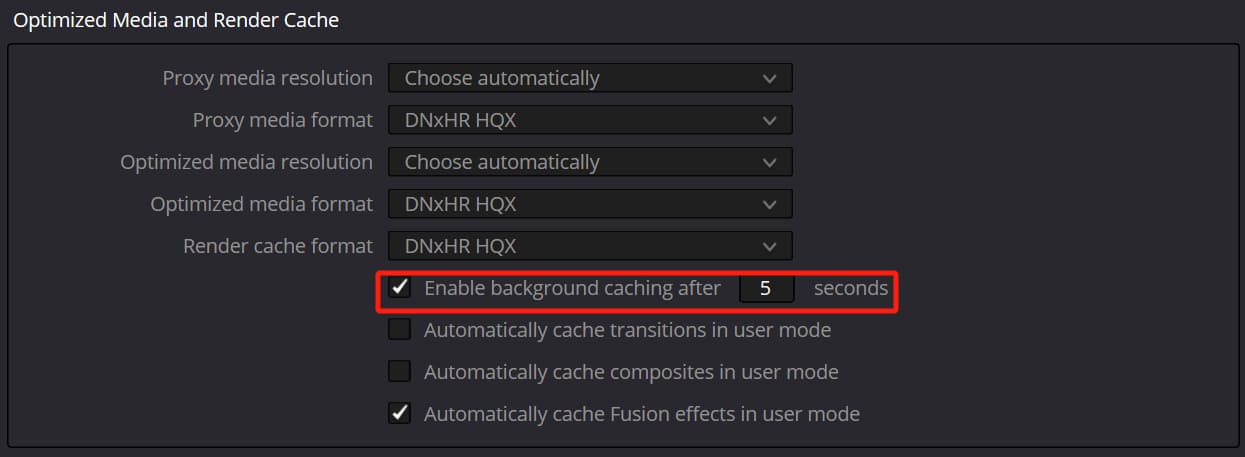
1. In the project settings under the "Optimized Media and Render Cache" section, you can choose a cache format that is friendly to your processor. Examples include DNxHR, ProRes, or uncompressed 10/16-bit.
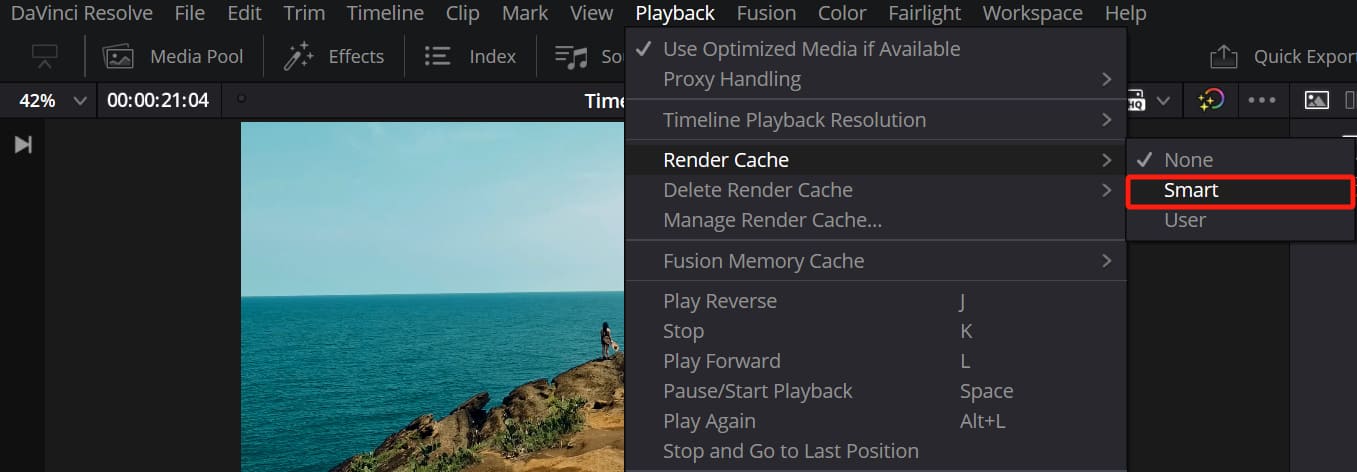
2. At the top menu, go to "Playback" > "Render Cache." Then, choose either "Smart" or "User" to turn on automatic or manual caching. This setting allows the program to pre-render clips with heavy effects like Fusion or OpenFX plugins.
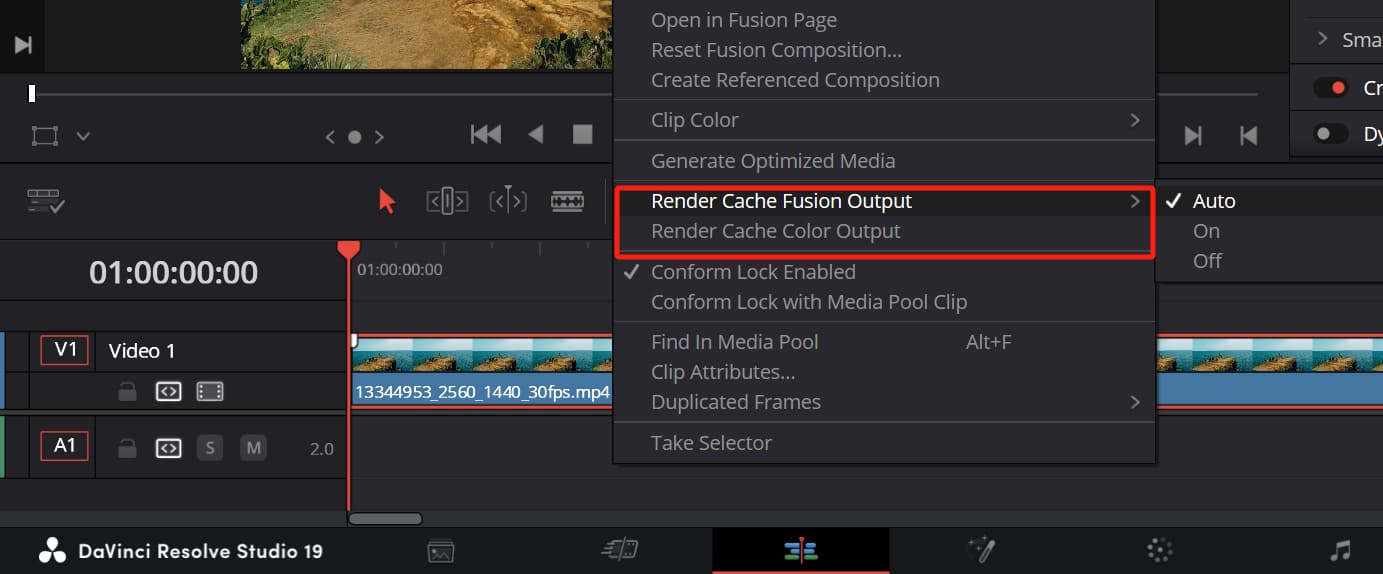
3. Right-click a clip on the timeline and select "Render Cache Fusion Output." Set it to "On" or "Auto," and also check the "Render Cache Color Output" option. This lets you decide by hand which clips should be cached.
How to Quickly Enable Render Cache in DaVinci Resolve?
To quickly turn on render cache in DaVinci Resolve, just go to the top menu, click "Playback" > "Render Cache," and choose the "Smart" option.
In Smart mode, DaVinci Resolve will automatically cache timeline clips that have heavy effects. It starts caching either while playing or 5 seconds after you stop interacting (the default is 5 seconds, but you can change this in the Project Settings).
This is the simplest method. Just one click and everything is set up automatically.
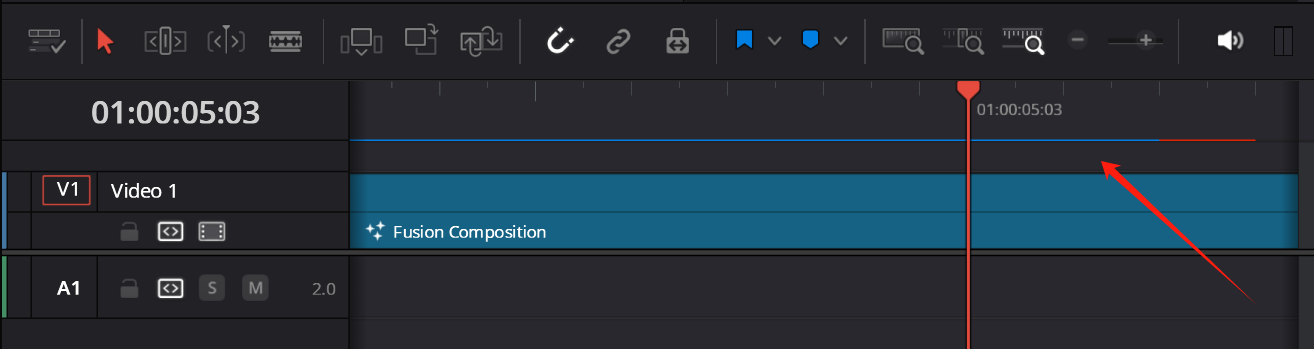
Once it's enabled, you can check the cache status by looking at the red line above each timeline clip. As caching progresses, the red line turns blue. When the line above a clip is completely blue, it means that clip will play back smoothly in real time.
The first time you play back, there might be a slight pause, but subsequent plays will be smooth.
When Smart render cache is selected, DaVinci Resolve automatically caches the clips in order, starting with compositions, then transitions, ResolveFX effects, and other effects.
How to Manually Render Cache in DaVinci Resolve?
To set up manual render caching, follow these steps:
In the top menu, click "Playback" > "Render Cache" and choose the "User" option.
Then, go to your timeline, right-click the clip you want to cache, select "Render Cache Fusion Output," and choose "On" instead of the default "Auto."
This way, DaVinci Resolve will cache only the clips you've manually flagged instead of the whole timeline.
The Best Format for DaVinci Resolve Render Cache
For render caching, the best format is DNxHR for Windows and ProRes for Mac. If you have plenty of storage, uncompressed 10/16-bit gives the best quality.
These formats render quickly and are friendly to your processor, graphics card, and memory. However, they need a lot of disk space.
To change the render cache format, click the gear icon in the lower right of the DaVinci Resolve interface. Then, go to Project Settings > Master Settings > Optimized Media and Render Cache > Render Cache Format. From there, choose DNxHR, ProRes, or another format you prefer.
During background caching, DaVinci Resolve converts your source clips into ".dvcc" files. These files can only be used within DaVinci Resolve and cannot be exported or moved to another computer.
How to Change the Auto-Start Time for Render Cache in DaVinci Resolve?
Open Project Settings and go to Master Settings. Under "Optimized Media and Render Cache," look for "Enable background caching after * seconds." Change the number to what you need.
For example, 3 seconds. This means that DaVinci Resolve will start caching in the background after 3 seconds of no action.
Where Is DaVinci Resolve Render Cache Stored?
You can find the cache location in Project Settings under Master Settings, then Working Folders, and finally at Proxy Generation Location. DaVinci Resolve creates a folder called "CacheClip" to store all the rendered cache files.
These folders have random alphanumeric names. If you open one, you'll see files ending in ".dvcc". These are the render cache files made by DaVinci Resolve in the background.

If you want to change the default location for render cache, just click the "Browse" button. Then choose the folder you want, and the cache location will update.
Also, when you open a project, DaVinci Resolve might show an error asking you to update the cache location. This happens when the external drive containing the cache files isn't available.
To fix the error, follow the same steps for changing the cache location. Click the "Browse" button next to Proxy Generation Location. Then select a folder on a drive that is available (preferably an internal, fast drive), and the error should go away.
Keep in mind that render cache can take up a lot of disk space — sometimes even terabytes. But once your project is finished, you can delete those files anytime.
How to Disable Render Cache in DaVinci Resolve?
To disable render cache, go to the top menu, choose "Playback" > "Render Cache," and then select "None." When you select "None," the blue or red lines (the cache indicators) on the timeline will disappear.
How to Use Render in Place in DaVinci Resolve?
Another simple way to improve timeline playback is by rendering clips in place. Here's how to do it:
- Go to the Edit page (Render in Place works only on the Edit page).
- Select all the clips you want to render in place by drawing a box around them or holding down Ctrl/Command and clicking each clip.
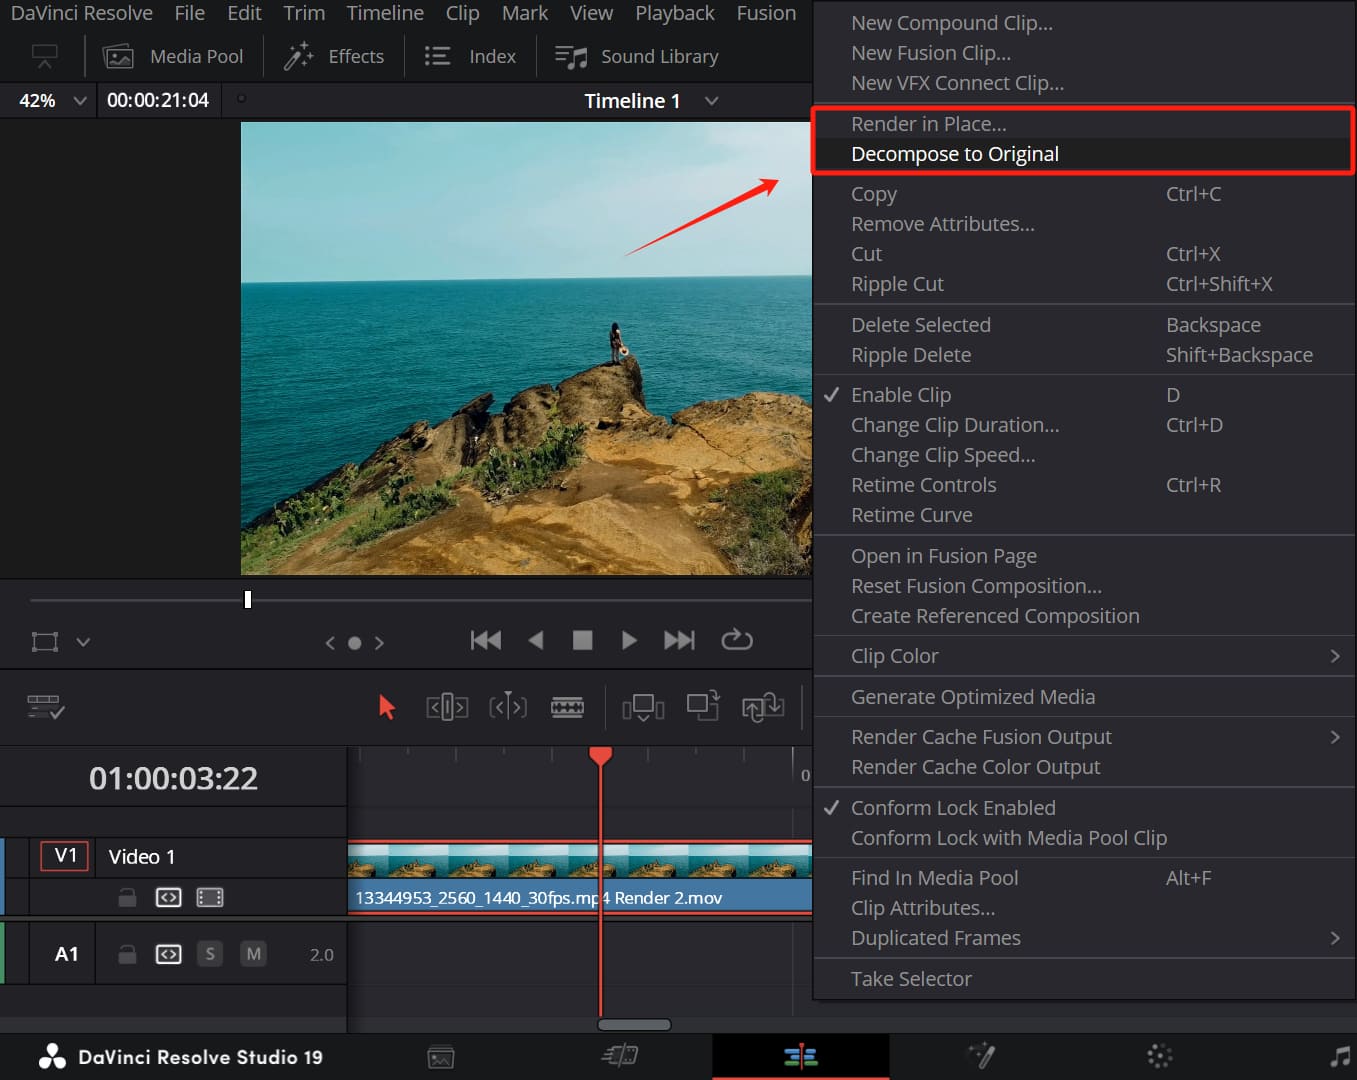
- Right-click and choose "Render in Place."
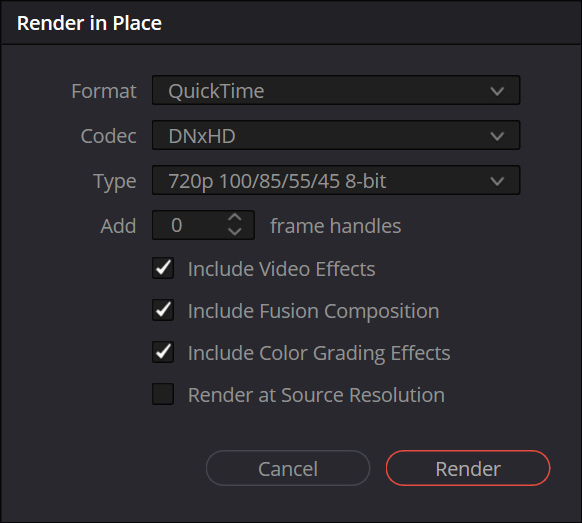
- Pick the format you need (for example, "QuickTime"). Then select your codec and type (such as DNxHR 720p 100/85/55/45 8bit) and enable any panel options you need. Click "Render."
- Choose the folder where you want to save the files. Once you select a folder, DaVinci Resolve will start rendering the selected clips right away.
After the rendering is finished, DaVinci Resolve will automatically replace the original clips on the timeline with the new rendered versions. It also imports these clips into the Master Bin in the Media Pool. To find them, click the "Search" button in the Media Pool and type "Render."
If you want to undo a Render in Place, just click "Decompose to Original." This will restore the clips on your timeline back to their editable, pre-rendered versions.
Your timeline clips will relink to the original media, and any effects you added will still be there and ready to tweak.
The previously rendered clips won't be deleted. They'll stay in place, and you can find them in the Media Pool.
Optimized Media vs Render Cache in DaVinci Resolve
You create optimized media before you start editing. It makes everything in Resolve play back more smoothly—whether you're in the Edit page, Media page, or Color page. It works for clips on your timeline and clips off the timeline, too.
Render cache runs while you're editing. It only renders the clips you've put on your timeline. It bakes in effects right away. Its only job is to boost real‑time playback during editing.
Optimized media by itself plays very smoothly. But if you add a lot of heavy effects to those optimized clips, playback can still stutter and drop to single‑digit frame rates. That's when render cache helps. It actually renders those effects and lets you play back in real time without stutter.
Conclusion
At the end of this article, we'd like to introduce you to TourBox. TourBox is a creative controller that boosts the efficiency of editors, colorists, and content creators.

Think of it like a gamepad or a custom keyboard. You map your favorite commands from any video‑editing software (not just DaVinci Resolve) onto the TourBox.
With TourBox, you never have to memorize software shortcuts. You still get the speed of hotkeys, but with Knob, Dial, and buttons that feel great under your fingers. You'll love how it transforms your editing workflow.
Besides speeding up your editing, TourBox also includes a built-in HoverAdjust feature made for DaVinci Resolve's color workflow. Just hover your cursor over any color control in Resolve and turn a TourBox knob to make quick, easy adjustments. No more fiddly clicking and dragging with the mouse.
Visit our DaVinci Resolve page to learn more about using TourBox.

That wraps up everything you need to know about render cache in DaVinci Resolve. We hope this article answers all your questions and helps you on your creative journey.