How to Remove Haze from Photos in Lightroom Classic?
Many of the photos we shoot appear to be wrapped in haze. We can usually tell they need editing just by how they feel. In this article, we'll look at haze from the perspective of tone and color, and show how to remove it using Lightroom Classic (LrC).

In this article, you will learn:
- Why Do Photos Look Hazy?
- Step 1: Basic Corrections
- Step 2: Tone Adjustments
- Step 3: Color Adjustments
- Conclusion
Why Do Photos Look Hazy?
When we say a photo looks hazy or not clear, we usually mean one of two things: it looks washed out, or it looks dull.
Washed out means the colors aren't pure or saturated enough. There's too much color noise or color cast. Dull means the tonal range is weak. The subject doesn't stand out, details are missing, and contrast is low.
So to remove haze from a photo, we need to do these six things:
- Bring back rich detail
- Restore contrast and set proper black and white points
- Make the subject clear and separated from the background
- Get an accurate white balance
- Clean up colors so they're pure and free of color noise
- Set reasonable saturation
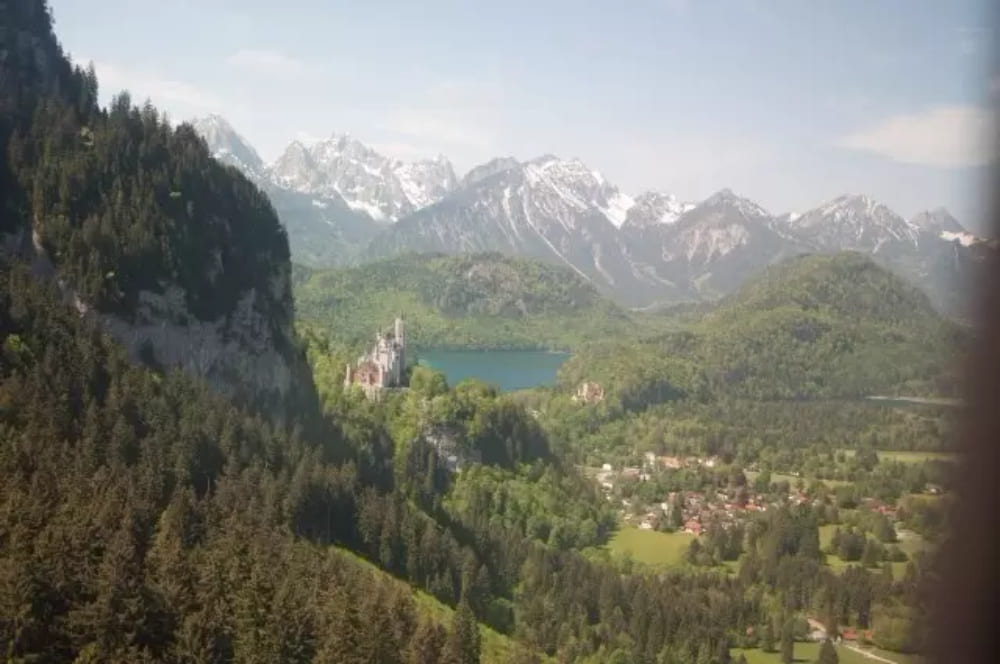
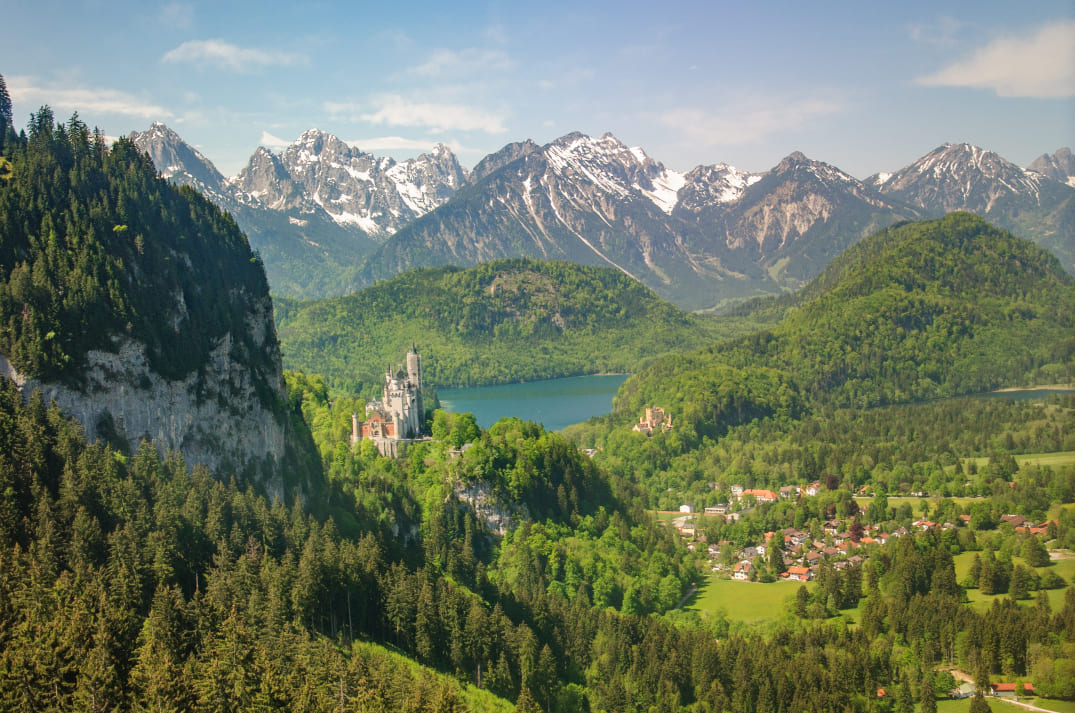
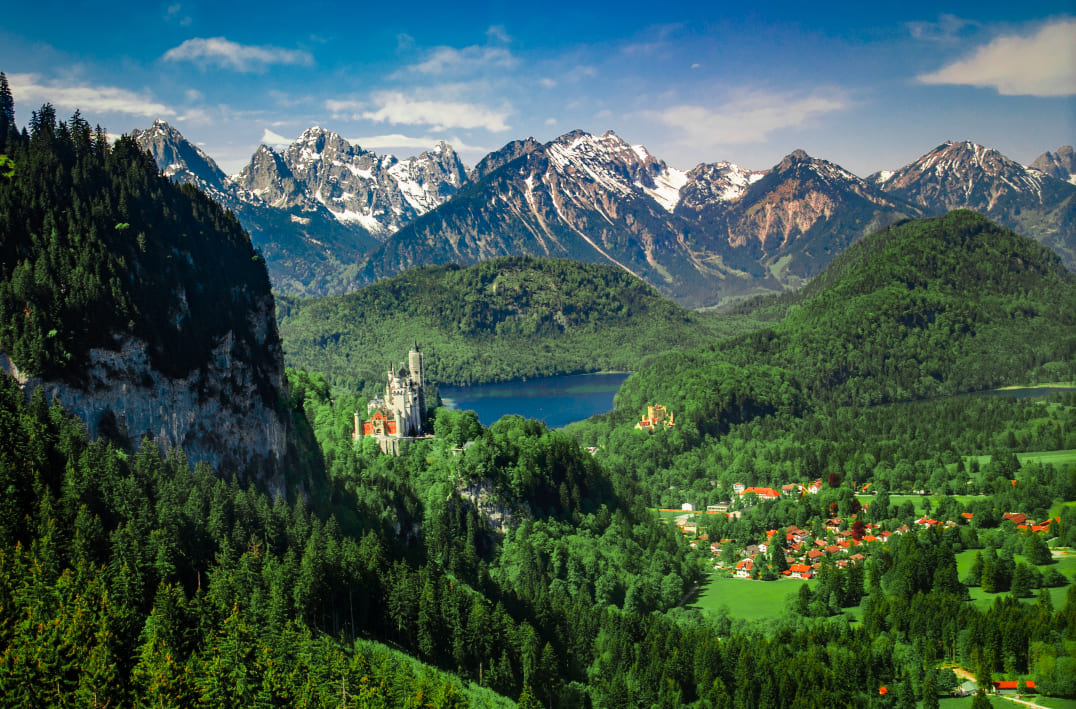
Next, we'll use the photo below — which has a hazy look — as an example and walk through step-by-step how to remove the haze in Lightroom Classic.
Step 1: Basic Corrections
Basic corrections are the first step in editing. They fix things like camera or lens color casts, perspective, and vignetting.
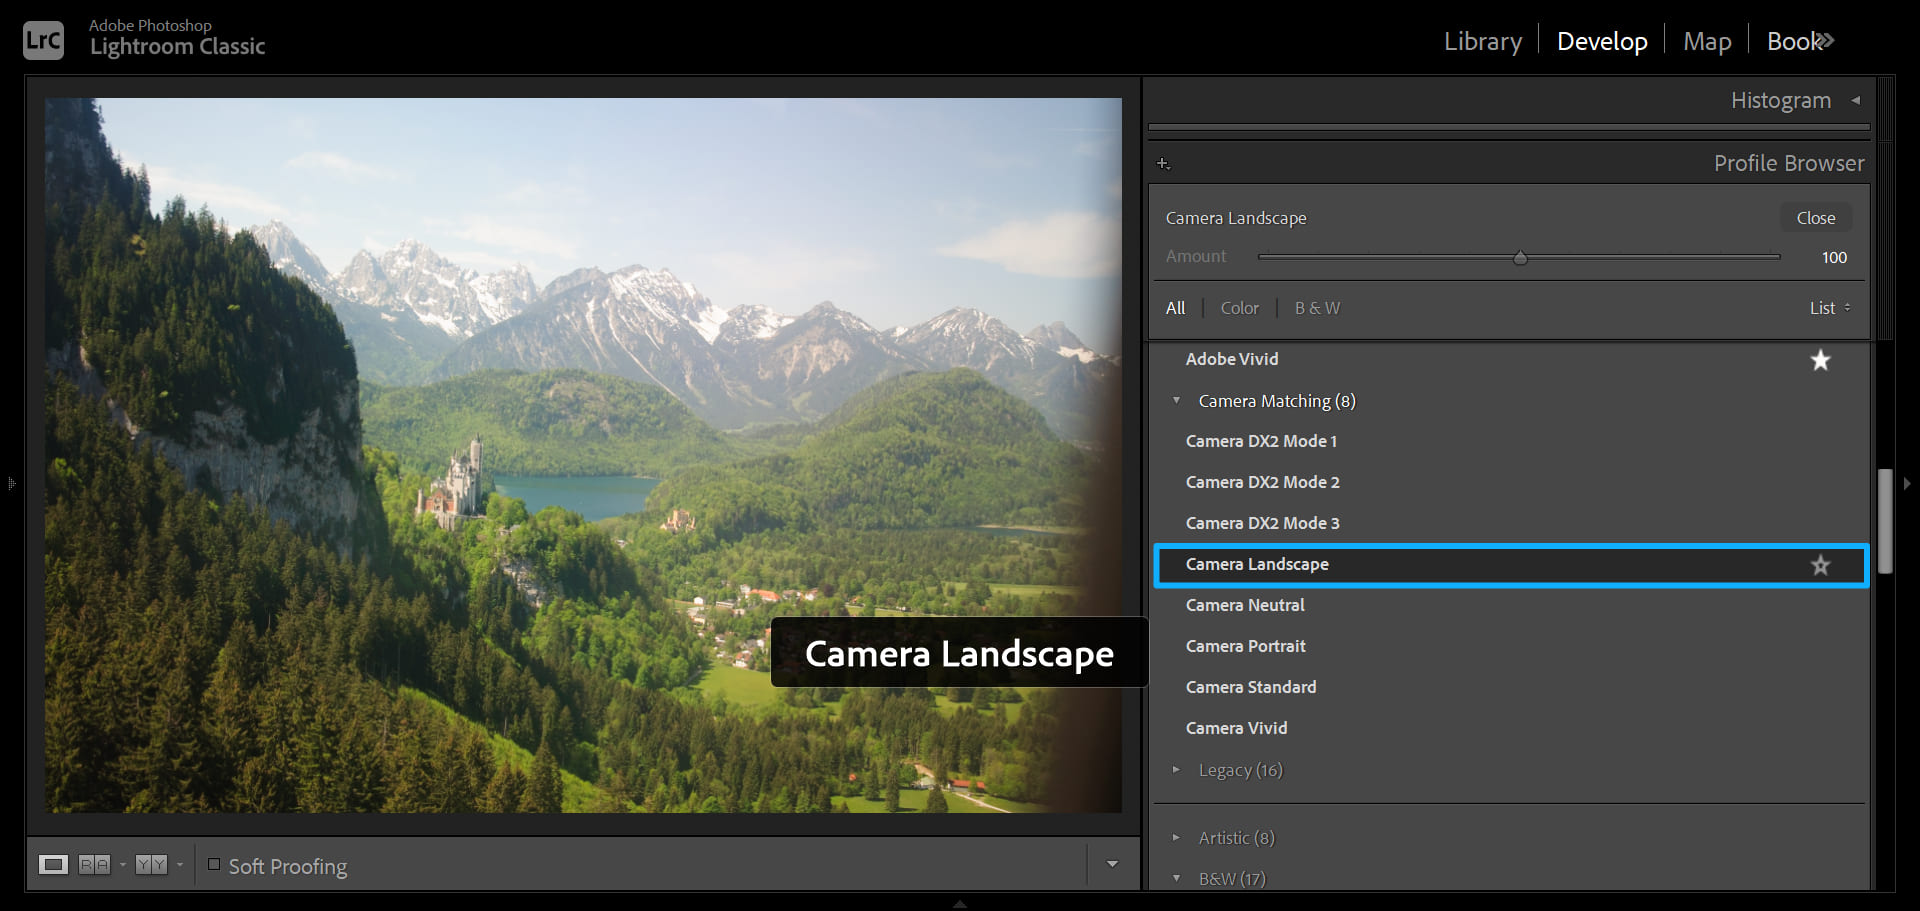
First, load a profile in LrC's Basic panel. This time, we pick the "Camera Landscape" profile. That profile gives a contrast and color baseline suited for landscape photos. It makes further tweaks easier.
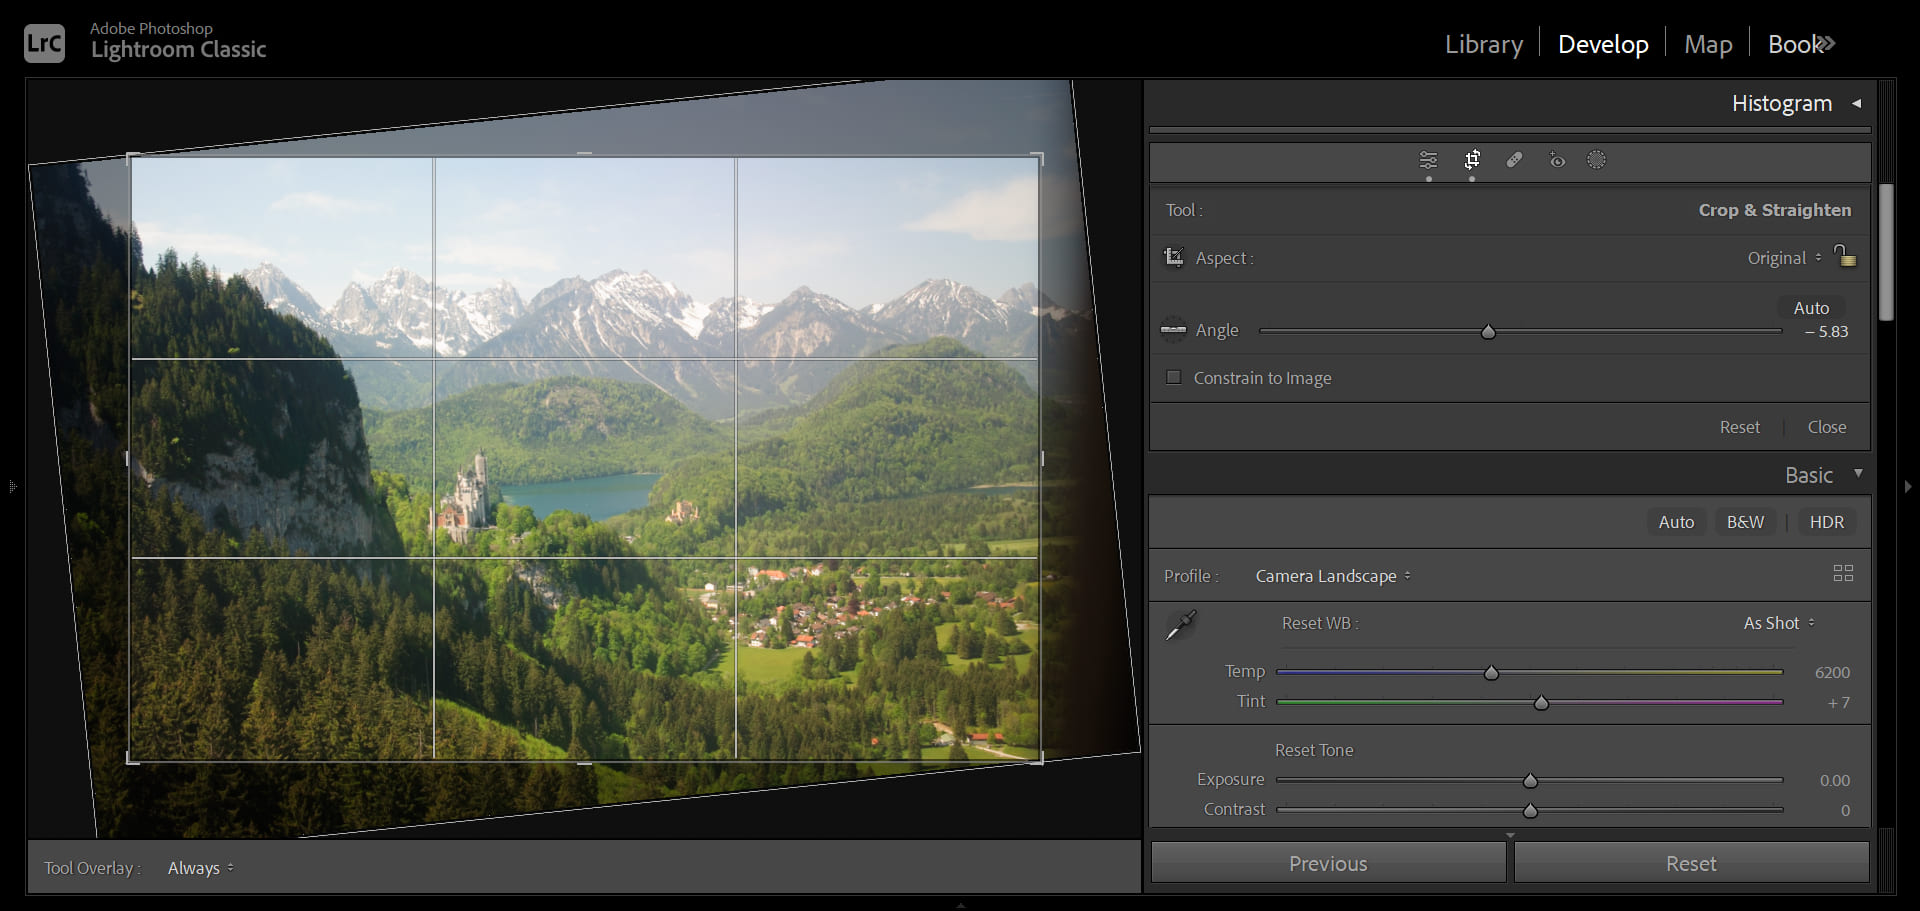
You can see this photo wasn't shot level. The frame is tilted, and a dark window frame shows up at the edges. So rotate the image and crop out anything you don't want, like extra sky or unwanted foreground.
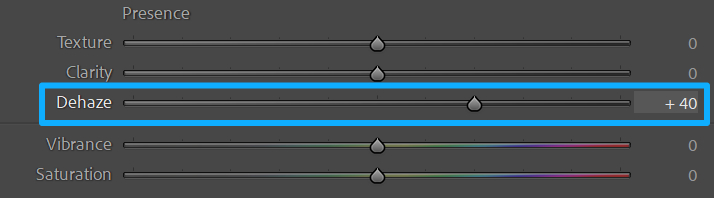
Next, we'll use a handy Lightroom tool: the Dehaze slider in the Effects panel.
Move Dehaze left to add haze, or right to remove it. The tool changes things like saturation, contrast, and clarity. Unlike changing each setting by hand, Dehaze's algorithm targets the gray, hazy parts of the image while protecting already clear areas. It works a bit like an intelligent shortcut.
For hazy photos, start with Dehaze for an initial cleanup, then fine-tune other settings. In our example, we set Dehaze to +40.
Step 2: Tone Adjustments
Tone adjustments cover the first three haze-fighting items:
- Rich detail
- Strong contrast and proper black/white points
- A clear subject
First, recover detail in the highlights and shadows. We set Highlights to -100 and Shadows to +100.
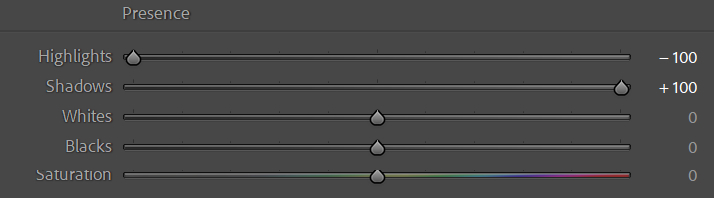
That pulls back blown-out highlights and brings out detail in dark areas.
A photo only feels clear when the contrast and the black/white points are right. We increase Contrast to +20 to make the tonal differences stronger, and set Blacks to -60 so the darkest parts become true black.
If the darkest parts of a photo stay dark gray, the image will still feel like it has a veil of haze. The haze disappears only when the blacks are truly black and the whites are truly white.
The sky and the distant mountains look hazy because they're too bright. That haze can add depth, but it also makes the photo feel less clear.
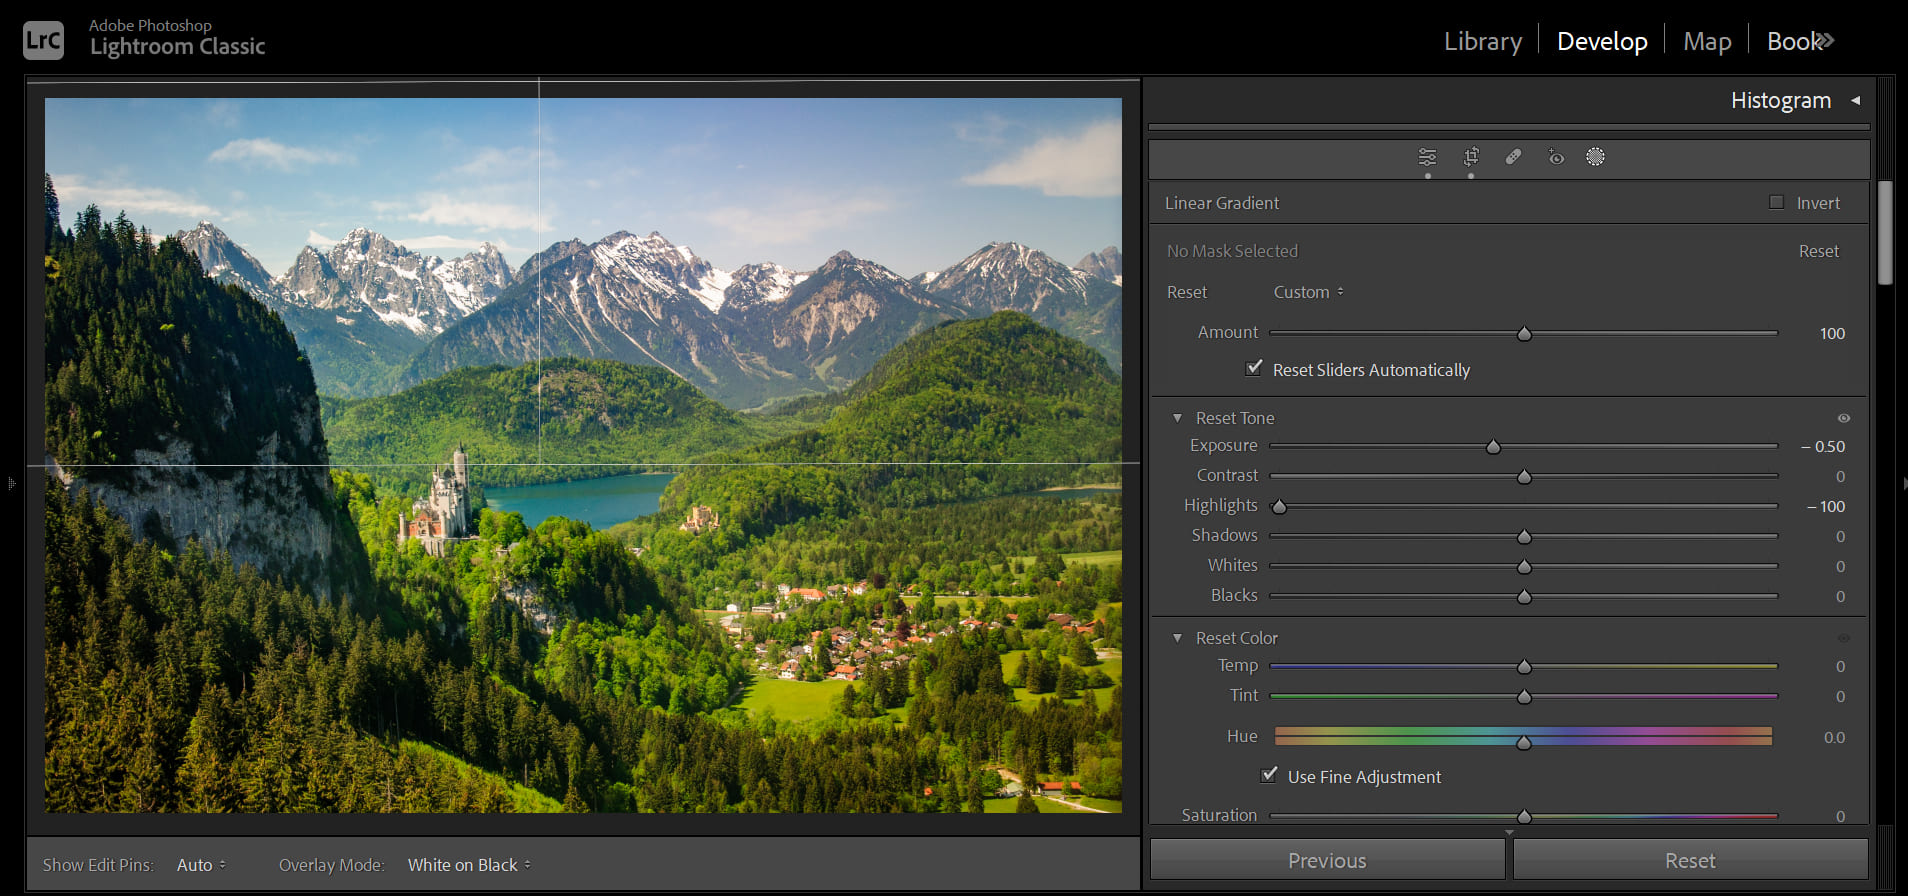
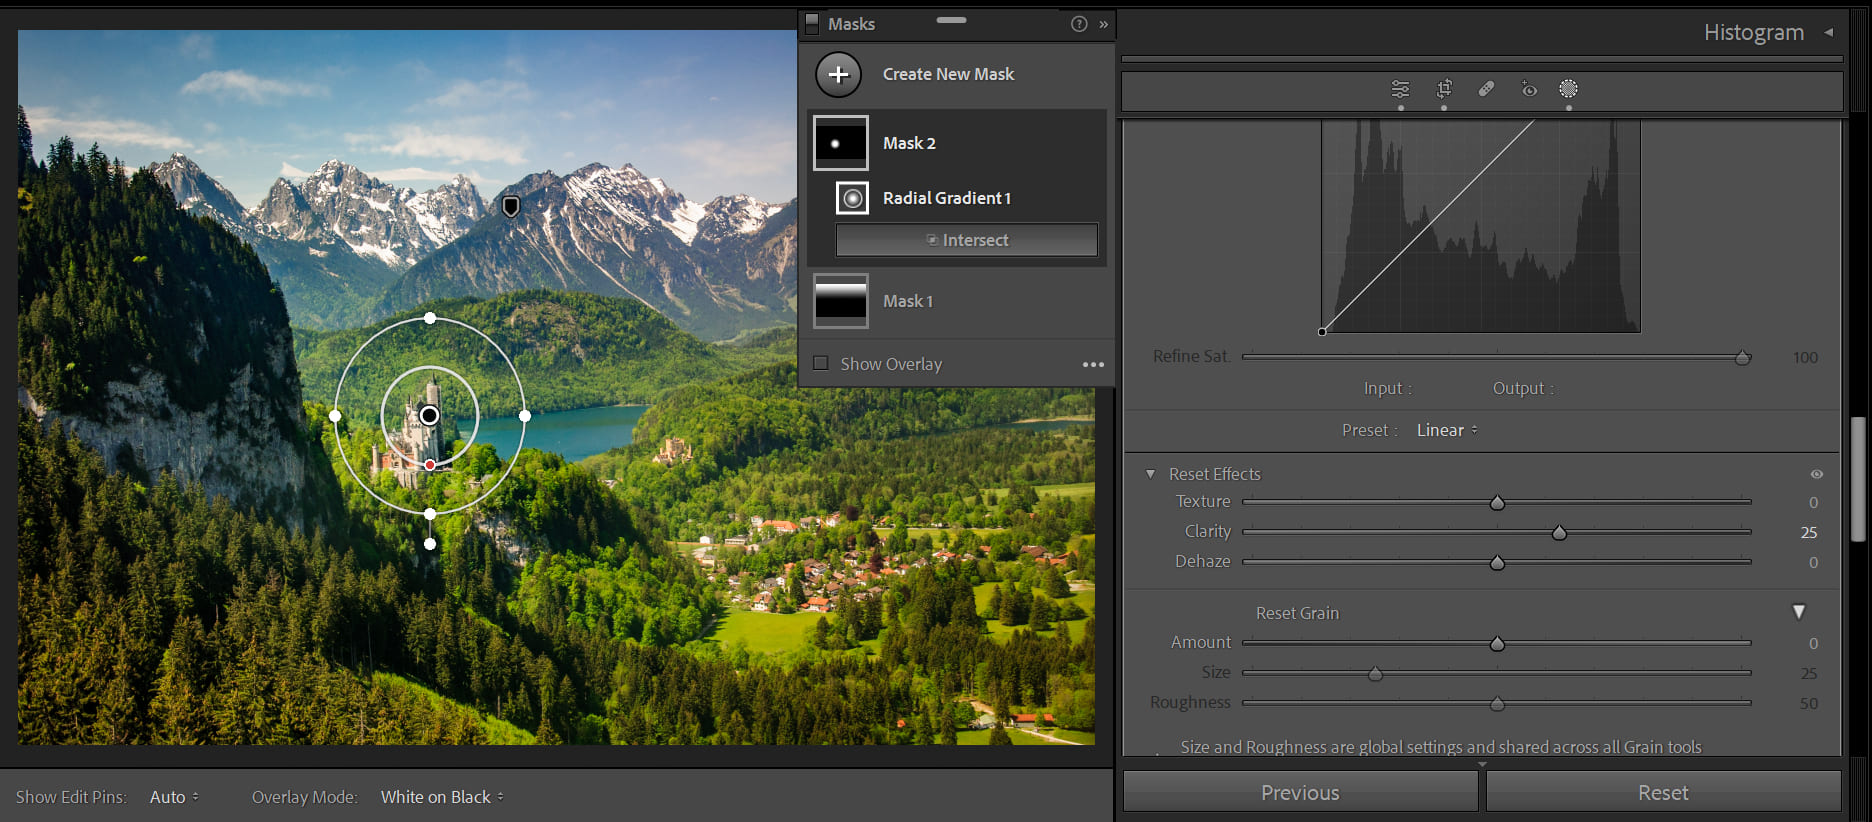
Use a Linear Gradient: set Exposure to -0.5 and Highlights to -100, then drag it from the top down to cover the sky and far mountains. This darkens the distance and brings out more detail in the snowy peaks and the sky.
A clear image should be sharp, especially the subject. Raise Clarity to +8 to gently boost overall sharpness.
Next, use a Radial Gradient to select the subject — Neuschwanstein Castle — and increase Clarity by +25 (clarity preset) on that area so the subject pops.
After these basic tone tweaks, the photo already looks much better. The next step is to make the colors feel just as clear.
Step 3: Color Adjustments
This step matches the last three items in the six-point haze checklist:
- Accurate white balance
- Clean, pure colors with no unwanted color casts or noise
- Reasonable saturation
First, the photo's base color — its white balance — must be correct. If white balance is off, everything can look like it's covered by a blue haze (if it's too cool) or a yellow haze (if it's too warm).
This photo's white balance is already correct, so we don't need to change it. Next, we'll make the colors clean.
It's actually simple: the sky should be blue, the trees should be green. Of course, color grading is personal — every photographer has their own style and taste.
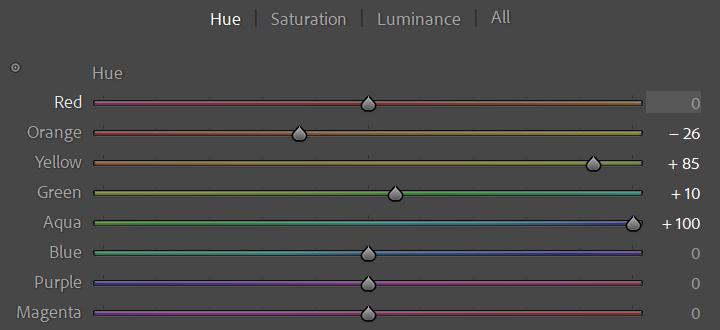
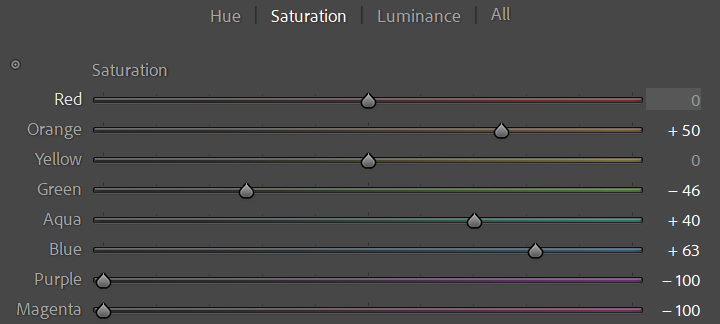
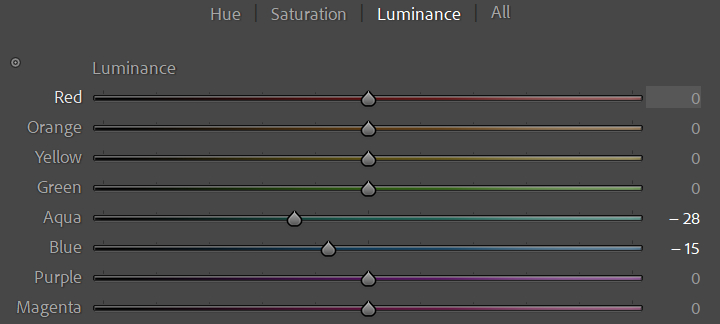
Here we'll use Lightroom Classic's HSL panel. Below are some of the HSL settings we used:
Hue:
Saturation:
Luminance:
Here's how the photo looks after the HSL edits.
Quick note: When you color in LrC, do you ever feel the panels take up too much screen space? They're fixed in place and can't be dragged. That makes it hard to focus on small details — you end up crammed into Lightroom's native layout instead of seeing the photo clearly.

That's why we recommend the TourBox controller, a favorite among many photographers. TourBox's Dynamic Panel lets you work outside Lightroom's fixed panels and color with the photo full screen.

You can open your custom, floating Dynamic Panels anywhere or move them to a second monitor. That keeps the Lightroom sidebars out of the way so you can focus on the image itself.
If you want to learn more, click through to our Dynamic Panel page.

Back to our edit: finally, boost Vibrance to +20 to make the colors pop. Depending on the image, you can also reduce noise and add a bit of sharpening. That finishes the edit.
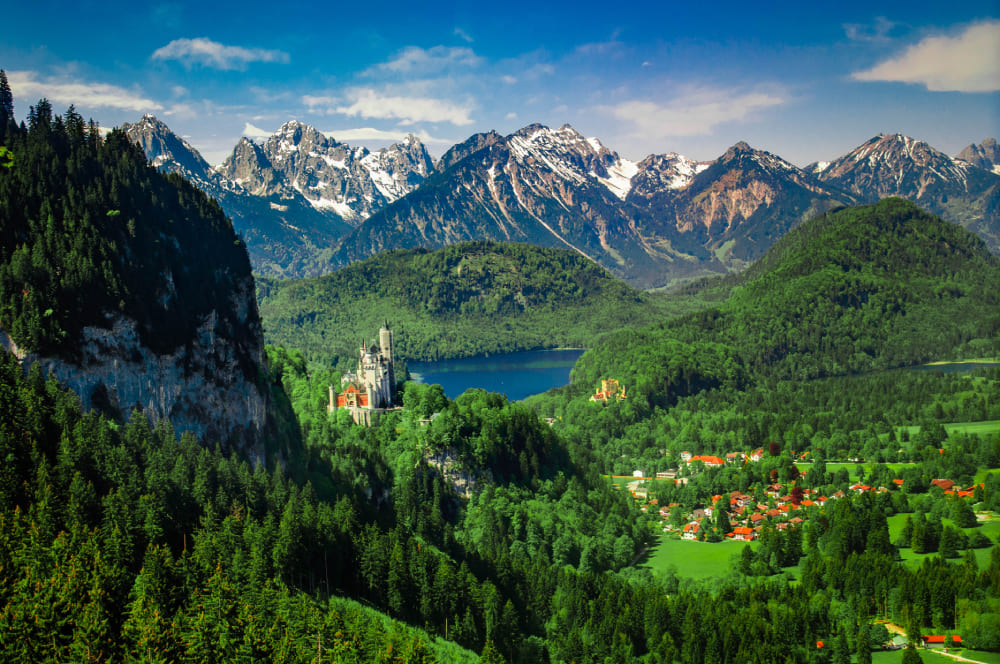
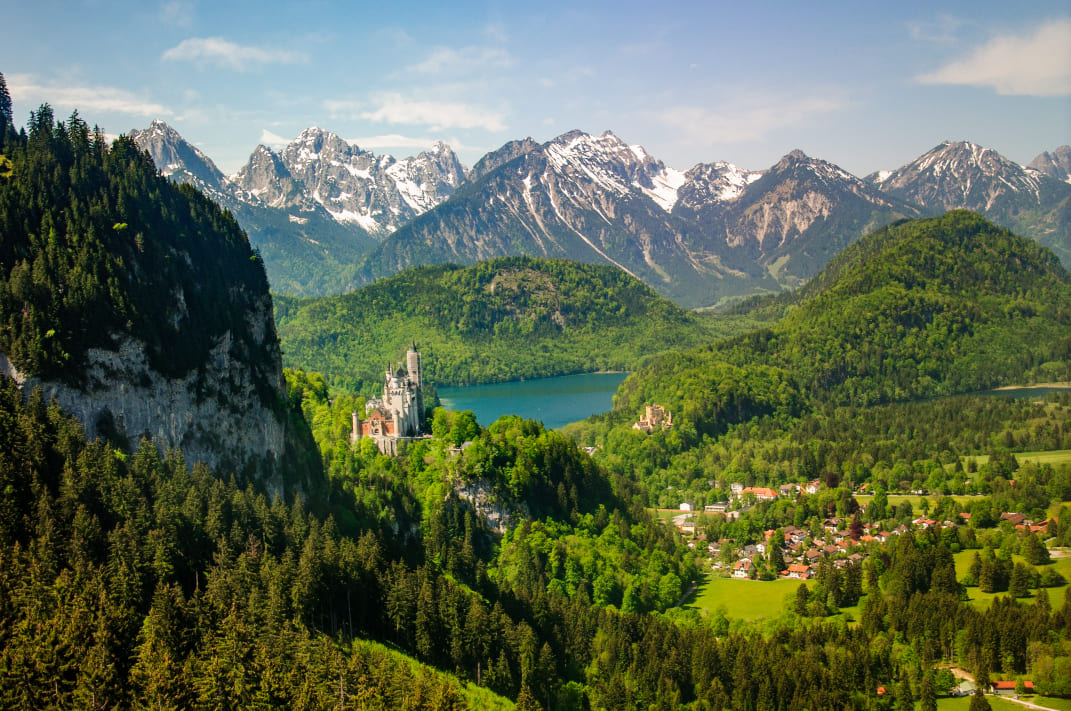
Compare it with the original hazy file — much clearer now, right?

Conclusion
Photos with a hazy look usually come from two causes: color issues or tone issues.
- Color problems show up as washed-out colors — wrong white balance, muddy tones, or low saturation.
- Tone problems show up as flat or dull tones — the subject isn't clear, details are weak, and contrast is low.
In this tutorial, we fix both problems in three steps using Lightroom Classic. Step by step, we remove the haze from the example photo and make it feel clear again. Color grading is personal, so feel free to follow your own taste. That said, using a TourBox can speed up your work and make the editing process more pleasant.
Here's a quick summary of how to remove haze:
- Rich detail — LrC Basic panel: Highlights, Shadows
- Strong contrast and proper black/white points — LrC Basic panel: Contrast, Blacks, Whites
- Clear subject — LrC Basic panel: Clarity; Radial Gradient: Clarity
- Accurate white balance — LrC Basic panel: Temp
- Clean colors with no unwanted casts — LrC HSL panel, or use masks for finer local edits
- Proper saturation — LrC: Vibrance and Saturation
That's it! Follow these steps, and your photo should lose that hazy feel and look much clearer.