How to Use Green Screen on Premiere Pro?
In this tutorial, we will delve into the exciting world of visual effects and explore how to use Premiere Pro's green screen and Effect Controls to achieve the iconic Shadow Clone Jutsu effect from the popular anime series "Naruto".
Let's embark on this fun and thrilling journey together, as we get ready to bring some ninja magic to your video projects.

In this article, you will learn:
- Green Screen in Premiere Pro
- How to Use Green Screen on Premiere Pro?
- How to Do Shadow Clone Jutsu in Premiere Pro?
- Final Thoughts About Green Screen in Premiere Pro
Green Screen in Premiere Pro
If you're a film enthusiast, you've probably heard of green screen or seen behind-the-scenes footage of actors performing in front of a green screen. Green screens are commonly used in film and TV special effects for several reasons:
- Green is not commonly found in human appearances. Humans typically don't have green skin or green irises, and clothing choices can easily avoid the color green. Additionally, even when used in outdoor settings, green can be easily separated from the sky.
- Cameras are more sensitive to green. Digital camera sensors often use a Bayer array, where the number of green pixels is twice that of red or blue pixels. This sensitivity to green makes it easier for cameras to capture green screen footage, facilitating mask creation during post-production.
Note:
A green screen doesn't need to be green. It can also be blue or any other color. In fact, blue screens were frequently used in the early film days. So why do we say green screens are preferred? Green is the furthest color from human skin tones, making it the most suitable choice.
In reality, green screen technology is quite accessible in our everyday lives. All you need is a green cloth, a camera, a computer, and editing software to get started.
In this tutorial, we'll share how to create the Shadow Clone Jutsu effect from Naruto using the green screen feature in Premiere Pro.
How to Use Green Screen on Premiere Pro?
First, import your footage clips into Premiere Pro. The footage used in this tutorial is sourced from the Mixkit website. To facilitate post-production, we have chosen a green-screen video.
Of course, you can always shoot your own footage, as your own content will undoubtedly be more suitable for this effect. Here are some details to keep in mind when shooting green screen footage:
- Green Screen Setup: Ensure a flat and evenly lit green screen background, avoiding any shadows or reflections. Use high-quality green screen fabric to ensure easy post-production compositing.
- Shooting Angle and Size: Make sure there is enough distance between the subject and the green screen to prevent overlap. Consider the shooting angle and camera height to achieve a natural-looking composite.
Note: The better the initial footage is shot in front of the green screen, the better the final production can be. Therefore, the pre-production shooting phase is crucial.
The purpose of using a green screen is to separate the foreground from the background, making it easier for post-production tasks such as masking and adding effects.
In Premiere Pro, apart from using the green screen to extract the subject from your footage, you can also utilize the Free Draw Bezier Tool. We will discuss both methods separately in the following steps.
Method 1: Free Draw Bezier Tool
To begin, you'll need to create a mask around the subject in your footage clip. In Premiere Pro, locate the Free Draw Bezier tool under the Opacity settings in the left-hand side Effect Controls panel.
Enlarge the monitor window and use the Free Draw Bezier tool to roughly outline the subject's contour.

Next, press the play button next to Mask Path in the Mask 1 section of the Opacity settings. Premiere Pro will automatically perform basic motion tracking.
Pause at a moment when there is a slight change in movement. Since Premiere Pro's mask tracking only follows motion and does not deform, different movements or poses may require manually adjusting anchor points to create keyframes and generate deformation.
Additionally, you can fine-tune the appearance of the mask to make it look more natural by adjusting the parameters of Mask Feather and Mask Expansion.
For footage with significant motion changes, using the Free Draw Bezier tool requires modifying frame by frame, which can be quite labor-intensive and requires a great deal of patience. This is where the advantage of using green screen footage comes into play.
Method 2: Ultra Key
For green screen footage, Premiere Pro offers a quick solution called Ultra Key for easy background removal.
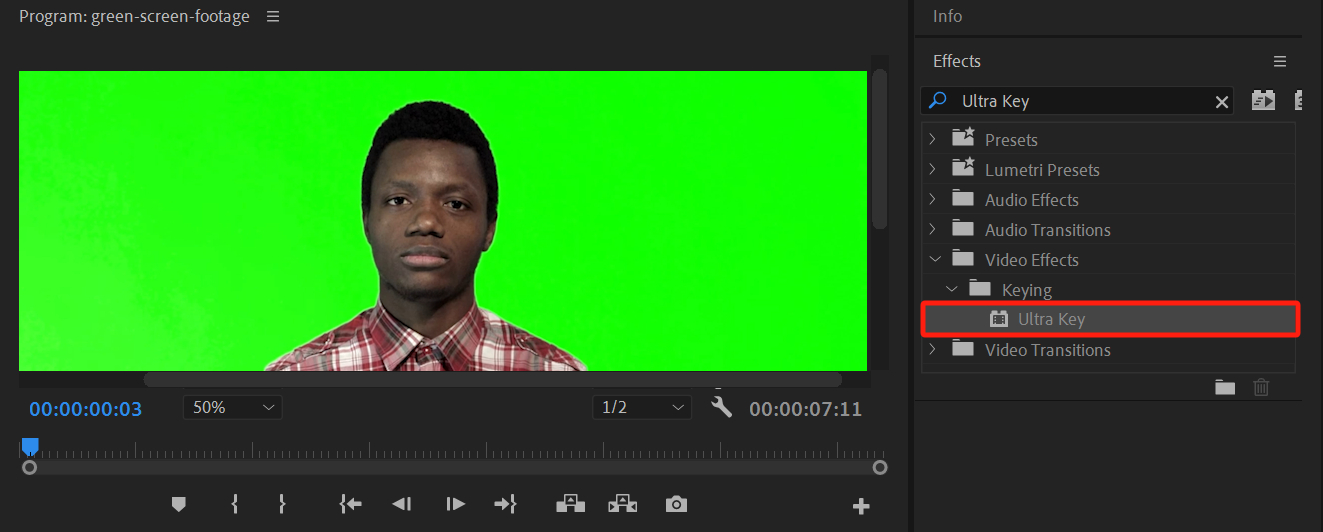
Navigate to the Effects panel on the right-hand side of Premiere Pro. If you don't see the Effects panel, go to Window and click on Effects.
In the Effects panel, go to Video Effects > Keying and click on Ultra Key. Alternatively, you can search for "Ultra Key" in the search bar and then drag it onto the footage clip on the timeline that contains the green screen.
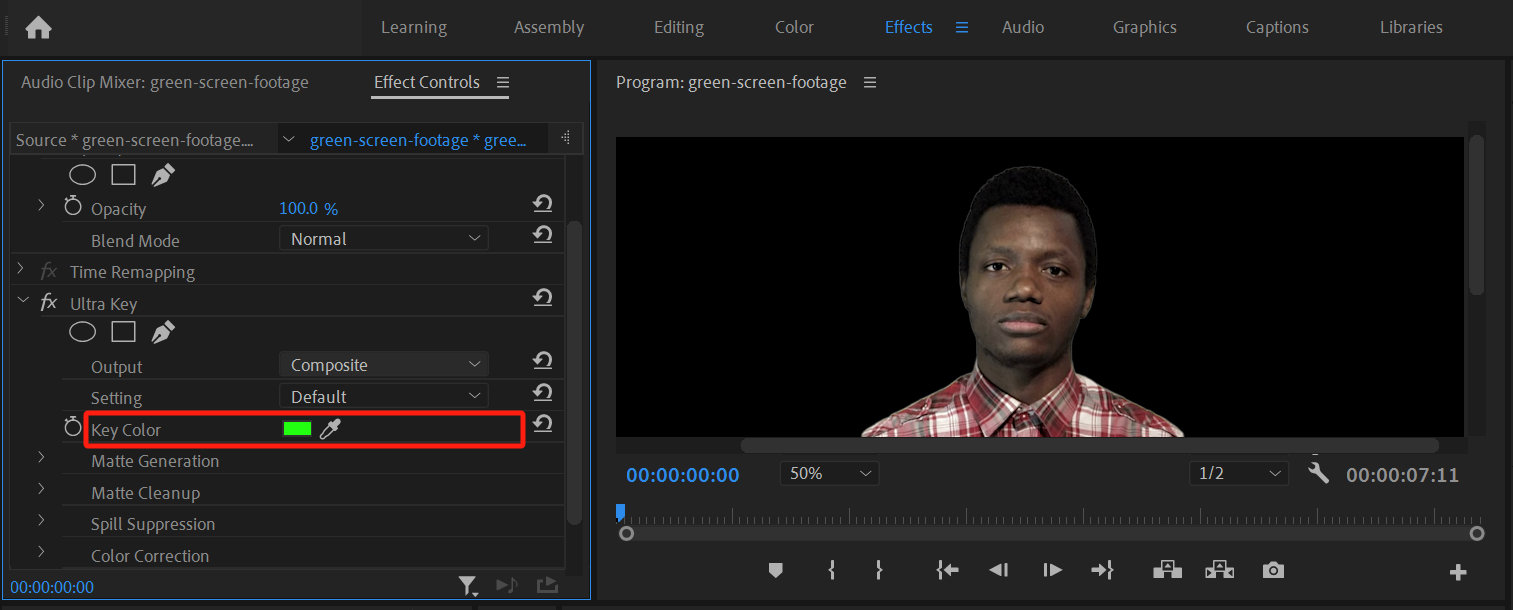
In the Effect Controls panel, locate the Ultra Key control options. Then, choose the "Key Color" tool from the options.
Simply select the green screen area from the background in the monitor window, and just like that, the selected green screen background will be removed.
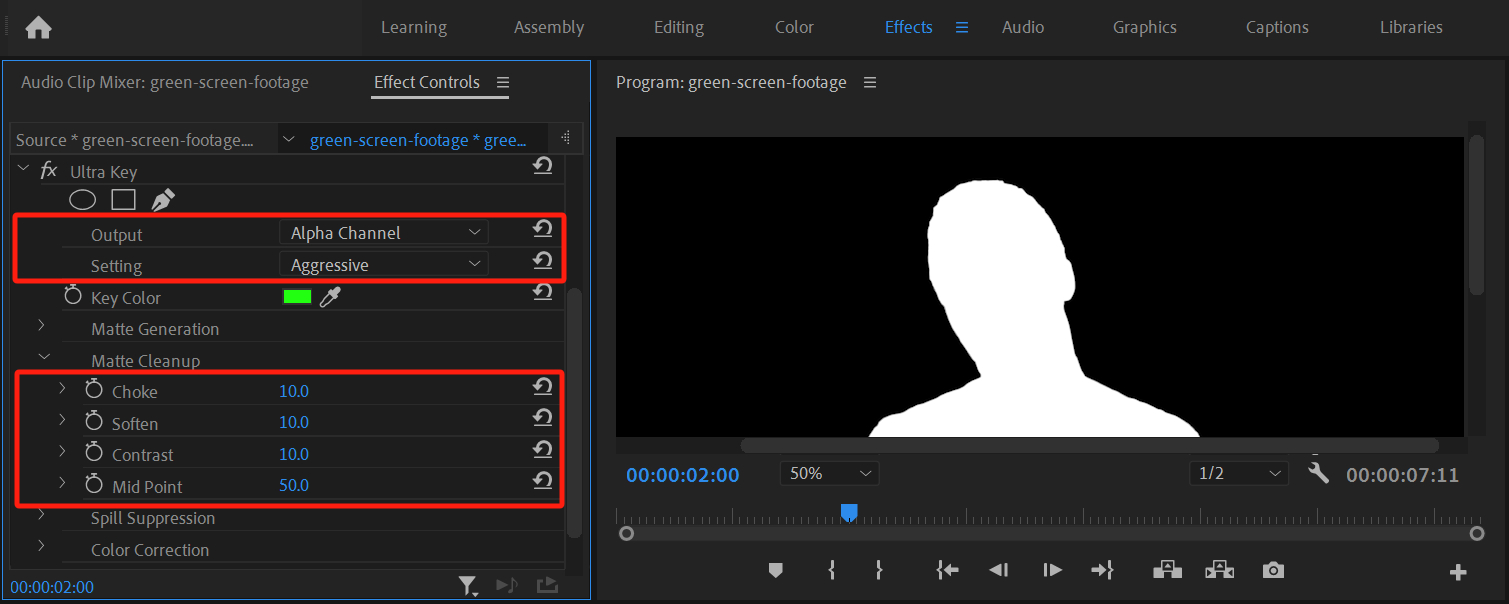
The green screen background color disappears, but there may still be some imperfections in the effect. Click on the "Output" option in Ultra Key, switch to "Alpha Channel," and select a value of "Aggressive" for the "Matte Cleanup" setting.
You will see that the background turns black and the subject turns white, with the gray areas indicating parts of the green screen that haven't been fully removed. From there, you can adjust the Matte Cleanup parameters of Ultra Key until the gray areas are no longer visible.
Alternatively, you can also make adjustments directly in the Composite Output settings mode and fine-tune the effect by synchronously observing the changes in the monitor.
How to Do Shadow Clone Jutsu in Premiere Pro?
Once you have successfully extracted the subject using the green screen in Premiere Pro, you can further enhance the effect by incorporating the Effects feature. Here, we will attempt to create a simple Shadow Clone Jutsu effect from Naruto.
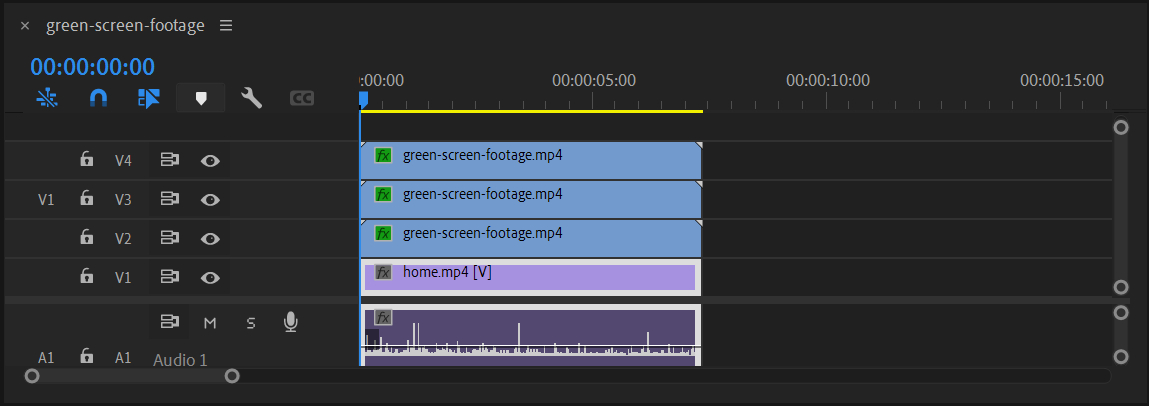
Now, you can import background footage and place it on Video Track 1, while placing the green screen footage on Track 2. Then, duplicate the green screen footage tracks for the characters (or duplicate more according to your preference).
In the Motion settings within the Effect Controls panel, we can create keyframe animations by setting keyframes for Position.
Here, you can add the starting point of the keyframe by clicking on the small diamond-shaped marker to the right of the Position. Then, enter the corresponding position values for each keyframe at the ending point.
The result should look something like the video below, which currently appears a bit comical.
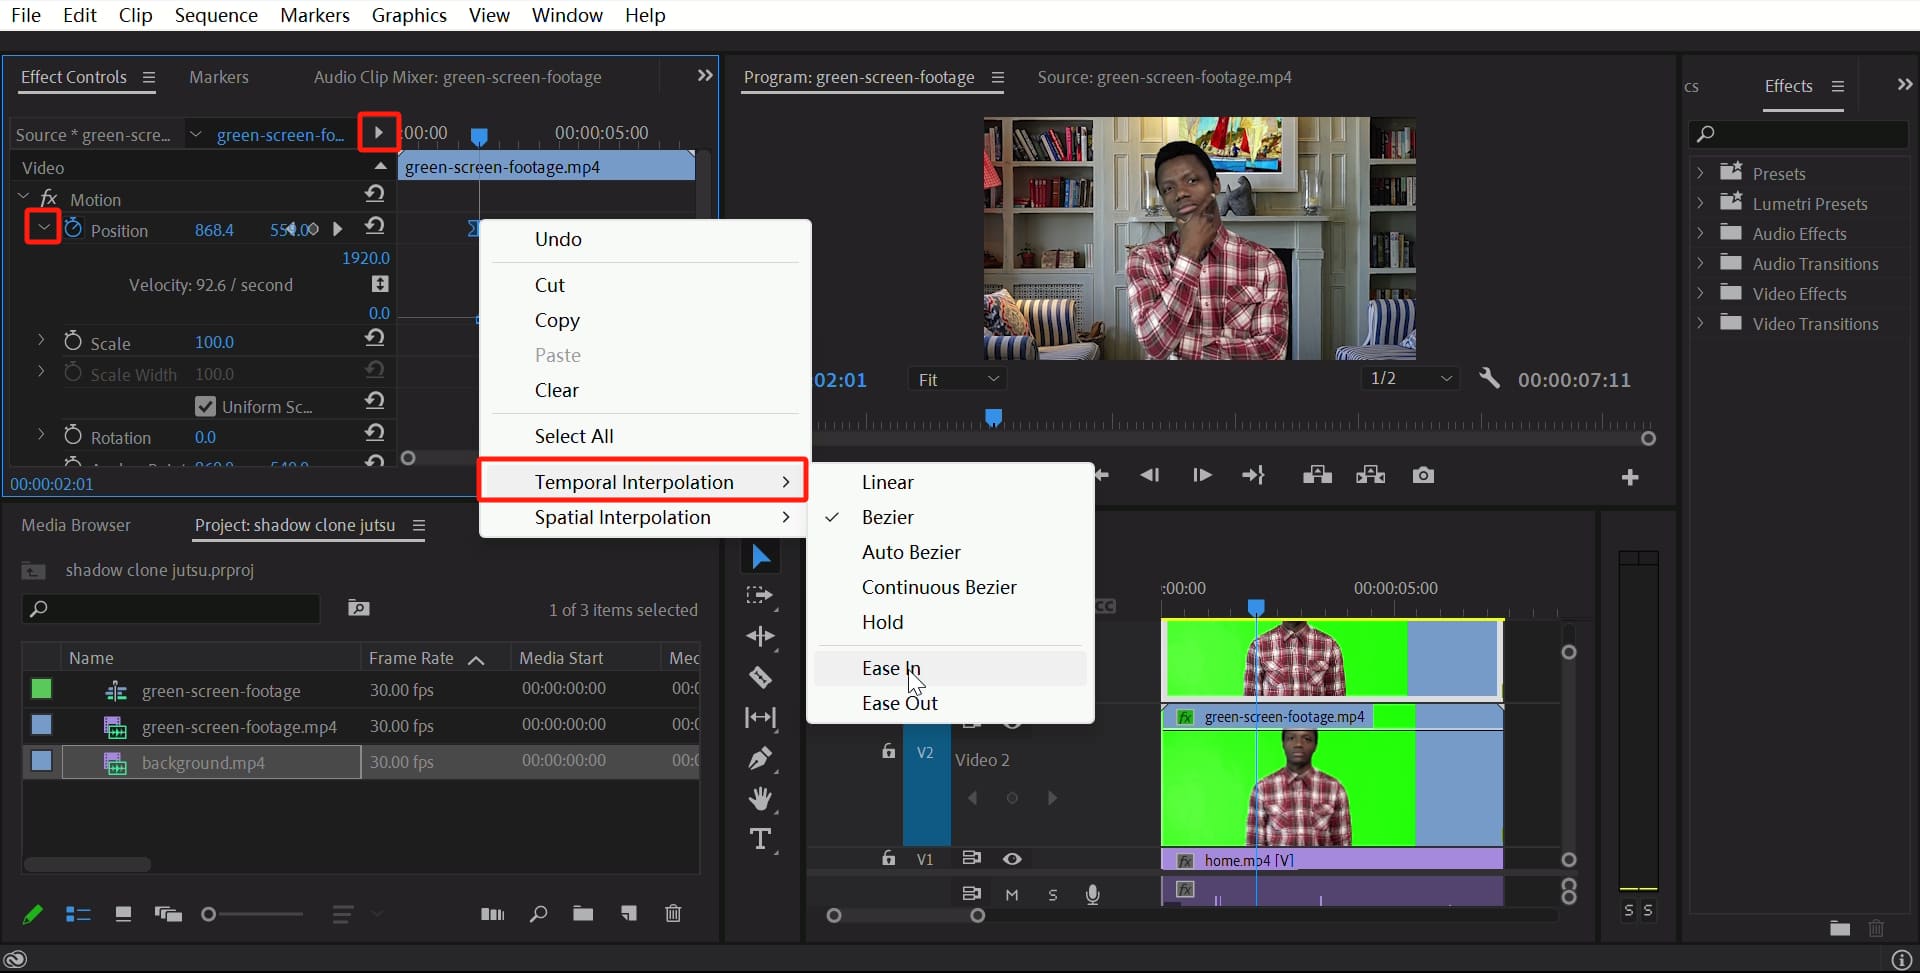
Next, you can bring up the timeline by clicking on the Show Timeline View option to the right of the current footage tab in the Effect Controls panel. Then, click on the small arrow on the left side of Position to zoom in on the timeline.
From there, you can right-click on the keyframes on the timeline and choose your preferred keyframe animation mode under Temporal Interpolation.
The specific steps are illustrated in the image below.
Next, you can add a more natural blur effect to the Shadow Clone Jutsu. In the Effects panel, locate the video effect called Directional Blur, and apply it to each of the two video tracks where the clones appear.
Go to the Effect Controls panel and set the Direction under Directional Blur to 95 degrees. Create a keyframe animation for the Blur Length, starting from 50 and gradually decreasing to 0. (The steps for creating keyframe animation are the same as mentioned earlier for the position.)
This will add a dynamic blur effect to simulate the movement of the clone jutsu.
If you feel that a single Directional Blur effect may not be sufficient, you can explore additional effects in the Effects panel (such as the Wave Warp effect). By combining keyframe variations, you can unleash your creativity and make these effects truly shine.
Final Thoughts About Green Screen in Premiere Pro
In our tutorial on Premiere Pro green screen, we covered the usage of green screens and shared a step-by-step method to create the iconic Shadow Clone Jutsu effect from Naruto.
When it comes to editing software like Premiere Pro, utilizing the traditional keyboard and mouse for timeline control can often be frustrating and cumbersome. While these tools have served us well for years, they often fall short of providing the seamless and intuitive editing experience that many creators crave.

That's where TourBox comes in. With its intuitive and flexible control over the timeline, TourBox can instantly make you fall in love with the seamless editing experience at your fingertips.
But that's not all – TourBox offers a range of functionalities that extend beyond mere timeline control, making it an invaluable companion for video editing and unleashing your creative potential.
If you're tired of the limitations and frustrations of traditional keyboard and mouse editing, TourBox is here to revolutionize your Premiere Pro experience.