A Guide to Rotating and Warping Text in Photoshop
Welcome to our Photoshop text-effects tutorial! Photoshop is a go-to tool for creating eye-catching designs, whether you're a pro or just experimenting. You can tweak text in all kinds of ways — rotate it, skew it, distort it, and more.
In this guide, we'll walk you through rotating text step by step, plus show you how to warp it for extra flair. Fire up Photoshop and let's get started!

In this article, you will learn:
- How to Rotate Text in Photoshop?
- How to Warp Text in Photoshop?
- How to Boost Your Productivity in Photoshop
How to Rotate Text in Photoshop?
Rotating text in Photoshop is a simple yet effective technique that can help you create eye-catching designs and graphics. By following the steps outlined in this tutorial, you'll be able to rotate text freely or by a specific angle, giving you the flexibility to create unique and engaging visuals. To rotate text in Photoshop, follow the steps outlined below.
Step 1: Create a New Document
Open Photoshop and create a new document by clicking on File > New or using the keyboard shortcut Ctrl+N (Windows) or Cmd+N (Mac). Set the desired dimensions, resolution, and background color in the New Document dialog box, then click Create.
Step 2: Add Text to the Document
Select the Text tool from the toolbar on the left or press T on your keyboard. Click anywhere on the canvas to create a new text layer. Type your desired text and format it as desired using the options found in the Character and Paragraph panels. You can access these panels by clicking on Window > Character and Window > Paragraph in the menu bar.
Step 3: Rotate the Text
There are two ways to rotate text in Photoshop: Free Transform and Rotate by a Specific Angle.
Free Transform
- Select the text layer in the Layers panel by clicking on it.
- Press Ctrl+T (Windows) or Cmd+T (Mac) to activate the Free Transform mode.
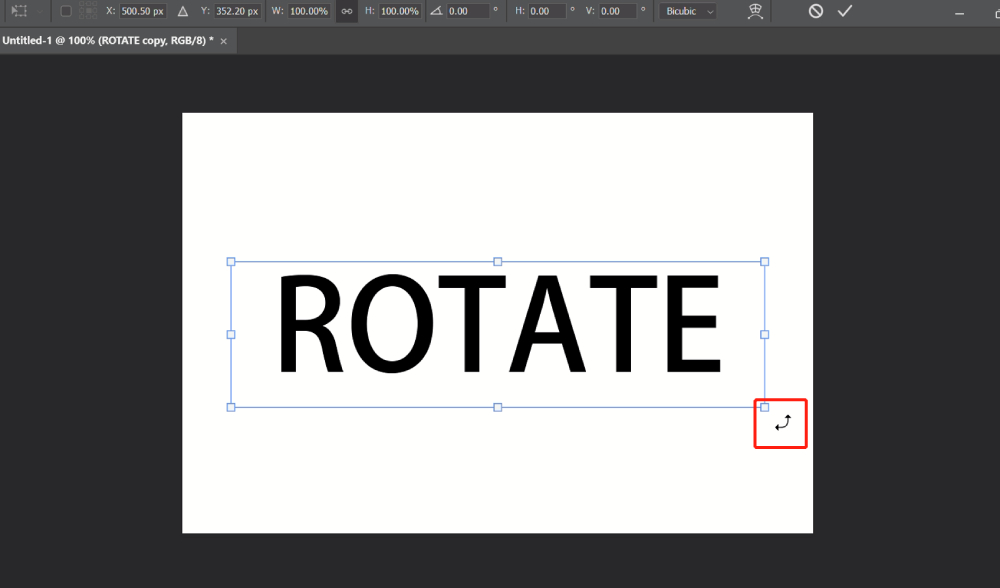
- Move the cursor near a corner handle until it changes into a curved, double-headed arrow.
- Click and drag the handle to rotate the text freely. Hold the Shift key while rotating to constrain the angle to increments of 15 degrees.
- Press Enter (Windows) or Return (Mac) to confirm the rotation.
Rotate by a Specific Angle
- Select the text layer in the Layers panel by clicking on it.
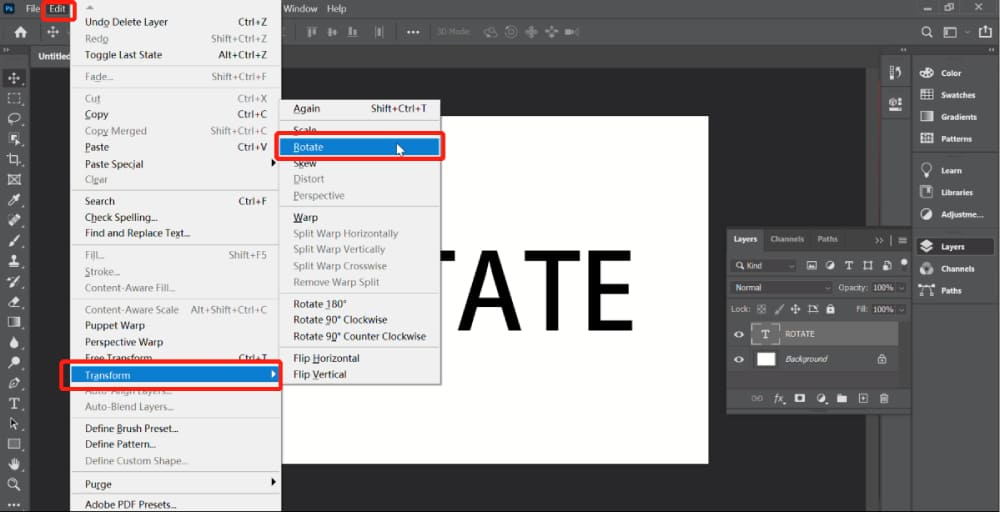
- Click on Edit > Transform > Rotate in the menu bar.
- In the options bar at the top of the screen, enter the desired rotation angle in the Set rotation angle field. A positive value rotates the text clockwise, while a negative value rotates it counterclockwise.
- Press Enter (Windows) or Return (Mac) to confirm the rotation.

Step 4: Save Your Work
To save your work as a Photoshop document (PSD), click on File > Save As and choose Photoshop as the file format. If you want to save the rotated text as an image file (e.g., JPEG or PNG), click on File > Save As and select the desired file format from the dropdown menu.
Conclusion
Rotating text in Photoshop is a simple yet powerful technique that can add a unique touch to your designs. Whether you're creating a logo, a banner, or just a simple graphic, rotating text can help you convey your message in a more dynamic and visually engaging way.
But if you're looking for even more ways to manipulate and enhance your text, then you're in luck - because in the next section, we'll be exploring the exciting world of Warp Text in Photoshop.
With Warp Text, you can take your text effects to a whole new level, creating stunning designs that are sure to catch the eye. So, let's get started and see what amazing text effects we can create with Warp Text in Photoshop!
How to Warp Text in Photoshop?
While rotating text can certainly add some interest to your designs, there's an even more versatile and exciting text feature in Photoshop that can take your designs to the next level: the Warp Text function.
With Warp Text, you can bend, twist, and distort your text in countless creative ways, adding a whole new level of pizzazz to your designs.
In fact, the possibilities are virtually endless when it comes to using Warp Text to create stunning text effects that will make your designs truly pop.
In this section, we'll show you how to use the Warp Text function to create stunning text effects that will make your designs pop.
Step 1: Create a New Document
To get started, open up Photoshop and create a new document by clicking on "File" > "New". In the New Document dialog box, enter your desired dimensions and resolution, and click "Create".
Step 2: Add Text
Next, select the Text tool from the toolbar on the left-hand side of the screen, and click anywhere on your canvas to add a new text layer. Type in your desired text, and choose your font, size, and color from the options bar at the top of the screen.
Step 3: Access the Warp Text Function
With your text layer selected, go to the top menu bar and click on "Type" > "Warp Text". This will bring up the Warp Text dialog box, which contains a variety of different text-warping options.

Step 4: Choose a Warp Style
In the Warp Text dialog box, you can choose from a variety of different Warp Styles, each with its own unique effect. For example, the "Arc" style will bend your text into a curved shape, while the "Flag" style will warp it into a wave-like pattern. Experiment with different styles until you find one that you like.

Step 5: Adjust the Warp Options
Once you've chosen a Warp Style, you can further customize your text by adjusting the various Warp Options. These options will vary depending on the Warp Style you've chosen but may include things like Bend, Horizontal Distortion, and Vertical Distortion.
Use the sliders and drop-down menus to fine-tune your text's appearance until you're happy with the result.
Step 6: Add Layer Styles
To take your text effects to the next level, try adding some layer styles to your text layer. These can be accessed from the Layers panel on the right-hand side of the screen. Experiment with different styles like Drop Shadow, Bevel & Emboss, and Outer Glow to add depth and dimension to your text.
Step 7: Save and Export Your Design
Once you're happy with your text effects, it's time to save and export your design. Go to "File" > "Save As" to save your file in Photoshop format, or go to "File" > "Export" to save your design in a different file format.
Conclusion
By using the Warp Text function in Photoshop, you can create stunning text effects that will make your designs stand out. With a little experimentation and creativity, you can bend, twist, and warp your text in countless ways, adding depth and dimension to your designs.
So, give it a try and see what kind of amazing text effects you can come up with!
How to Boost Your Productivity in Photoshop
As you've seen in this tutorial, there are countless ways to manipulate text in Photoshop and create stunning text effects. But as with any creative endeavor, the key to success is not just having the right tools, but also using them efficiently.
That's where TourBox comes in - a powerful and intuitive controller that can help you streamline your workflow and take your Photoshop productivity to the next level.

With TourBox, you can easily assign shortcuts and commands to its knobs and buttons, allowing you to perform common tasks like adjusting text size, rotating text, and warping text with just a few quick movements.
Plus, its ergonomic design makes it comfortable to use for extended periods, so you can stay focused on your work without experiencing any discomfort or fatigue.
Whether you're a professional designer, a digital artist, or just someone who loves to experiment with graphics, TourBox is a powerful tool that can help you work more efficiently and effectively in Photoshop.
So, if you want to take your text effects to the next level and enhance your overall Photoshop productivity, we highly recommend giving TourBox a try.
Congratulations! You now have a solid understanding of how to rotate and warp text in Photoshop, and you're well on your way to creating stunning text effects that will make your designs stand out.
But if you're hungry for even more knowledge and inspiration, we've got you covered.
Check out the following YouTube tutorials (made by The Photoshop Lab) on text effects in Photoshop, where you can learn from the pros and discover new techniques and ideas to take your designs to the next level.
With the power of Photoshop and your newfound skills, the possibilities for creating amazing text effects are endless!