Mastering HDR Photography: Techniques for Stunning Images
Even the most expensive camera in the world cannot perfectly capture the emotional impact of a stunning sunset on our souls. That's because the human eye is the most powerful camera, with a dynamic range unmatched by any camera.
However, clever photographers have found a way around this. You can synthesize HDR photos in post-processing software to recreate the awe-inspiring scenes you witness as accurately as possible.
If you're unfamiliar with the concept of HDR in photography, keep reading. This article will provide you with the answers you seek.

In this article, you will learn:
- What Is HDR in Photography?
- What Is the Difference Between Photography HDR and HDR Monitors?
- Pre-Shooting Techniques for HDR Photography
- Post-Processing Techniques for HDR Photography
- Final Thoughts About HDR Photography
What Is HDR in Photography?
HDR technology is something most people have likely encountered without realizing it, as nowadays, most smartphones use HDR in their photography.
Without HDR, due to the limited tolerance of smartphone sensors, it's impossible to capture both highlight and shadow details in high-contrast scenes simultaneously.
So, what does HDR mean in photography? HDR stands for High Dynamic Range. The term "Dynamic Range" refers to the levels of brightness that a camera sensor can capture.
Despite advancements in imaging technology and sensor quality over the years, limitations remain. In certain scenarios, issues like overexposed highlights and shadow detail loss persist.
Therefore, professionals devised a clever workaround: capturing multiple images in the same scene and position, adjusting exposure parameters incrementally from low to high in each shot to include normal exposure for highlights and rich detail for shadows.
These images are then selectively combined as needed.
This method effectively resolves the issue of insufficient dynamic range when faced with high-contrast environments.
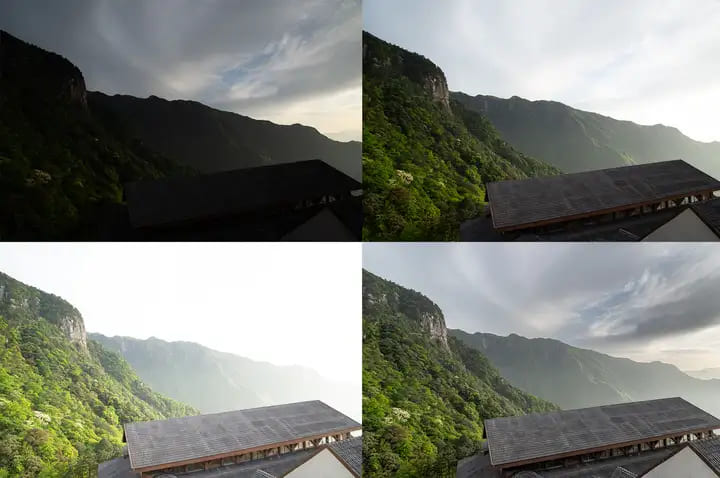
In practical terms, in a high-contrast scene, preserving detail in the sky results in dark ground. Conversely, preserving ground detail leads to a washed-out sky.
Through HDR photography, by capturing three (or more) images—one overexposed to retain ground details, one normally exposed for mid-tones, and one underexposed to preserve sky details—these images are merged into one, achieving the effect of high dynamic range.
What Is the Difference Between Photography HDR and HDR Monitors?
You may often come across the term "HDR monitor," but is the HDR in monitors the same as HDR in photography?
The answer is no:
- HDR in photography is an image capture technique that involves capturing a broader dynamic range by taking multiple photos with varying exposures.
- HDR in monitors, on the other hand, is an image display technology that focuses on correctly displaying a wider dynamic range on the screen. The counterpart to HDR display technology is SDR (Standard Dynamic Range) display technology, which is currently the most common.
In simple terms, photos captured using HDR techniques can be displayed both in HDR and SDR formats.
However, HDR display requires high-end hardware, which is why it hasn't become widespread yet. This means that most images you encounter on the internet are still displayed in SDR format.
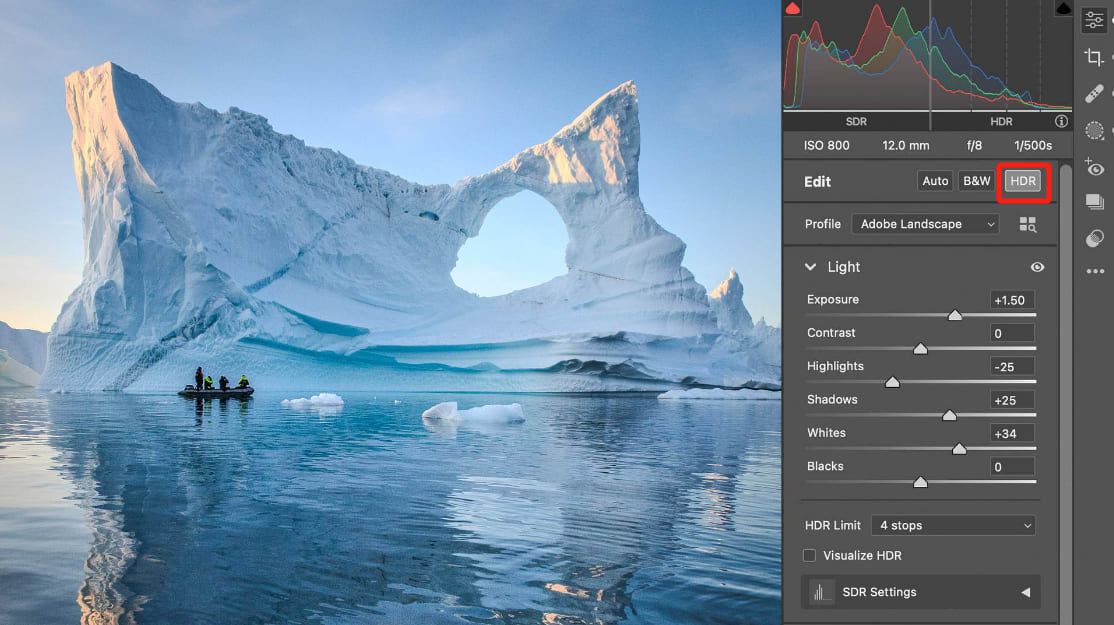
In Camera RAW, there's an option for HDR display. When you activate this feature and your monitor supports HDR, you'll see your photos displayed in HDR.
Viewing photos in HDR can create a more immersive experience. However, this feeling can only be truly appreciated when you view them on an HDR monitor. It's hard to visually convey this experience through images or describe it adequately in words.
Pre-Shooting Techniques for HDR Photography
HDR in photography is fundamentally an image capture technique, so to achieve the correct HDR effect, you first need to capture the original materials for HDR synthesis.
Therefore, during the pre-shooting phase, you will need to take multiple photos with varying exposures, typically 3 photos or more.
Here are some techniques for capturing HDR materials in photography:
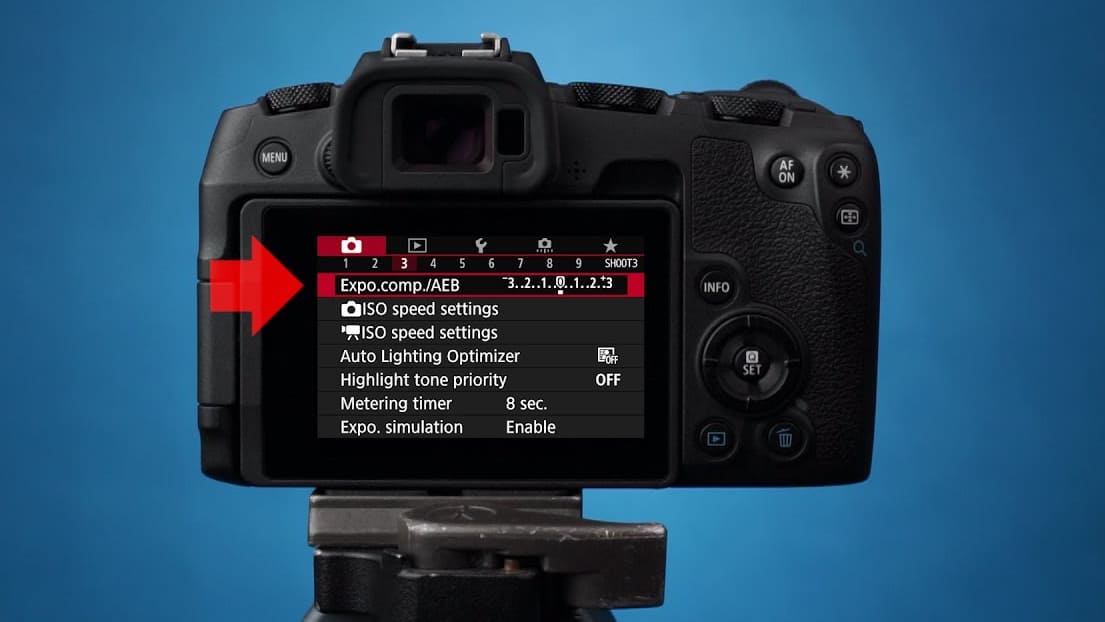
1. Utilize Auto Exposure Bracketing (AEB) Function
Most cameras come with the Auto Exposure Bracketing (AEB) feature. When activated, the camera automatically takes multiple shots with different exposure levels, including normal, underexposed, and overexposed shots.
AEB is often the simplest and most convenient method.
2. Use a Tripod for Stability
Since you'll need multiple photos for later synthesis into one image, all shots with different exposures must be taken from the same scene and angle. Stability is crucial.
A reliable tripod provides steady support, preventing image misalignment caused by camera shake.
3. Shoot in RAW Format
When shooting using HDR composite techniques, opting for RAW format over straight JPG offers greater adjustment flexibility in post-processing. Maximizing the dynamic range of the image allows you to freely create the style you desire.
Post-Processing Techniques for HDR Photography
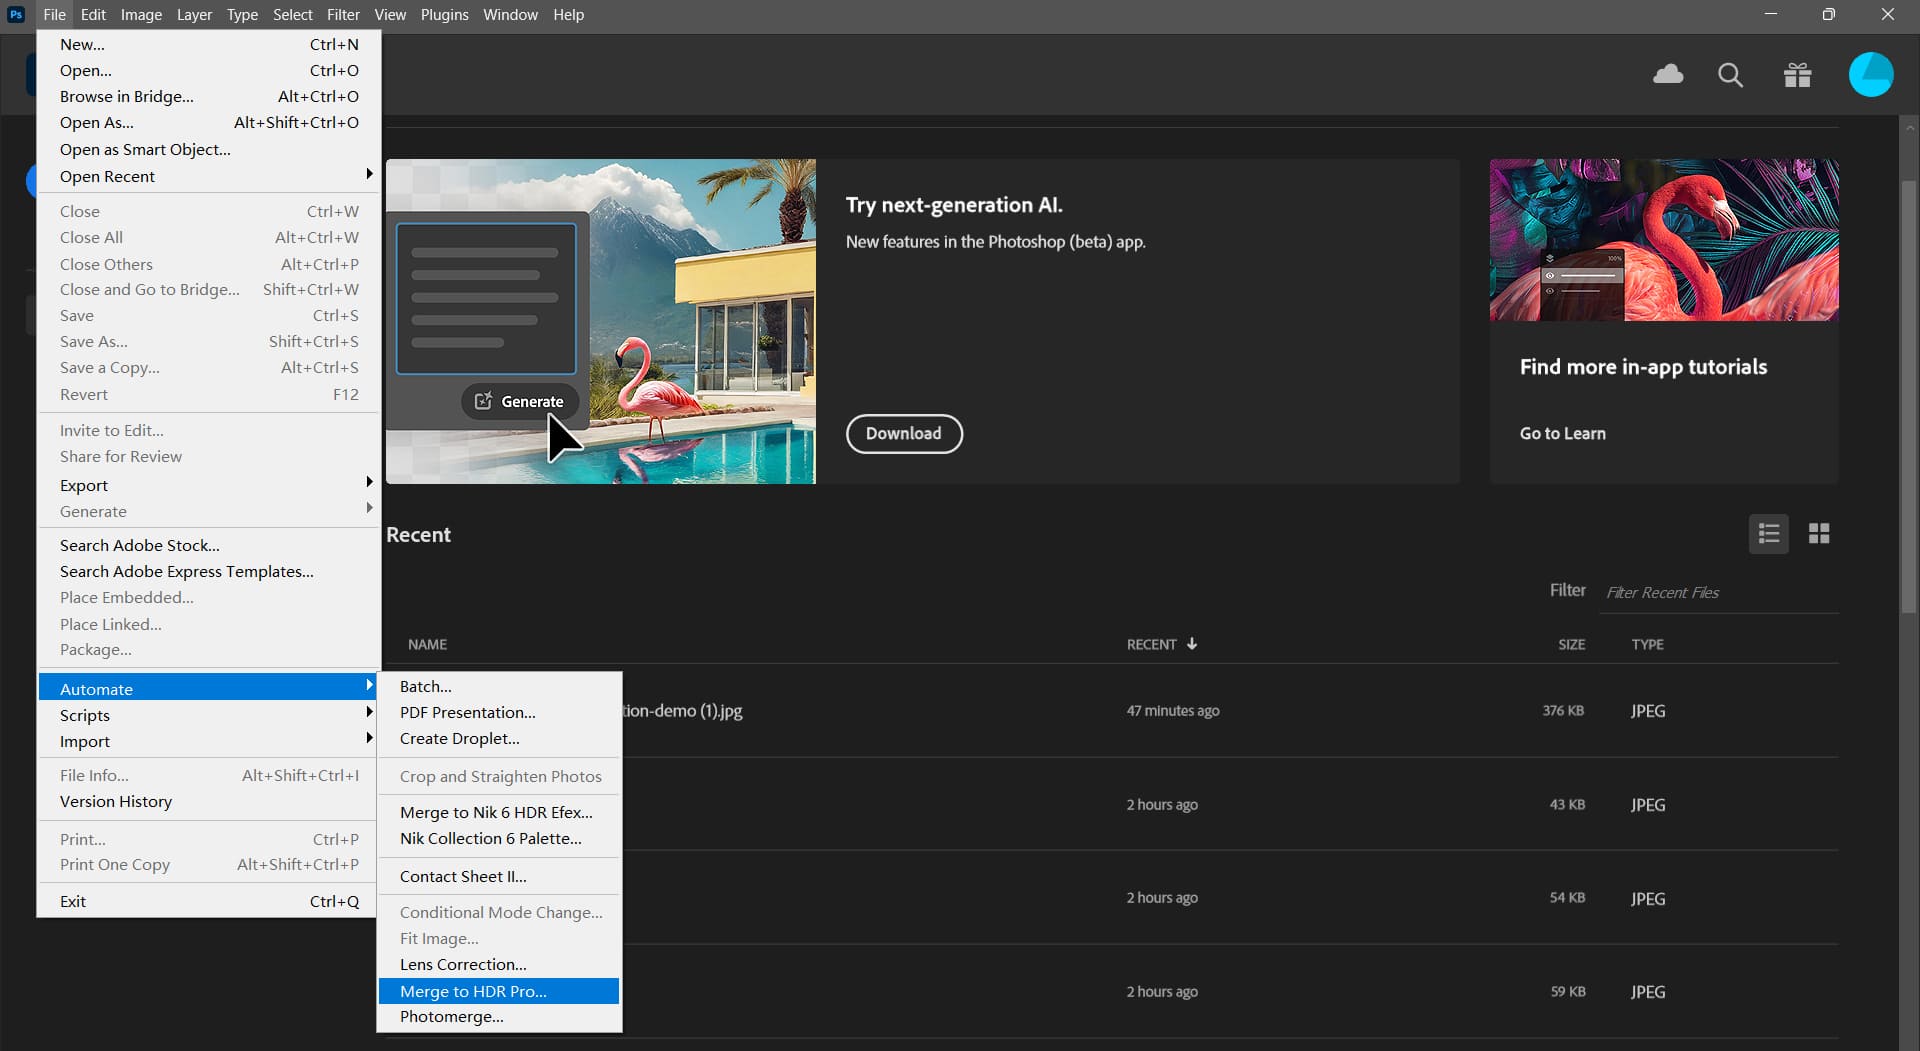
When it comes to handling HDR photography, numerous photo editing software options are available for merging and processing HDR images. Let's take Adobe Photoshop as an example to walk through a straightforward and rapid method for merging HDR images.
To begin, ensure you have three or more photos ready for HDR merging. In Adobe Photoshop, navigate to the top menu and select "File," then "Automate," and finally "Merge to HDR Pro."
Upon selecting these options, a panel titled "Merge to HDR Pro" will appear. Here, you can add the photos you wish to merge for HDR. If your photos were taken without a tripod, it's advisable to enable the "Attempt to Automatically Align Source Images" option.
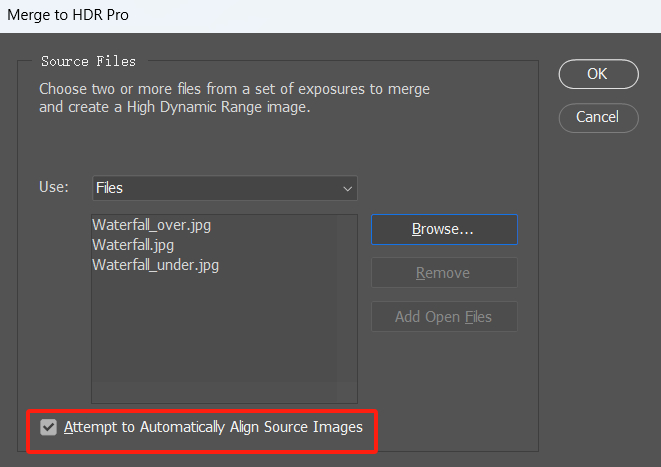
After adding your photos, click "OK." This action will open another panel, displaying thumbnail previews of the source images and a preview of the merged result.
Next, you'll need to choose between 16-bit or 32-bit mode. Opting for 32-bit mode will retain more image details but result in larger file sizes. On the other hand, 16-bit mode provides a smaller file size while maintaining decent image quality.
It's important to note that only files with 32 bits per channel are capable of storing all HDR image data. Therefore, ensure you select the 32 bits per channel mode for the best results.
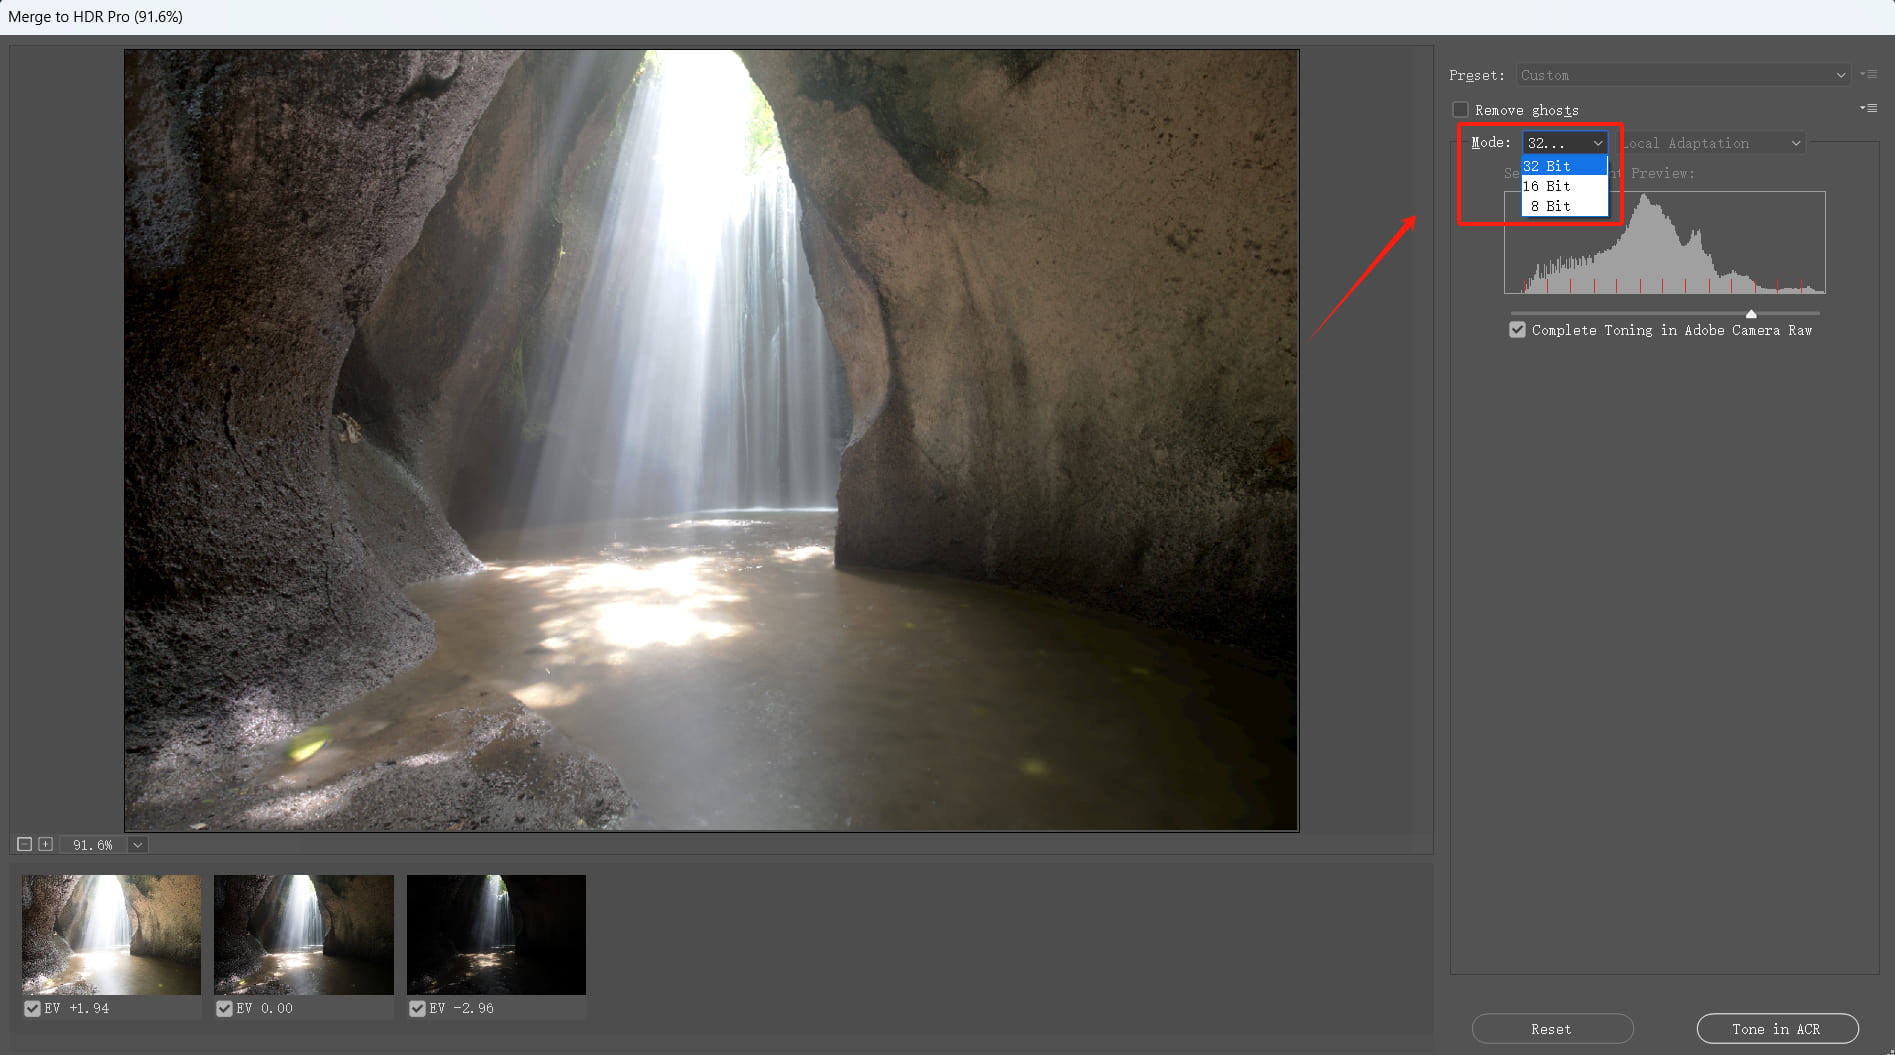
Within the 32-bit mode, you'll encounter a histogram and two options:
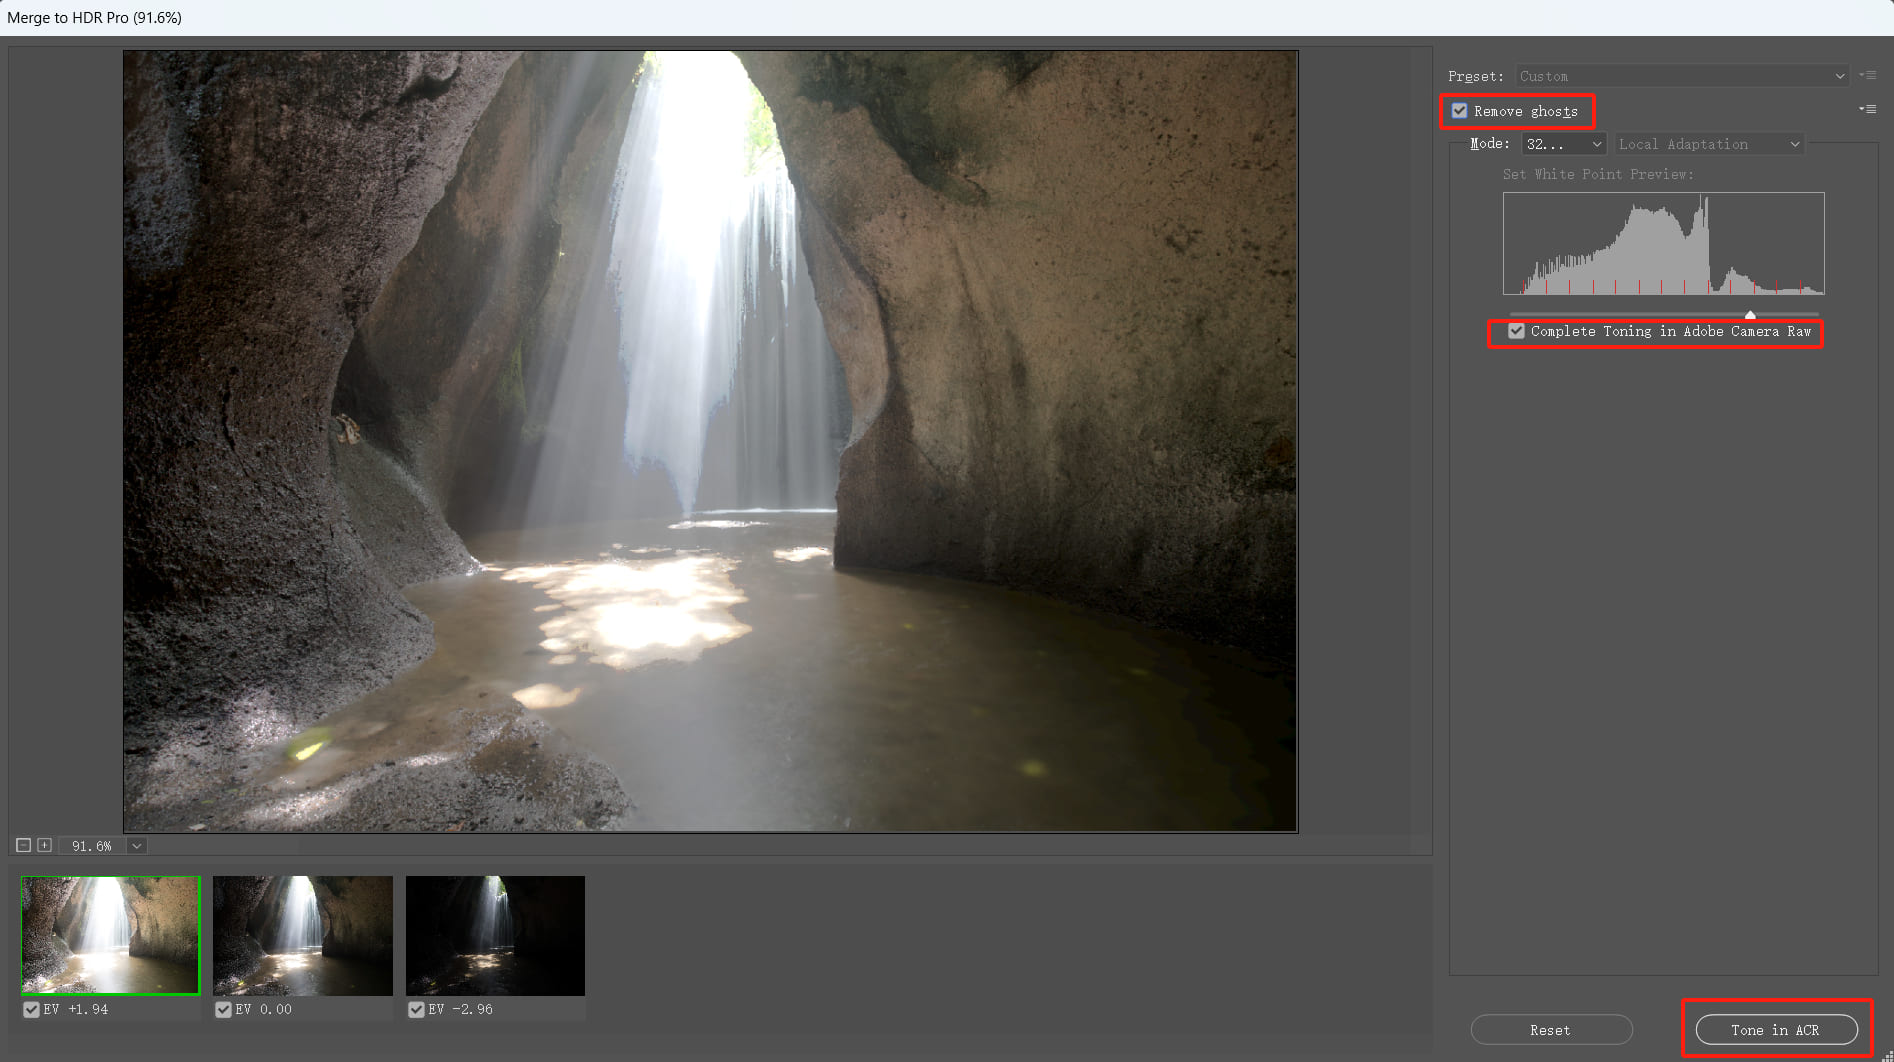
- Remove Ghosts: When your exposure bracketed photos have moving objects like cars, people, or leaves, check the "Remove Ghosts" option. In Photoshop, a green border will highlight the base image with the best color balance, while any moving objects found in other photos will be eliminated.
- Complete Toning in Adobe Camera Raw: By selecting this option, you'll see a "Tone in ACR" button appear in the bottom right corner of the panel. Clicking on this button opens the Adobe Camera Raw filter to adjust the colors of your HDR composite image.
Once you've fine-tuned all the color adjustments in Adobe Camera Raw, simply click OK to successfully complete the HDR photo merging process.
It's worth noting that during the HDR image merging, some noise might creep in. To boost image quality, consider sharpening and denoising the HDR image within Camera Raw.
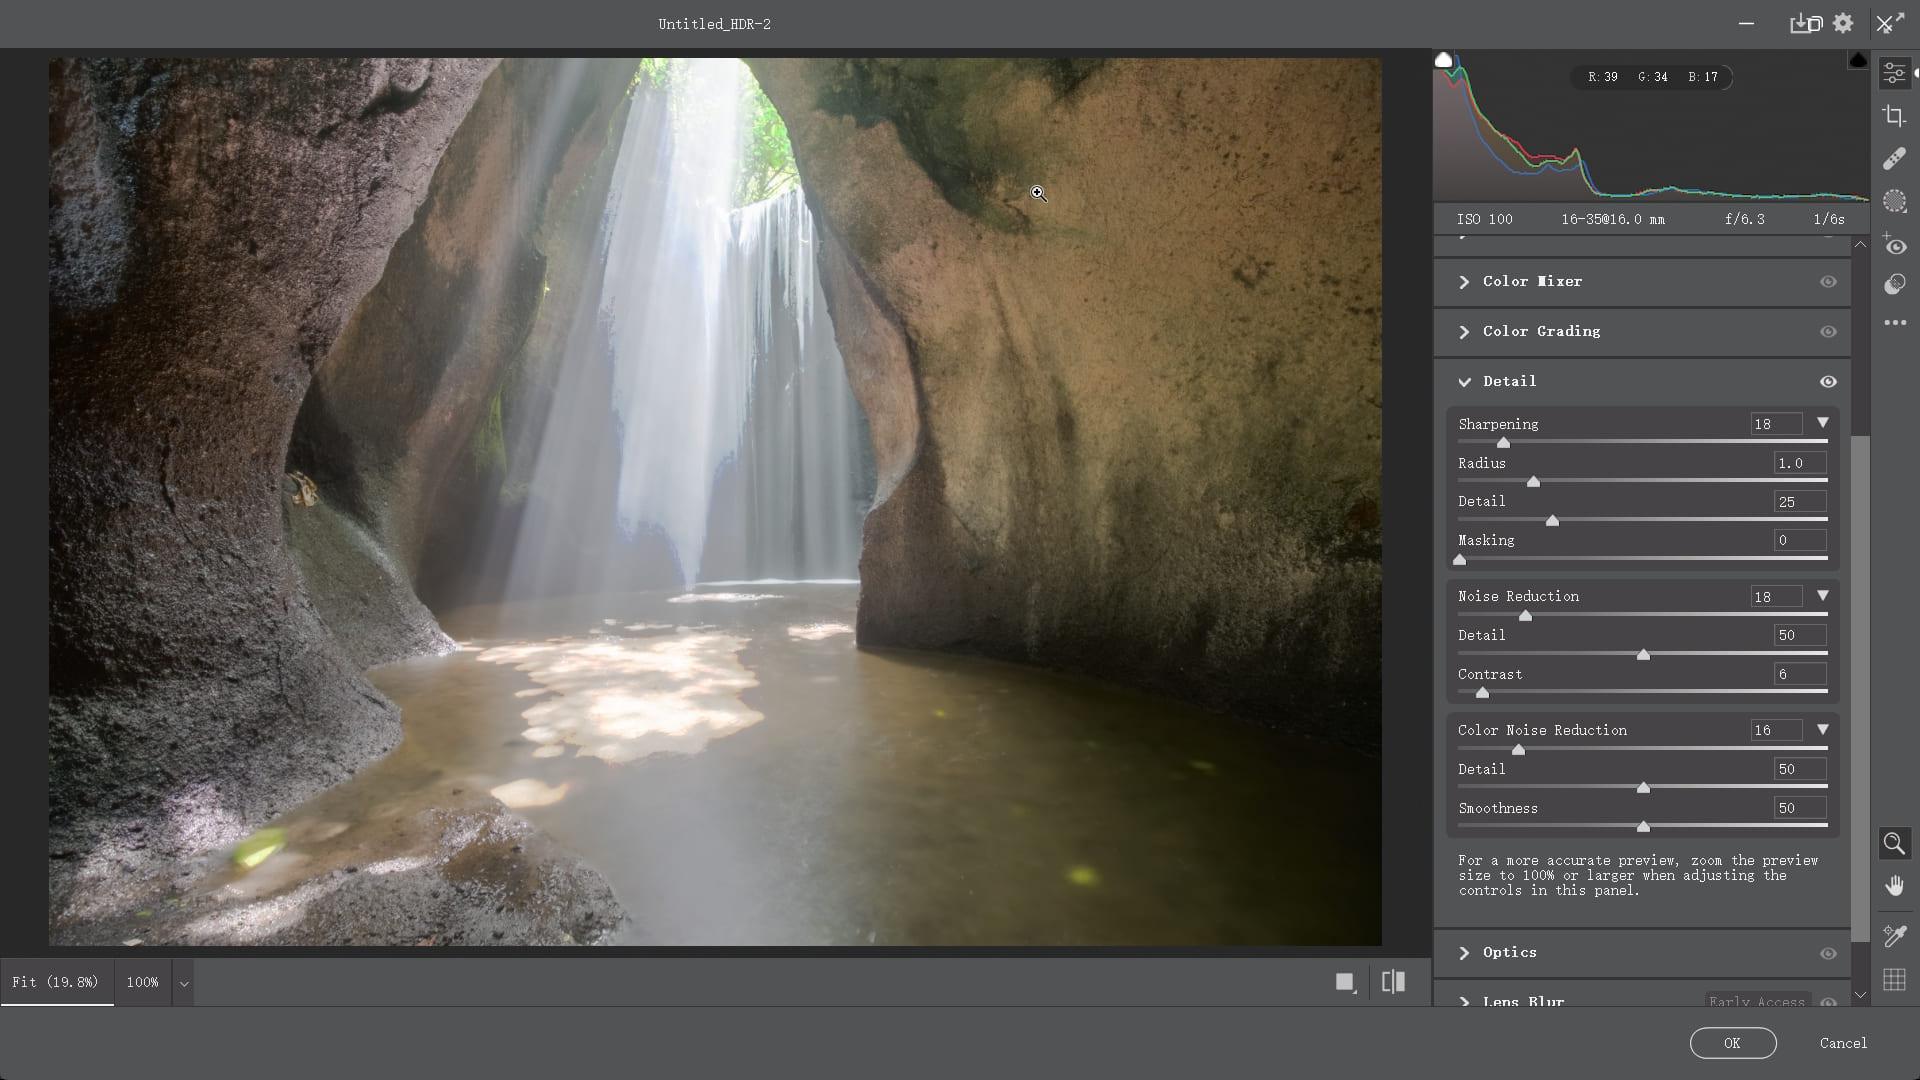
After this process, Photoshop will create a fresh HDR image for you. Feel free to continue tweaking and refining it to your liking. For example, you can experiment with various filter effects based on your personal preferences.
Final Thoughts About HDR Photography
By delving into the core principles of HDR photography and mastering the techniques of shooting beforehand and blending in Photoshop during post-processing, we believe you now have the ability to create exceptional HDR images.
The skills of HDR photography not only unveil richer details and a broader dynamic range in your photos but also authentically portray the beauty you witness in landscapes and scenes.
If you seek to explore different techniques and tools to streamline your workflow, you might find the TourBox, a creative controller beloved by many photographers and digital artists, appealing.

Imagine managing, editing, and color grading a vast array of photos as if using a game controller, where TourBox offers a similar tactile experience.
You can completely ditch the use of a keyboard for photo post-processing. TourBox streamlines every step of your photo editing, and you won't feel any fatigue even after prolonged use.

Our tutorial on HDR photography concludes here. Stay creative, keep progressing, and anticipate creating more awe-inspiring pieces.