How to Add Keyframes in Premiere Pro: A Step-by-Step Guide
Adding keyframes is a crucial step in video editing, as it enhances the smoothness of animation and allows for adjusting audio volume.
In Adobe Premiere Pro, adding keyframes is a straightforward process, but there are some important details to keep in mind. In this tutorial, we will analyze how to add keyframes in Premiere Pro from various perspectives. Without further ado, let's get started!

In this article, you will learn:
- What Are Keyframes?
- How to Add Keyframes in Premiere Pro?
- How to Delete Keyframes in Premiere Pro?
- How to Move Keyframes in Premiere Pro?
- How to Copy Keyframes in Premiere Pro?
- How to Add Keyframe Interpolation in Premiere Pro?
- Key Details to Consider When Adding Keyframes in Premiere Pro
- How to Improve Efficiency in Premiere Pro?
What Are Keyframes?
From Hollywood special effects movies to the casual Vlogs you shoot, they are all composed of a series of continuous images, where each image represents a frame.
A frame is the smallest unit of a single image in animation, equivalent to each frame on a film reel. To depict motion or change in any animation, at least two different states, represented by keyframes, need to be provided.
The computer automatically generates the intermediate frames or transitional frames that connect these keyframes.
In Premiere Pro, you can create seamless animation effects by adjusting various parameters such as motion, effects, audio, and many others.
For example, video keyframes can control attributes such as position, size, opacity, rotation, and more, while audio keyframes can adjust volume, pitch, reverb, and other parameters.
By adding keyframes, you can create dynamic effects in your video or audio, making the entire content more engaging and captivating.
How to Add Keyframes in Premiere Pro?
There are two ways to add keyframes in Premiere Pro:
- Adding Keyframes Directly on the Timeline
- Adding Keyframes Using the "Effects Controls" Panel
1. Adding Keyframes Directly on the Timeline
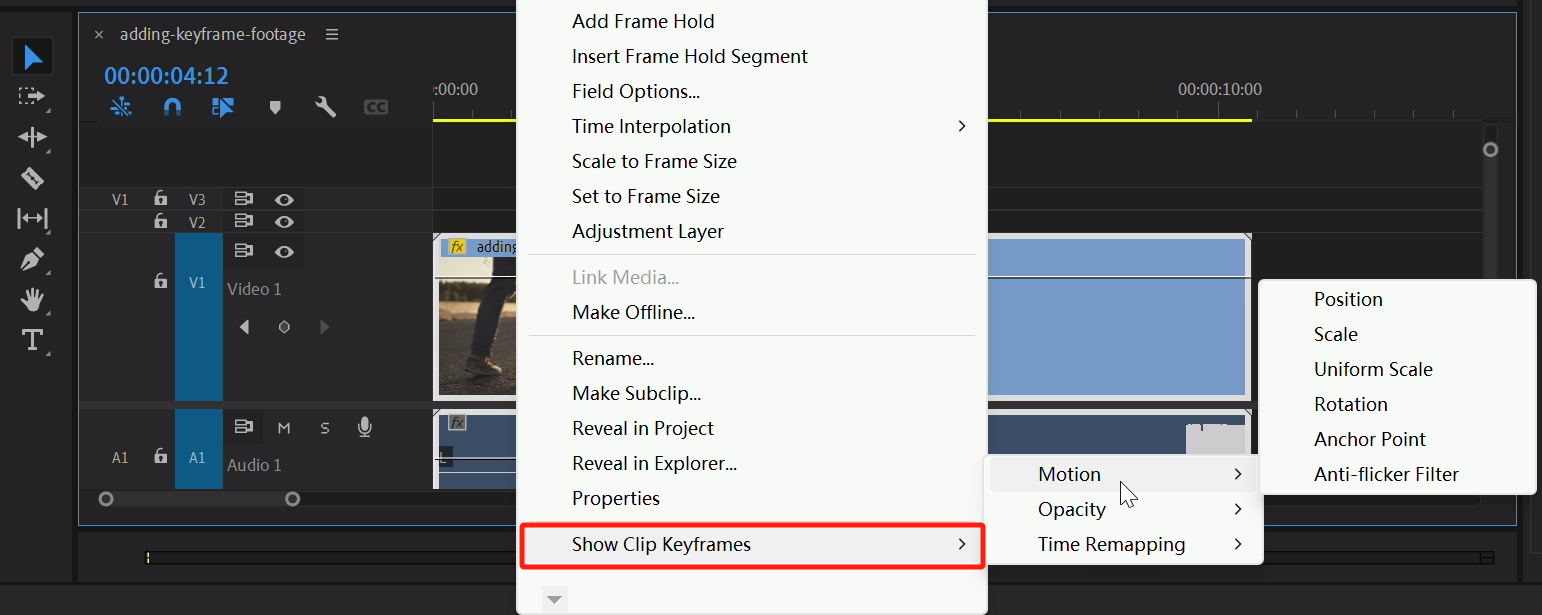
Import the video or audio you want to edit into Premiere Pro and drag it onto the timeline. Then, select the desired video or audio track on the timeline, right-click, and choose "Show Clip Keyframes."
You will see three keyframe controls under "Show Clip Keyframes": Motion, Opacity, and Time Remapping. Depending on the effect you want to achieve, make the appropriate selection. This will display keyframes for the corresponding properties on the timeline.
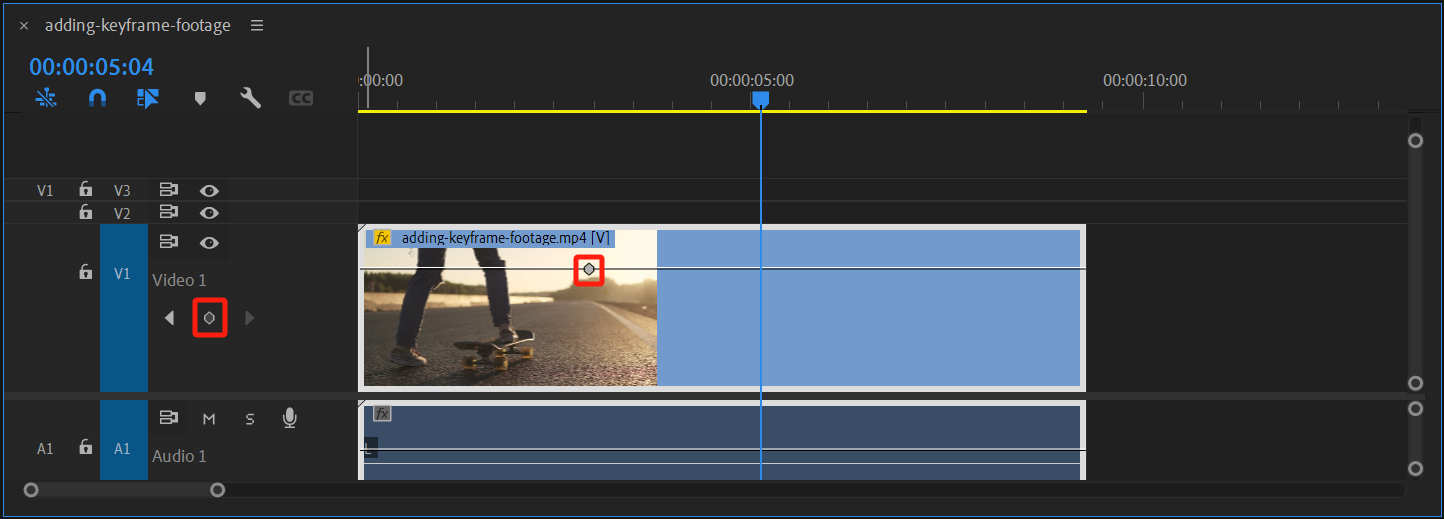
By zooming in on the track, you will notice a line running along it. If you try dragging this line, you will see a changing value. In Premiere Pro's default state, this line controls opacity.
Play the track and pause at the desired position where you want to add a keyframe, or simply drag the playhead to the target location.
Click on the "Add-Remove Keyframe" icon located on the left side of the track, which looks like a small diamond. This will add a keyframe.
How to quickly adjust the length and height of tracks in Premiere Pro?
While holding the Alt key (Option key for Mac users), place the mouse cursor on the timeline and scroll the mouse wheel to adjust the length of the timeline track. To adjust the height of a selected track, hold the Alt key and scroll the mouse wheel at the front end of the track.
It's also possible to adjust the height of audio tracks to modify the waveform display.
2. Adding Keyframes Using the "Effects Controls" Panel
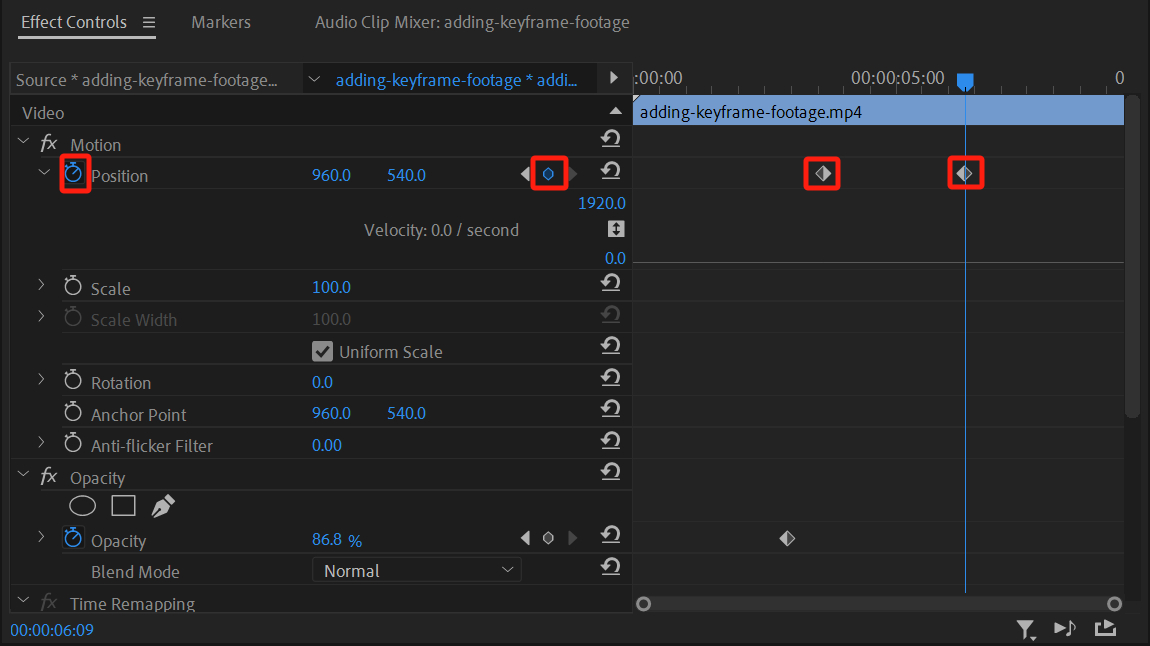
Select the video or audio track where you want to add keyframes. Then, navigate to the "Effects Controls" panel and locate the desired property, such as position, size, volume, and more.
Highlight the property you wish to adjust, click on the ”Toggle Animation“ icon on the left side that resembles a stopwatch, and then click on the small diamond-shaped ”Add/Remove Keyframe“ icon to add a keyframe.
On the timeline, you can adjust the value of the property by dragging the keyframe.
Additional Tip:
You can make your workflow even more convenient by clicking on Show/Hide Timeline View, located in the top right corner of the Effect Controls panel. This will display or hide the timeline for the selected clip on the right side of the panel.
This allows you to make keyframe adjustments directly on the timeline within the panel, providing a seamless editing experience.
How to Delete Keyframes in Premiere Pro?
Deleting keyframes in Premiere Pro is also a simple process. Just select the keyframe you want to remove and press the "Delete" key on your keyboard.
You can also remove the currently selected keyframe by clicking on the "Add/Remove Keyframe" icon again.
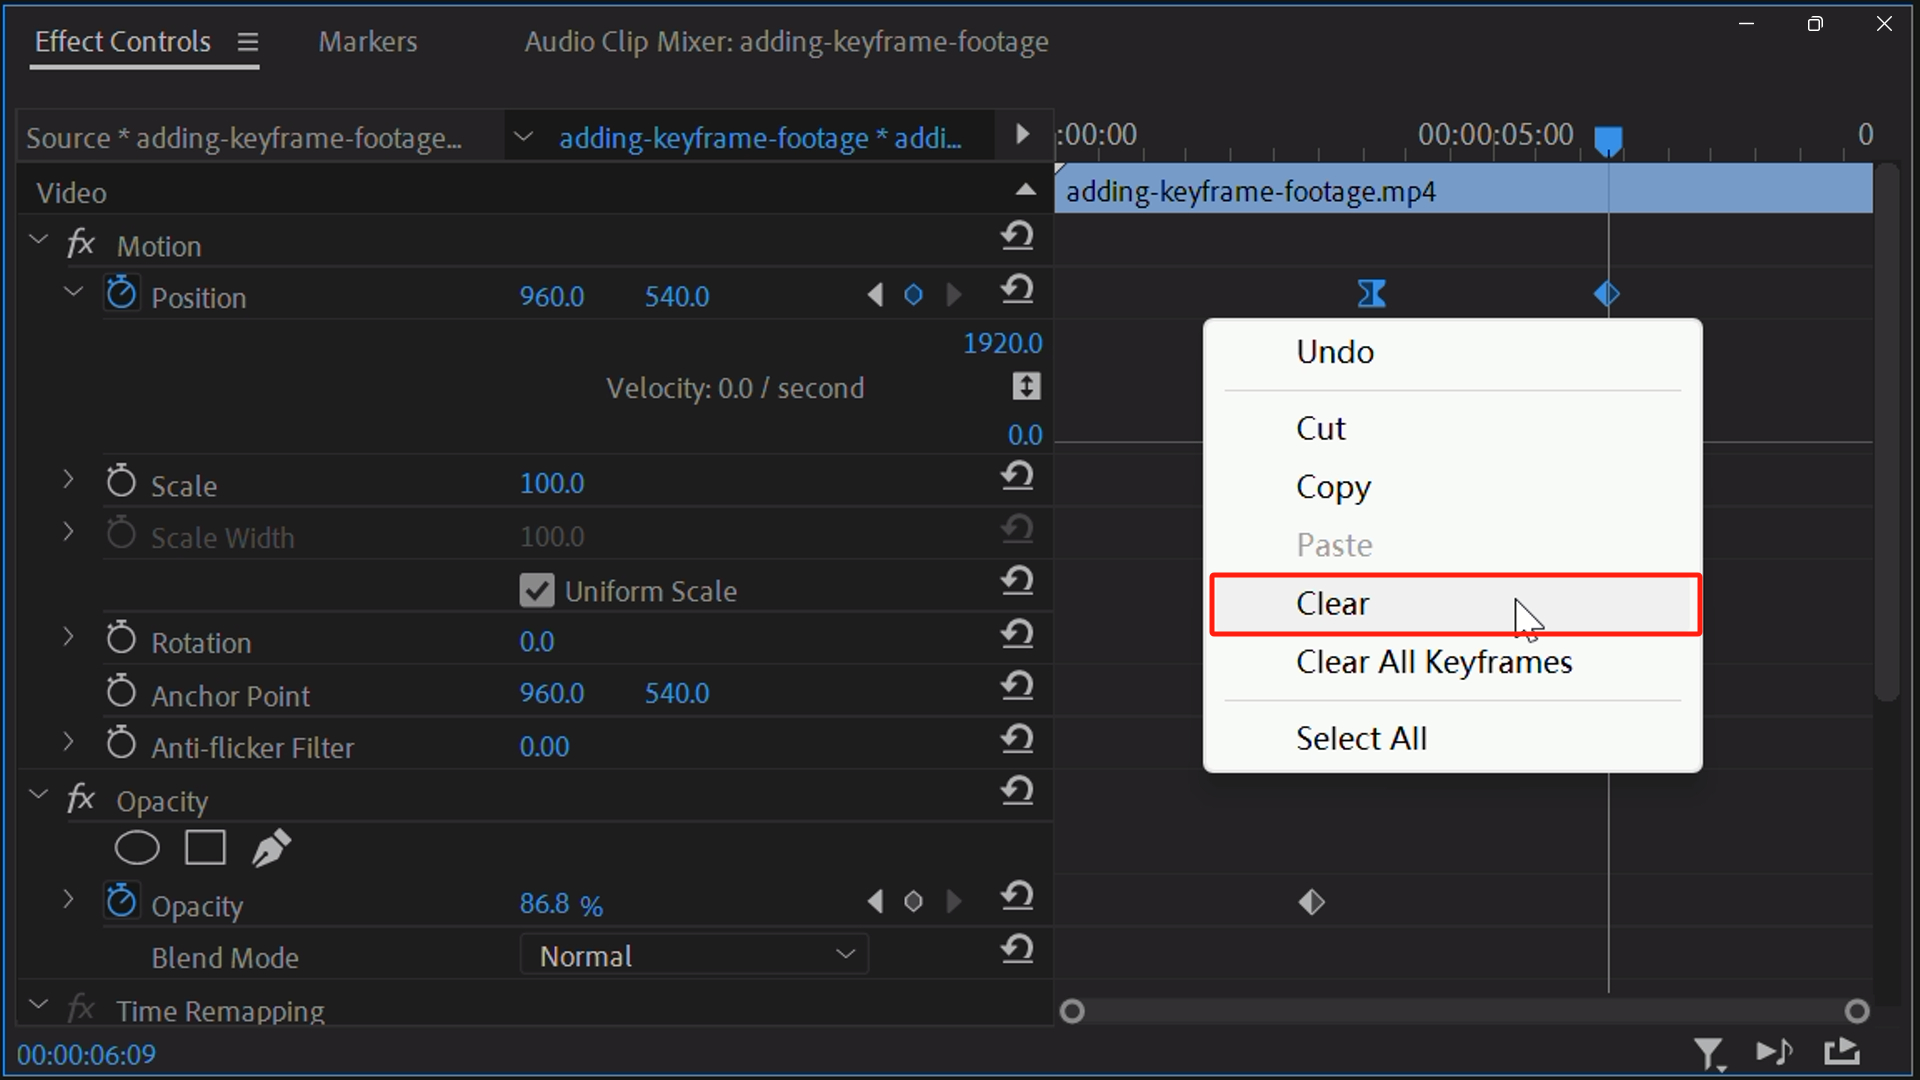
To delete multiple keyframes at once, you can hold down the Shift key in the Effects Controls panel and click on the keyframes you want to remove one by one on the timeline.
Then, right-click on the timeline panel and select "Clear," as shown in the image below. This allows you to delete multiple keyframes simultaneously.
Additional Tip:
When the keyframe button is blue, it indicates that the keyframe is in a selected state.
How to Move Keyframes in Premiere Pro?
Moving the position of keyframes can control the pacing of an animation. For example, the farther apart two keyframes are, the slower the resulting animation will appear. Conversely, the closer two keyframes are, the faster the resulting animation will be.
You can directly click and hold the left mouse button on a keyframe in the timeline panel, then move the cursor left or right. Once you reach the desired position, release the left mouse button to complete the movement.
To move multiple keyframes at once, simply hold down the Shift key while clicking on each keyframe you want to move, and then drag them together.
How to Copy Keyframes in Premiere Pro?
When creating films or animations, it is often necessary to apply the same animation effects to different elements, requiring the use of identical keyframes.
In Premiere Pro, you can efficiently replicate animations for other elements by copying and pasting keyframes from a completed animation.
Note:
The process of copying keyframes differs between the timeline panel and the Effects Controls panel in Premiere Pro. The Effects Controls panel offers more keyframe manipulation options, so it's important to differentiate between the two.
1. Use the Alt Key for Copying
- Select the keyframe(s) you want to copy on the timeline in the Effects Controls panel.
- Hold down the Alt key and drag the keyframe(s) left or right to duplicate them.
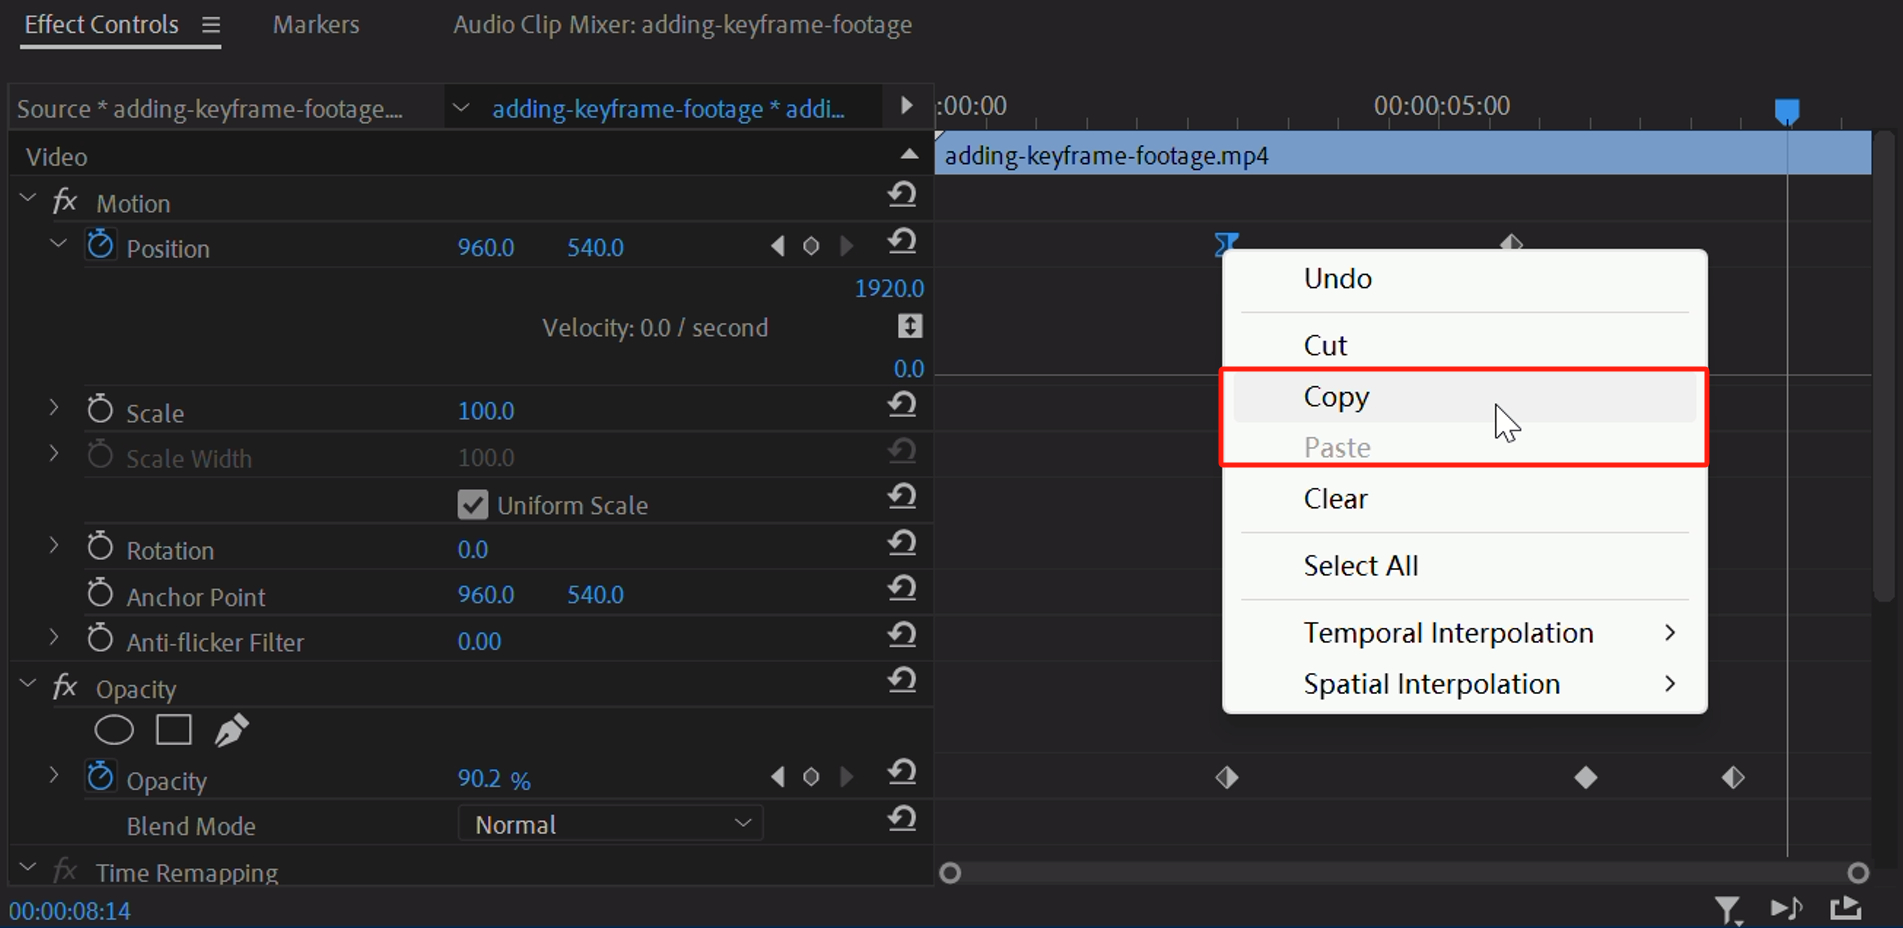
2. Copy from the Context Menu
- Right-click on the keyframe(s) you want to copy in the Effects Controls panel.
- Choose the "Copy" option from the context menu.
- Move the playhead to the desired position.
- Right-click and select the "Paste" option from the context menu. The copied keyframe(s) will appear at the playhead position.
3. Use Keyboard Shortcuts for Copying
- Select the keyframe(s) you want to copy by clicking on them.
- Use the Ctrl+C shortcut to copy the keyframe(s).
- Move the playhead to the desired position.
- Use the Ctrl+V shortcut to paste the copied keyframe(s). This process works in both the timeline panel and the Effects Controls panel.
Additional Tip:
In addition to copying and pasting keyframes within the same element, you can also choose to copy keyframe animations to other elements.
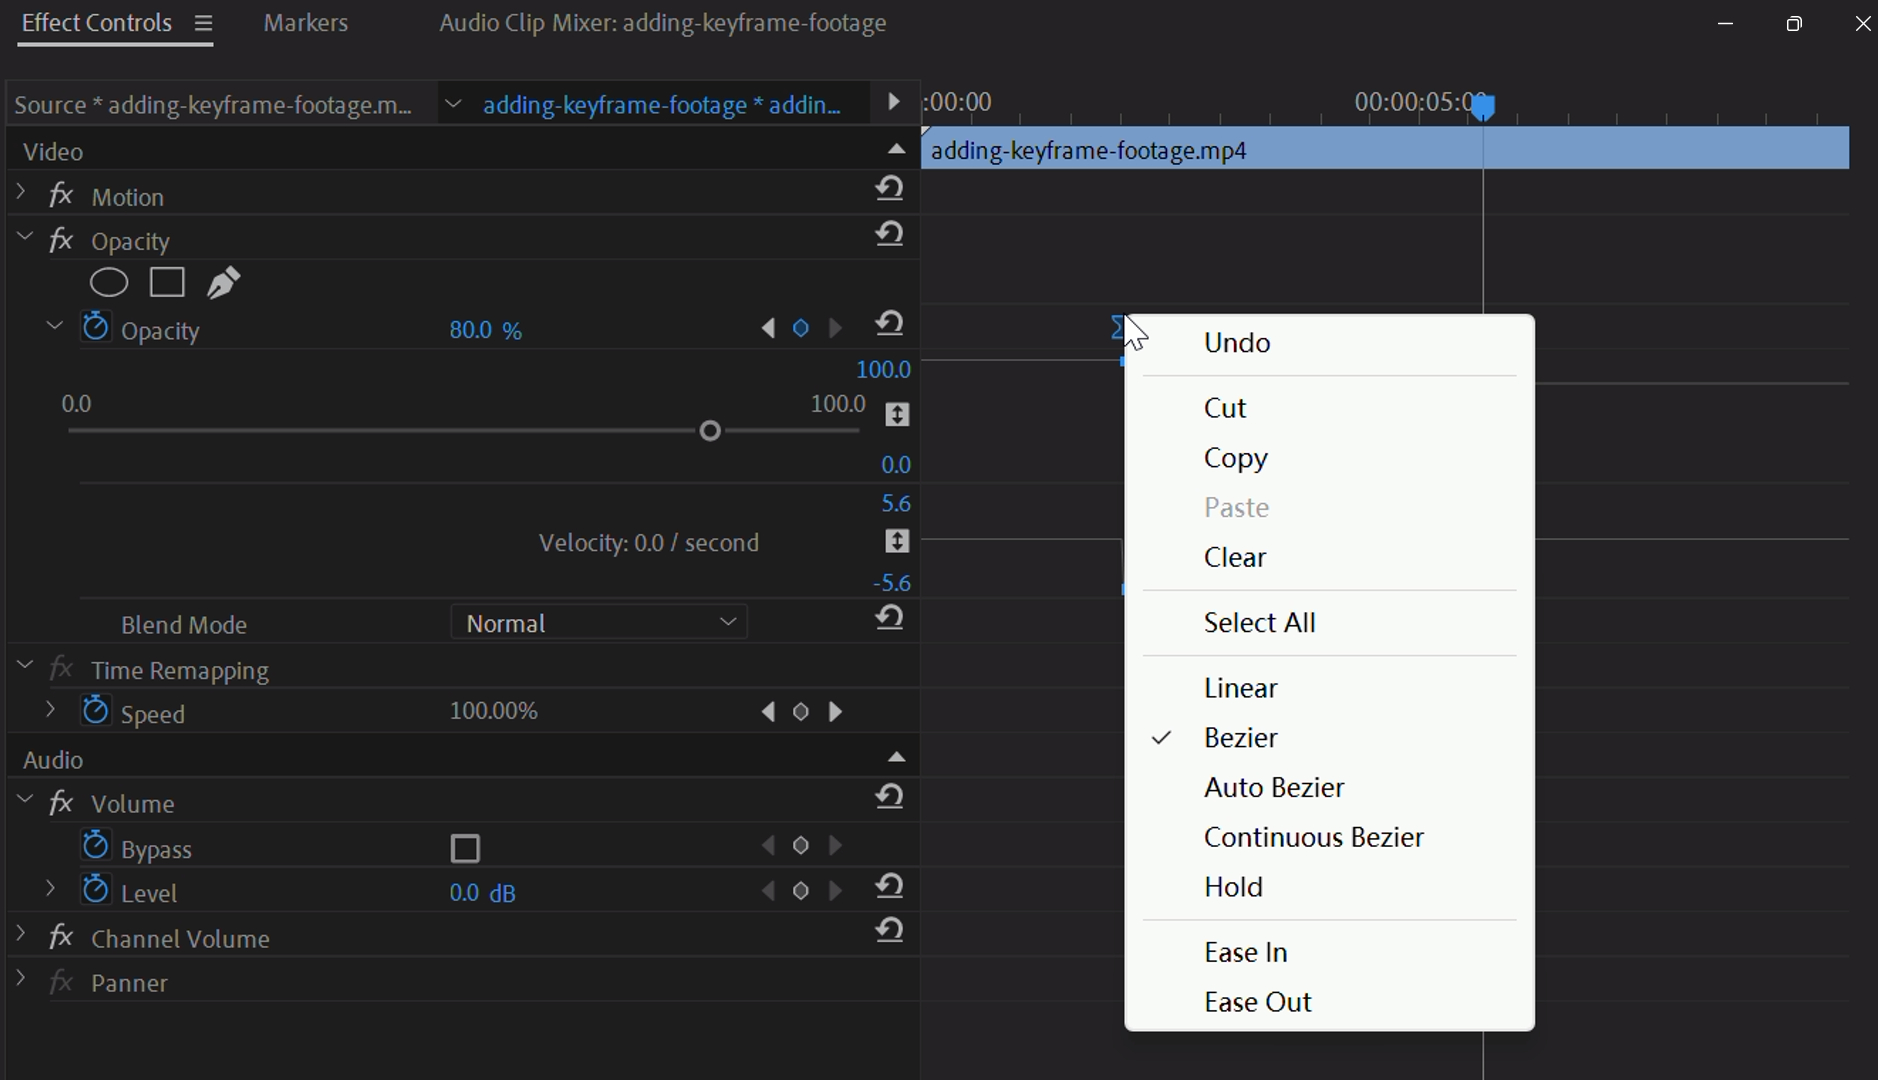
How to Add Keyframe Interpolation in Premiere Pro?
Interpolation refers to the process of filling in unknown data between two known keyframes. In simple terms, if you tell Premiere Pro that the value of a property in the first keyframe is 0, and in the second keyframe it is 100, the question of how to transition from 0 to 100 is about interpolation.
In Premiere Pro, keyframe interpolation allows you to control the speed and changes between keyframes, and it can be categorized into two main types: Temporal Interpolation and Spatial Interpolation.
Although Temporal Interpolation and Spatial Interpolation have several similar sub-options, they have different meanings.
- Temporal Interpolation: With this interpolation, you can precisely adjust the keyframes for time-based animations, such as opacity changes. This interpolation allows you to set the easing in and easing out of the keyframes, creating a smooth transition.
- Spatial Interpolation: When making spatial adjustments to a clip, such as position animations, you can adjust the spatial interpolation of the keyframes controlling the movement.
The concept of keyframe interpolation involves complex computer graphics calculations, which can be both tedious and difficult to understand. When it comes to choosing the interpolation option that makes your video or audio animation smoother, there are actually no strict rules.
The purpose of keyframes is to meet your desired object transformations, and often getting close to the desired effect is sufficient. In most cases, you can simply use Ease In or Ease Out.
Of course, you can further adjust the transition effects between keyframes using Bezier curves. Understanding the adjustment of Bezier curves is also straightforward – steeper lines result in faster changes, while flatter lines lead to slower changes.
Key Details to Consider When Adding Keyframes in Premiere Pro
When adding keyframes, it's important to pay attention to certain details to achieve the best animation effects. Here are a few things to keep in mind:
- Place keyframes at the appropriate timing to achieve optimal animation effects.
- Ensure smooth transitions between keyframes, avoiding abrupt changes that may appear jarring.
- When adjusting keyframe values, be mindful not to exceed the limits of the property. Doing so may result in unexpected or abnormal effects.
How to Improve Efficiency in Premiere Pro?
In the previous sections, we've covered how to add keyframes and manipulate their interpolation in Premiere Pro. Now, let's take a moment to explore how you can further enhance your workflow and boost efficiency while using Premiere Pro.
One tool that can greatly assist in streamlining your editing process is TourBox.

TourBox is a versatile controller specifically designed for creative professionals, including video editors. With its ergonomic design and customizable buttons, TourBox offers a seamless and intuitive editing experience.
By integrating TourBox into your Premiere Pro workflow, you can gain quick access to commonly used functions, such as adjusting timeline scrubbing, navigating through clips, and modifying keyframe values.
This means you can perform these actions with a simple twist, press, or slide of TourBox's knobs and buttons, saving you valuable time and effort.
And that concludes our tutorial on how to add keyframes in Premiere Pro. We hope you found it helpful. As a final suggestion, why not give TourBox a try and experience the difference it can make to your editing workflow?