How to Add Watermark in Lightroom Classic?
Lightroom Classic is an essential photo editing software for photographers who capture thousands of photos each year and love to share their work.
In addition to its ability to quickly enhance and process photos in batches, Lightroom Classic also allows you to add watermarks to your images.
Photography enthusiasts understand the importance of protecting the copyright of their work. In this tutorial, we will share how to add a watermark in Lightroom. Let's get started!

In this article, you will learn:
- Why Add Watermarks to Photos?
- How to Add Watermark in Lightroom?
- How to Save Watermarks as Presets?
- Recommended Professional Lightroom Watermark Plugin
- Final Thoughts About Adding Watermark in Lightroom
Why Add Watermarks to Photos?
Indeed, most photographers and photography enthusiasts are not fond of adding watermarks to their photos. Watermarks can disrupt the overall composition and aesthetics of the image.
However, online image theft is a common occurrence, and photographers can't let that hinder them from sharing their work for the sake of copyright protection.
If you value copyright, incorporating a simple copyright watermark using Lightroom Classic can be a great habit to adopt.
Another important reason is that adding your name as a watermark to your photos serves as self-promotion. If one of your photographic works goes viral, the watermark becomes your calling card, making more people aware of your talent.
But here's the catch: as editing software advances, removing watermarks from photos has become easier than ever. So, why bother going through the trouble of adding watermarks?
In reality, as long as you ensure that the photos you post on the internet and social media platforms have watermarks, anyone who removes them would be knowingly breaking both legal and moral boundaries.
Furthermore, as mentioned above, adding a watermark to your photos is like signing your work, which can greatly assist in self-promotion.
How to Add Watermark in Lightroom?
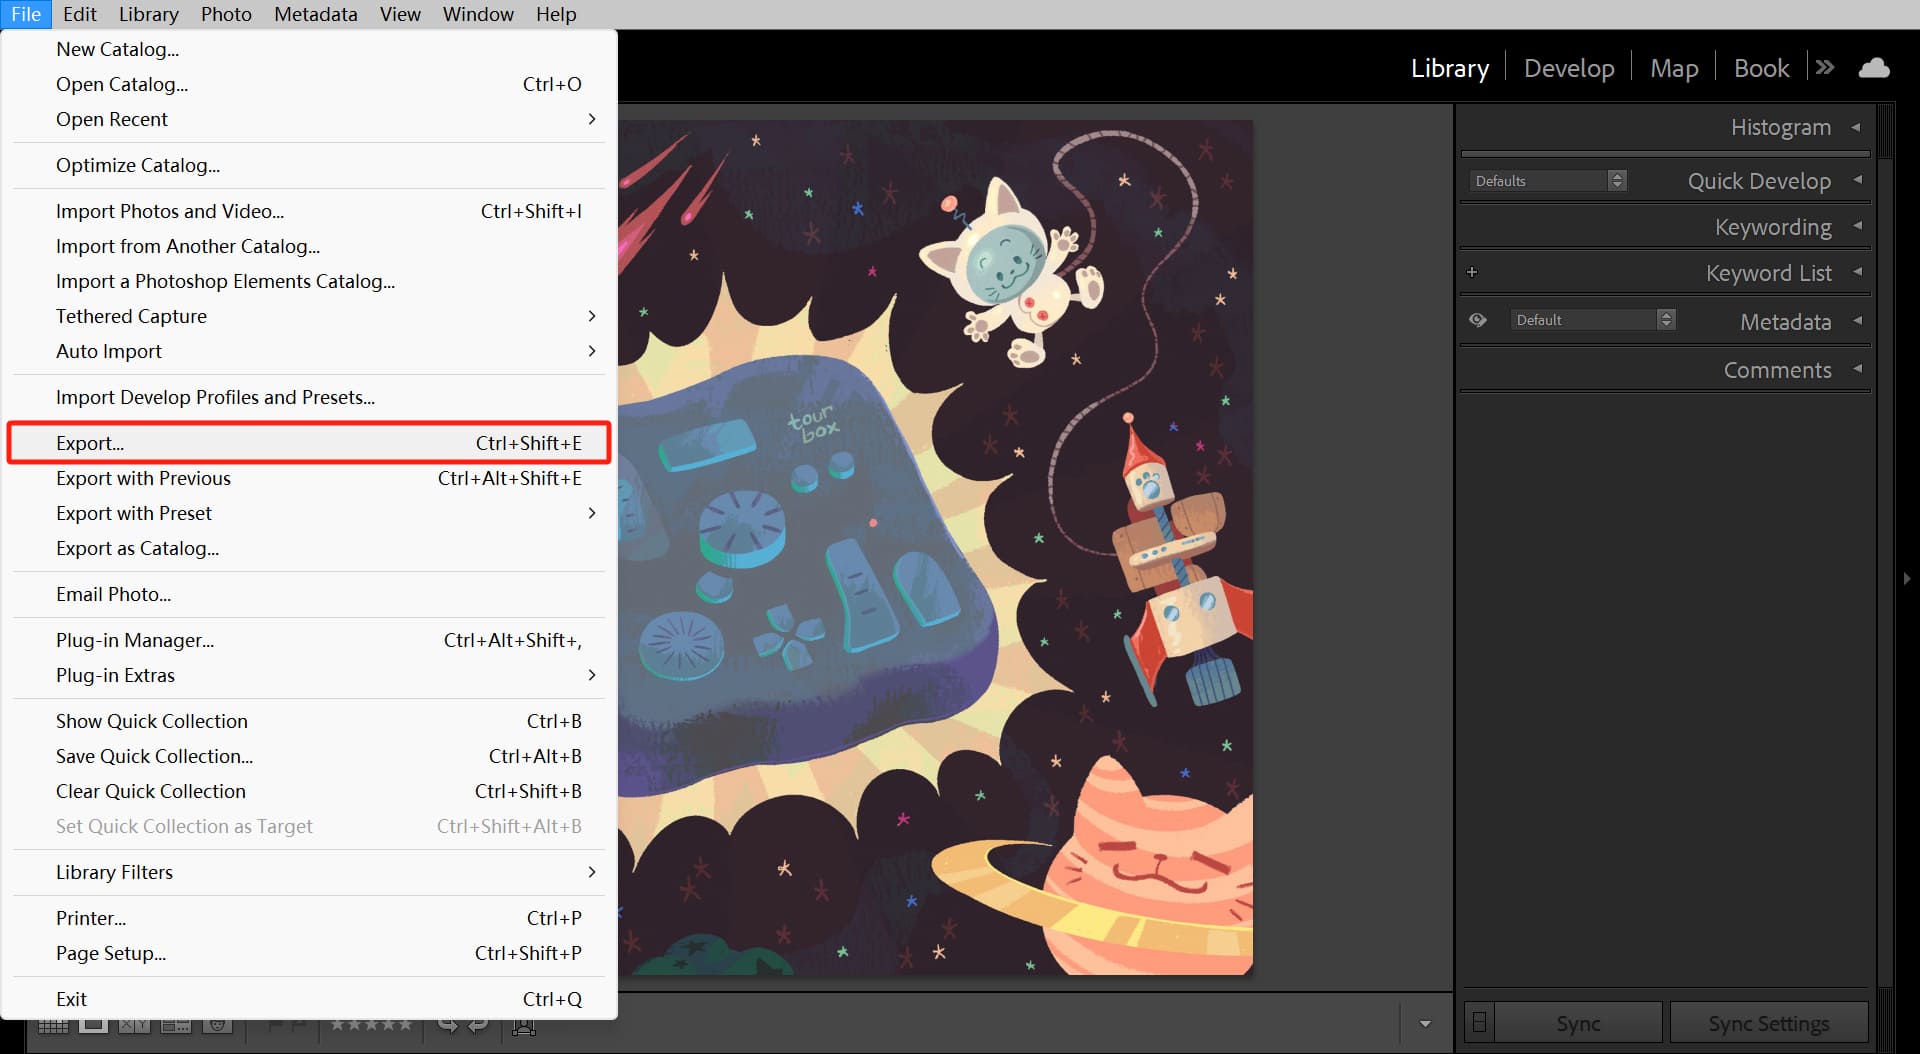
To begin, open Lightroom Classic and select all the photos in the Library module that you want to add watermarks to. Then, in the top menu bar, choose "File" > "Export".
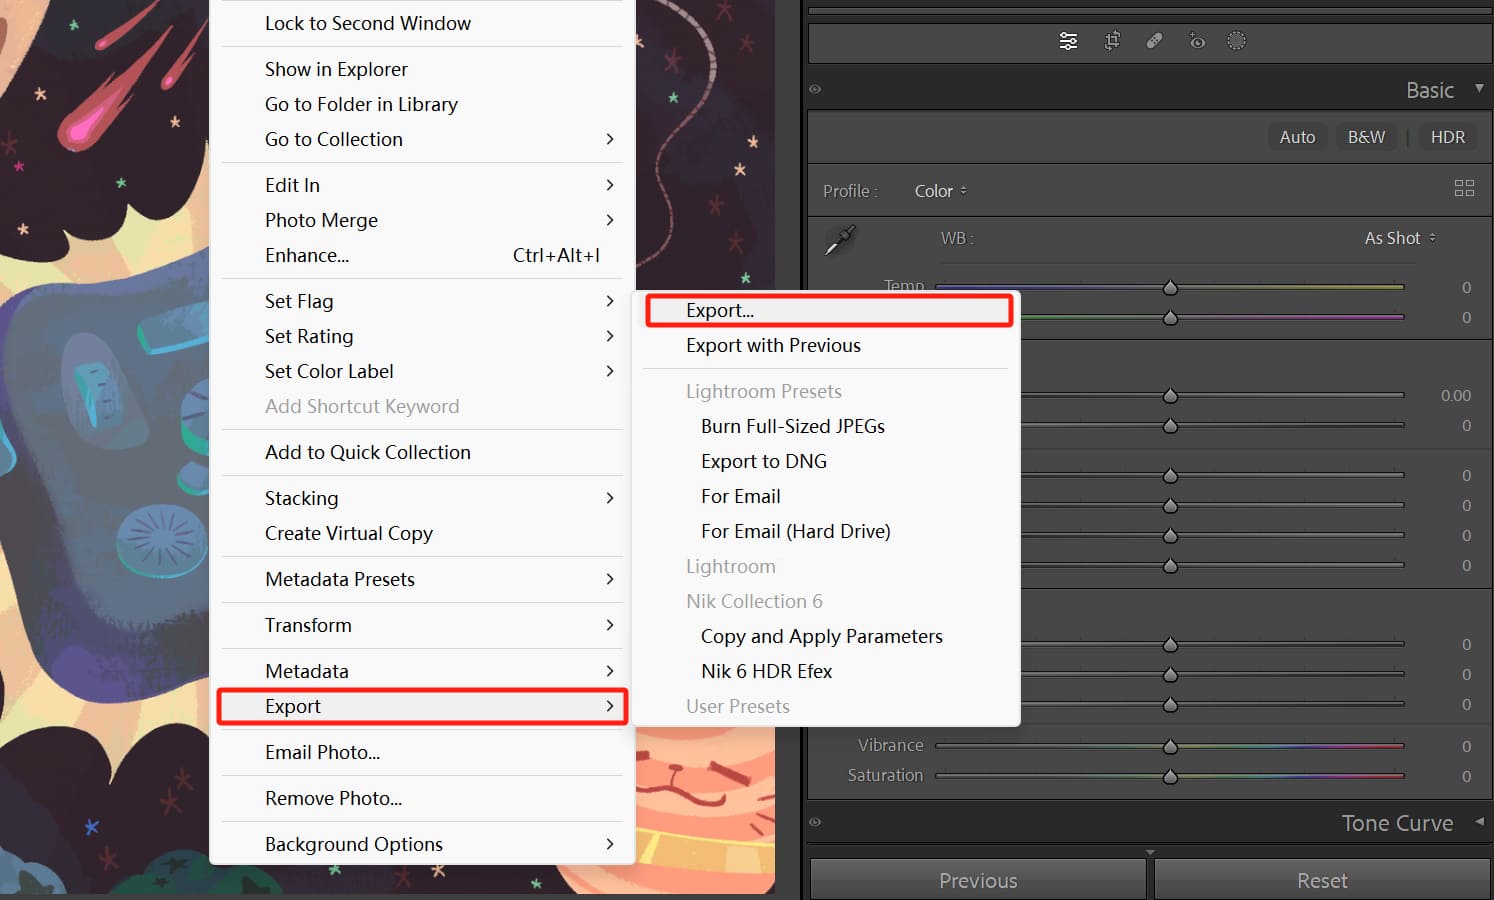
Alternatively, in the Library or Develop module, right-click on the photos you want to export, select "Export", and then choose "Export" again.
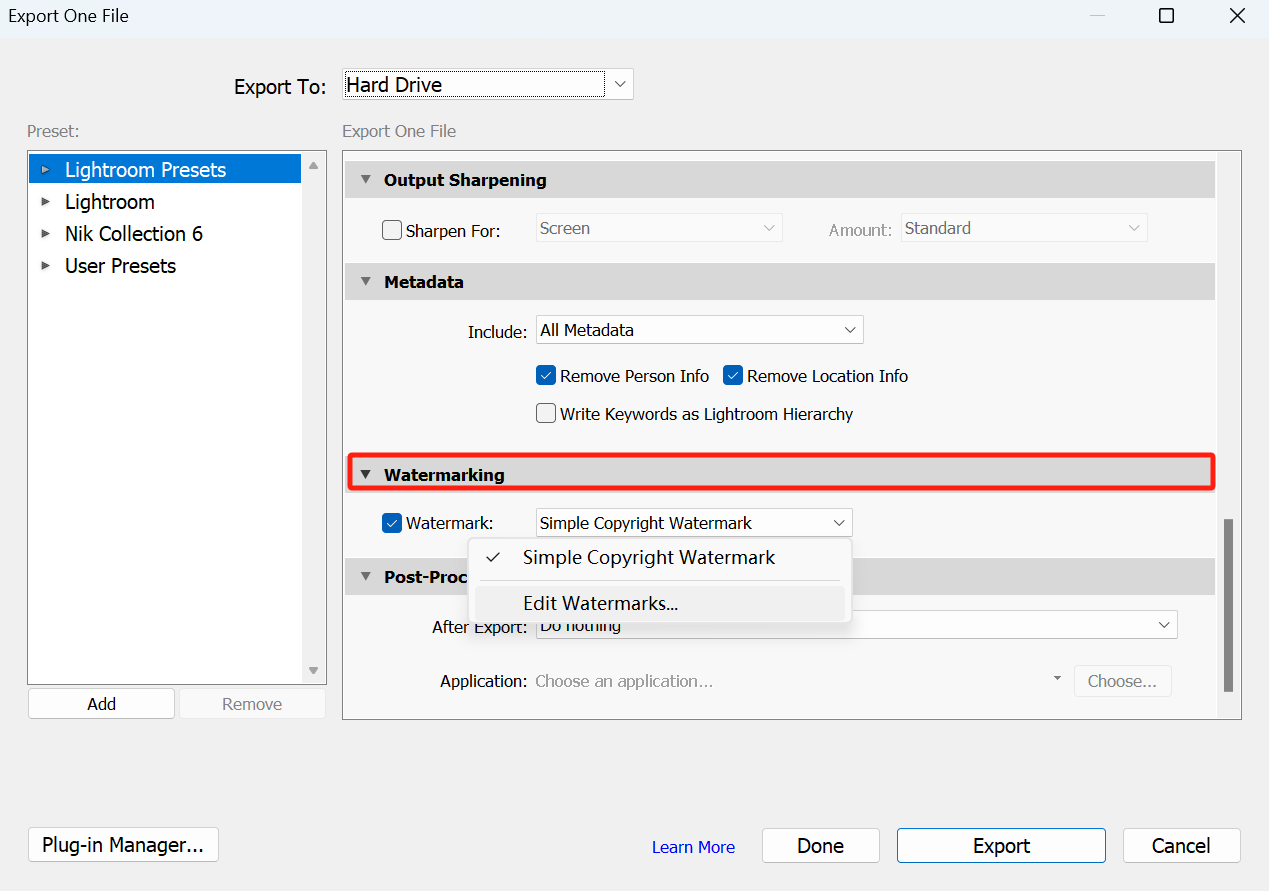
Both of these actions will take you to the export settings panel. In the export settings panel, locate the section for Watermarking. Check the box for watermarking and then select "Edit Watermarks".
In the watermark settings panel, you can customize the font, shadow, opacity, and other effects of the watermark. You can also choose a graphic as the watermark for your photos.
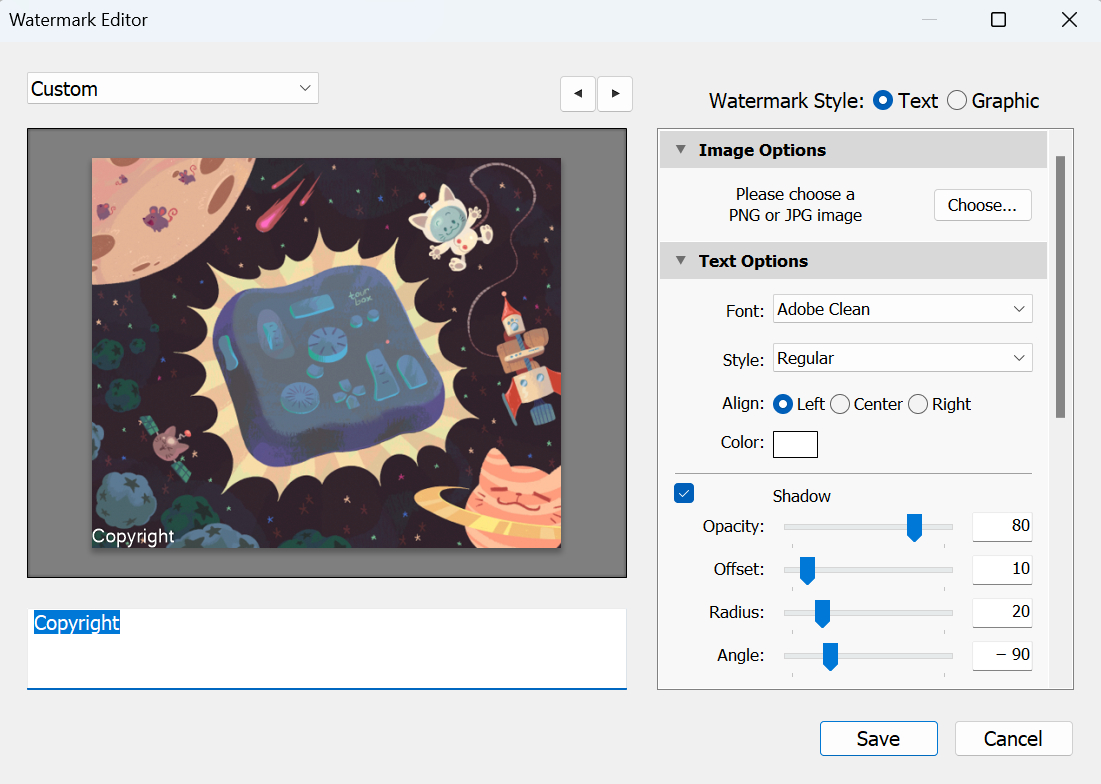
Finally, click "Save" and click on "Export" to successfully add the watermark to your photos.
Additional Tip:
We recommend choosing a low-saturation color for your watermark, such as gray.
This way, it minimizes distractions for viewers while appreciating the photo, and it also makes it more challenging for someone to remove the watermark by using color selection techniques.
How to Save Watermarks as Presets?
In Lightroom Classic, when you create a new watermark setting and save it, that setting is automatically saved as a watermark preset.
The next time you export photos, you can directly use this watermark preset. This means that whenever you have a need to export photos, you can easily embed the watermark.
All of this can be done in a matter of seconds, and you can effortlessly apply it to thousands of photos in batches.
In addition to watermark presets, you can also save export settings as presets on the left side of the export settings panel. This way, after you finish editing hundreds of photos, you can simply select them, right-click, choose "Export," and use the export preset you've created.
This way, the photos will be stored in the folder you specified, following the logic you designed, whether it's for screen sharing, printing, changing file names, or adjusting to specific sizes and resolutions.
Lightroom presets are a fantastic invention that saves you from the tedious task of tightening multiple screws like Charlie Chaplin in the Modern Times. They eliminate the repetitive and ineffective labor, making your workflow much more efficient and enjoyable.
But there's another creative tool that can greatly enhance your productivity and overall Lightroom experience, and it's beloved by photographers and digital artists alike. That tool is TourBox.

Imagine this: when you're sifting through photos in Lightroom, you need one hand on the keyboard and another hand on the mouse, browsing through them one by one. However, with TourBox, you can accomplish all of this with just one hand.
Taking Lightroom Classic as an example, using TourBox will simplify every step of your photo management and editing process. You'll undoubtedly love the unprecedented operational experience that TourBox brings to the table.
Visit our photo editing page to learn more about TourBox and how it can revolutionize your workflow.
Recommended Professional Lightroom Watermark Plugin
If you want to add information like aperture, shutter speed, ISO, and other details as watermarks in your photos, the built-in watermark settings in Lightroom Classic might not fully meet your needs.
That's why we recommend the LR/Mogrify 2 plugin, a professional Lightroom plugin. Once installed and activated, you can use tokens to add various field information when exporting your photos.
In addition to the common information like aperture, shutter speed, and ISO, you can also include details such as exposure value, exposure compensation, flash, lens, camera model, latitude, and longitude. Basically, if you can think of it, you can do it.
The only downside of this plugin is that you need to install the ImageMagick library in addition to the plugin itself.
This plugin has been around for many years and has always been one of Adobe's recommended plugins. It's so good that Adobe themselves might have been too lazy to include similar functionality in the software.
If you're interested, you can explore how to use this plugin:
- LR/Mogrify 2: https://www.photographers-toolbox.com/products/lrmogrify2.php
- ImageMagick: https://imagemagick.org/script/download.php
Final Thoughts About Adding Watermark in Lightroom
Although there are free tools available online to add watermarks, they generally produce low-quality images and offer limited customization options.
Therefore, it's still essential for photographers and content creators to master how to add watermarks in Lightroom. After all, if you're still manually adding watermarks one by one, it's just too time-consuming.
And that concludes our tutorial. In this tutorial, we shared some knowledge and techniques on how to add watermarks in Lightroom, hoping it has been helpful to you.
If you're interested in the creative tool TourBox, you can start with the more cost-effective option, TourBox Lite, to experience its benefits.
