How to Change Color in Photoshop: Art of Color Manipulation
Have you ever found yourself confused when trying to change the colors of your photos in Photoshop?
You want to add a certain color tone to your entire photo, but no matter how much you tweak the colors, it just doesn't look right and doesn't achieve the desired effect. So, how can you add the colors you want to your photos?
In this tutorial, we will share a method on how to change color in Photoshop. By learning this technique, you'll be able to apply your desired color tones to your photos in a versatile way. Let's get started!

In this article, you will learn:
- Preparation for Changing Color in Photoshop
- The Idea of Changing Colors in Photoshop
- How to Change Color in Photoshop?
- Final Thoughts About Changing Color in Photoshop
Preparation for Changing Color in Photoshop
In this tutorial, we will share a Photoshop color adjustment method specifically suited for still-life photos, where the subject is relatively singular.
For example, take a look at the photo below: the subjects are all quite singular, and the background is simple. The desired final effect we want to achieve is to give the entire image a specific color tone.
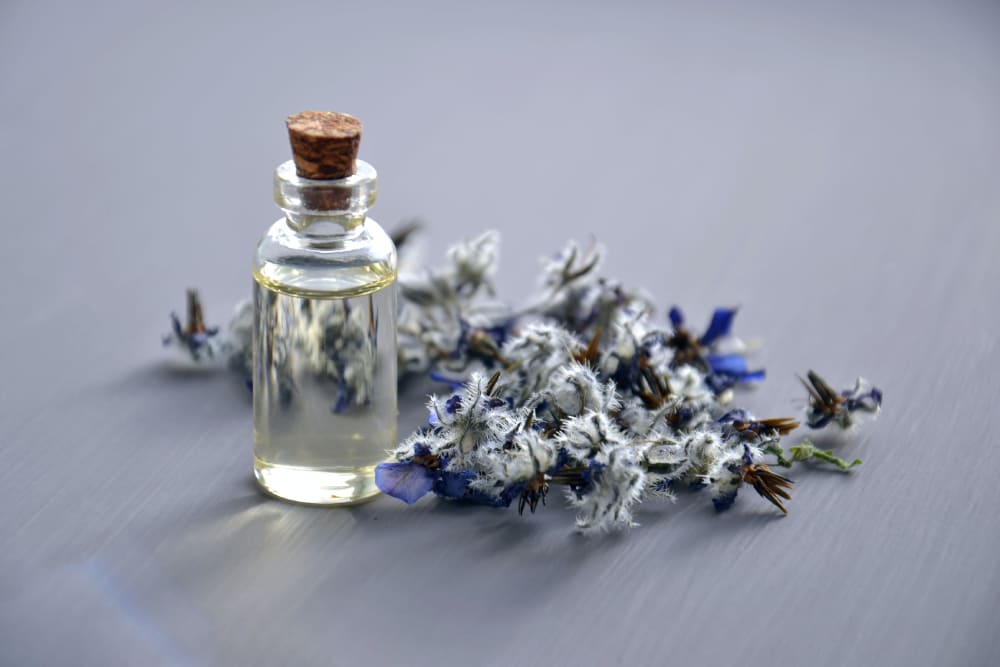
In this case, we want the entire image to have a cool, bluish tone, but you can also go for an overall pink or purple tone if you prefer.
To make the effect more pronounced, we recommend choosing a clean-colored image with a simple background and fewer colors. A plain white background and limited color palette will make the effect more noticeable.
The Idea of Changing Colors in Photoshop
Before starting a project, it is important to understand the process of changing colors in Photoshop. This can be broken down into three main steps:
- Step 1: Adjust the brightness, contrast, and grayscale of the image using tools like Exposure.
- Step 2: Add approximate colors using tools like curves. It's important to note that if you're not familiar with the principles of Photoshop, you may not be able to achieve your desired color tone exactly. In that case, adding a similar color will suffice. For example, if you want a turquoise blue, adding a shade of blue will do, and you can fine-tune it in Step 3.
- Step 3: Fine-tune the colors added in Step 2 using tools like Hue/Saturation. This helps adjust the colors to achieve the desired result. For example, if you added blue in Step 2, you can use the Hue/Saturation tool in Step 3 to adjust it to a turquoise blue.
Now, let's explain each step in detail:
- The purpose of Step 1 is to adjust the brightness and contrast of the photo, establishing an overall tone of brightness or darkness.
- In Step 2, the aim is to add color to the photo, especially if the original photo lacks vibrant colors. In such cases, adding a similar shade will suffice. For example, if you want a turquoise blue, adding a shade of blue will be suitable. You can then fine-tune it in Step 3.
- The goal of Step 3 is to make subtle adjustments to the colors added in Step 2. This involves tweaking the hues to achieve the desired color. For example, if you added blue in Step 2, you can use the hue tool in Step 3 to adjust it to a turquoise blue.
How to Change Color in Photoshop?
Import your photo into Photoshop, duplicate the background layer, and then convert the new layer into a smart object.
Step 1: Adjust the Brightness & Contrast
Go to the "Filter" option in the menu bar at the top of Photoshop and select "Camera Raw Filter" from the drop-down menu.
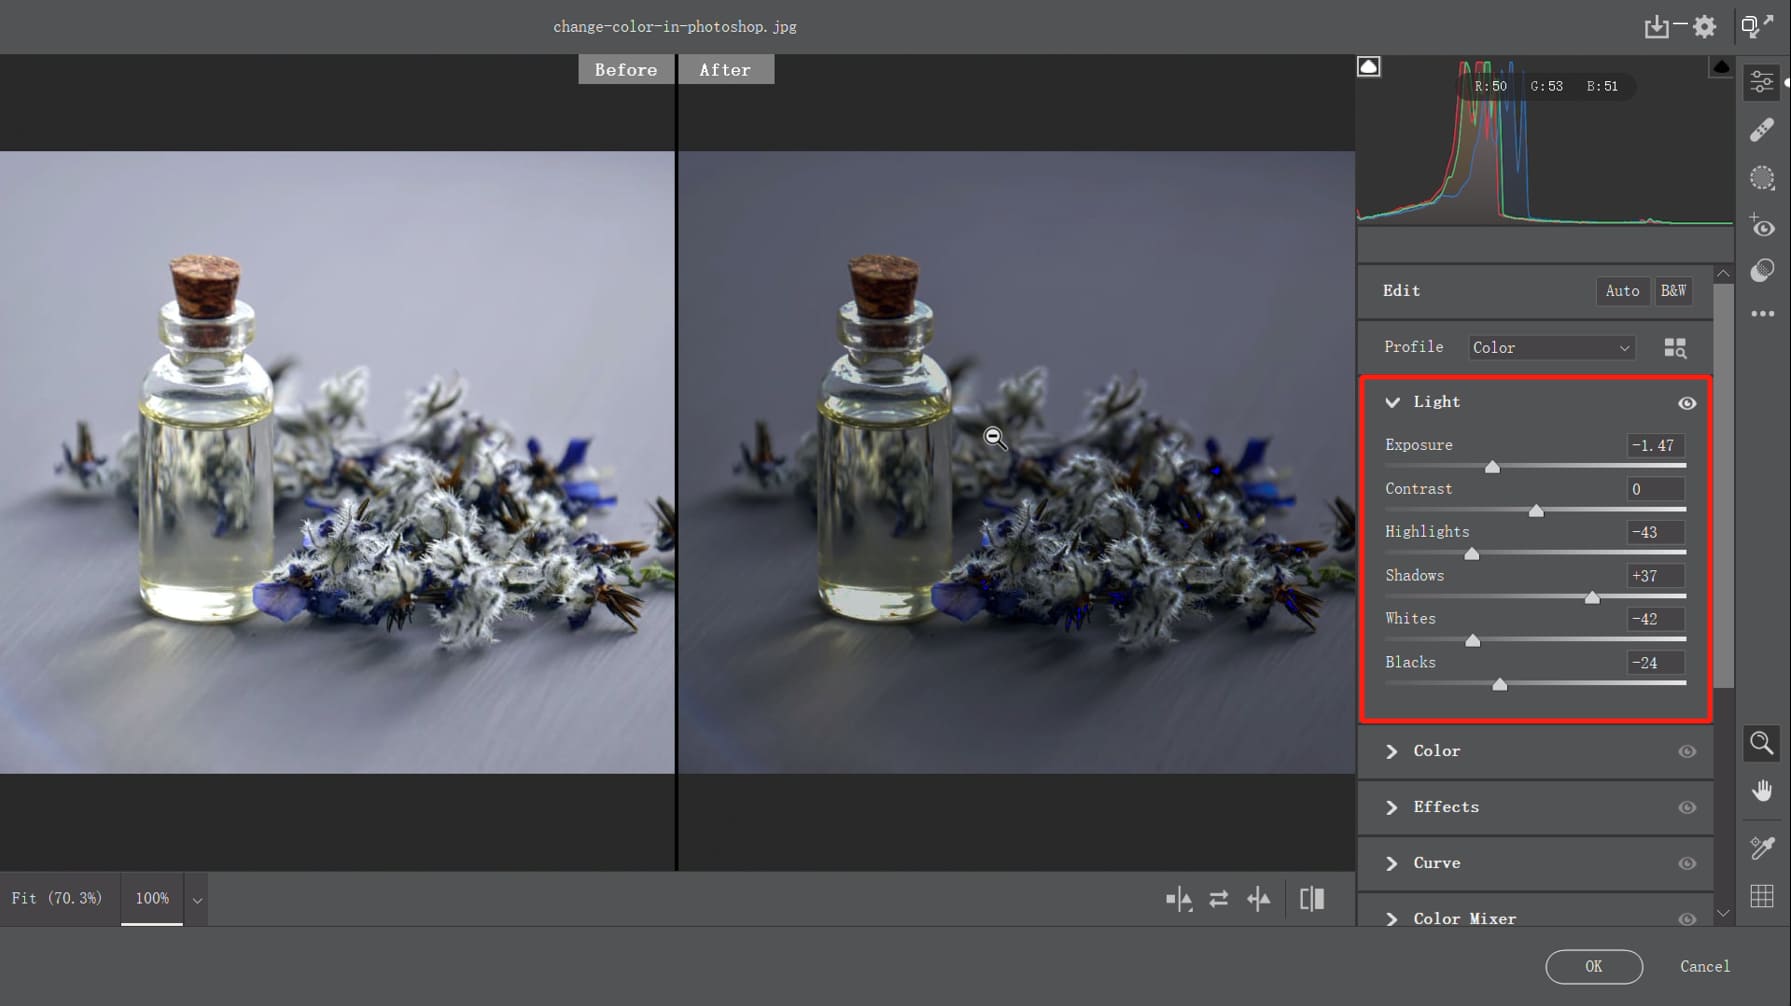
Since our desired final effect is a darker overall image with minimal white areas and slightly gray shadows, you need to adjust the brightness of the photo in the Camera Raw Light dropdown panel:
- Reduce the exposure and black values to make the photo darker overall.
- Next, increase the shadow values to bring out details in the darker areas.
- Then, you need to reduce the whiteness of the image, so decrease the highlights and white values.
Step 2: Add Approximate Colors That You Need
Now, it's time to add colors to the image and make color changes. In this step, you can continue using the color temperature and tint options in Camera Raw to add the approximate colors that you desire.
Go to the "Color" panel in Camera Raw, where you can adjust the color temperature towards the blue side and the tint towards the magenta side.
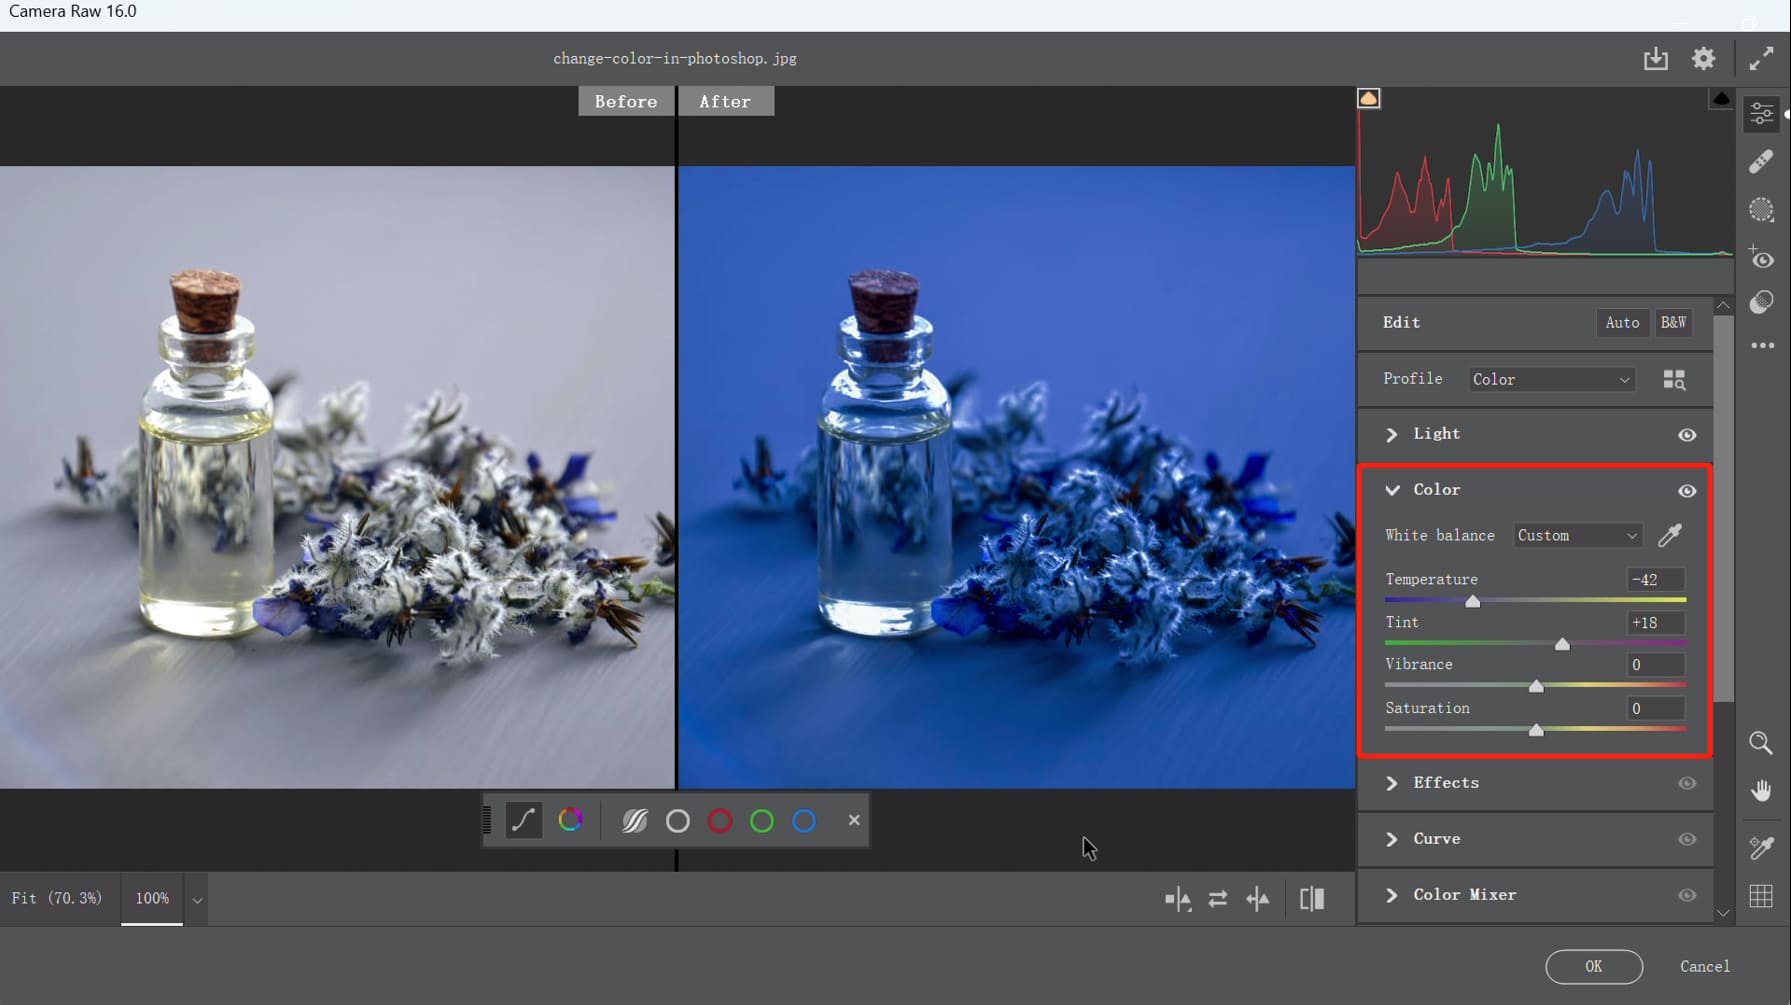
However, after making these adjustments, the blue effect might still be significantly different from the ideal blue we want. No matter how you adjust the color temperature, the blue remains a bright and intense shade, which makes the photo look unnatural.
So, here comes the question: How can you reduce the brightness of the added blue while making the blue color more prominent?
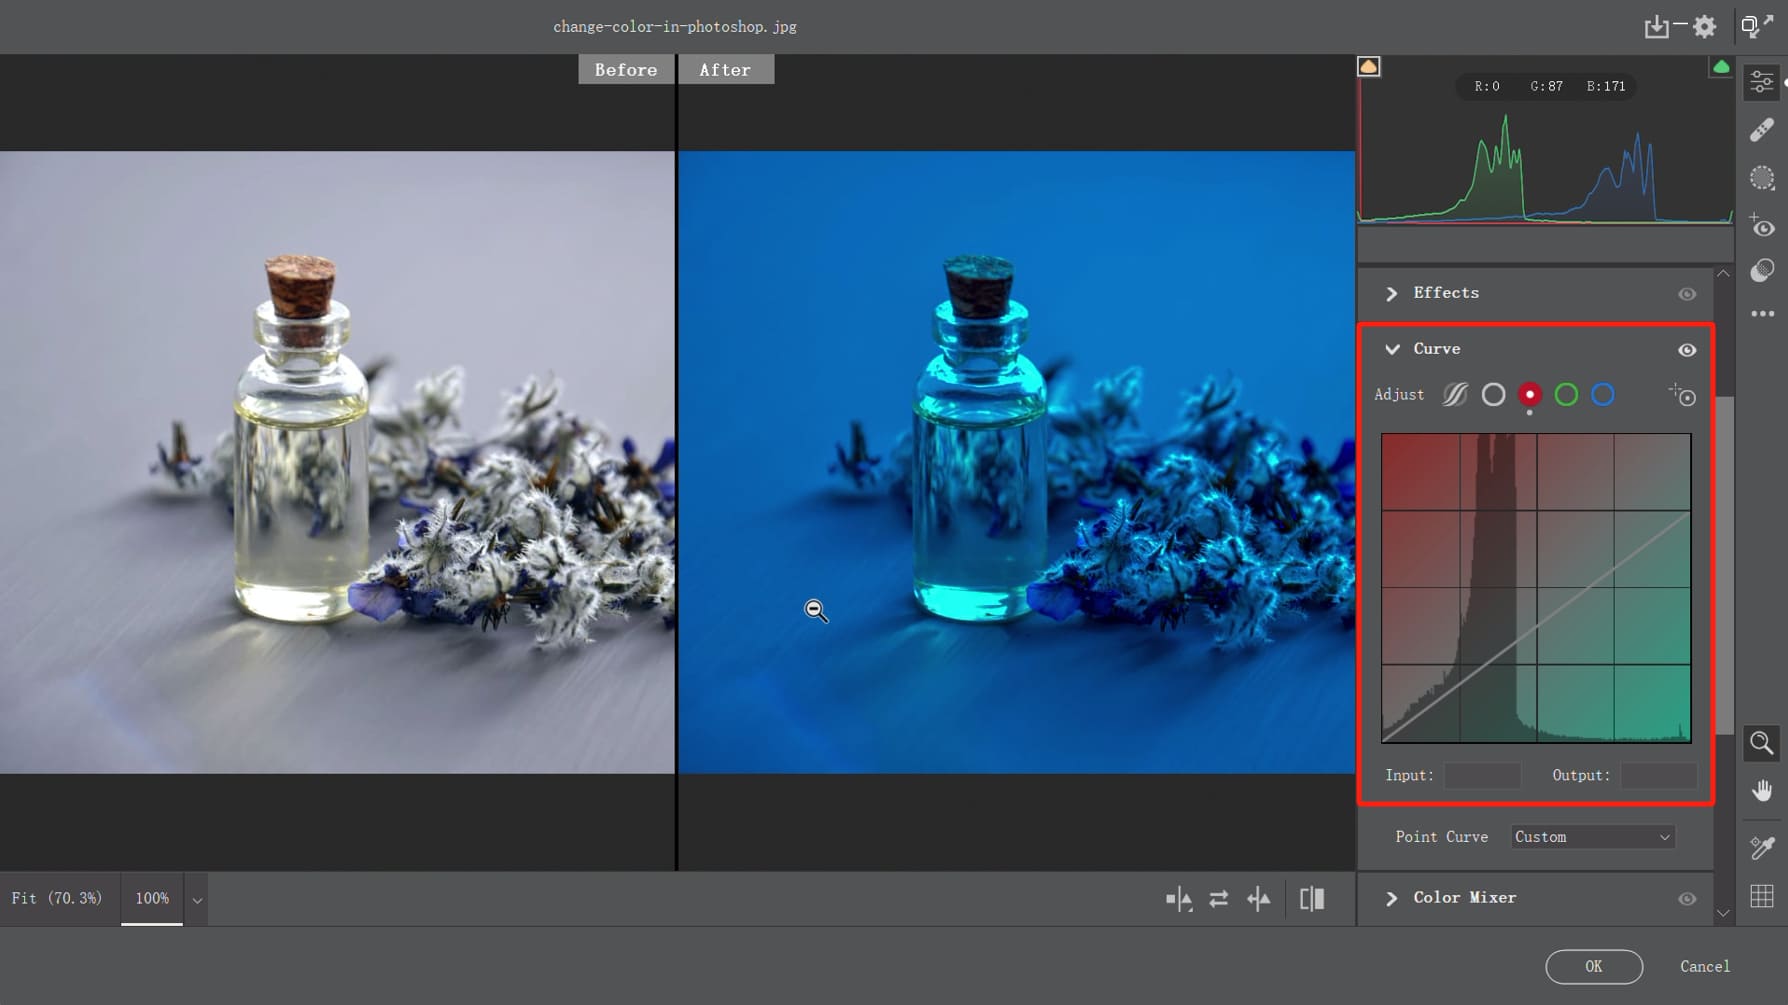
Now, let's use the curves tool to make some adjustments. Since we want the photo to appear more blue, the natural approach would be to add blue to the highlights. To do this, you need to move the anchor point in the top right corner of the blue curve upwards.
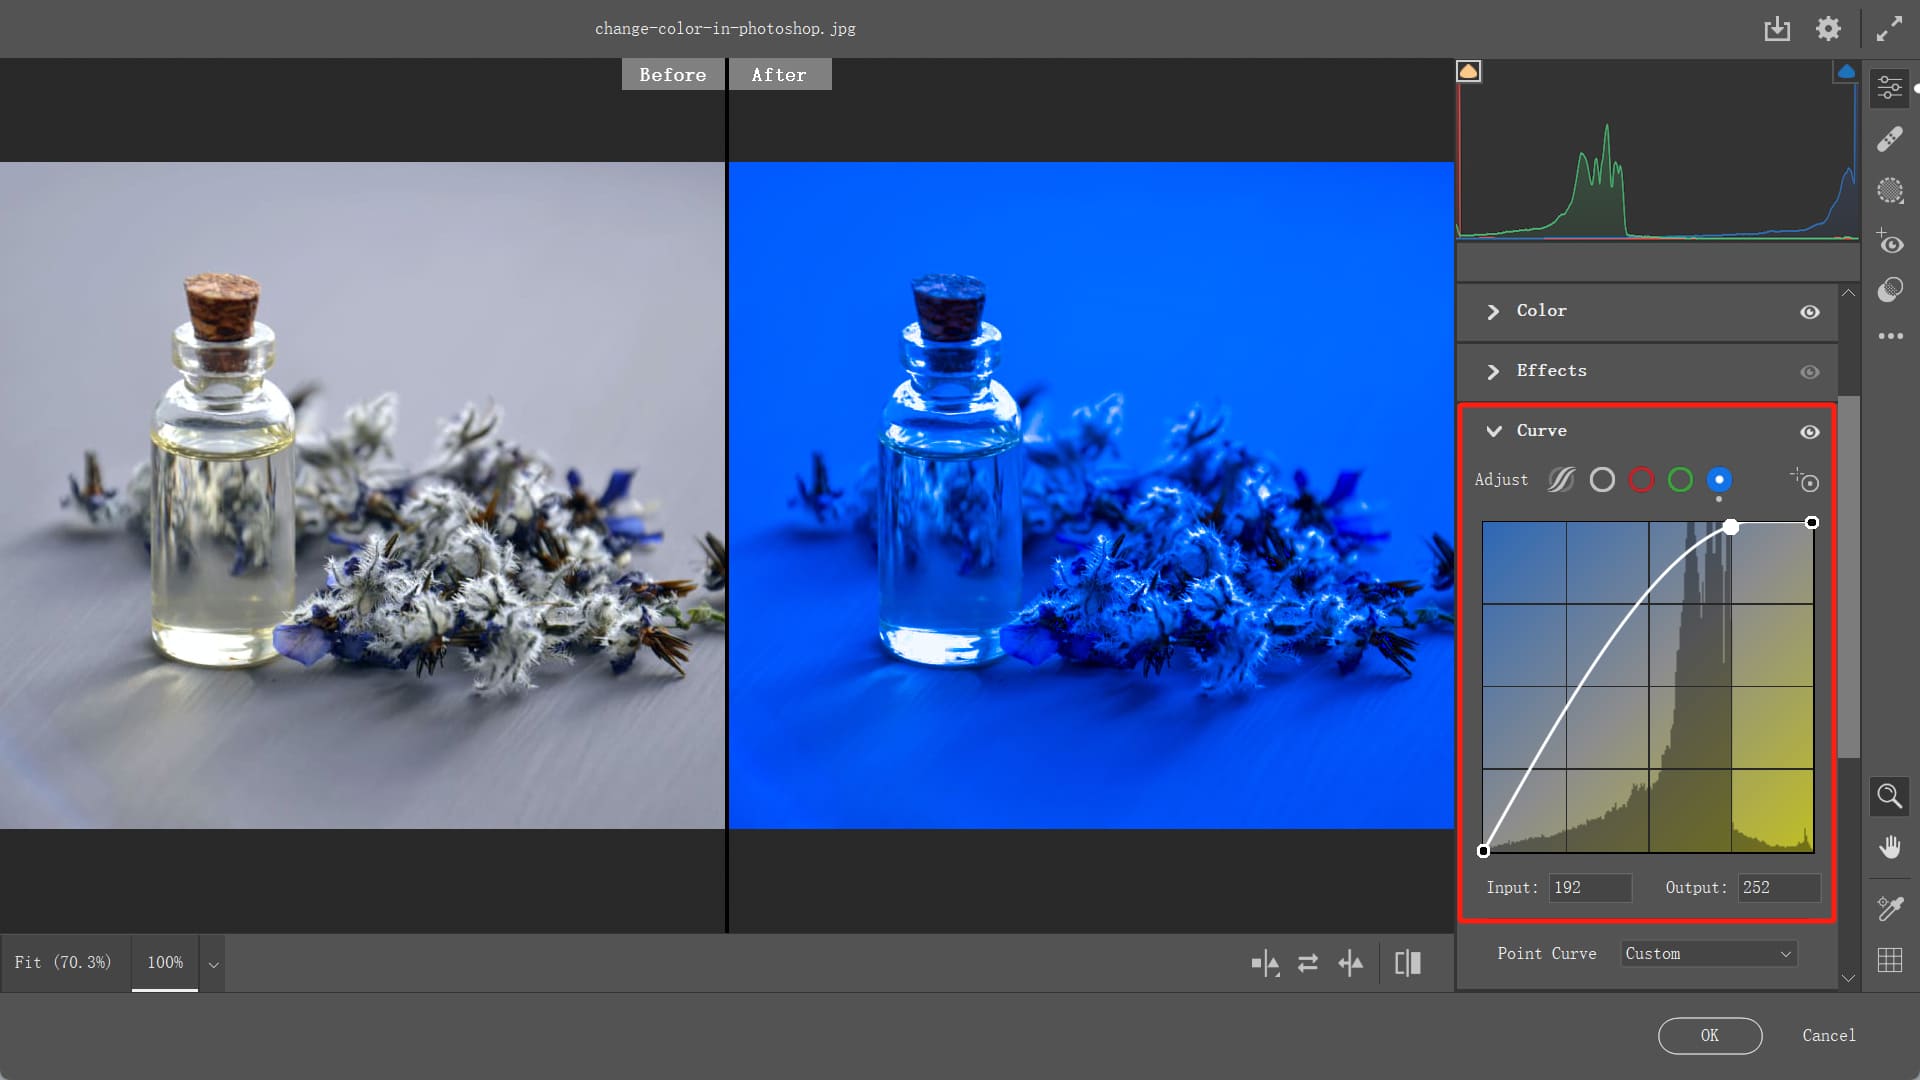
However, the result after making this adjustment might look strange. No matter how we move the blue curve, the blue added to the highlights always appears too bright.
Here's a common misunderstanding: adding blue to the highlights simply requires raising the blue curve.
If we directly raise the blue curve, although it adds blue to the highlights, we must remember that the curve has another function. It not only adjusts colors but also affects brightness. So, when we move the blue curve upwards, we unintentionally perform these actions: adding blue to the highlights + increasing the brightness of the blue.
Since moving the color curve upwards not only affects the color but also alters the brightness, it results in the added blue appearing too bright. The higher we move the blue curve, the more blue is added, and the brighter the blue becomes.
However, we want a cool and gloomy blue effect, and pulling up the blue curve clearly won't achieve that. Let's reset the curve adjustments.
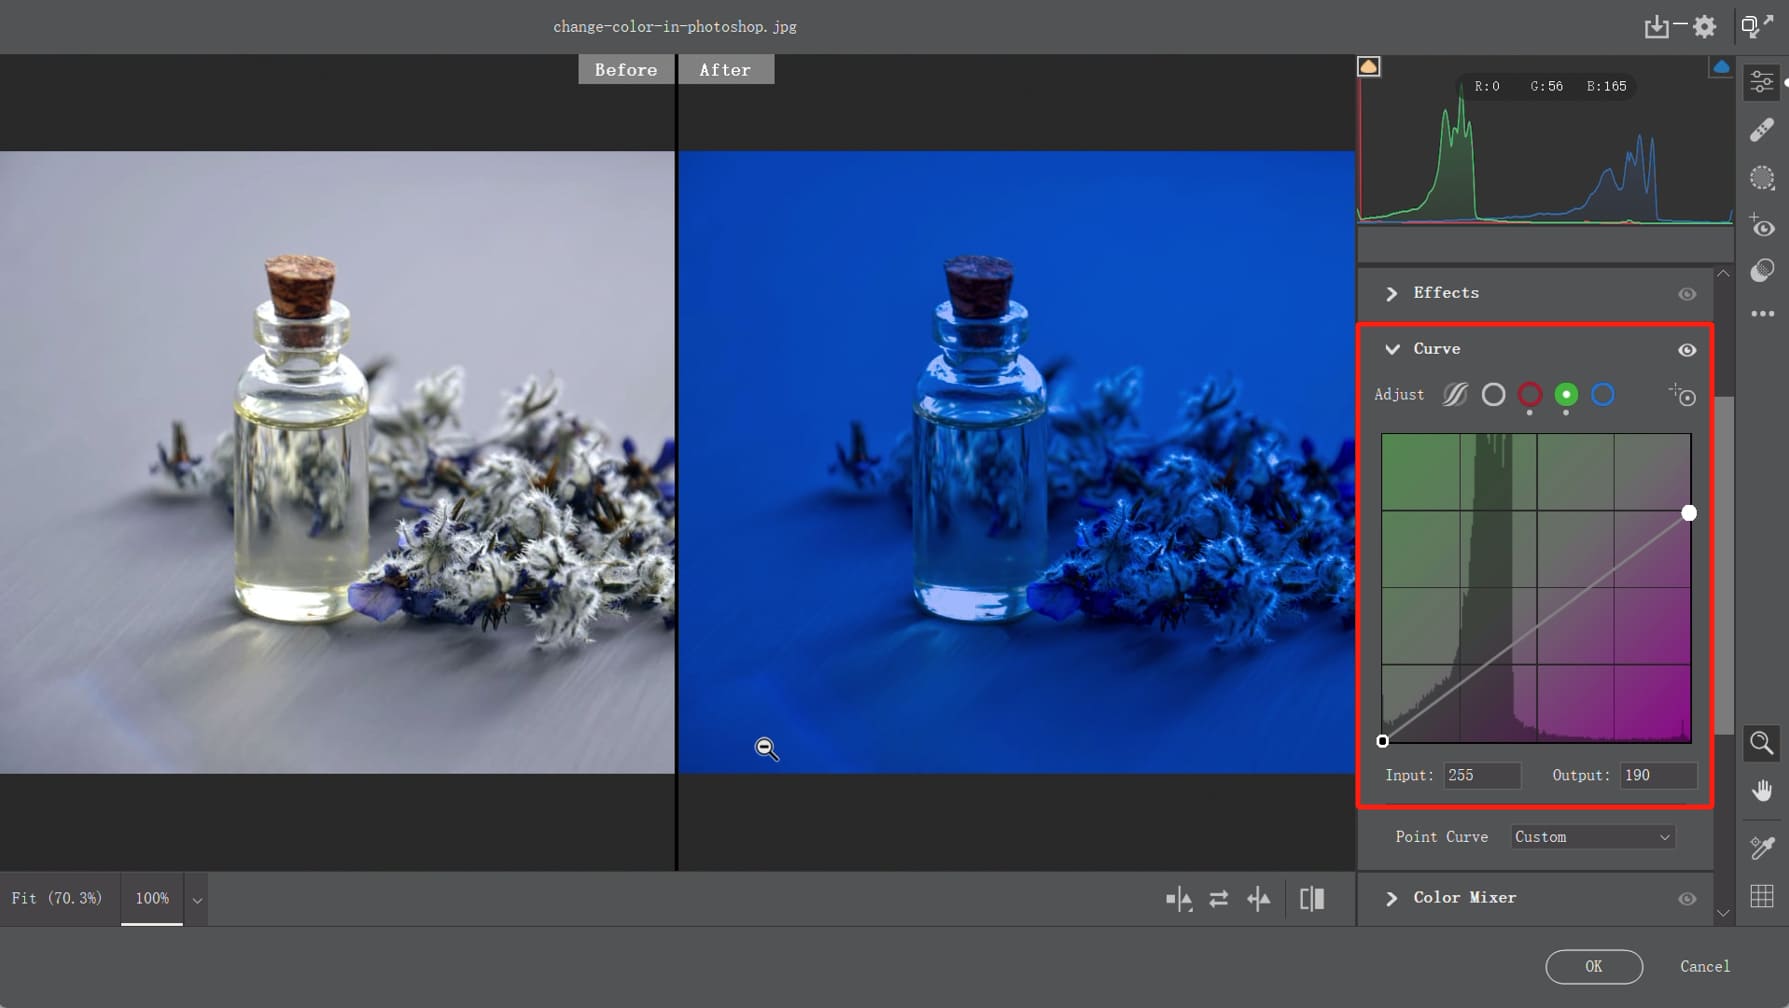
Since you cannot add blue using the blue curve, you can apply the complementary color principle from color theory: reducing yellow in a photo will increase the appearance of blue. This means you can indirectly add blue to the image by reducing yellow.
How to Reduce Yellow in the Image?
By utilizing the principle of color blending: increasing magenta in the image + increasing cyan in the image = reducing yellow = adding blue.
How to Increase Magenta and Cyan in the Image?
By applying the complementary color principle: reducing green = increasing magenta / reducing red = increasing cyan.
So, the final solution is: lowering the red curve + lowering the green curve = adding blue + reducing color brightness.
Adjust the red curve:
Adjust the green curve:
Step 3: Fine-tune Your Color Effect
Now that there is a lot of blue in the image, it's time to make adjustments to the blue color.
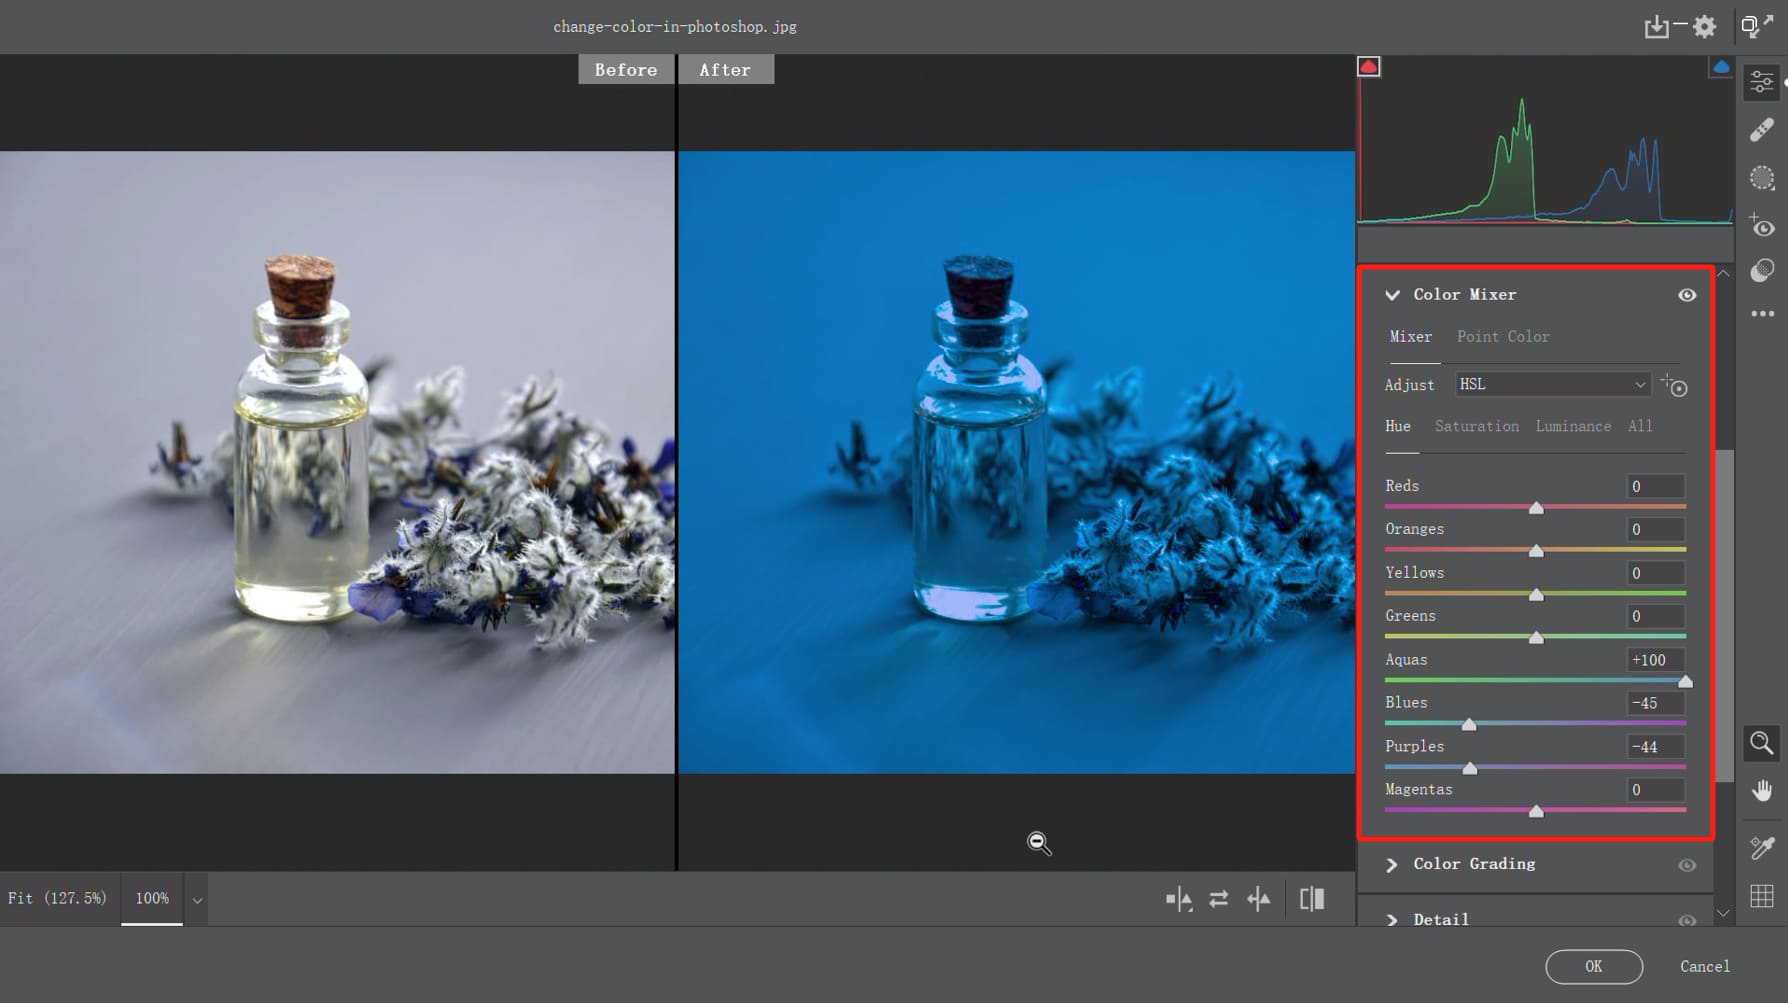
Select the "Color Mixer" dropdown panel, and now you can make adjustments to the HSL (Hue, Saturation, and Luminance) of the photo.
Hue:
Here, you need to move the blue towards cyan, so you can shift the Aquas towards the right and the Blues towards the left. Additionally, shift the Purples in the image toward blue.
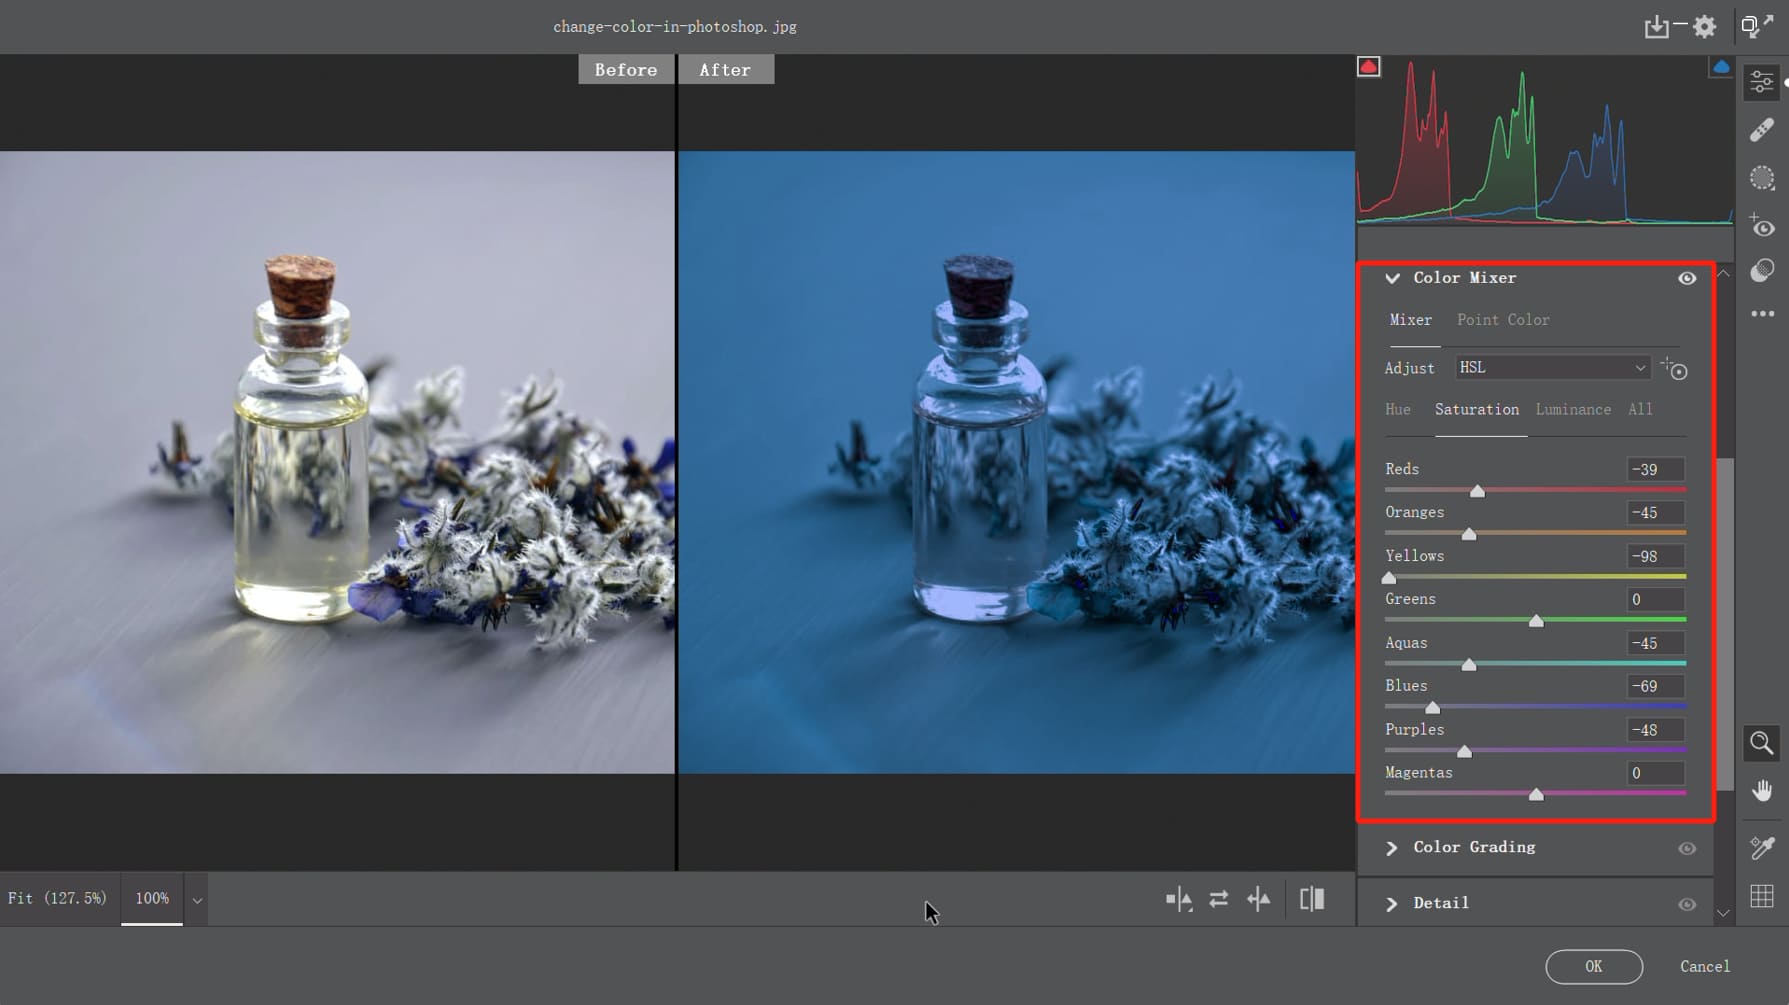
Saturation:
Decrease the saturation of the main colors in the image. If the saturation of the main colors in your photo is too high, it may make those colors stand out too much within the overall blue tone, resulting in a lack of harmony in the image.
So, you can slightly reduce the saturation of the main colors in the image. Specifically, focus on adjusting the saturation of the blue color and decreasing its saturation.
Brightness:
We want a dark shade of blue, so you can decrease the luminance of the Blues and Aquas.

Mission accomplished! Let's take a look at the final result of the color change in Photoshop.

Final Thoughts About Changing Color in Photoshop
Several techniques in Photoshop can be used to change the colors of an image. In this tutorial, we primarily focused on how to use the Camera Raw filter in Photoshop for color adjustments.
Of course, Photoshop offers a wide range of functionalities for changing photo colors. With a good understanding of color theory and the corresponding Photoshop tools, you can create truly amazing results!
Further Reading:
If you're looking to enhance your editing workflow and take your color-changing skills to the next level, we highly recommend checking out TourBox. This innovative and intuitive console is designed to streamline your Photoshop experience, allowing you to make precise adjustments with ease.

With its customizable buttons and dials, you can easily navigate through Photoshop's tools and functions, including color adjustments, making your editing process faster and more efficient.
Whether you're a professional photographer or a passionate enthusiast, TourBox is a fantastic tool to have in your creative arsenal. Give it a try and see how it can revolutionize your color-changing workflow in Photoshop!

And with that, we conclude our guide on how to change color in Photoshop. We hope this has been helpful for your creative journey.