How to Delete Markers in Premiere Pro?
In video editing, markers are a crucial tool in Premiere Pro that helps you easily locate specific points for editing.
However, there may be times when you need to remove these markers after completing your edits. That's when you might wonder how to delete markers in Premiere Pro. This tutorial will provide you with the answer.

In this article, you will learn:
- What Are Markers in Premiere Pro?
- How to Delete Markers in Premiere Pro?
- How to Optimize Marker Workflow in Premiere Pro?
What Are Markers in Premiere Pro?
Before diving into how to delete markers in Premiere Pro, let's briefly explain what markers are.
Markers are a type of annotation tool used in video editing software to indicate specific time points or positions requiring video editing.
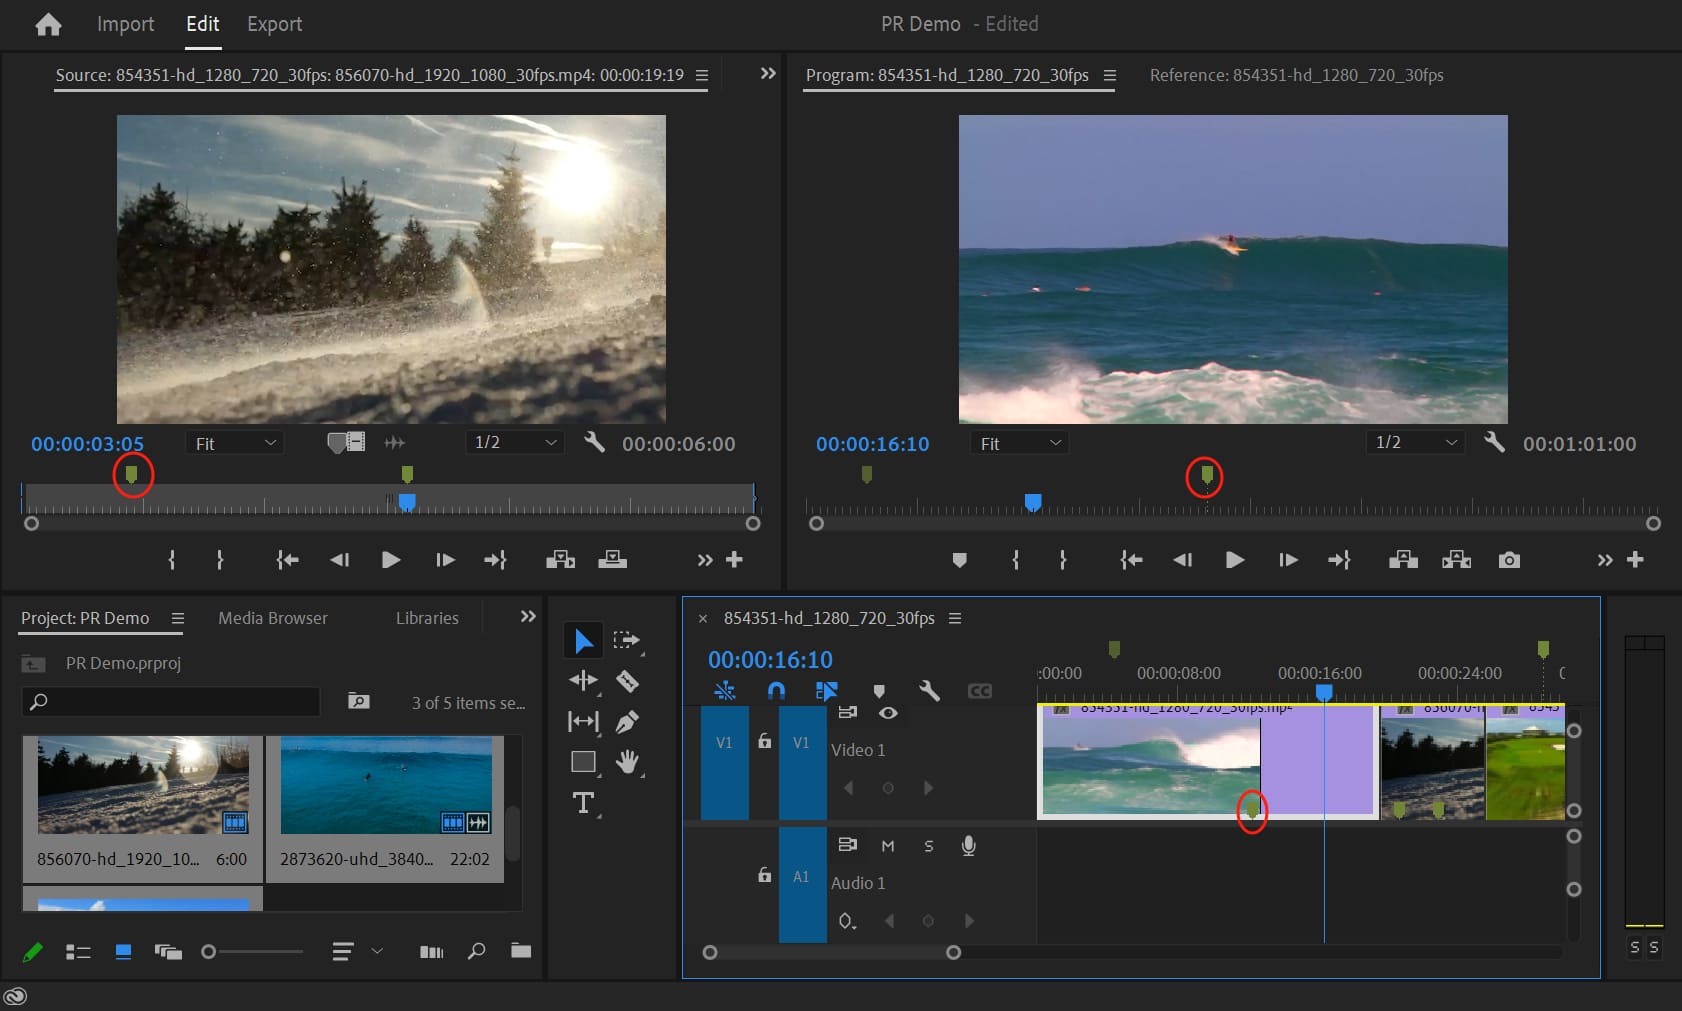
In Adobe Premiere Pro, you can add markers in the Source Monitor, Program Monitor, or directly on the Timeline, as shown in the image below. This flexibility makes markers in Premiere Pro highly versatile.
To create a marker, simply press the "M" key on your keyboard. Alternatively, you can click the "Add Marker" button in the toolbar beneath the Monitor panel.
Additional Tip:
If you can't find this button, you can customize it by clicking the "Button Editor" on the far-right side of the Monitor panel.
Creating markers in Premiere Pro is simple, but not everyone may know how to delete them.
How to Delete Markers in Premiere Pro?
There are three methods to delete markers in Premiere Pro, and we will go through each of them.
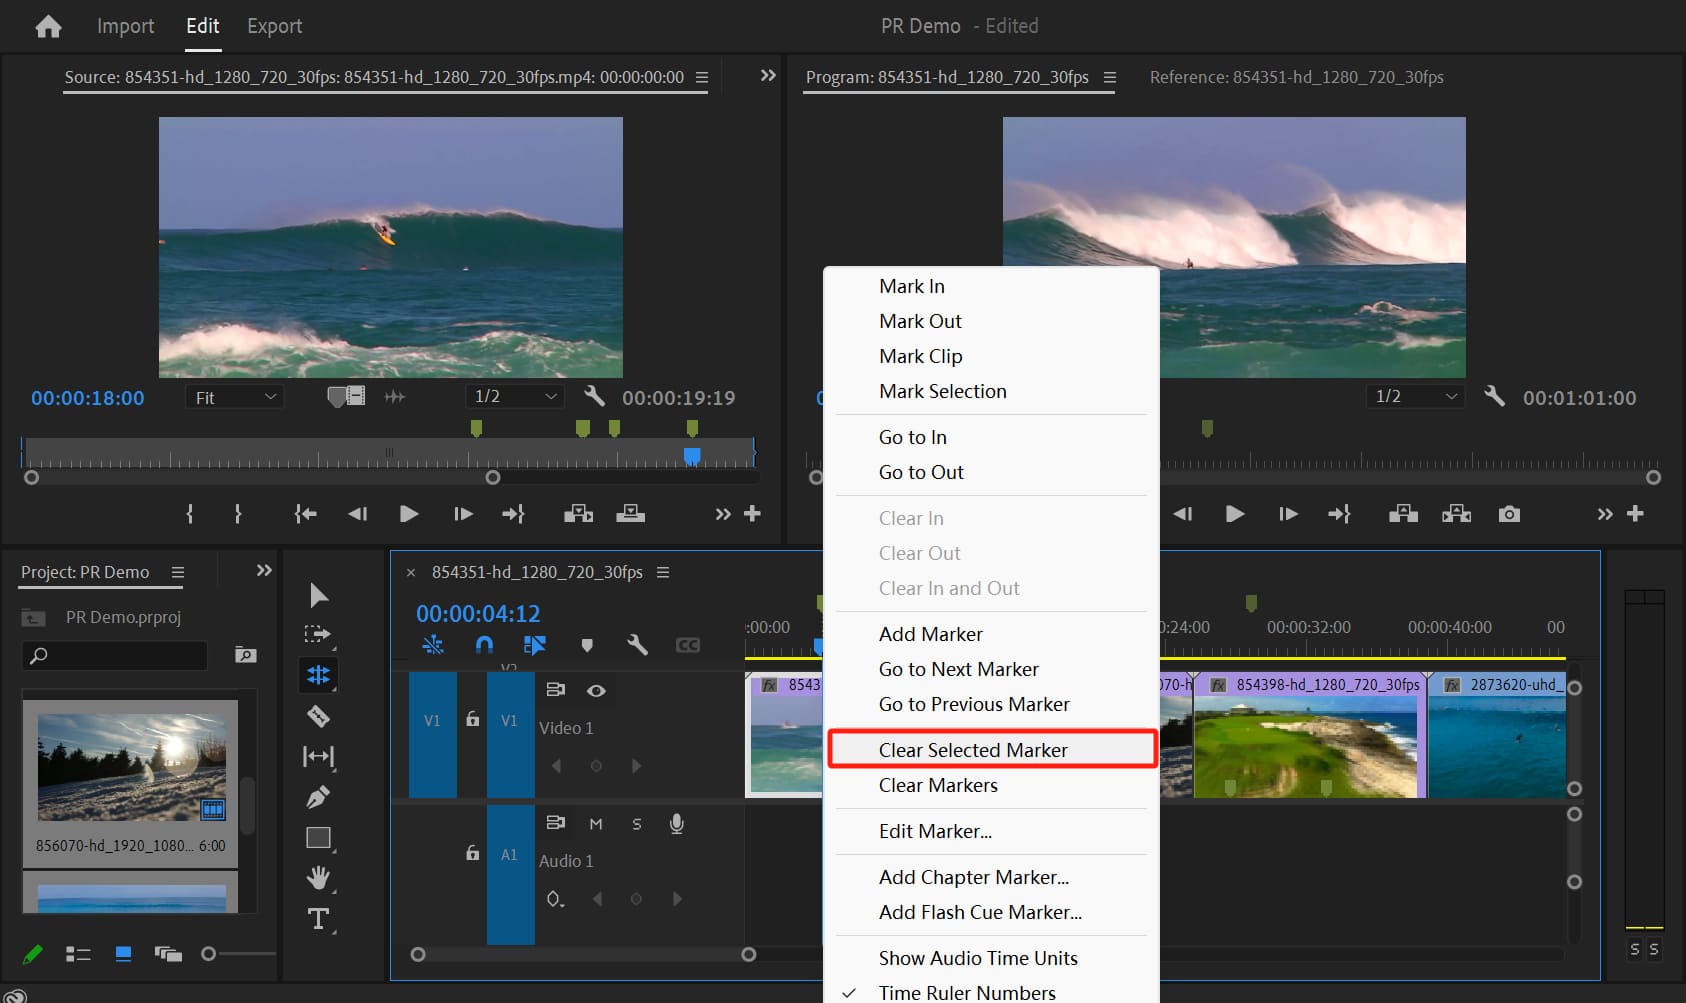
Method 1: Delete Markers Using the Right-Click Menu
The most common method is to right-click on the marker and select "Clear Selected Marker."
The problem is that sometimes you may find that you can only choose "Clear Markers," which deletes all the markers. The option to "Clear Selected Marker" may not be available.
Here's the catch: If you have added markers in both the Source Monitor and the Program Monitor, corresponding markers will appear on the Timeline.
The markers above the Timeline correspond to the markers on the Program Monitor, while the markers below the Timeline correspond to those on the Source Monitor.
To delete the corresponding marker, you must click on the marker directly to select it. Then, when you right-click on the marker, you will see the option to "Clear Selected Marker" in the menu.
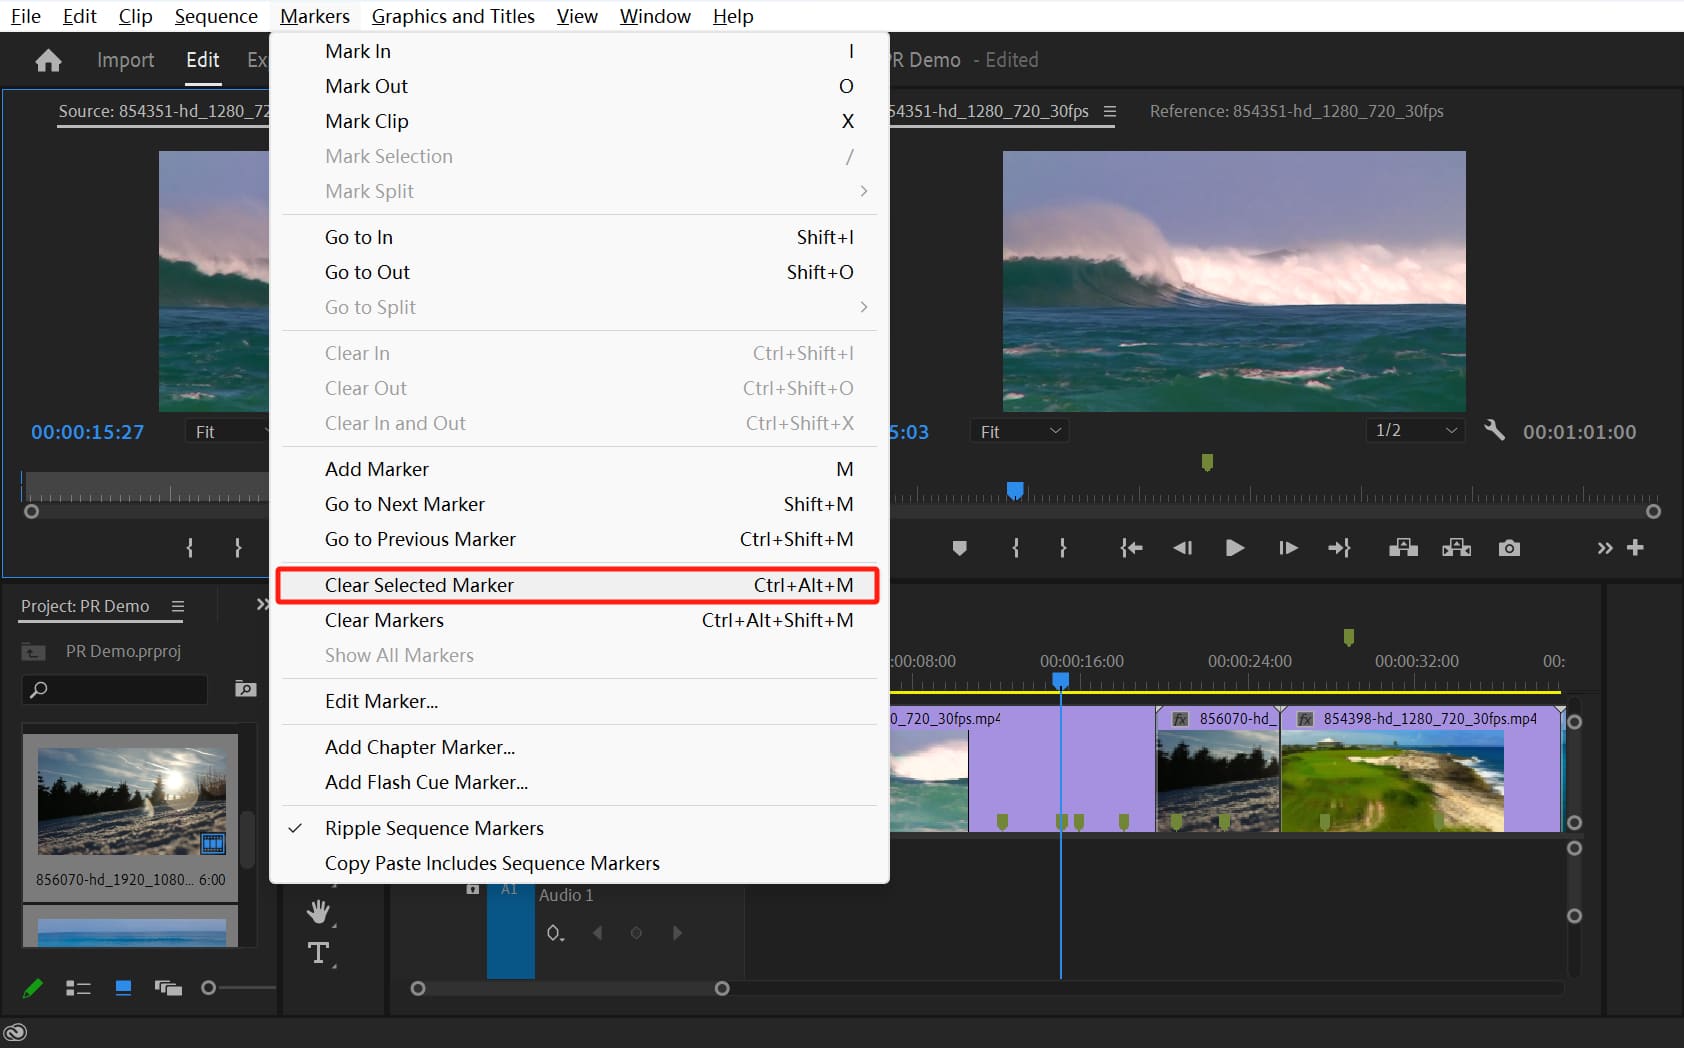
Method 2: Delete Markers from the Top Menu Bar
You can also click on "Markers" in the top menu bar of Premiere Pro and choose "Clear Selected Marker" from the dropdown menu. Again, this method requires you to select the marker first.
Method 3: Delete Markers from the Markers Panel
If you frequently use markers, the above two methods can be cumbersome since you have to select the marker and navigate through a long menu to choose "Clear Selected Marker."
The most direct and convenient method is to double-click on the marker. This action will bring up the marker settings panel.
In this panel, simply click the "Delete" button to quickly remove the marker.

Additional Tip:
In the Program Monitor or Timeline panel, apart from using the "M" shortcut key to add markers, you can press "M" again to enter the marker settings panel.
How to Optimize Marker Workflow in Premiere Pro?
After learning how to delete markers in Premiere Pro, you might be interested in using keyboard shortcuts to further enhance your workflow.
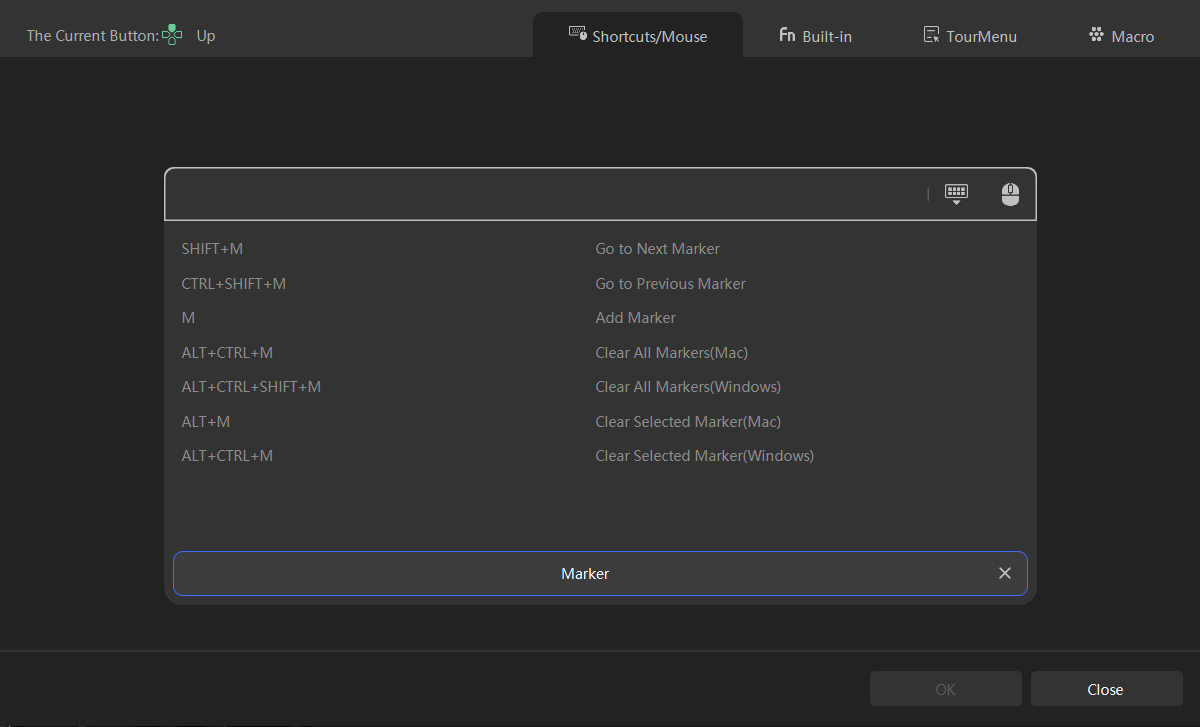
But wait, let's take a look at the keyboard shortcuts for markers in Premiere Pro:
- Clear Markers (Mac): Opt + Cmd + M
- Clear Markers (Windows): Ctrl + Alt + Shift + M
- Clear Selected Marker (Mac): Opt + M
- Clear Selected Marker (Windows): Ctrl + Alt + M
- Go to Next Marker: Shift + M
- Go to Previous Marker: Ctrl/Cmd + Shift + M
Do these complex shortcuts give you a headache? No worries! Why not try TourBox, a creative tool loved by digital artists and content creators?

With TourBox, you don't need to memorize any shortcuts. You can simply match the markers in Premiere Pro with TourBox using the TourBox Console software.
The built-in functions provided in TourBox Console make your setup incredibly easy, and TourMenu and macros open up endless possibilities for your operations.
Check out our video editing page for more information about TourBox and how it can revolutionize your workflow.
If you prefer a more cost-effective option, you might like TourBox Lite, which is a simplified version suitable for first-time users of TourBox.

In Adobe Premiere Pro, there are many ways to delete markers, and mastering these methods can help you complete video editing tasks more quickly and easily. That concludes our tutorial, and we hope it has been helpful to you.