How to Draw a Line in Photoshop: A Comprehensive Tutorial
In this guide, we will walk you through the detailed steps and techniques for creating seamless and precise lines using the powerful tools available in Photoshop.
Whether you're a beginner or an experienced artist, this tutorial will equip you with the skills to master the art of how to draw a line in Photoshop. Let's dive in and unlock a world of endless possibilities!

In this article, you will learn:
- Why Line Drawing Is Important in Photoshop?
- How to Draw a Straight Line in Photoshop?
- How to Draw Polygons in Photoshop?
- How to Draw Curves in Photoshop?
- How to Draw Dashed Lines in Photoshop?
- How to Draw Colorful Lines in Photoshop?
- How to Adjust Line Thickness in Photoshop?
- Final Thoughts About Drawing a Line in Photoshop
Why Line Drawing Is Important in Photoshop?
Photoshop's line drawing capabilities offer a wide range of applications and can be used in various scenarios.
It allows you to create clean and precise outlines, define shapes, add details, and enhance the overall composition of your artwork. From creating intricate illustrations to designing logos, lines play a crucial role in defining form, structure, and visual impact.
Additionally, Photoshop's line tools enable you to create smooth curves, incorporate texture, and experiment with different line weights, resulting in visually captivating and professional-looking designs.
Whether you're working on digital art, web design, or photo editing, the ability to draw lines in Photoshop opens up a world of creative possibilities.
How to Draw a Straight Line in Photoshop?
The easiest way to draw a straight line in Photoshop is by using the dedicated Line Tool designed specifically for this purpose (remember to set it to pixels in the mode settings at the top). Then, simply click and drag on the canvas to draw a straight line at any desired angle.
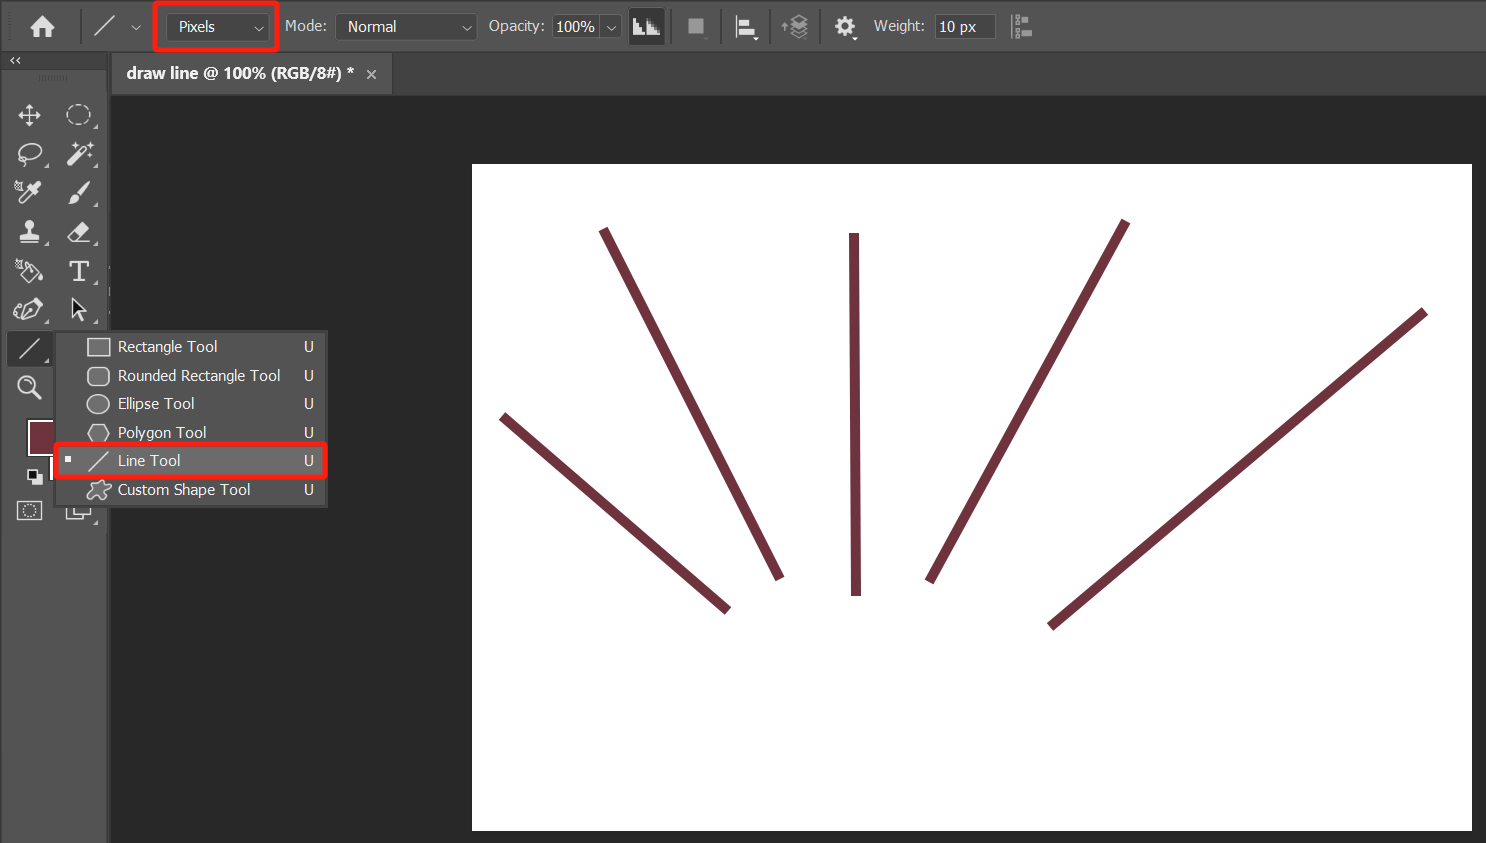
Additional Tip:
You can customize the color, width, opacity, and other settings of the line according to your specific needs.
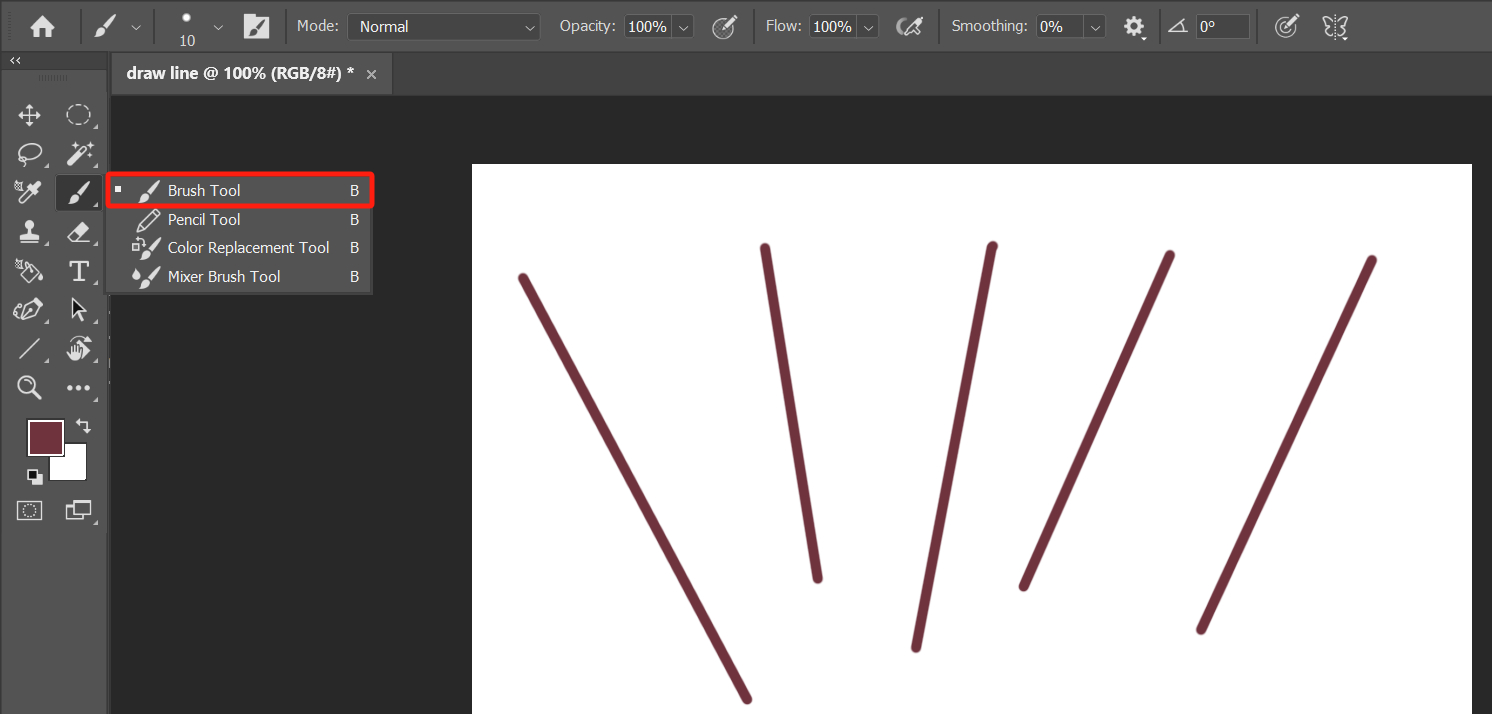
You can also utilize the Brush Tool for drawing straight lines. Simply click on the starting point of the line, hold down the Shift key (a crucial step), and then click on the endpoint of the line. Photoshop will draw a straight line for you.
These lines are based on your current brush settings, allowing you to adjust the brush color, size, and other settings according to your specific needs.
How to Draw Polygons in Photoshop?
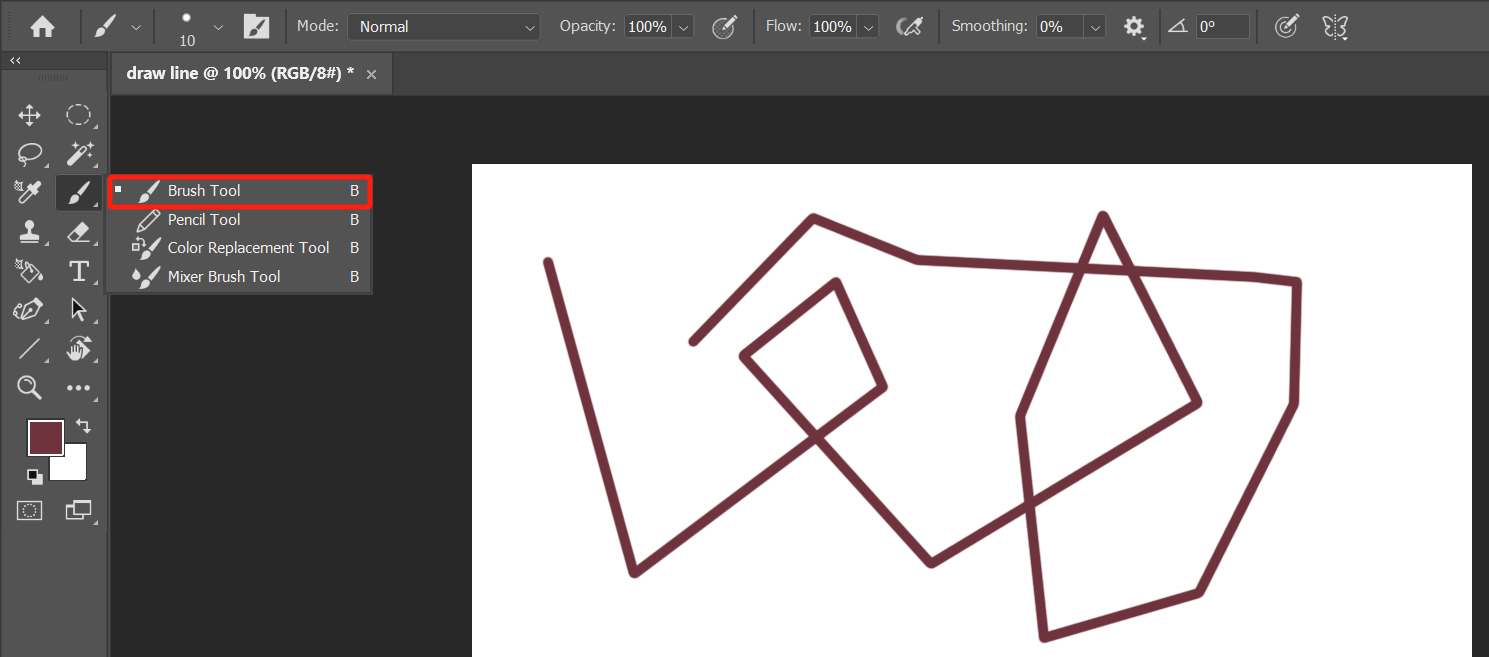
You can also use the Brush Tool in Photoshop to create visually appealing straight-line patterns. Just like you've already tried, if you click on a target point and then hold down the Shift key, a straight line will be drawn.
However, if you don't release the Shift key at this point and continue holding it down while clicking again, the endpoint of the previous line will become the starting point of the new line.
Therefore, by holding down the Shift key and continuously clicking on target points, you can create a continuous pattern of interconnected straight lines, forming either a unique polygon or a pattern of straight lines.
How to Draw Curves in Photoshop?
By now, you should be familiar with drawing straight lines in Photoshop, but what about drawing curves?
Of course, you can use the Brush Tool to easily draw any desired lines, but if you don't have a graphics tablet, controlling the shape of the curve solely with a mouse can be challenging.
Now, you have two options:
- Purchase a reliable graphics tablet, such as the renowned Wacom brand, which is definitely a worthwhile investment.
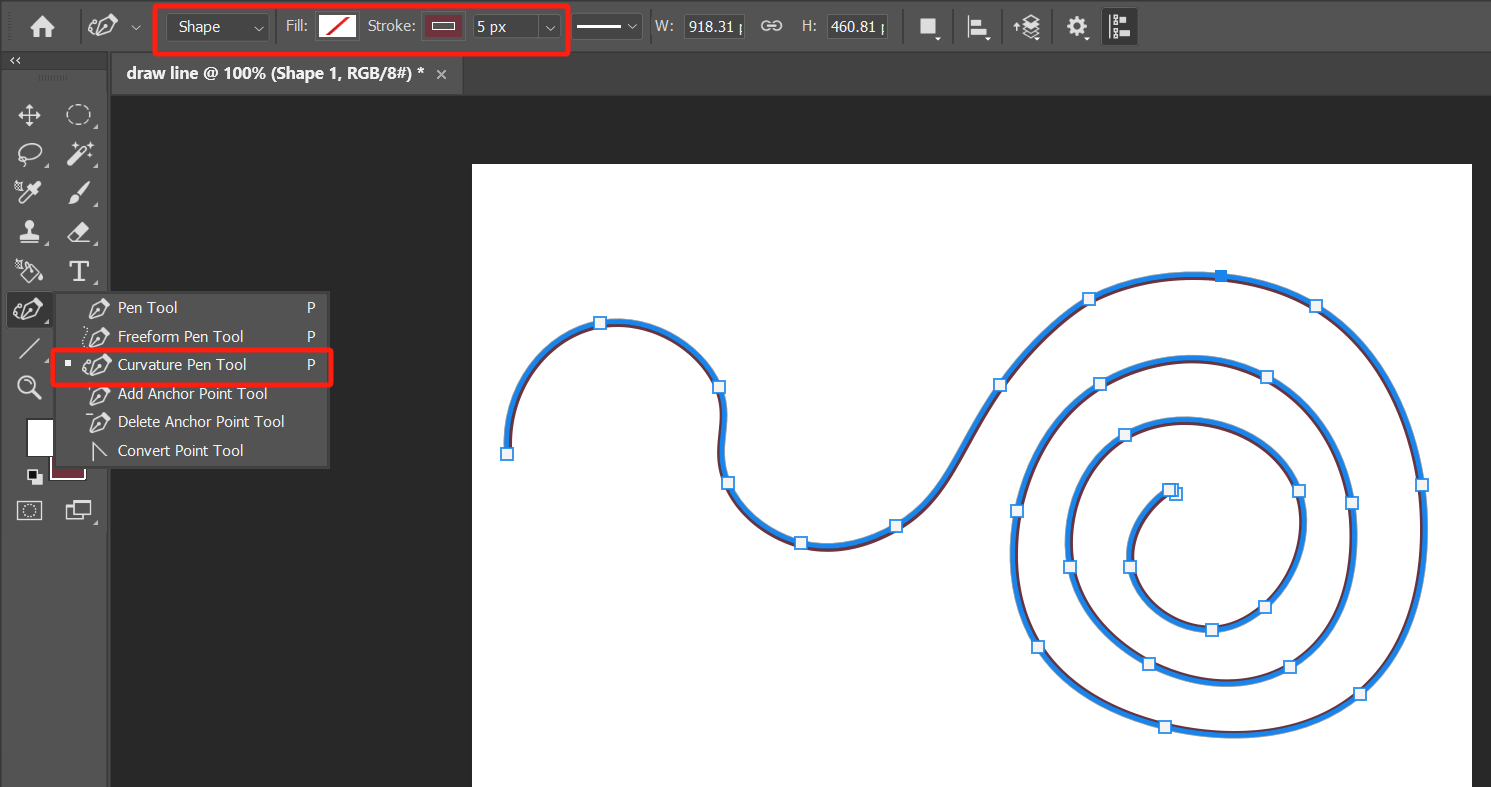
- Alternatively, you can use the Curvature Pen Tool in Photoshop, which allows you to create smooth curves without the need for a graphics tablet.
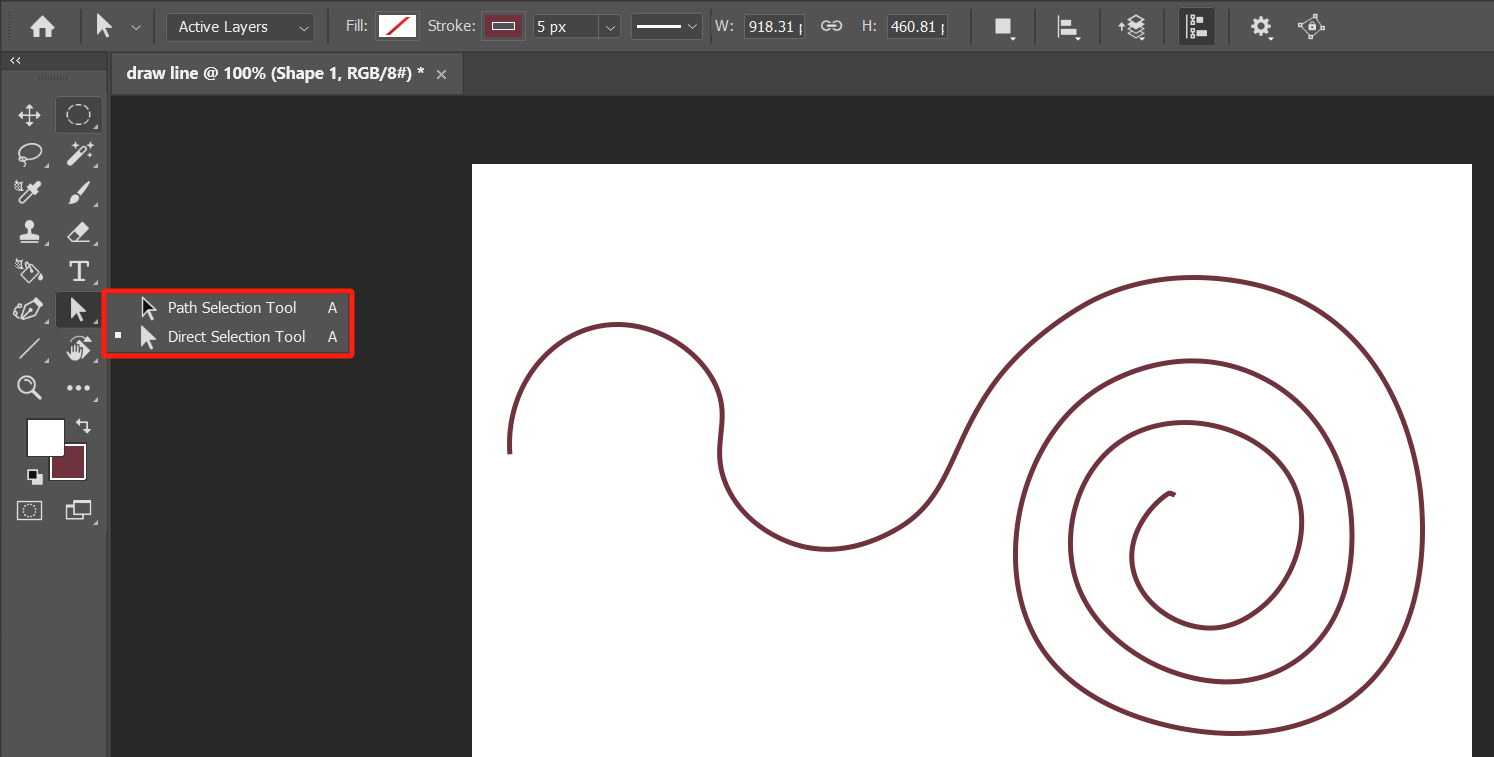
The "Curvature Pen Tool" is tucked away under the "Pen Tool" menu on the left side of Photoshop. When using this tool, set the "Mode" to "Shape," the "Fill" to "No Color," add a color to the "Stroke," and adjust the line thickness.
To draw curves, simply click and drag. The best part is that the lines remain fully editable - just click and drag any point to modify its shape. Press the "Ctrl" key and click to finish the drawing. (Mac users can make the necessary adjustments accordingly.)
After completing the drawing, if you wish to make further modifications to the curve, you can use the Direct Selection Tool to click on the curve and select individual points and segments on the curve path for further adjustments.
If you want to move the entire curve, you can use the Path Selection Tool.
How to Draw Dashed Lines in Photoshop?
Click on the Stroke Options above the Pen tool, and you will see two preset dashed line options. Click on the dashed line preset of your choice, and you can start drawing dashed lines.
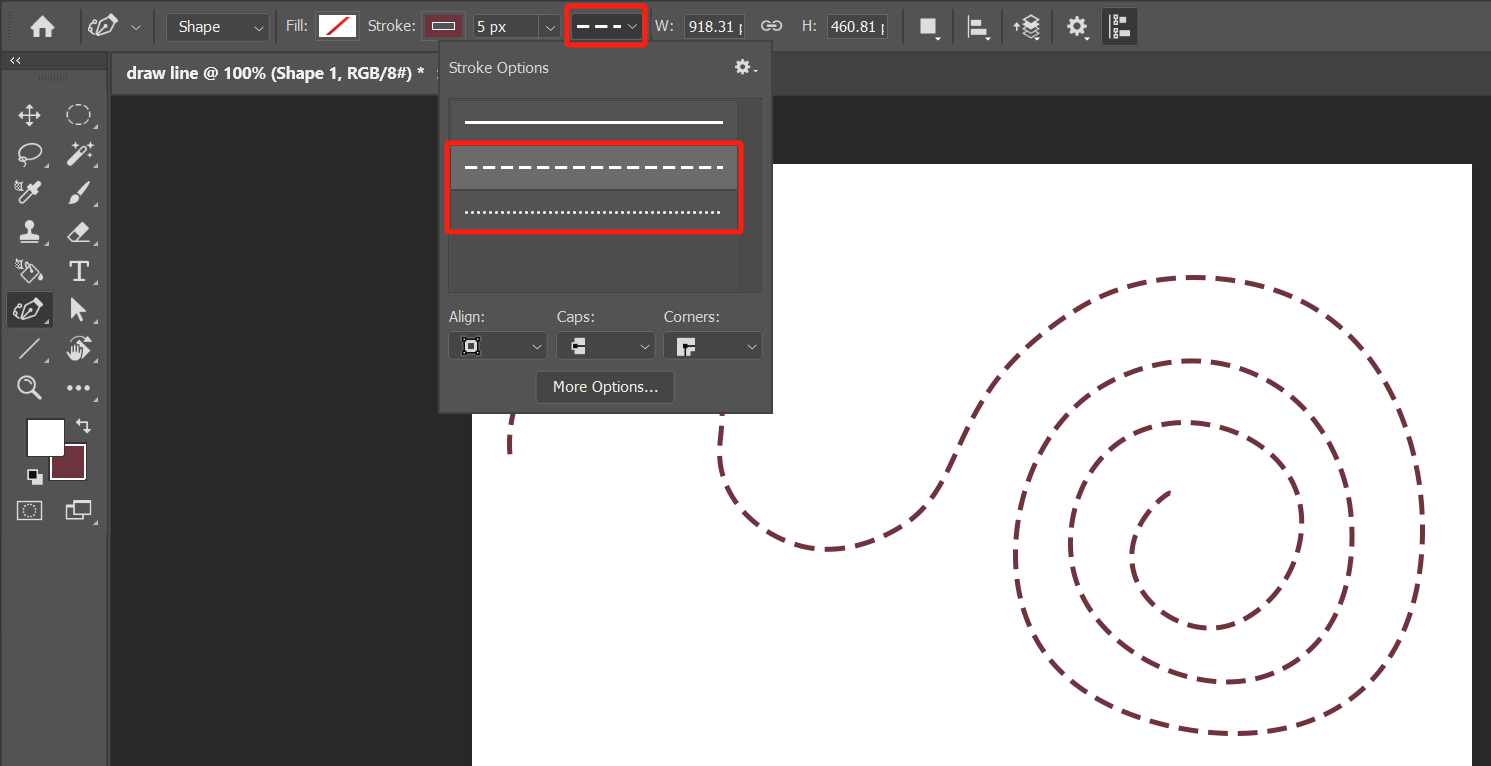
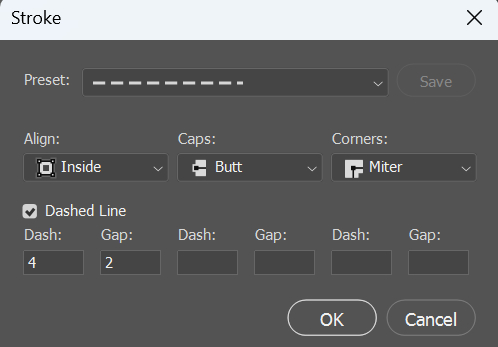
If you want to create your own custom preset for dashed lines, click on "More Options" to create a custom dashed line preset. Adjust the settings and click "Save" to save the preset for future use.
How to Draw Colorful Lines in Photoshop
Drawing colorful lines in Photoshop can be done in the following two ways:
- To draw lines of any color using the Brush Tool (B) or other tools in "Pixel" mode, adjust the color in the color picker panel in the toolbar on the left side of Photoshop.
- If you wish to use any other tool in "Shape" mode, you can adjust the color in the "Stroke" options, even after drawing the lines.
How to Adjust Line Thickness in Photoshop?
When it comes to adjusting line thickness in Photoshop, there are two scenarios:
- If you're using the Brush Tool or any other pixel-based tools, you can either modify the Weight parameter in the options bar above or use the shortcut by using the square brackets "[" and "]" to increase or decrease the brush size.
- If you're using a tool in "Shape" mode (such as the Shape mode in the Pen Tool), you simply need to set the stroke thickness in the settings bar above.
Final Thoughts About Drawing a Line in Photoshop
In the previous sections of our tutorial on how to draw lines in Photoshop, we explored various techniques for creating straight lines, curves, and dashed lines.
While traditional keyboard and mouse operations in Photoshop offer precise control, constant adjustments can become cumbersome.
You may have considered using a graphics tablet, but even with pressure-sensitive pens, achieving precise control for tasks like adjusting brush size, opacity, and canvas rotation can be challenging.
Is there a solution that can simultaneously enhance your workflow efficiency and provide precise control in creative software? Look no further than TourBox.

TourBox offers a customizable interface that puts essential tools and functions right at your fingertips. With its ergonomic design and intuitive layout, you can easily assign shortcuts and commands to the various dials, buttons, and knobs on TourBox.
This enables you to swiftly adjust brush size, opacity, and canvas rotation with precision, eliminating the need for repetitive mouse clicks or complex key combinations.
If you're looking to enhance your workflow efficiency and achieve precise control in creative software like Photoshop, TourBox is the perfect companion.
By combining TourBox with your graphics tablet, you can bid farewell to traditional keyboard and mouse operations, allowing you to fully immerse yourself in the creative process.
As we reach the end of our how to draw a line in Photoshop tutorial, we sincerely hope that it has provided valuable assistance on your creative journey.