How to Draw Expressive & Lifelike Eyes: A Beginner's Guide
Eyes are the most captivating focal point in character drawing. Expressive eyes can give characters soul and emotion, making them unforgettable at first sight.
But why do the eyes you draw always seem lifeless and dull, like out-of-focus lenses?
Don't worry! In this simple tutorial, we'll help you draw eyes that truly "speak." Let's get started!

In this article, you will learn:
- How to Draw the Structure of an Eye?
- How to Draw Depth and Focus in the Eye?
- How to Draw Eyes in Perspective?
- How to Draw Different Eye Shapes?
- Extra Tips: Drawing Eyes in Digital Art
How to Draw the Structure of an Eye?
The eye is a complex and delicate structure. Understanding its anatomy is essential to creating expressive and lifelike eyes. Beginners often miss key details such as:
- The Shadow from Lashes on the Eyelid: Eyelashes don't just "stick" to the eyelid; they grow from its edge, casting subtle shadows.
- The Lower Eyelid and Eye Bag: The lower eyelid (or "tear trough" ) slightly bulges and catches the light, while the eye bag below it recedes, creating a shadow.
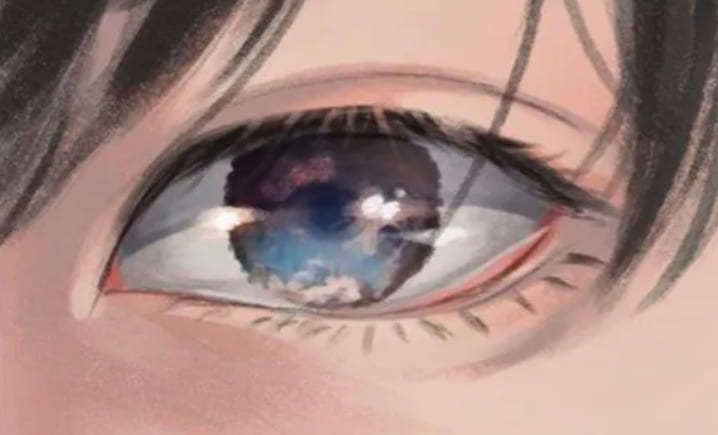
- Lighting on the Sclera (the White of the Eye): The sclera isn't pure white. It reflects environmental light, creating soft highlights and shadows that add depth.
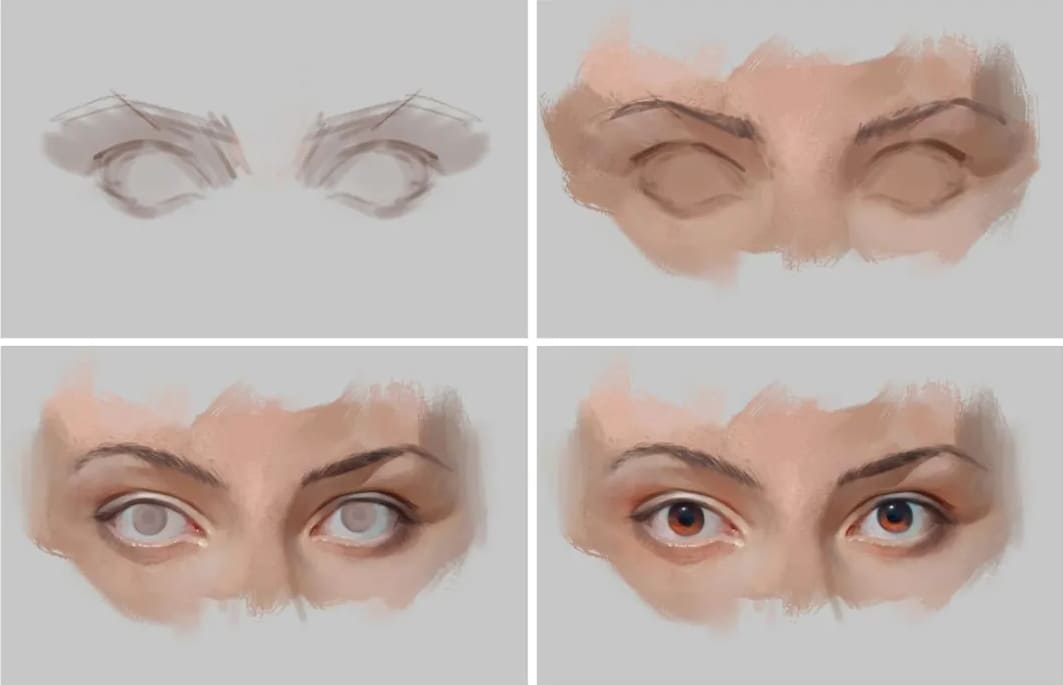
Before adding color, start with a clean line drawing to define the eye's basic structure and boundaries. Key tips include:
- Define Boundary Lines Clearly: Mark the edges of the eyeball, eyelids, and lashes to separate different parts of the eye.
- Follow the Structure's Flow: Draw lines that follow the natural curves of the eye to avoid stiff, unnatural outlines.
The area around the eye features both raised and recessed parts. Light interacts with these surfaces, creating contrasts essential for conveying depth.
- Upper Eyelid and Eye Socket Shadows: The upper eyelid often casts a shadow over the eye, especially if the light source is from above.
- Inner and Outer Corners of the Eye: The inner corner is typically recessed, while the outer corner sits higher. Shading these areas differently enhances realism.
- Highlight Placement: The placement of highlights on the eyeball depends on the light source. A well-placed highlight can make the eye appear shiny and full of life.
How to Draw Depth and Focus in the Eye?
Creating depth and realistic focus is key to drawing expressive eyes. These subtle transitions between sharp and soft details give the eyes dimension and a lifelike appearance.
Start by considering how eyebrows and eyelashes follow the curved surface of the eye. Ignoring this curvature can make them look flat.
Eyebrows should reflect the natural arches of the brow bone, with varying thickness and shading depending on the light source. Denser areas will appear darker, while lighter areas catch more light, emphasizing the direction and texture of the hair.
Eyelashes grow outward from the eye in a fan-like spread, centered around the eyeball. Pay attention to their direction, spacing, and natural curl to avoid a stiff "row of lines" look.
Group lashes into small clusters, making some denser and others sparser for a more dynamic effect. Light sources will create subtle highlights on individual lashes, adding to their realism.
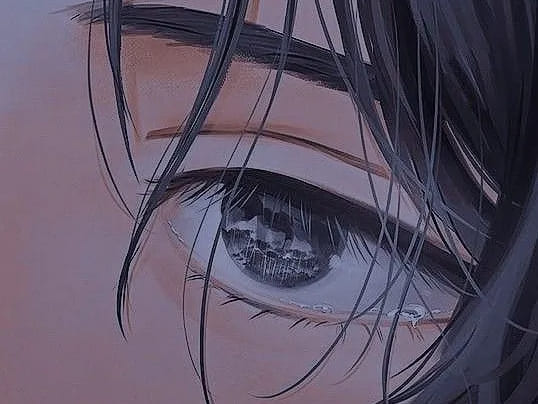
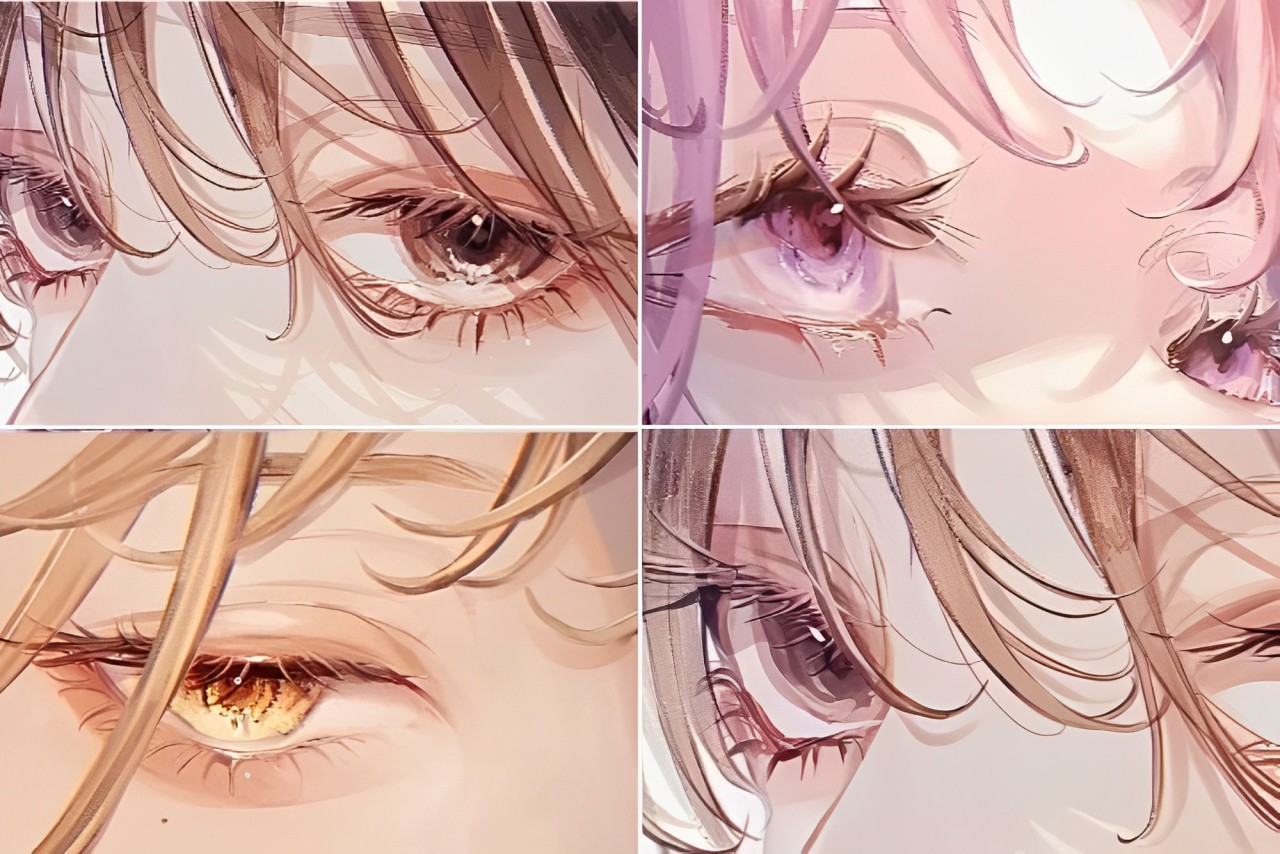
When drawing a side profile, depth becomes even more critical. The eye closer to the viewer should be detailed, with strong iris color and well-defined lines.
The farther eye can be softened or slightly blurred to create a sense of distance. This "sharp-near, soft-far" approach enhances the eye's spatial depth and makes the portrait more three-dimensional.
Lastly, highlights on the lashes and eyes should follow the same principles of depth. Avoid overly sharp edges in the highlights. Instead, let them fade gently along the curved surfaces of the eyeball and lashes, creating a more natural and luminous effect.
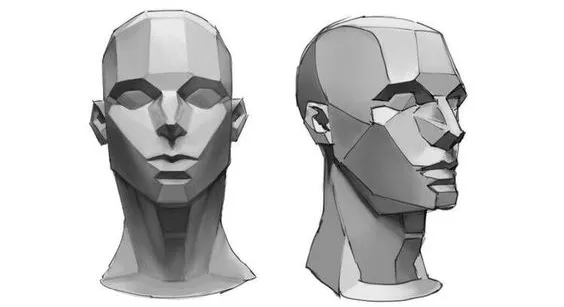
How to Draw Eyes in Perspective?
When drawing a character's side profile or a turned face, understanding perspective changes in the eyes is essential. Eyes are not flat surfaces but spherical organs embedded in the face. As the head turns, the shape and proportions of the eyes shift due to perspective.
The eye closer to the viewer will appear larger and more detailed, while the farther eye will look smaller and narrower due to foreshortening.
Similarly, the pupil's shape changes with the angle of the eye. The pupil is perfectly round from a direct front view, but as the eye turns sideways, it gradually becomes an oval. Ignoring this change can make the character's gaze look stiff or unnatural.
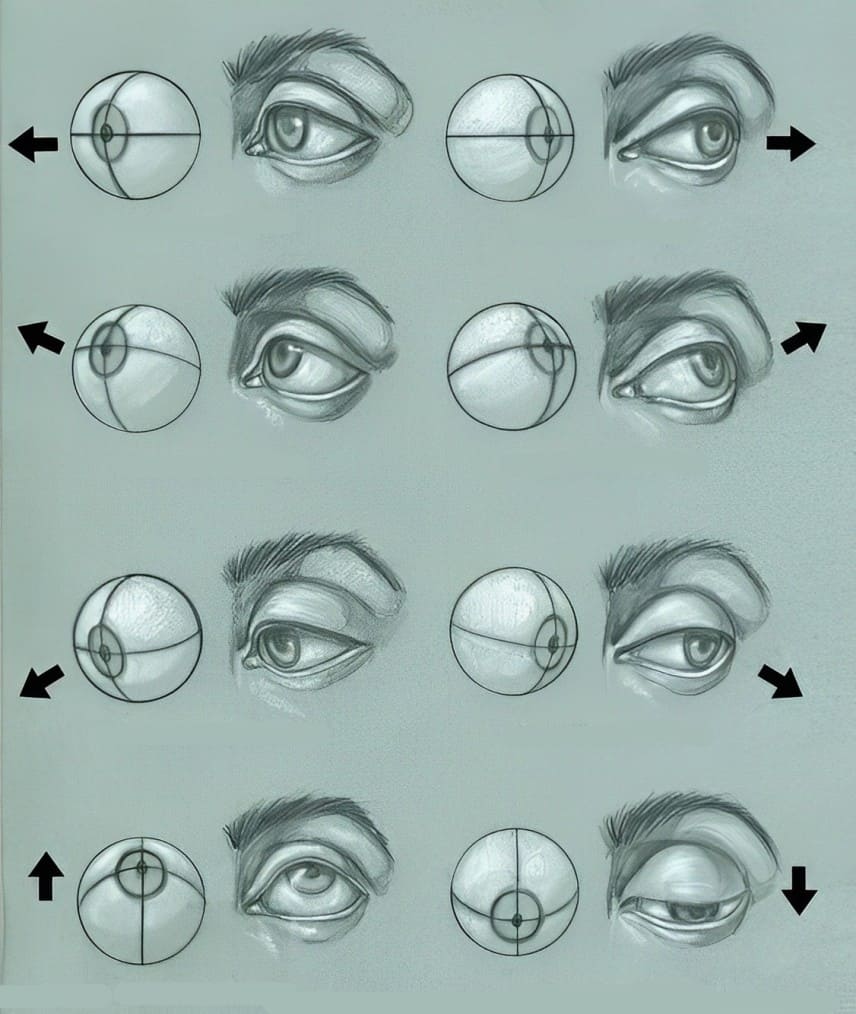
Another crucial point is ensuring both eyes are aligned in the same direction. If one eye looks off at a different angle, the character may appear cross-eyed or unfocused. To avoid this, draw a guideline connecting both pupils to check that they point toward the same target.
By understanding how perspective affects eye shape, size, and gaze direction, you can create more natural, expressive characters that truly seem to be looking at something in their environment. This attention to detail adds depth and realism to your artwork.

How to Draw Different Eye Shapes?
In character design and illustration, the shape of the eyes plays a crucial role in conveying personality and emotion. Different eye shapes can express a wide range of traits, from warmth and kindness to mystery and cunning.
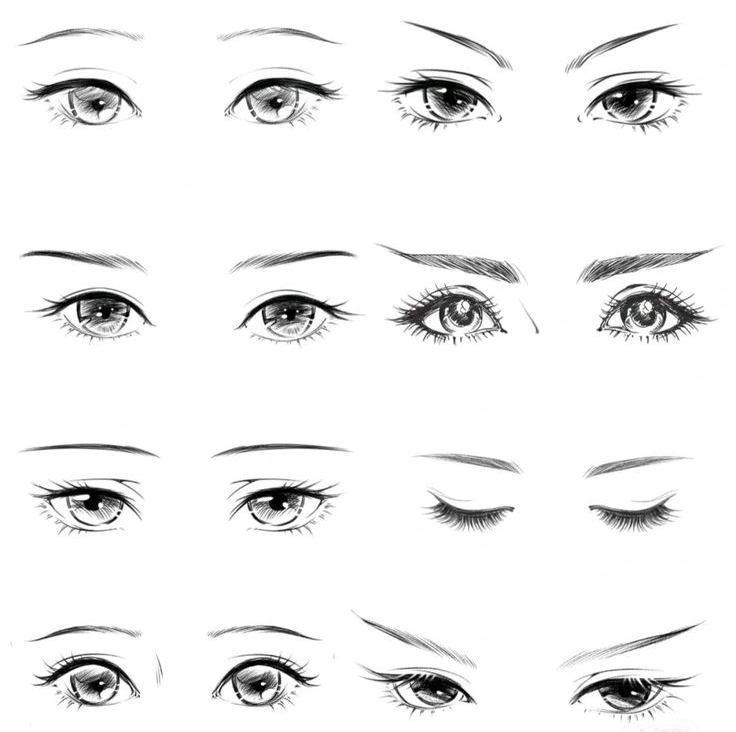
Common eye shapes include almond eyes, round eyes, fox eyes, and more. Each of these shapes has a distinct appearance and emotional impression.
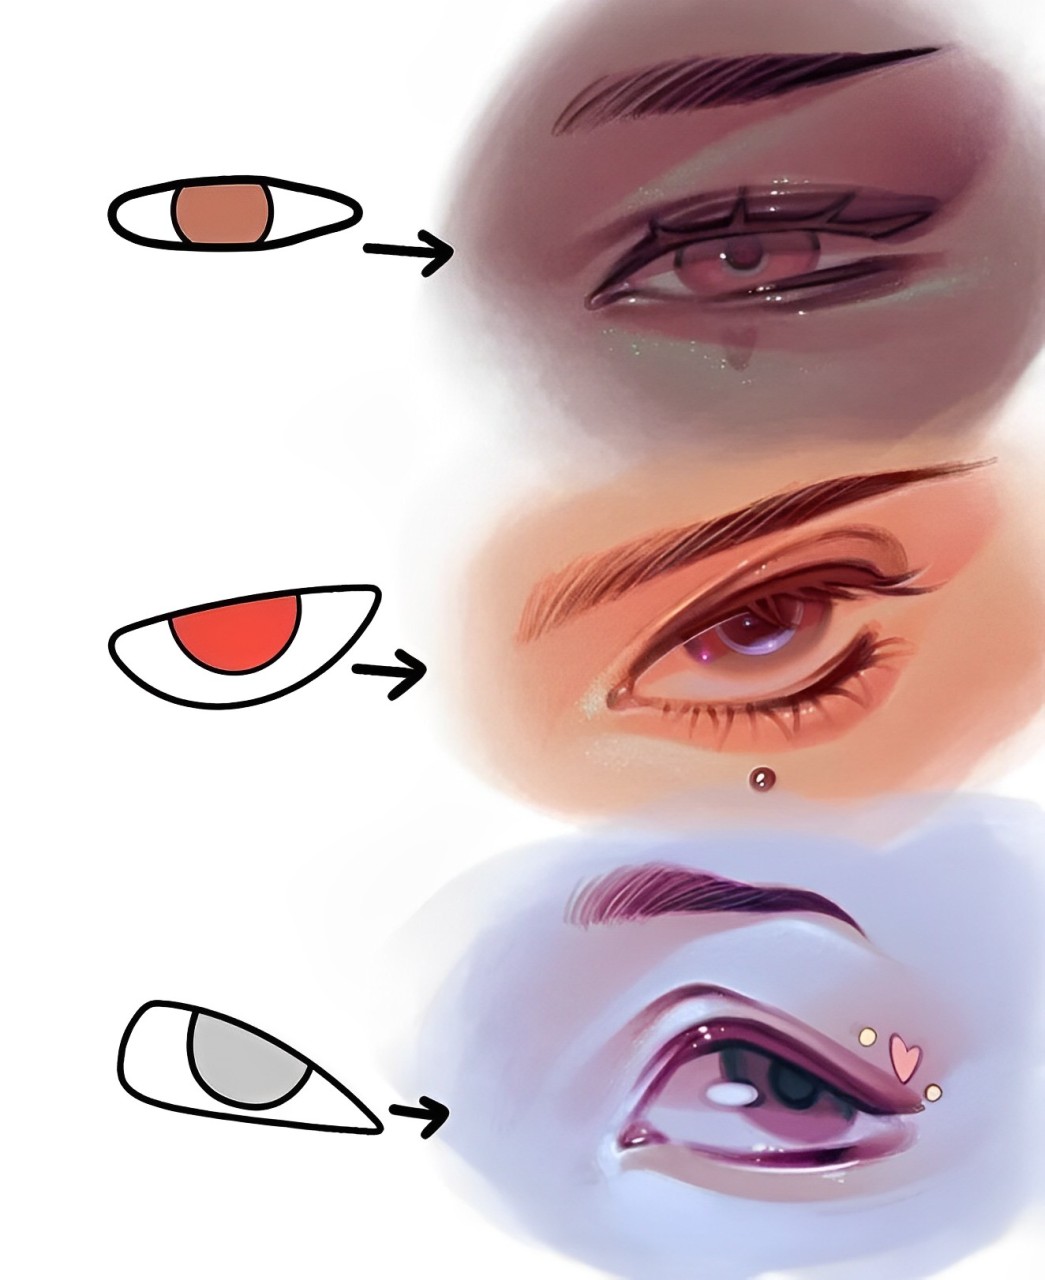
When drawing eyes, avoid making them too uniform or generic. Eye uniqueness comes not just from the overall shape but also from details like the curvature of the inner and outer corners, the thickness of the upper and lower eyelids, and the direction and density of the eyelashes.
These small adjustments can drastically change how the eyes appear and enhance your character's individuality.
There is no fixed formula here — success comes from observation and practice. Study real-life eyes or photo references, paying attention to their outlines, proportions, and subtle variations.
With time and experimentation, you will be able to create expressive and distinctive eyes that bring your characters to life.
Extra Tips: Drawing Eyes in Digital Art
In digital art, drawing eyes involves more than just outlining shapes and structures. Many details and techniques can make eyes more vivid and expressive. Here are some tips to enhance the effect of drawing eyes:
- Layering and Transparency: Drawing different parts of the eyes (like the eyeball, eyelashes, pupil, etc.) on separate layers allows for easier adjustments and modifications. Adjusting transparency can add soft light and shadows to the eyes, avoiding harsh edges.
- Highlights and Gradients: Adding subtle highlights using gradient tools on the eyeball can make the eyes appear more three-dimensional and glossy. Adjust the size and position of highlights based on the light source to enhance the eyes' depth.
- Detail Handling: Digital painting allows for zooming in and refining details, especially in areas like eyelashes, eyelids, and irises. Use fine brushes to depict these small details, giving the eyes a lively texture and shine.
- Softening Shadows: Deepen gradients with a soft brush tool to soften shadows in the eyes, avoiding harsh edges. Particularly under the eyes and in the eyelid shadows, gentle blending can make the eyes look more natural.
- Adjusting Color Temperature and Contrast: Modifying the color temperature and contrast around the eyes in digital art can create different atmospheres. For instance, using cool-toned shadows and warm-toned highlights can add depth and emotion to the eyes.
In addition to the digital art tips mentioned earlier, we'd like to introduce you to TourBox, a creative console that can significantly enhance your digital art creations.

Let's take drawing eyes in digital art software as an example. Tasks like switching layers, adjusting opacity, changing brushes, and tweaking brush properties are necessary and frequently performed.
Digital art involves constant adjustments and modifications, meaning that relying solely on a keyboard and mouse leads to wasting time on repetitive tasks.
By using TourBox, you can easily and efficiently handle these tedious tasks, much like using a game controller. Click our digital painting page link to explore more about the benefits of TourBox.

If you enjoy digital drawing on an iPad, why not try our TourBox Elite Plus? Watch the video below to see how TourBox Elite Plus can be the perfect companion for iPad drawing.