How to Edit Photos: A Must-See for Beginner Photographers
Whether you're using a professional camera or just your phone, it's important to edit your photos. For beginners, it's key to understand what photo editing is and what changes you should make.
In this article, we'll talk about what photo editing means and how to do it. Let's get started!

In this article, you will learn:
- What Is Photo Editing?
- How Should You Edit Your Photos?
- Final Thoughts: When Editing Isn't a Race Against Time
What Is Photo Editing?
Photo editing means using software to adjust and enhance your photos after you take them.
Whether you use a professional camera or your phone, you'll face small issues like low light or imperfect framing. In these cases, you can change things like exposure, contrast, colors, and crop the image to better match your idea.
For example, if your photo looks too dark because of low light, you can brighten it a bit to add more depth. If the composition isn't ideal, you can crop out extra parts to highlight the main subject. A few simple tweaks can turn an ordinary photo into something special.
Photo editing is both a skill and an art. It not only fixes small flaws in your shots but also adds personality and emotion to your work. With a few basic techniques, you can easily improve the quality of your photos and let each one tell its own unique story.

How Should You Edit Your Photos?
Photo editing covers a lot of little details, so it's hard to master everything in just one article. In this section, we'll use a few simple examples to give you a basic idea of photo editing. This will also help you as you learn more advanced techniques later.
1. Use Cropping to Improve Your Composition
Cropping can give your photo a fresh look and help the main subject stand out. For example, the photo below is an ordinary cat taken on the street.

How can you make that plain cat look more appealing? You do this by highlighting its best features with smart cropping.
At first, you might notice that the background is a bit messy. A cluttered background can take away from the cat's charm. In this case, cropping the image makes the cat the clear focus.
The cat's eyes are its most expressive feature. To bring more attention to them, position the cat's eyes along the upper third of the frame when you crop.
Also, brighten the eyes and tone down the colors of its fur and the background. This way, all the attention goes straight to the eyes.
In the photo below, you can see that the edited version is much more striking and eye-catching compared to the original.

When shooting a single subject, especially in still life or product photography, cropping is even simpler. Just focus on the subject and show off its best details.
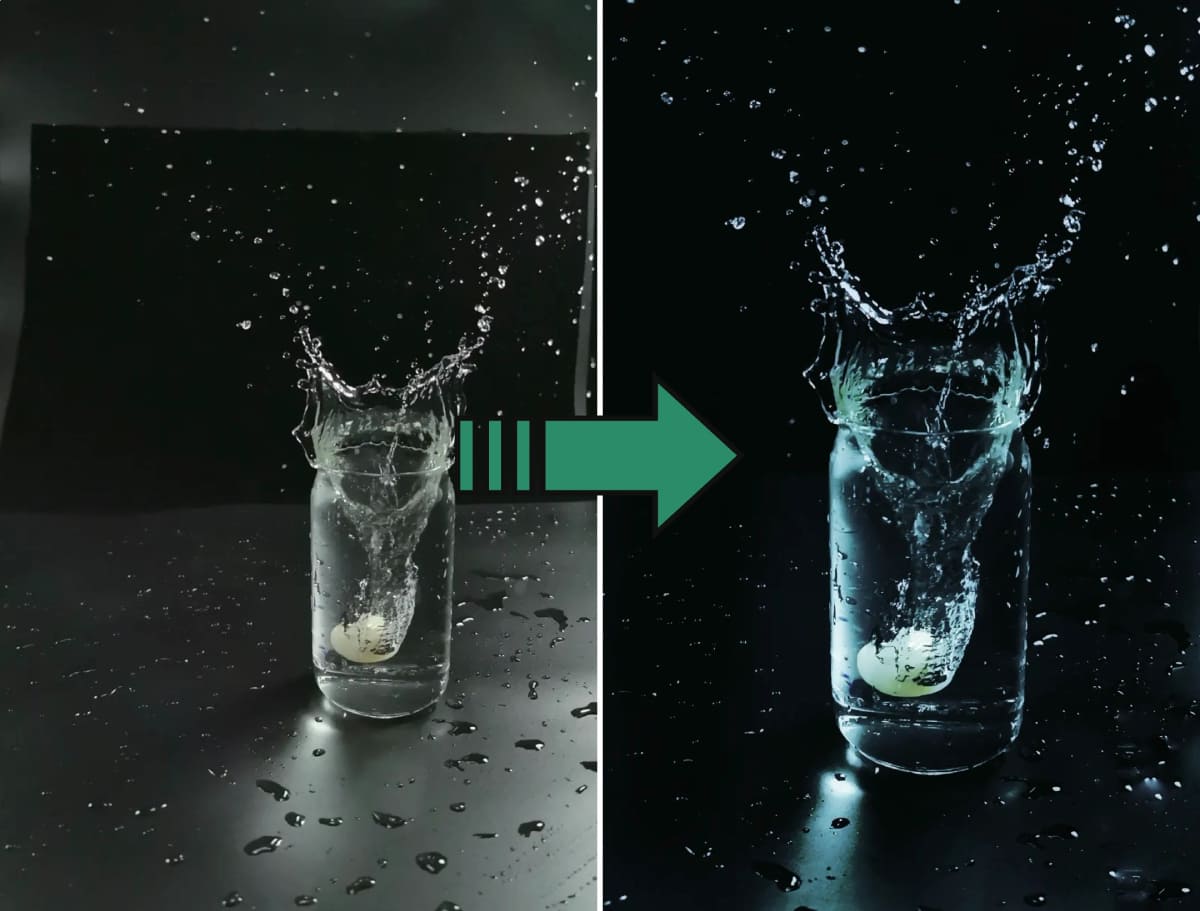
2. Make the Colors Pop Without Overdoing It
When shooting subjects or still life, you often use a centered composition. This style is meant to capture the object's shape and features.
If your photo only shows simple subjects, it's even more important that the colors and shapes come through clearly.
For these types of images, the key to editing is to emphasize the object's true colors and restore its natural look.
For example, in the original photo below, you can see that the background is a bit murky and the colors aren't very bright because of the glass panel blocking them.
So in post-processing, by cleaning up the background and making the colors more vivid and clear, you can better showcase the still life.
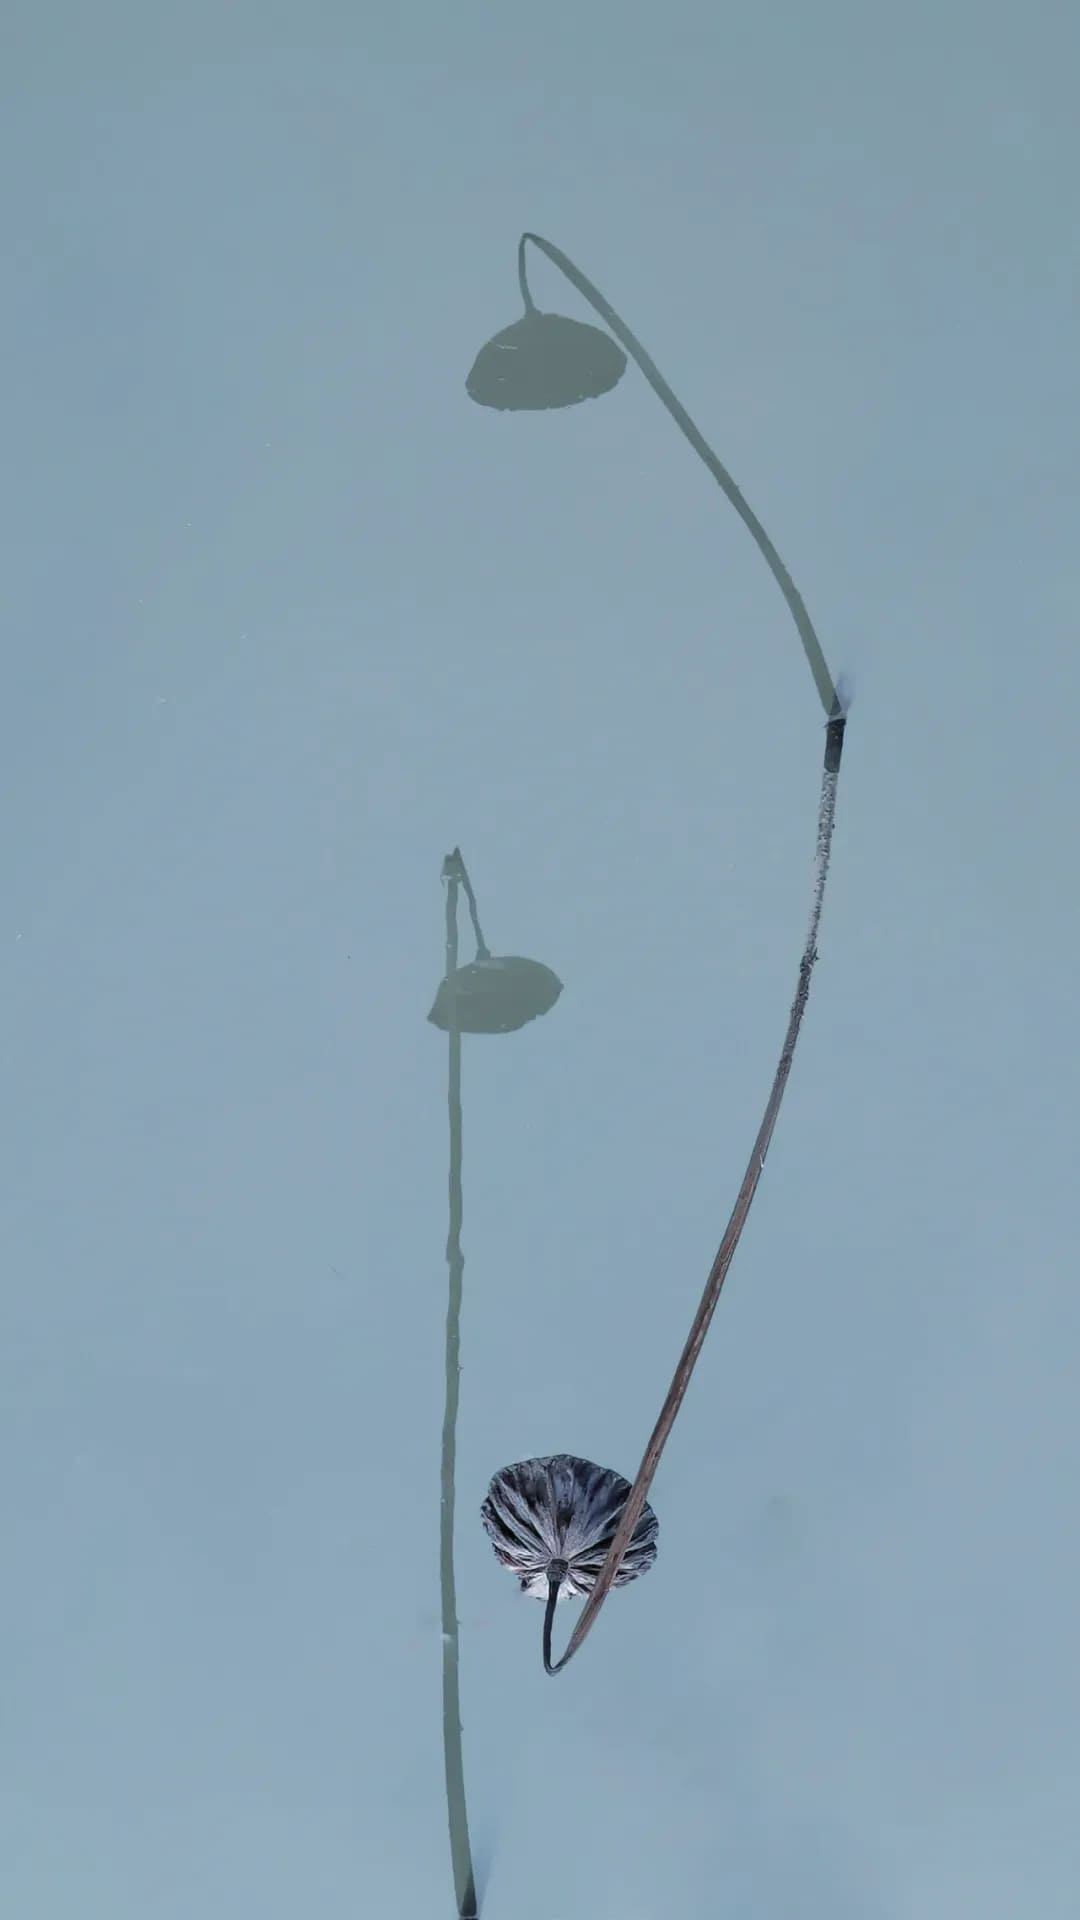
3. Emphasize the Subject, Minimize Distractions
In the original photo below, the lotus looks great and the water is calm. The scene isn't too busy.
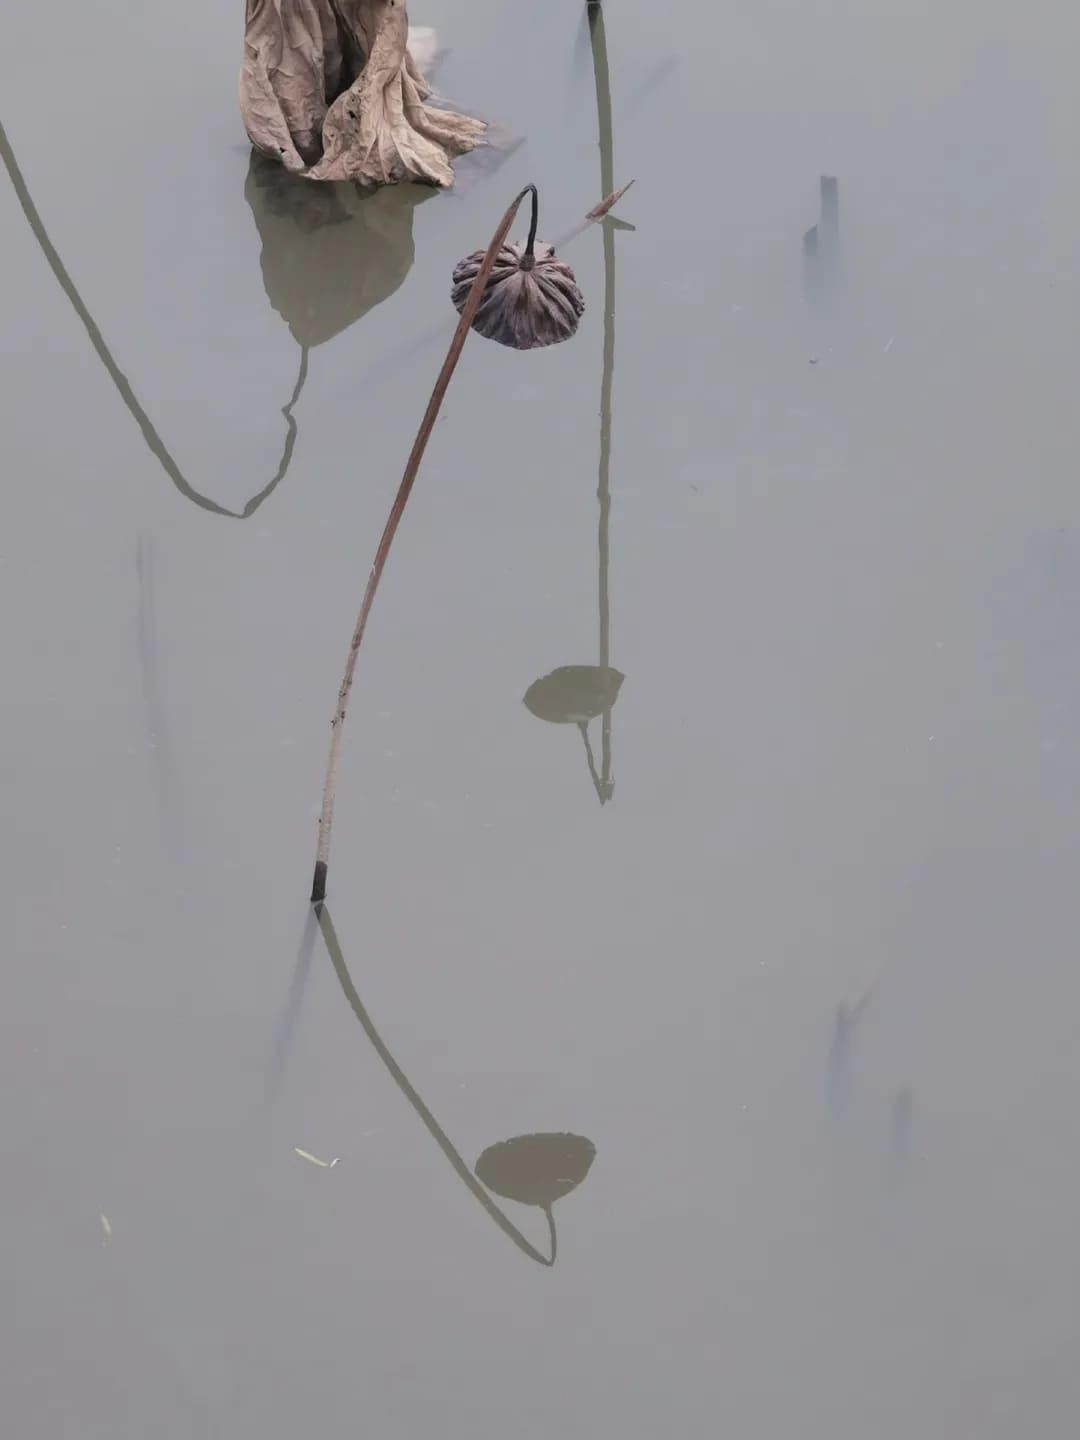
The problem is the large patch of withered lotus leaves in the upper left corner. They look lifeless, make the picture messy, and ruin the triangular balance in the center.
When editing, we can crop out the parts that don't help the subject stand out.
If you can't crop enough, try using editing tools to remove them. This method is common in artistic or creative photos, but it's usually not allowed in documentary photography.
Then, add a touch of cool tones to enhance the calm, minimal look.
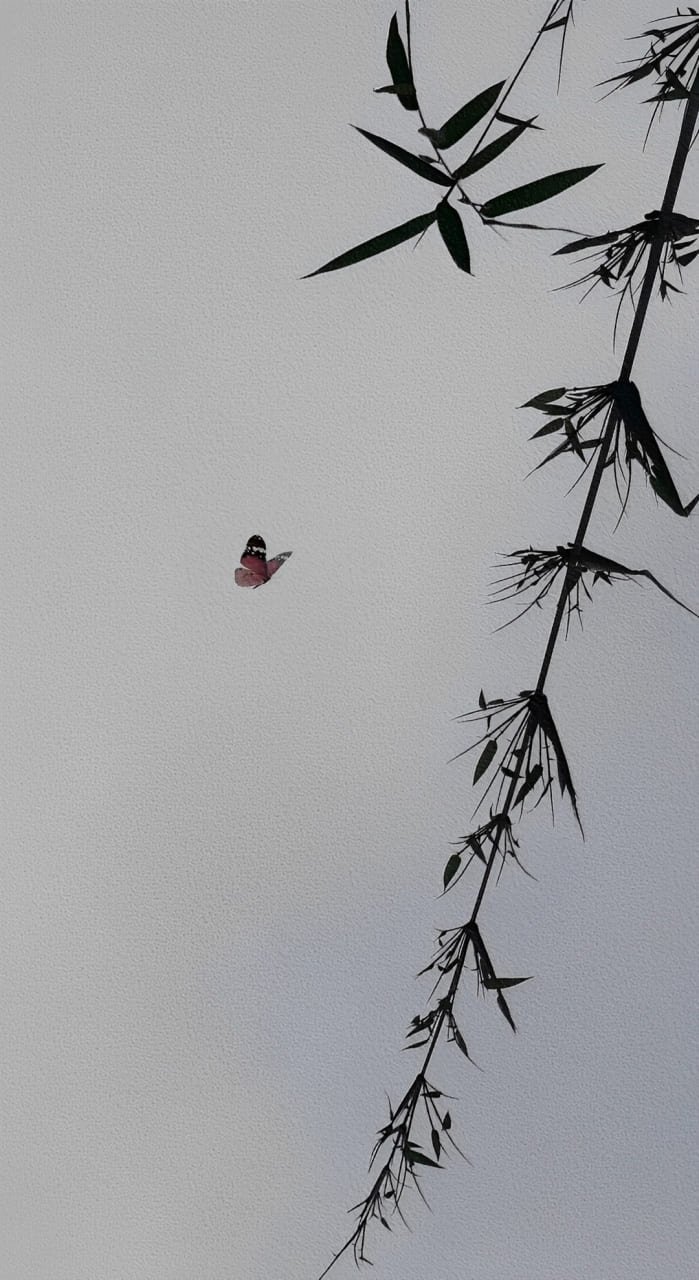
4. Add Elements to Strengthen the Subject
In photography, it's important to know when to remove things and when to add them. Every change should focus on the main subject and theme.
For example, the original photo below was taken on an overcast day. The thick clouds make the background simple and clean.

However, a photo of just a single bamboo stick can seem too plain. When shooting, we noticed that the bamboo looked almost black and white when lit from behind, and the soft clouds gave the scene a look similar to a traditional ink painting.
In editing, we can get creative and add more depth to the image. For instance, we added a butterfly in an empty part of the photo. The butterfly acts as the finishing touch, bringing life and energy to the otherwise plain bamboo.
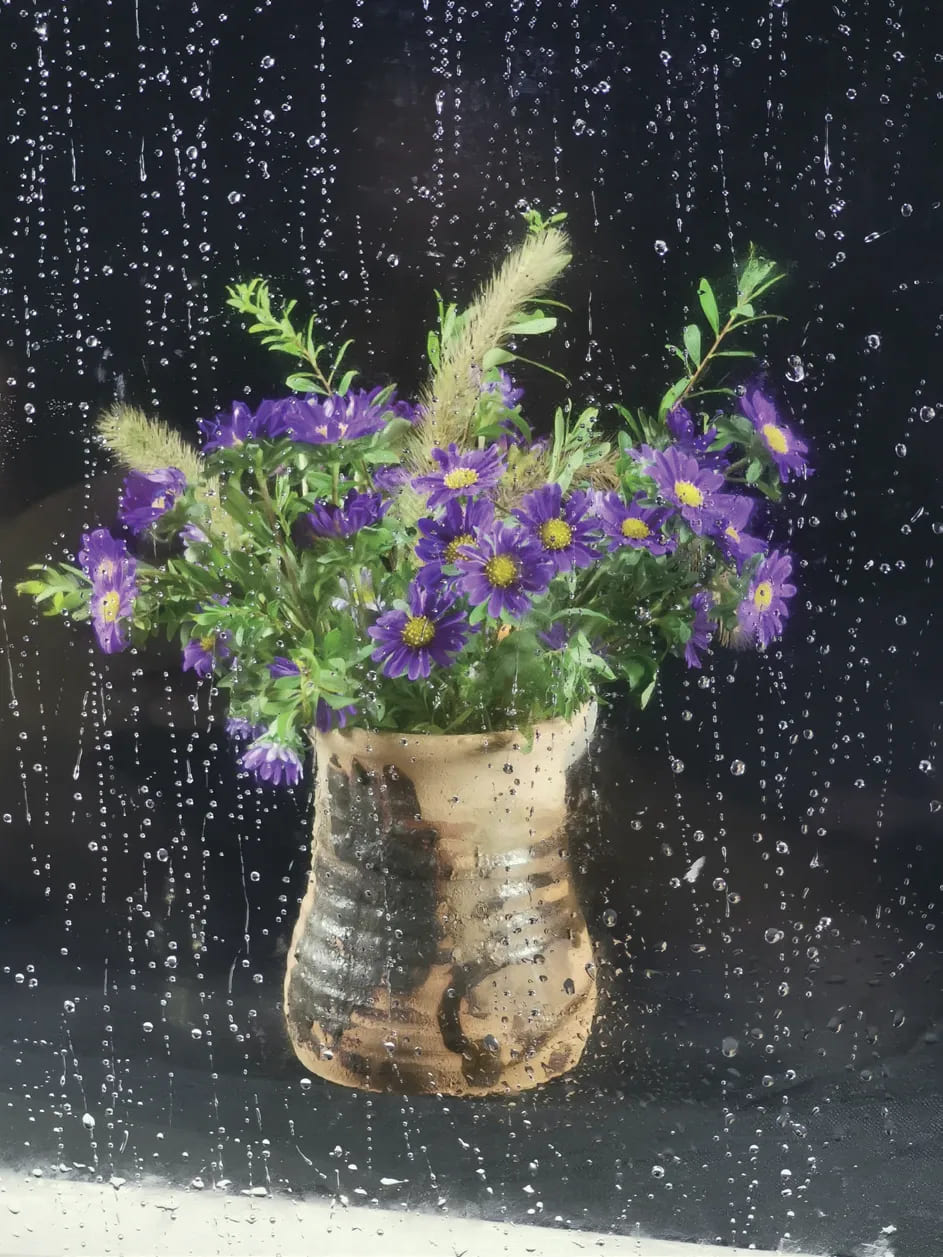
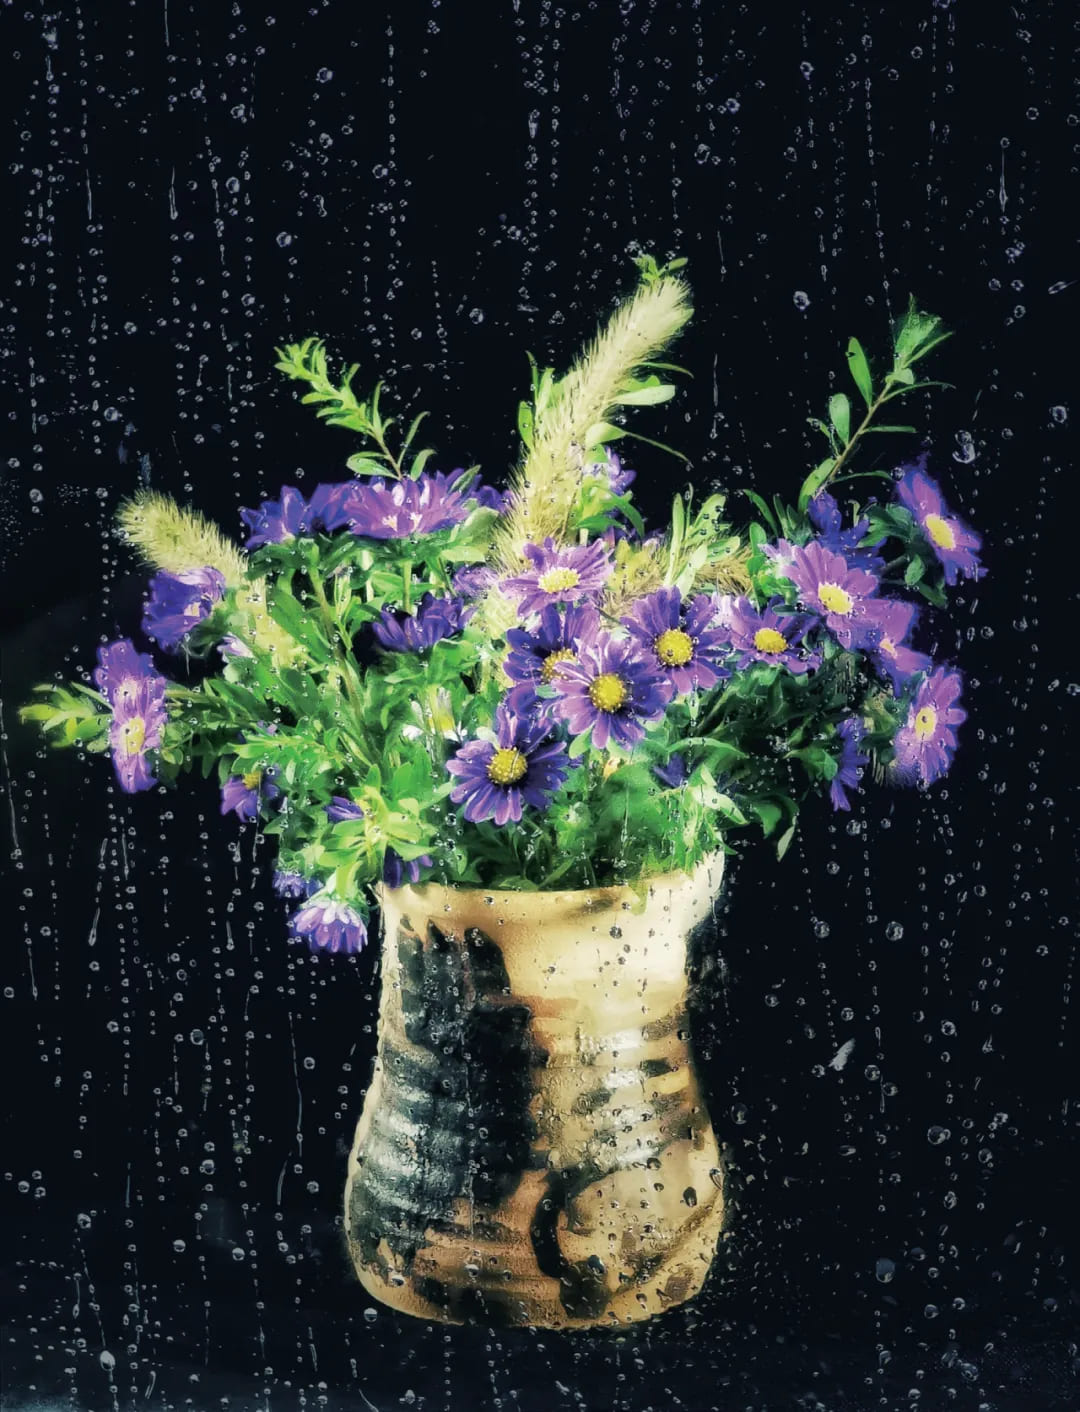
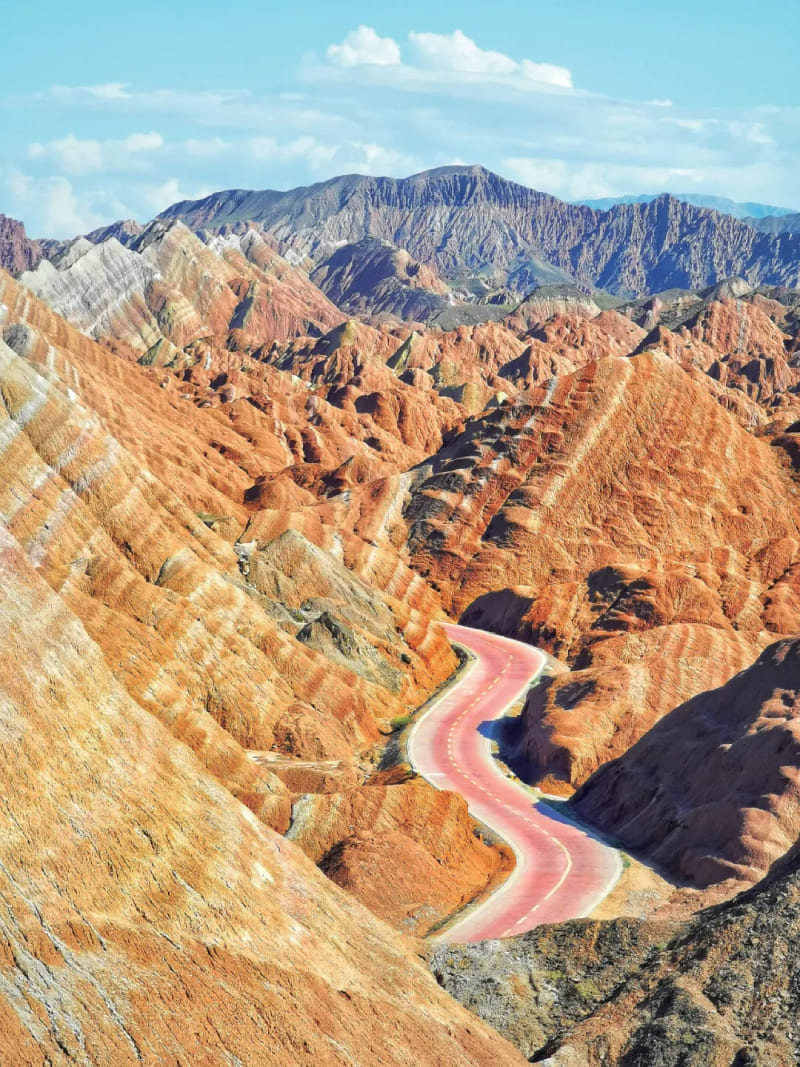
5. Bring Back the Original Look for a Vivid Image
Looking at the photo below, many might say its problem is too much haze and dull colors. The goal of editing is to clear up the image and make the colors pop.
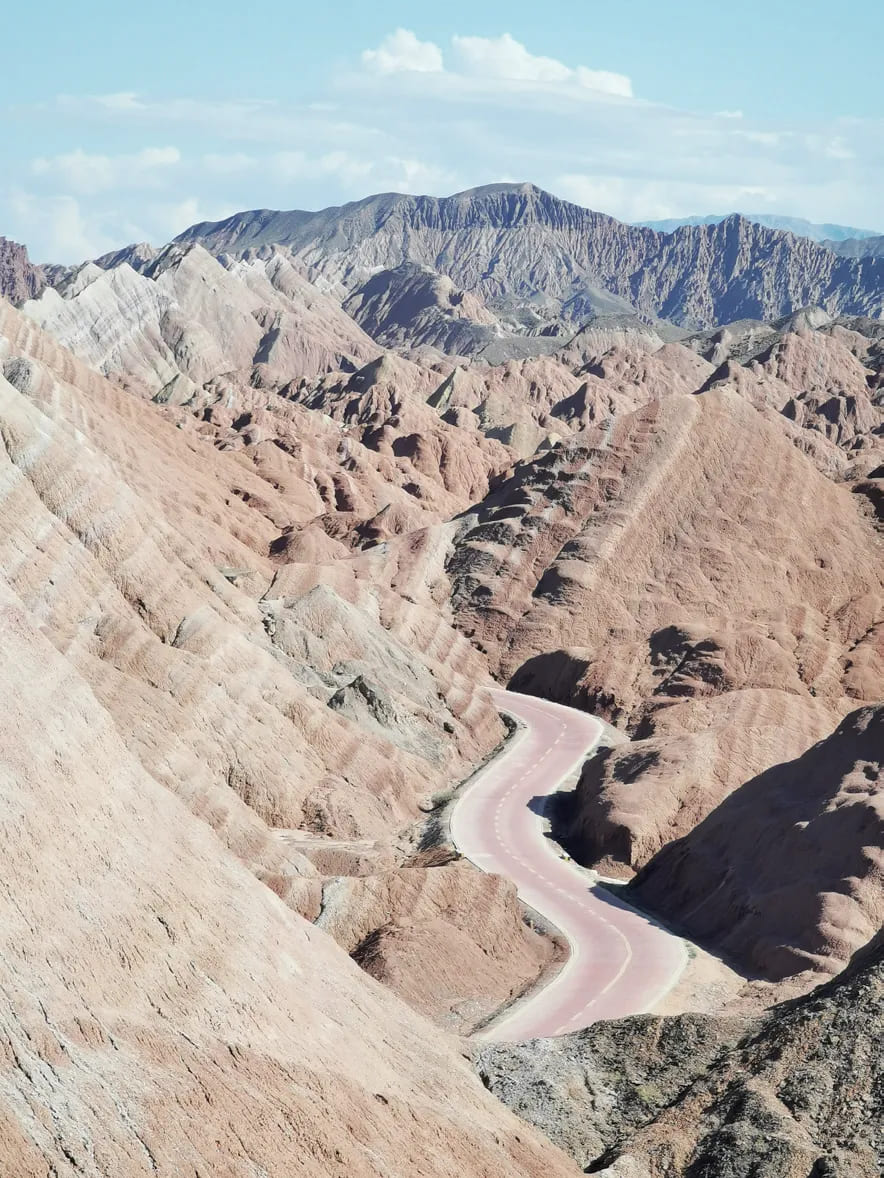
Often, when we take landscape photos, they seem flat not because the scenery is bad, but because we chose the wrong time. For example, the photo above was taken around noon when the sunlight is harsh, which made the image overexposed.
By lowering the exposure in editing, you can restore the bright, vivid colors and proper contrast. That's why it's important to notice any lighting issues before you edit.
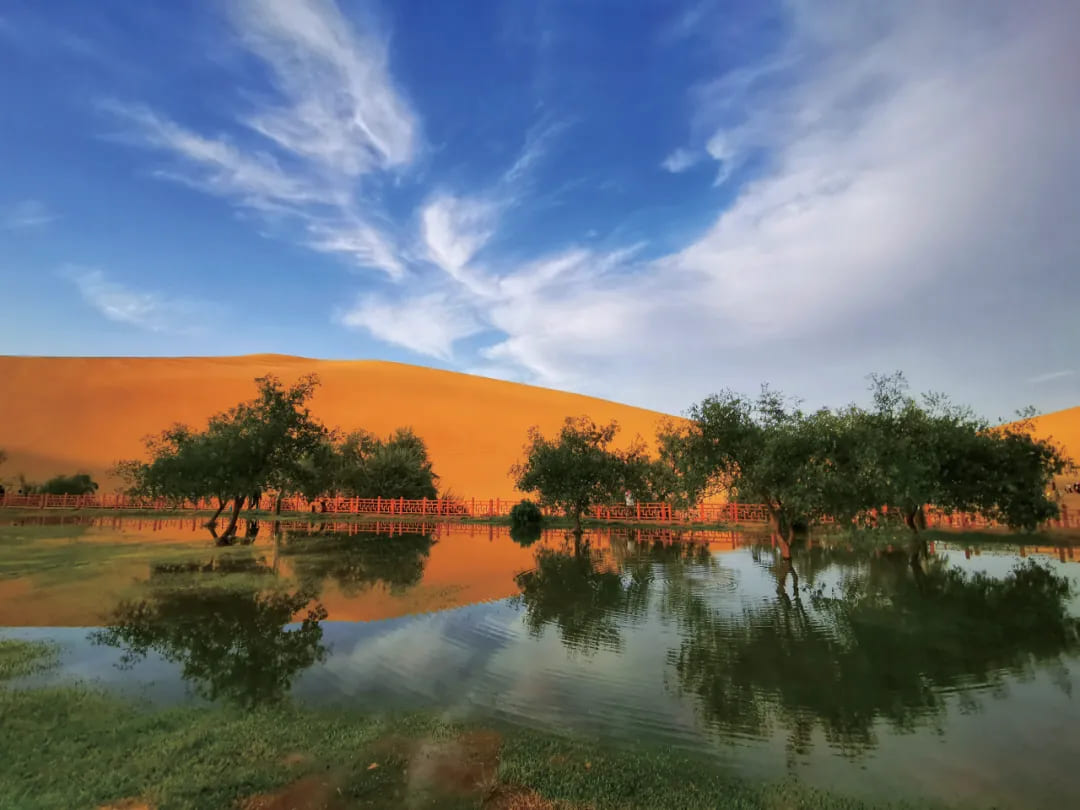
Now, look at the next photo. It was taken in low light, and by raising the exposure a bit, the image returned to its natural look.
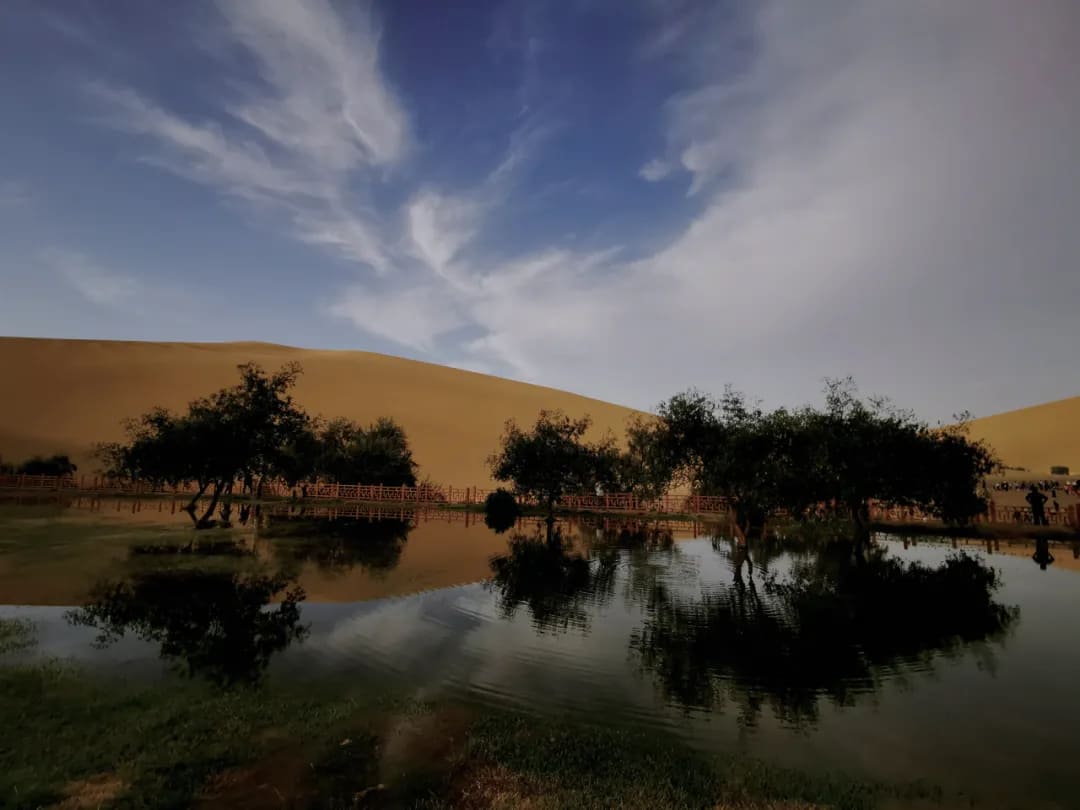
Sometimes, you don't need heavy editing. Just spot the problem while shooting and fix it directly. That's often the easiest way.
Final Thoughts: When Editing Isn't a Race Against Time
Photo editing isn't just about making your pictures look better. It's also a way to show your creativity and style. But when you're stuck doing the same tasks over and over, it's easy to feel worn out.
The hard truth is not that editing is difficult, but that repeating the same steps can drain your creative spark. That's why new photographers need to find a fast, efficient editing workflow that works for them.
We would like to recommend the TourBox creative console. Are you tired of using your mouse to click on tiny sliders? Try using the TourBox Knob to adjust the color temperature with your fingertips.

When you feel its smooth touch, the change from 2900K to 5500K isn't just a number. It feels like the warmth of candlelight shifting to the glow of sunrise.
That "Exposure" setting that used to make your hand shake now only needs a gentle push of your thumb on the Scroll, like turning the focus ring on an old film camera. The numbers feel alive.

Maybe the real boost in efficiency isn't about moving your fingers faster, but about making your tools feel invisible. If you're interested in TourBox, please click on our photo editing page to learn more about how it can help you.