How to Remove Background in Photoshop
Are you struggling to remove the background from an image in Photoshop? Whether you're a graphic designer, photographer, or digital artist, learning how to remove the background in Photoshop is an essential skill. In this tutorial, we will explore several techniques to delete background in Photoshop
So, let's dive into the world of Photoshop and learn how to remove background in Photoshop like a pro!

In this article, you will learn:
Part I: How to Remove Background in Photoshop
- Method I: Use the Select and Mask Workspace
- Method II: Use the Quick Selection Tool
- Method III: Use the Magic Wand Tool
- Method IV: Use the Background Eraser Tool
- Method V: Use the Pen Tool
Part II: How to Improve Your Photoshop Workflow
How to Remove Background in Photoshop
Removing the background from an image is a common task in many design projects, such as creating product photos for e-commerce websites or designing marketing materials. However, it can be a challenging task, especially when dealing with complex backgrounds or intricate details.
Photoshop offers several tools and techniques to make the process easier, but it can still be time-consuming and require a certain level of skill and practice. In this section, we'll explore five methods for removing background in Photoshop that will help you get the best results.
Method I: Use the Select and Mask Workspace
The Select and Mask workspace in Photoshop is a powerful feature that enables users to create precise selections and refine them with advanced tools. This workspace is designed specifically for tasks such as removing backgrounds from images, and it provides a range of tools to make the process as seamless and efficient as possible.
Step 1: Open Your Image in Photoshop
The first step in removing the background from an image is to open it in Photoshop. Once you have your image loaded into the software, you can start working on the background removal.
Step 2: Select the Subject of the Image
Before you can remove the background, you'll need to select the subject of the image. There are a variety of selection tools you can use, such as the Magic Wand Tool, the Quick Selection Tool, or the Pen Tool. Choose the tool that works best for your image, and make a selection around the subject.
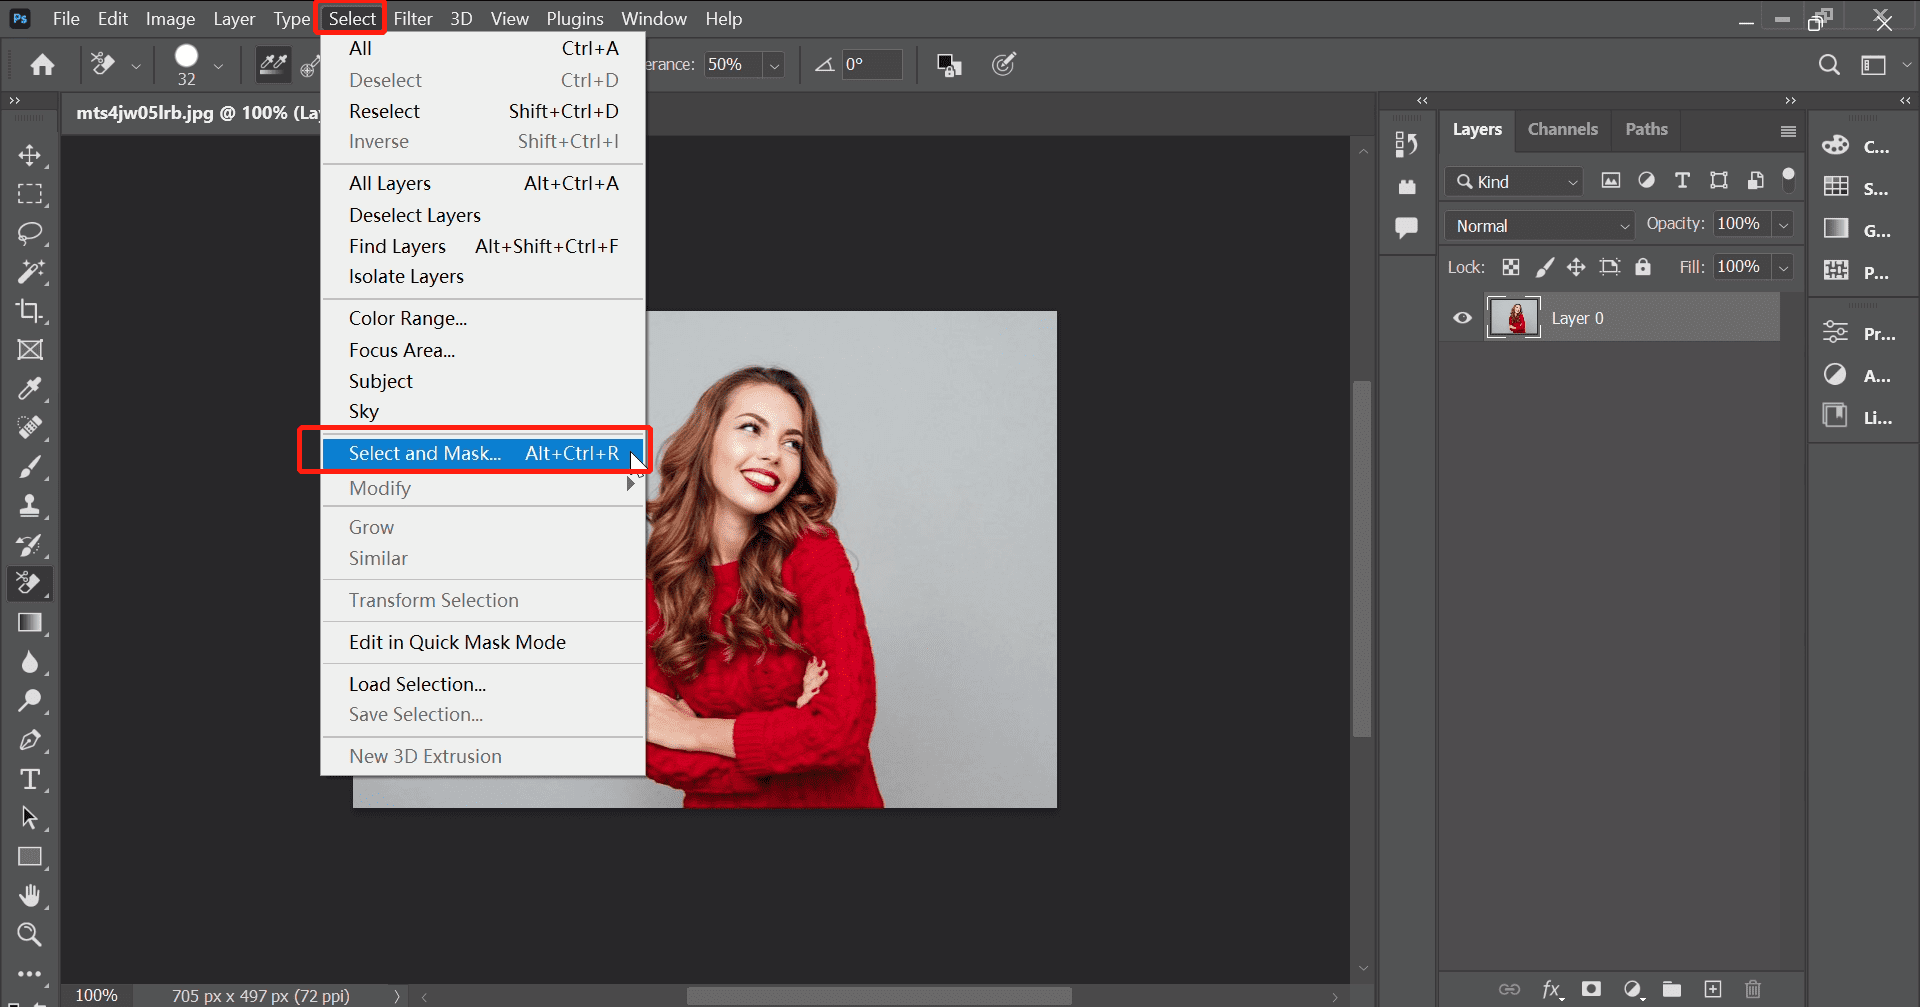
Step 3: Open the Select and Mask Workspace
Once you've made your selection, you can open the Select and Mask workspace by going to Select > Select and Mask. This will bring up a new window with a variety of tools for refining your selection.
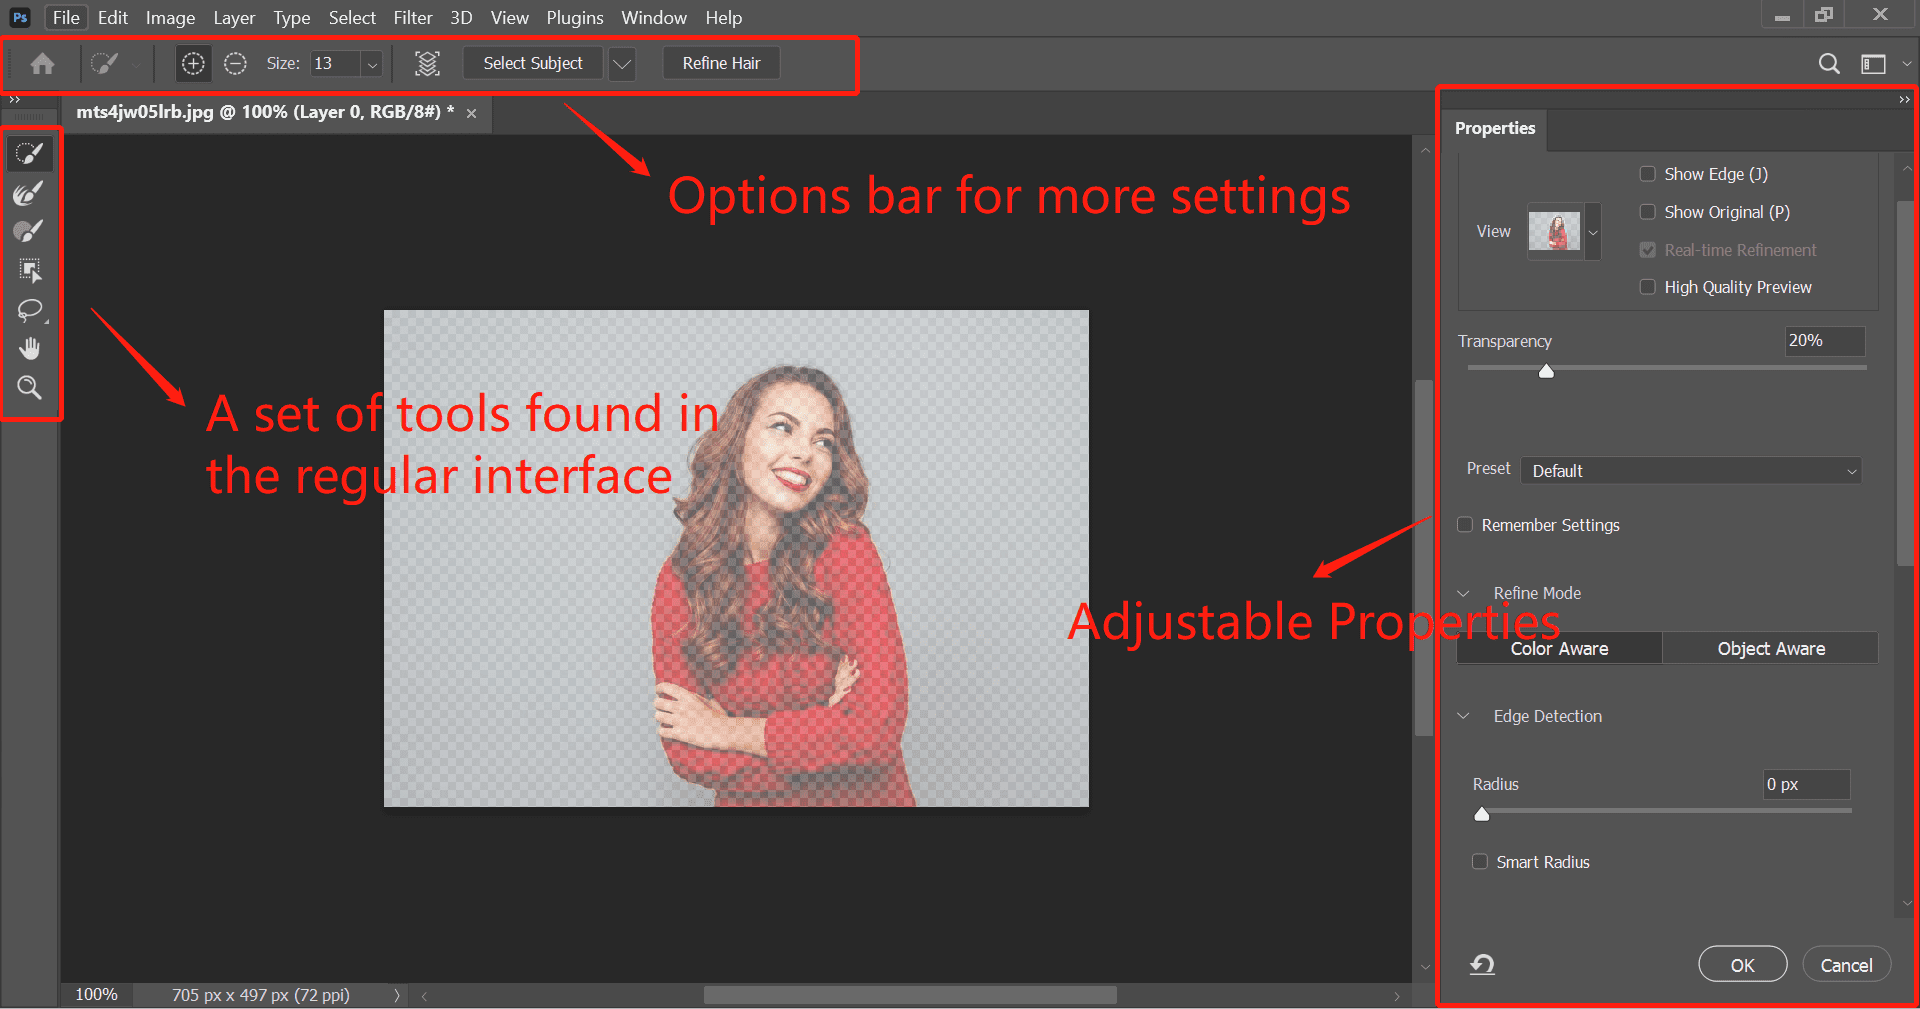
Step 4: Refine the Selection in Select and Mask Workspace
The Select and Mask workspace consists of a Tools bar, an Options bar, and adjustable properties. Using these tools, you can refine your selection to ensure that the subject is selected accurately and completely.
You can use tools like the Refine Edge brush to smooth out rough edges, or the Smart Radius option to automatically detect and refine the edges of the subject. You can also adjust the properties of the selection, such as Feather, Contrast, and Shift Edge, to optimize the selection further.
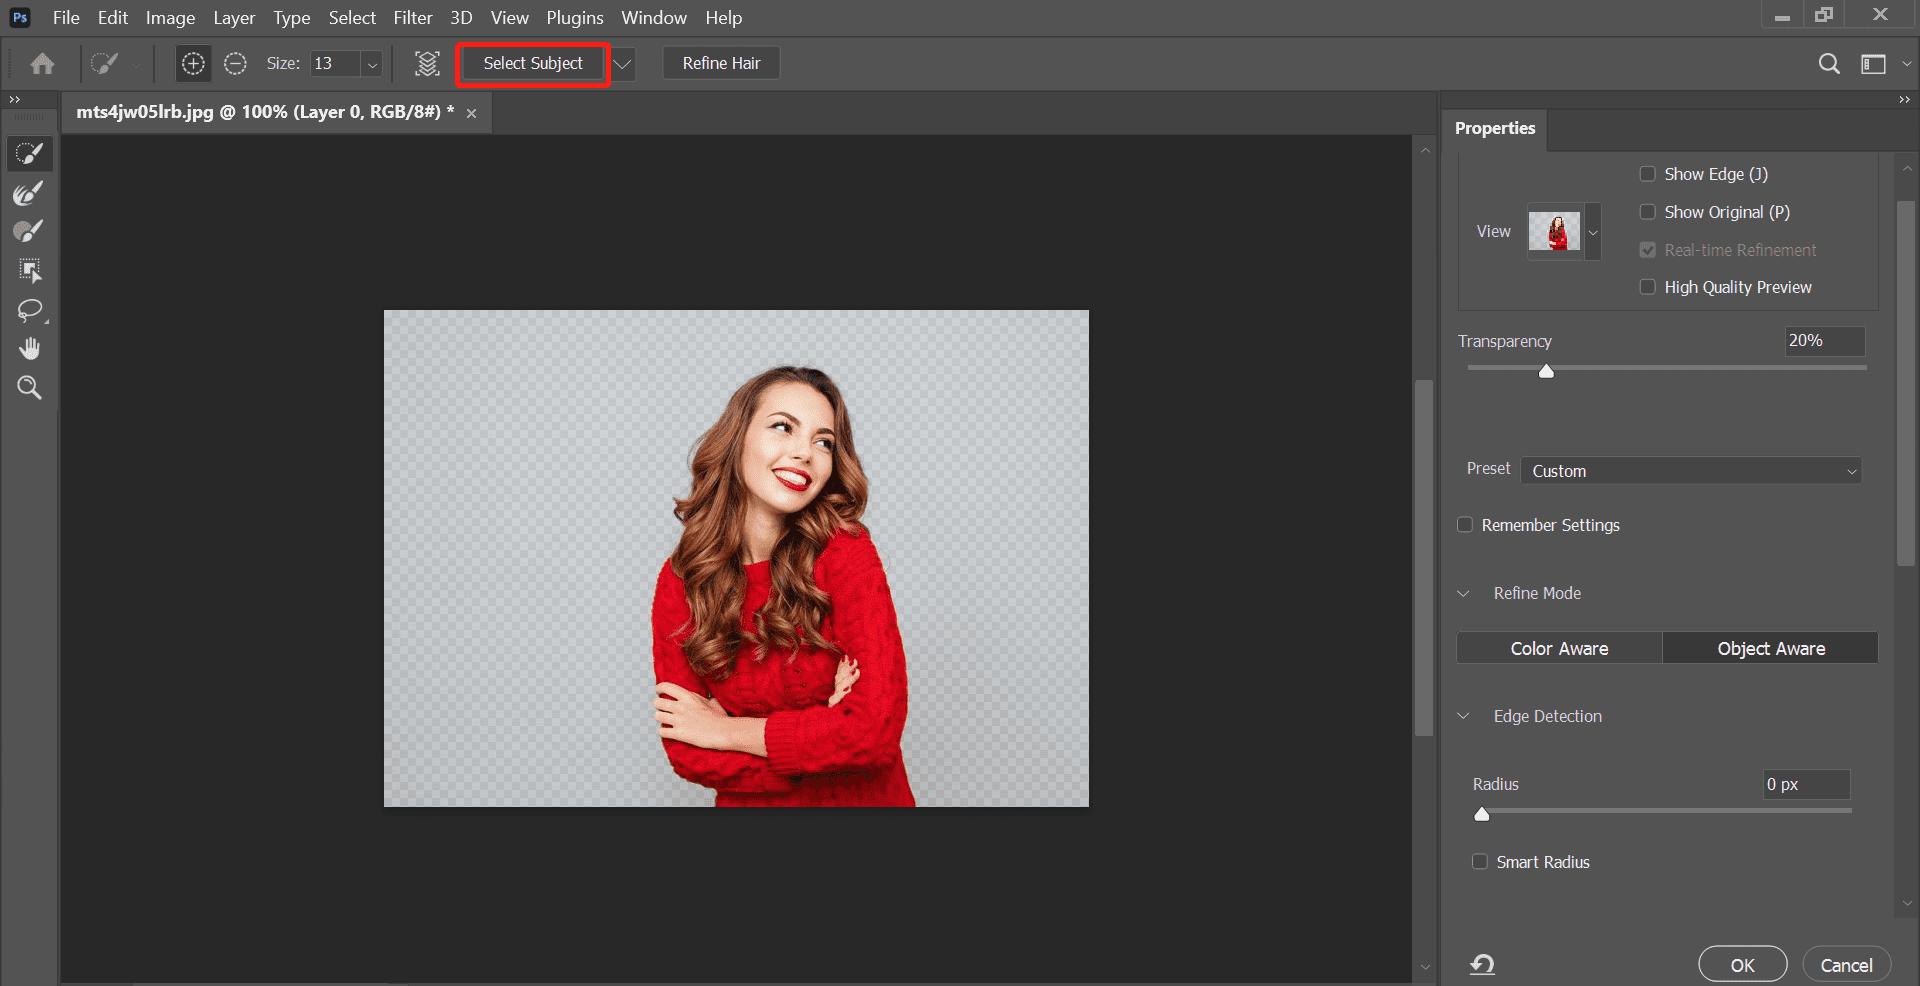
Step 5: Try the Select Subject Button
In the Select and Mask workspace, you'll see a variety of tools and options. Find the "Select Subject" button in the top left corner of the workspace and click on it. After you click this button, Photoshop will analyze your image and attempt to automatically select the subject.
You may need to refine the selection further using other tools within the Select and Mask workspace, such as the Refine Edge brush or the Smart Radius option.
Step 6: Preview the Result
As you refine your selection, you can preview the result in real-time to see how it will look once the background is removed. You can toggle between different preview modes, such as Overlay or On White, to see how the image will look against different backgrounds.
Step 7: Output the Result
Once you're happy with your selection, you can output the result in a variety of formats. You can choose to output the selection as a new layer, a new layer with a layer mask, or even as a new document.
Here is a more detailed video tutorial (made by Photoshop Training Channel) on Youtube for removing background in Photoshop:
Method II: Use the Quick Selection Tool
The Quick Selection tool is probably one of the easiest ways to remove background in Photoshop. Here's how:
- Select the Quick Selection Tool from the toolbar. You can also press W on your keyboard.
- Click and drag over the area you want to keep. Photoshop will automatically create a selection of similar pixels.
- Once you’re happy with your selection, go to the top menu and click on Select and Mask…
- Adjust the Edge Detection, Smooth, Feather, and Shift Edge sliders to fine-tune your selection.
- Choose the output as a New Layer with Layer Mask and click OK.
The background is now removed, leaving only your selection on a new layer. Check out this YouTube video (made by Insider Tech)that explains how to use the Quick Selection tool in Photoshop to delete a background.
Method III: Use the Magic Wand Tool
The Magic Wand tool is excellent for backgrounds with large areas of similar colors:
- Open your image in Photoshop.
- Select the Magic Wand tool from the toolbar or press W on your keyboard.
- Click on the part of the background you want to remove.
- If the entire background is not selected, increase the Tolerance in the options bar or hold Shift and click again on unselected areas.
- Go to Layer > New > Layer via Cut to create a new layer without the background.
Watch this YouTube video (made by Brendan Williams) to learn how to use the Magic Wand tool in Photoshop.
Method IV: Use the Background Eraser Tool
The Background Eraser tool allows you to delete the background in Photoshop by erasing it while maintaining the foreground intact:
- Open your image in Photoshop.
- Select the Background Eraser Tool from the toolbar.
- Adjust the Size, Hardness, and Spacing in the options bar as needed.
- Start erasing the background by clicking and dragging your mouse. Be careful not to erase the object in the foreground.
While the Background Eraser Tool is a popular feature in Photoshop, it may not be the best option for removing backgrounds in certain situations. We suggest taking a look at this YouTube video (made by Photoshop Training Channel) to gain a better understanding of its limitations and why it may not always be the most effective tool for the job.
Method V: Use the Pen Tool
The Pen tool can provide the most accurate results to remove background in Photoshop, especially for images with complex outlines:
- Open your image in Photoshop.
- Select the Pen tool from the toolbar or press P on your keyboard.
- Click around the object to create a path. Click and drag to create curves.
- Once you have drawn a path around the object, right-click inside the path and choose Make Selection…
- Choose Feather Radius as 0 pixels, and click OK.
- Go to Layer > New > Layer via Cut to create a new layer without the background.
Learn how to use the Pen Tool in Photoshop by watching this YouTube video (made by VerticDesigns).
How to Improve Your Photoshop Workflow
An effective workflow is essential for efficient image editing in Photoshop. By optimizing your workflow, you can reduce the time and effort required to complete your tasks and focus on your creative vision. Here are some tips and instructions to improve your workflow in Photoshop:
- Customize Your Workspace: You can personalize Photoshop's interface to match your preferences and requirements. Simply go to Window > Workspace and either choose one of the preset options or create your own. From there, you can move around or hide specific tools and panels by dragging and dropping or using keyboard shortcuts.
- Use Keyboard Shortcuts: Keyboard shortcuts in Photoshop can help you work faster. Instead of clicking through menus, you can use the keyboard to quickly perform different actions like selecting tools or zooming in and out. To see the shortcuts, go to Edit > Keyboard Shortcuts and customize them to your liking.
- Group and Label Layers: Managing layers is essential for keeping your images organized and editable. You can group and label layers to quickly locate them and make changes. To group layers, select them and press Ctrl/Cmd+G. To label layers, double-click on the layer name and type in the desired name.
- Save and Reuse Presets: Using presets in Photoshop can be a huge time-saver. Simply create and save presets for different tasks like color correction, filters, or brushes, and reuse them in other projects. To save a preset, select the desired settings and go to Edit > Presets > Preset Manager. Choose the type of preset and save it for future use.
- Use TourBox: Removing the background from an image can be a daunting task, but there's a tool that can help make it easier. The TourBox is a customizable tool that provides controls for your favorite editing tools, allowing you to work more efficiently and boost productivity.

With TourBox, you can quickly and easily make adjustments to your images, including removing backgrounds, without having to constantly switch back and forth between different tools and settings. Whether you're a professional photographer or a beginner, TourBox is a game-changer that can help you take your image editing to the next level.
Removing the background from an image can be a challenging task, but with Photoshop's Select and Mask workspace and other features, it doesn't have to be. By following the steps outlined in this article and using these powerful tools, you can achieve accurate and polished results that will take your designs to the next level.
Whether you're creating product photos for e-commerce or designing marketing materials, knowing how to remove background in Photoshop is a crucial skill that will help you stand out from the crowd.
So, don't be afraid to experiment and practice, and discover the best techniques that work for your projects. With dedication and creativity, you can become a master of image editing and achieve your vision.