How to Resize An Image in Photoshop
Resizing images is essential in design but risks quality loss if done improperly. This guide walks you through Photoshop's top techniques and pro tips step by step, to resize images without sacrificing clarity.
Whether you're a designer, photographer, or digital artist, mastering this ensures your work stays sharp and professional.

In this article, you will learn:
How to Resize an Image in Photoshop
In this section, we'll walk you through the process of resizing an image in Adobe Photoshop while keeping its quality intact. We've designed this tutorial with beginners in mind, so we'll use straightforward and easy-to-follow language to help you understand every step.
Prerequisites
- Adobe Photoshop installed on your computer (any version from CS6 to the latest Creative Cloud version will work for this tutorial).
- An image that you want to resize.
1. Open the Image in Photoshop
First, open Adobe Photoshop and follow these steps to open your image:
- Click on File in the menu bar.
- Select Open from the drop-down menu (or press Ctrl + O or Cmd + O on a Mac).
- Navigate to the folder where your image is stored. Select the image and click Open.
- The image will now be displayed on the Photoshop canvas.
2. Understand Image Resolution and Resampling
Before resizing an image, it's essential to understand two critical concepts: image resolution and resampling.
- Image Resolution: The resolution of an image refers to the number of pixels per inch (PPI) or dots per inch (DPI). High-resolution images have more pixels per inch, which results in finer detail and better quality.
- Resampling: Resampling is the process of changing the number of pixels in an image when resizing it. Resampling can either increase or decrease the image's pixel dimensions and affects the image's overall quality.
When resizing an image, we need to find the right balance between maintaining quality and achieving the desired size.
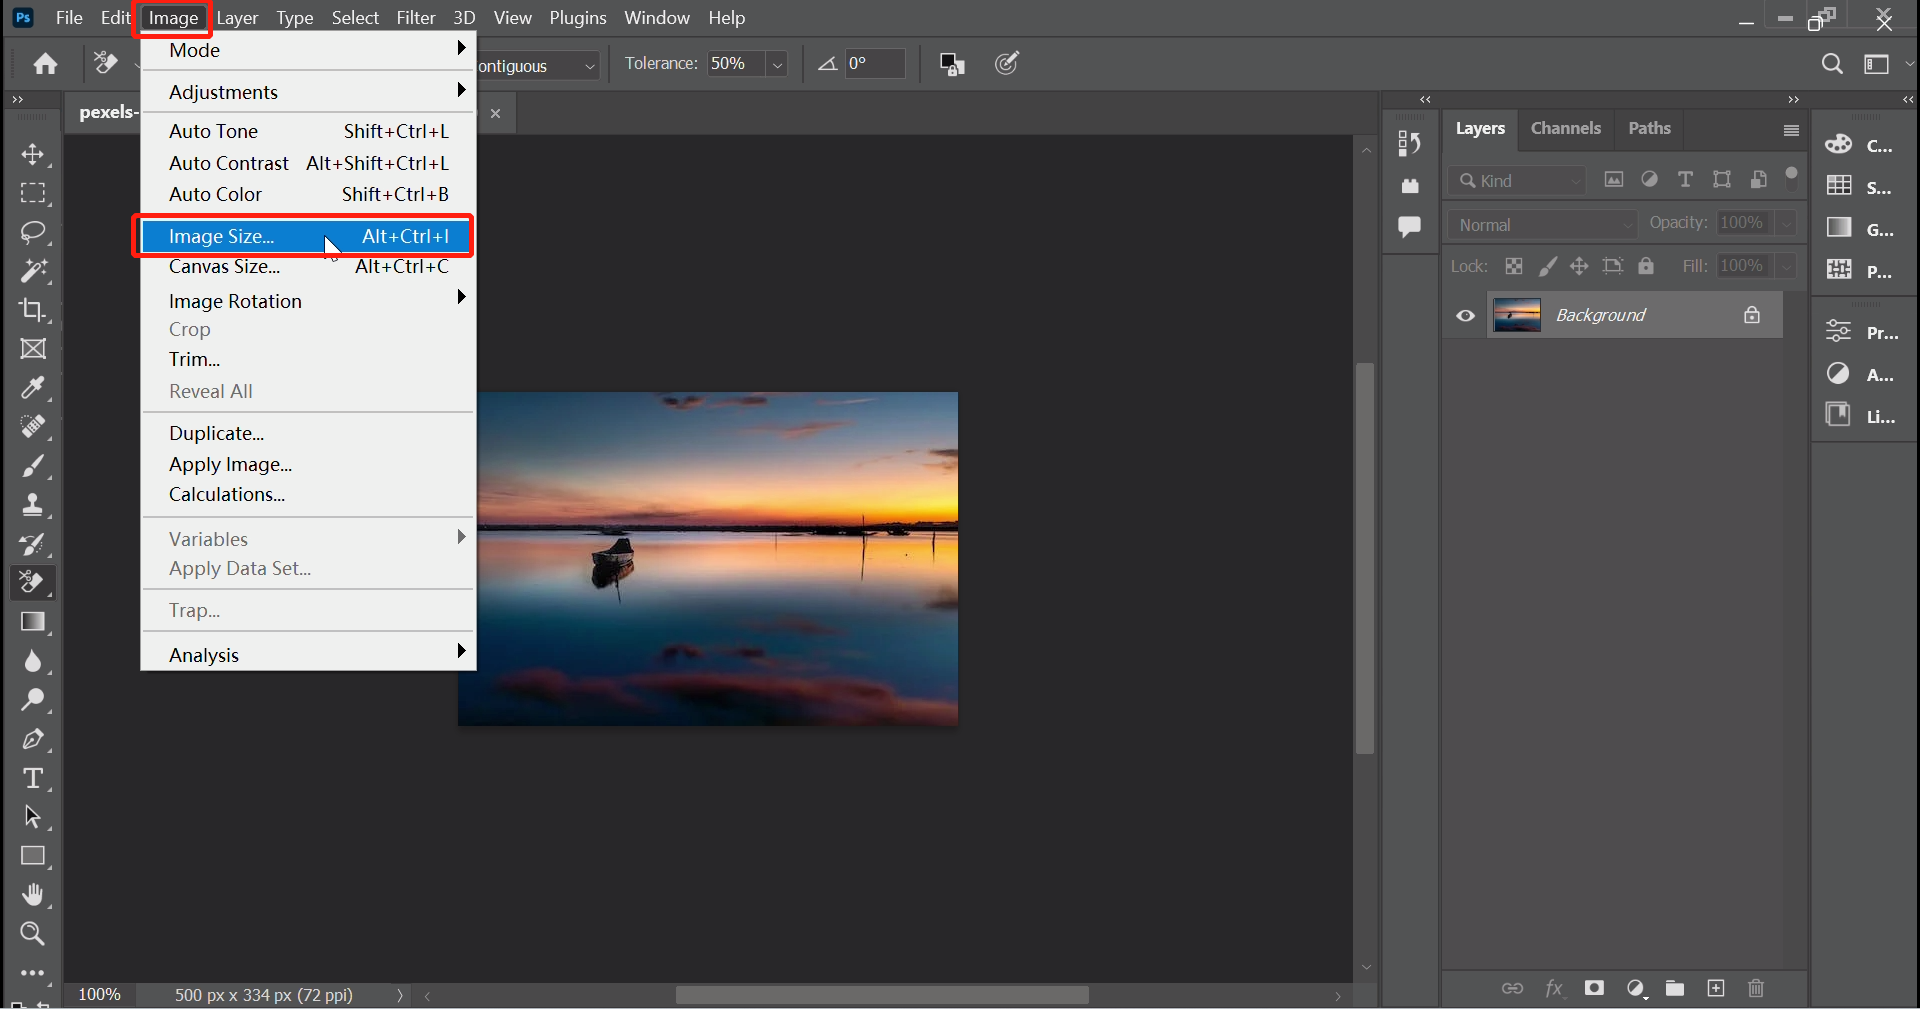
3. Resize the Image Using the Image Size Dialog Box
To resize an image in Photoshop, we'll use the Image Size dialog box. Follow these steps:
- Click on Image in the menu bar.
- Select Image Size from the drop-down menu (or press Ctrl + Alt + I or Cmd + Option + I on a Mac).
- This will open the Image Size dialog box, where you can adjust the image's resolution and pixel dimensions.
3.1. Change the Image Resolution
In the Image Size dialog box, locate the Resolution section.
Make sure the measurement unit is set to Pixels/Inch.
Enter the desired resolution value. For example, if you want to increase the resolution for print purposes, you might enter 300.
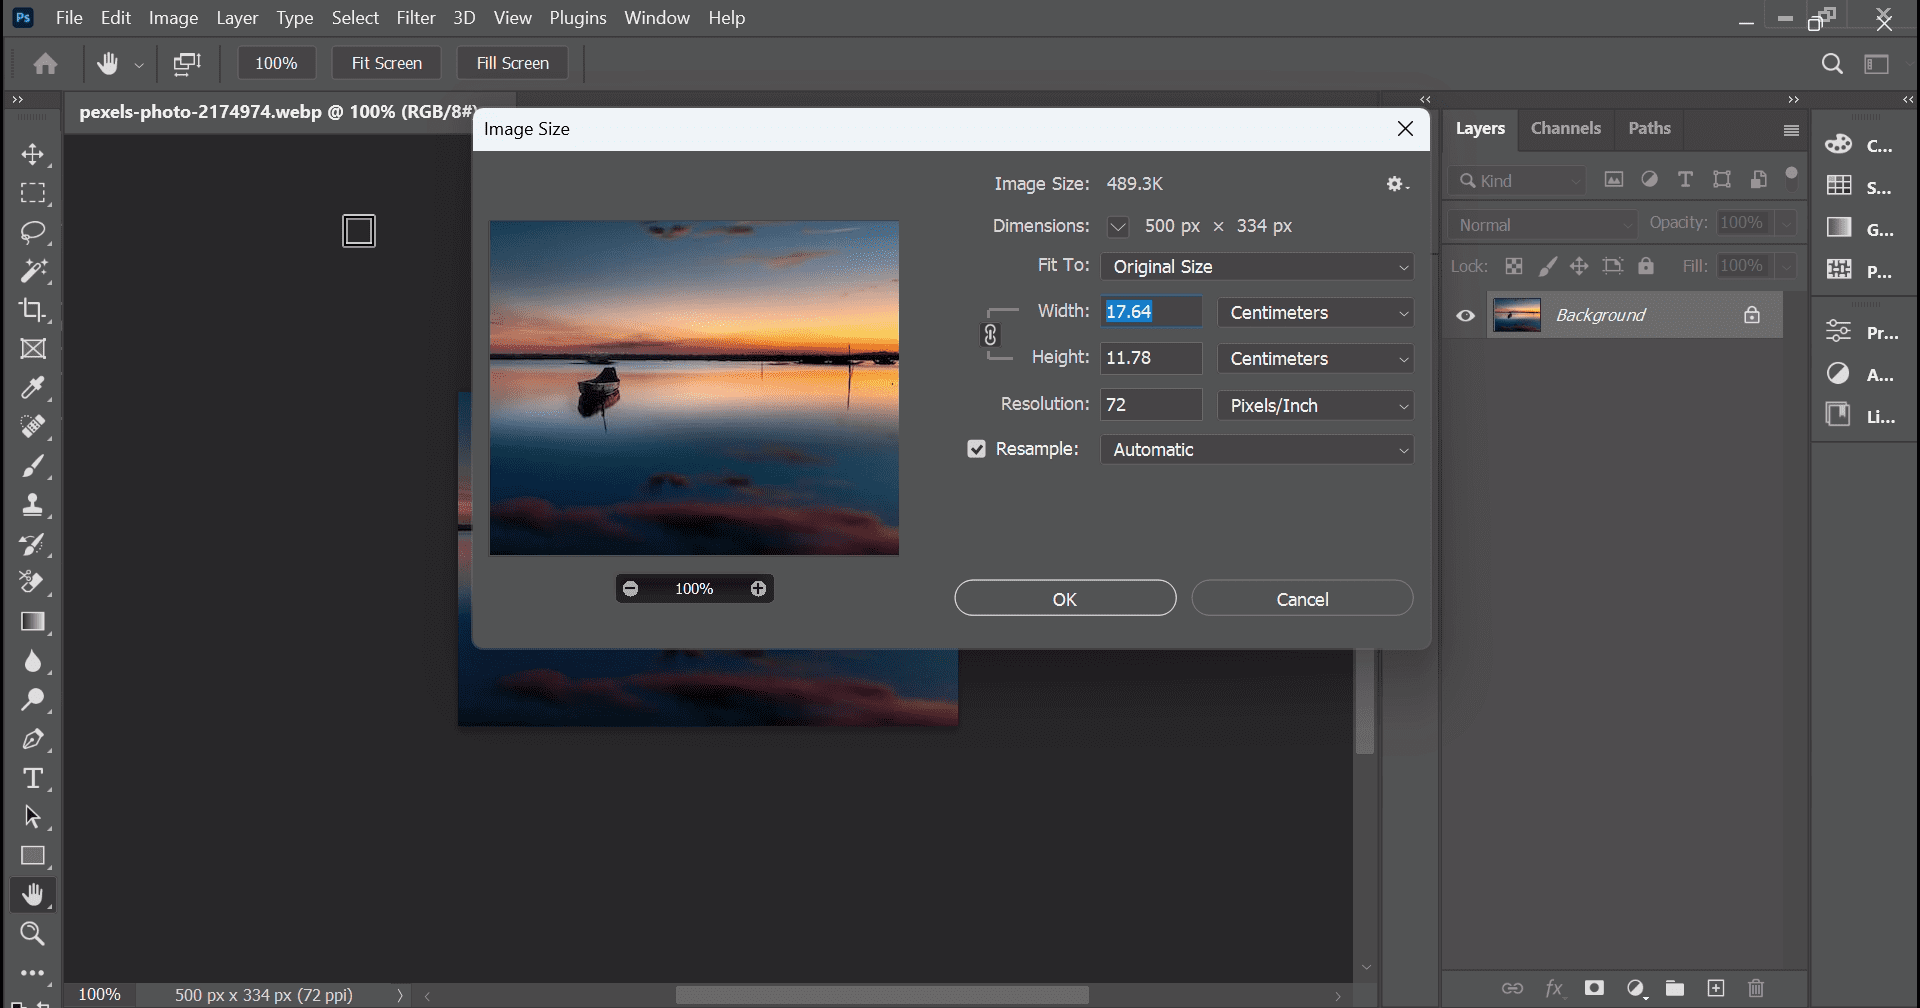
3.2. Change the Pixel Dimensions
In the Image Size dialog box, locate the Pixel Dimensions section.
Make sure the Constrain Aspect Ratio link icon is enabled (the chain icon between the width and height values). This ensures that the image's proportions remain the same as you resize it.
Enter the desired width or height value. The other value will adjust automatically to maintain the aspect ratio.
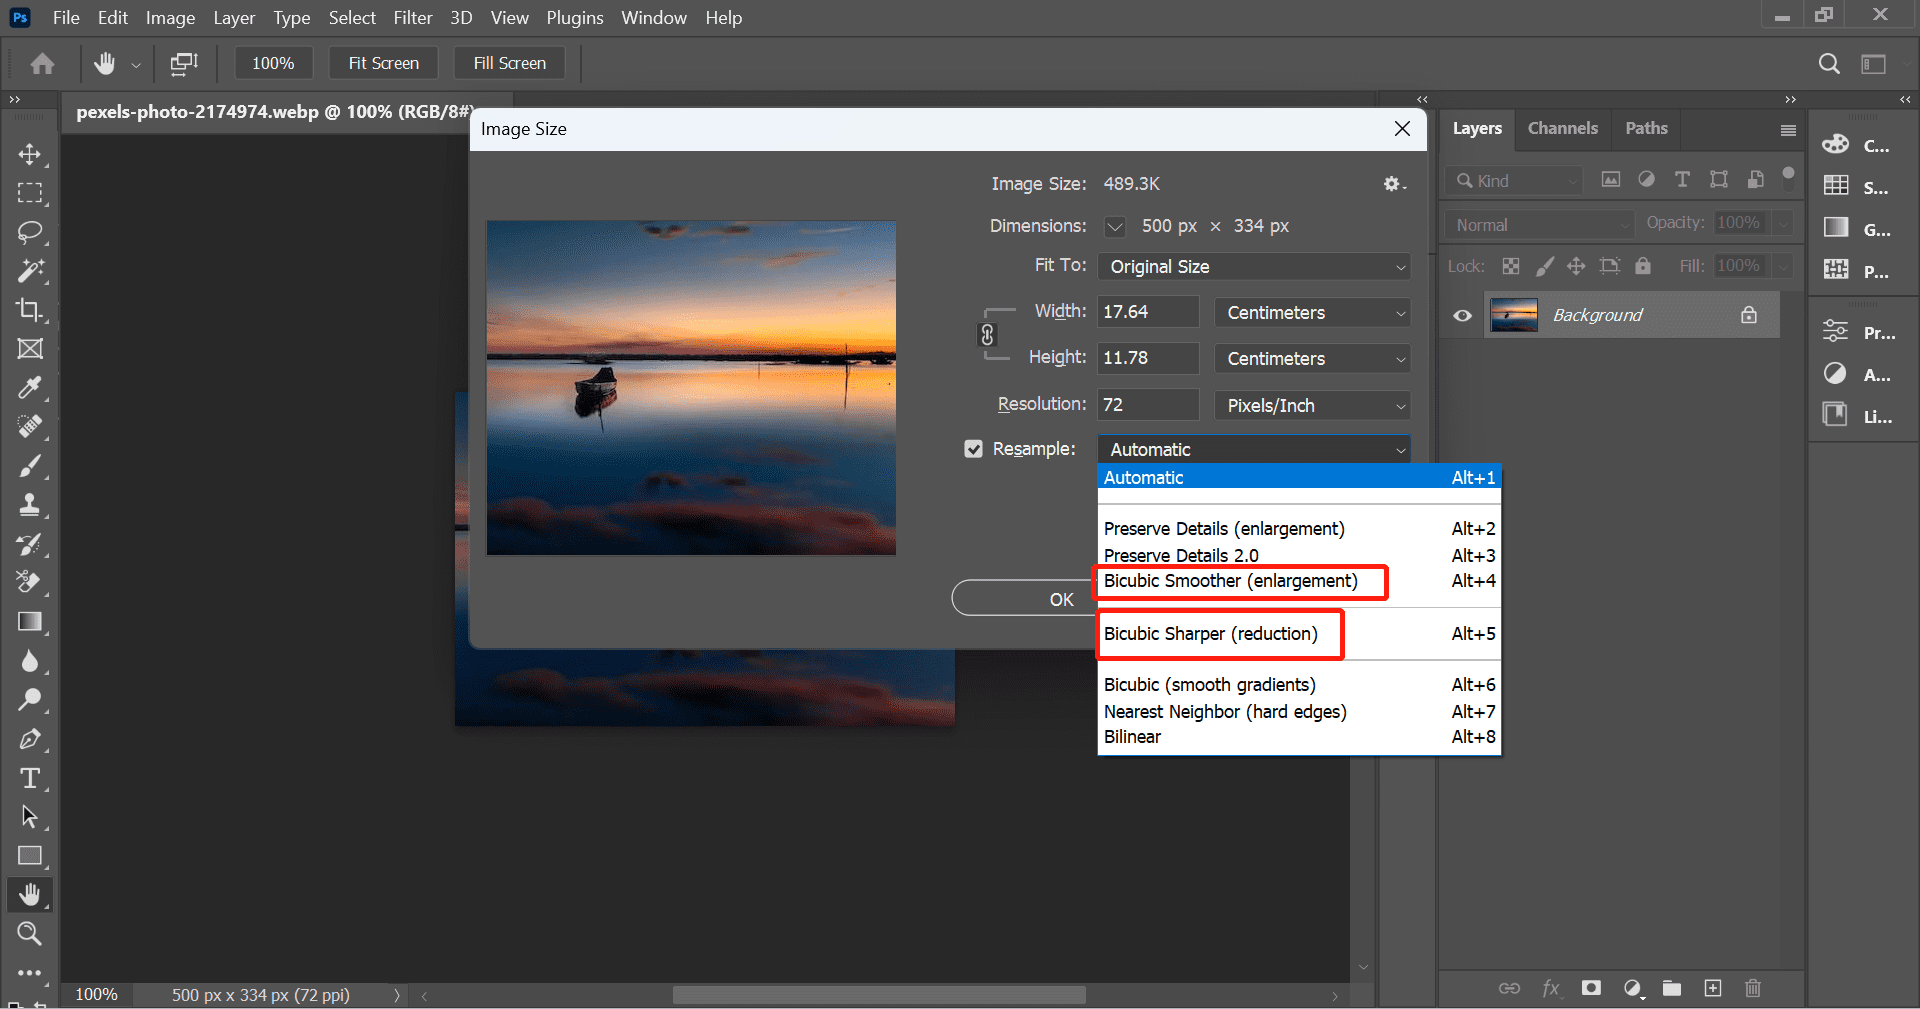
In the Resample drop-down menu, choose a resampling method:
- Preserve Details 2.0 (recommended): This option is suitable for enlarging images while preserving details and minimizing artifacts.
- Bicubic Smoother (enlargement): This option is best for enlarging images when the Preserve Details option isn't available.
- Bicubic Sharper (reduction): This option is suitable for reducing the size of an image while maintaining sharpness.
Click the OK button to apply the changes.
4. Save the Resized Image
After resizing the image, it's essential to save a new copy to avoid overwriting the original file. Follow these steps:
- Click on File in the menu bar.
- Select Save As from the drop-down menu (or press Ctrl + Shift + S or Cmd + Shift + S on a Mac).
- Choose a folder to save the resized image.
- Enter a new file name for the resized image.
- Select a file format (e.g., JPEG, PNG, or TIFF) suitable for your needs.
- Click Save.
5. Additional Tips and Tricks
- When enlarging an image, it's essential not to increase the size too much, as this can lead to pixelation and loss of quality. A good rule of thumb is not to enlarge an image more than 200% of its original size.
- If you need to resize an image for web use, aim for a resolution of 72 PPI, as this is the standard for most screens.
- To maintain the highest quality when resizing, consider using a lossless format like PNG or TIFF when saving the resized image.
- If you need to make multiple resizes of an image, always work from the original, high-resolution file to avoid compounding artifacts and quality loss. To save your image in a lossless format, go to File > Save As and choose the desired format.
Now you know how to resize an image in Photoshop while maintaining its quality. With practice, you'll be able to find the perfect balance between image size and quality for your specific needs.
By using these techniques, you can resize your images in Photoshop without losing quality, ensuring that your images look sharp and professional. Experiment with different methods and find the one that works best for your projects.
The above method is just one way to resize an image in Photoshop. Photoshop also offers features like Smart Objects, which allow you to resize images without sacrificing quality. If you're interested in learning more, check out the following YouTube video (made by Brendan Williams). It covers three different ways to resize images in Photoshop without sacrificing quality.
Tips and Tricks for Image Editing in Photoshop
Are you looking to take your image editing skills to the next level? In this final section of our article on how to resize an image in Photoshop, we'll share some image editing tips that you can use in conjunction with the techniques we've covered. These tips will help you elevate your images and make them truly stand out.
- Use Adjustment Layers: Adjustment Layers in Photoshop allow you to edit images without changing the original. To add an Adjustment Layer, click on the icon in the Layers panel and choose the type of adjustment you want to make, like Levels or Hue/Saturation. Then, adjust the settings to achieve your desired effect.
- Use Layer Masks: Layer Masks in Photoshop let you control which parts of a layer are visible or hidden. To add one, select the layer and click the Layer Mask icon (a rectangle with a circle inside) in the Layers panel. Then, use the Brush tool to paint on the mask and show or hide parts of the layer.
- Use the Clone Stamp Tool: The Clone Stamp Tool in Photoshop lets you duplicate parts of an image to cover up imperfections. Choose the tool, hold Alt, click on the area you want to clone, then paint over the area you want to replace, and Photoshop will do the rest.
- Use the Healing Brush Tool: The Healing Brush Tool in Photoshop lets you remove blemishes and preserve texture and detail. Select the tool, hold Alt, click on a similar area, then paint over the blemish to blend it with the surrounding area.
- Use TourBox to Improve Workflow: Editing images involves many tasks, including resizing, which can be time-consuming if you have to switch between different tools constantly. The TourBox tool is designed to help you work more efficiently by providing customizable controls for your favorite editing tools.

With TourBox, you can quickly and easily adjust the size of your images without having to navigate through menus or memorize keyboard shortcuts. Whether you're a professional photographer or a beginner, TourBox is a game-changer that can help you take your image editing to the next level.
Resizing an image in Photoshop can be a simple process as long as you follow the above steps and choose the right resampling method. By taking the time to resize your images correctly, you can avoid losing quality and ensure that your designs look their best.