Master the Art of Video Rotation in Premiere Pro: An Easy Guide
Are you tired of shooting videos with the wrong orientation, only to find out later that they need to be rotated?
Don't let those frustrating moments ruin your creative vision! In this tutorial, we're going to reveal the secrets of how to rotate video in Premiere, empowering you to take control of your footage and transform it into a masterpiece.
Get ready to unleash your creativity and captivate your audience as we dive into the world of video rotation in Premiere Pro.

In this article, you will learn:
- The Importance and Applications of Video Rotation
- How to Rotate a Video in Premiere?
- Tips for Video Rotation in Premiere
The Importance and Applications of Video Rotation
Before we delve into the specifics, let's take a moment to understand why video rotation is important and where it can be applied.
1. Why Rotate a Video?
Sometimes, videos are not recorded in the desired orientation. Perhaps you accidentally held your camera sideways, or the footage downloaded from a drone is upside down.
In such instances, the resulting video might not deliver the intended viewing experience. An upside-down or sideways video can be disorienting and unappealing to viewers.
Video rotation, the simple yet powerful editing technique, allows you to adjust the orientation of your video, ensuring it is aligned correctly.
With video rotation, you can flip or rotate your footage to the desired angle, enhancing the overall quality and viewer experience.
2. Applications of Video Rotation
Video rotation can be used in a wide range of scenarios, all with the goal of enhancing the viewer's experience. Here are some common applications:
- Correcting Orientation Errors: As mentioned earlier, if you've accidentally recorded a video in the wrong orientation, video rotation can correct this. It's a lifesaver for any footage that's been shot upside down or sideways.
- Creative Effects: Video rotation isn't just for fixing errors. It can also be used creatively to add a unique twist to your footage. For instance, you might rotate a clip for an interesting transition or to give your viewers a new perspective.
- Drone Footage and GoPro Videos: Often, videos shot from drones or action cameras like GoPros need some adjustment due to the movement and angles at which they're recorded. Video rotation can help align these videos better.
- Social Media Optimization: Different social media platforms favor different video orientations. For instance, Instagram prefers vertical videos, while YouTube favors horizontal ones. Video rotation allows you to adapt your content to suit different platforms, maximizing your engagement.
How to Rotate a Video in Premiere?
Adobe Premiere Pro is an industry-standard video editing software packed with a plethora of features. One such feature is the ability to rotate videos.
Whether you've shot a video in portrait mode that you'd like to view in landscape, or you want to spin a video for a creative effect, Premiere Pro makes it easy.
Here's a step-by-step guide on how to rotate video in Premiere.
Step 1: Import Your Video
First, launch Adobe Premiere Pro. Start a new project by clicking "File" > "New" > "Project," or open an existing project.
Then, import your video by selecting "File" > "Import." Navigate to your video file, select it, and click "Open."
Step 2: Add the Video to Your Timeline
Drag the imported video from the Project Panel to the Timeline Panel to add it to your sequence.
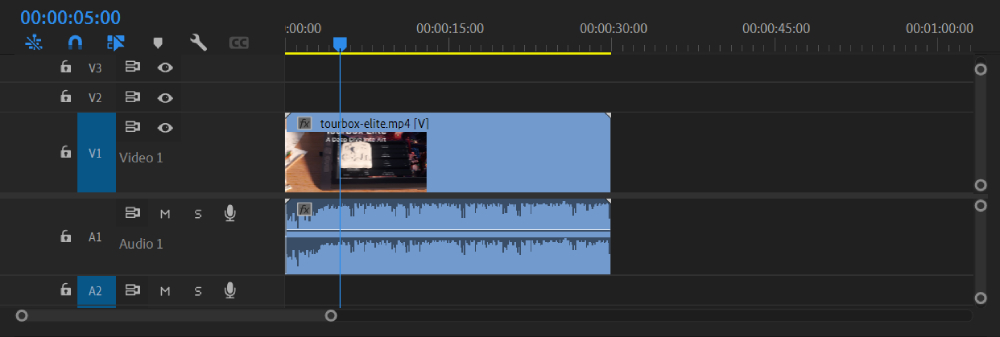
Step 3: Select the Video
In the Timeline Panel, click on the video you want to rotate to select it. When it's selected, it will be highlighted.
Step 4: Open the Effect Controls Panel
With the video selected, navigate to the Effect Controls Panel. If it's not visible, click "Window" > "Effect Controls" in the menu bar.
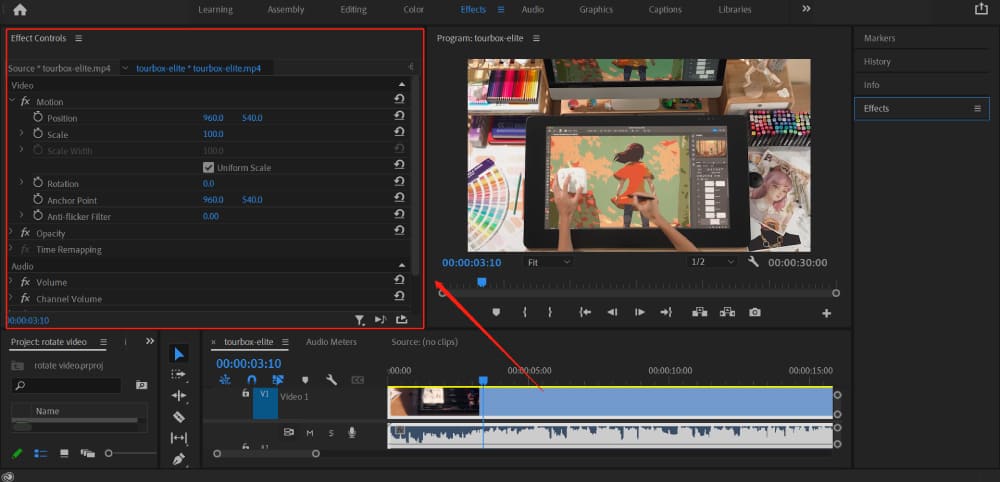
Step 5: Rotate the Video
In the Effect Controls Panel, you'll find several options. Look for the "Motion" dropdown menu. Click on it to expand it, revealing several controls, including "Position," "Scale," and "Rotation."
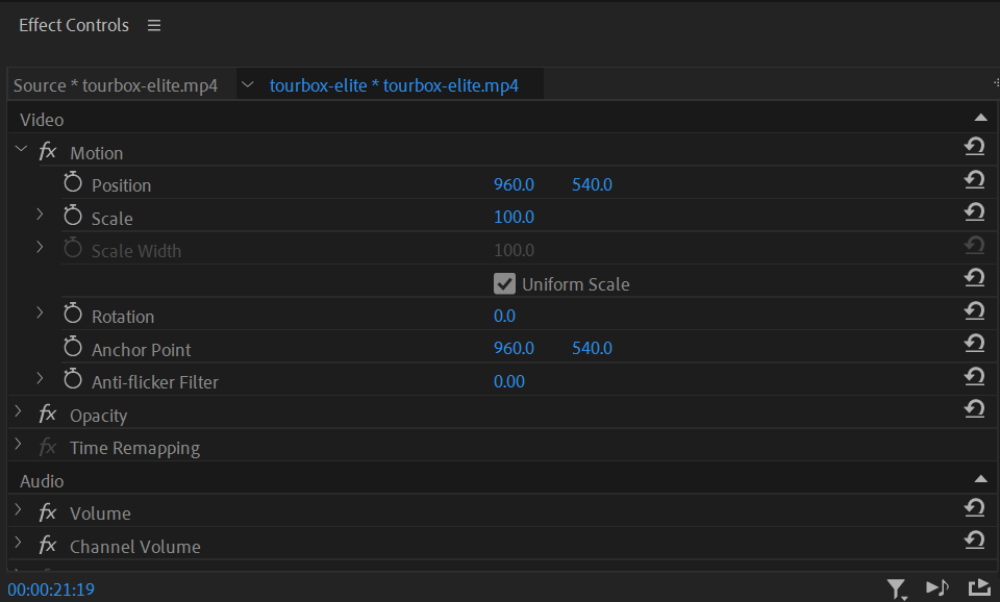
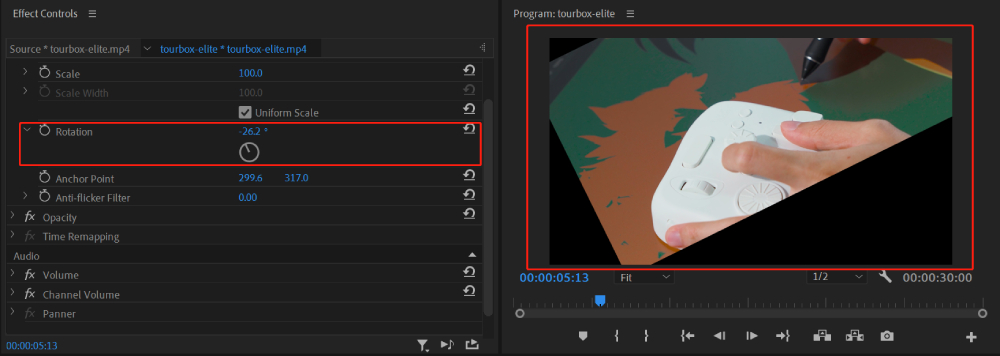
Click and drag the number next to "Rotation." Moving your cursor to the right will rotate the video clockwise, and moving it to the left will rotate the video counterclockwise.
The number represents the degree of rotation, so setting it to 90 will rotate your video 90 degrees clockwise, for instance.
Alternatively, you can click on the "Rotation" field and manually enter the degree of rotation.
If you're not satisfied with the rotation result, you can simply click on the small return symbol located next to the Rotation parameter, labeled "Reset Parameter."
With just a click, you can instantly restore the original setting and undo any unwanted rotation adjustments.

Let's set a random parameter, and you'll see that the video clip has been adjusted based on our chosen parameter.
In addition to that, we can also create an animated effect for the video rotation. Here's how:
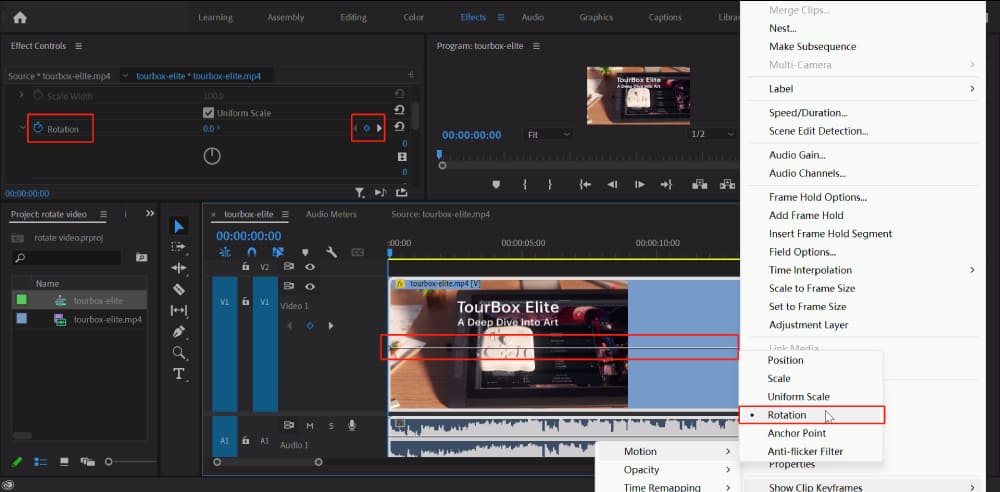
- Locate the "Rotation" parameter and set the initial rotation angle by entering a value or using the rotation slider.
- Move the playhead in the timeline to the starting point of the rotation animation.
- Click on the stopwatch icon (Toggle animation) next to the rotation parameter to add the first keyframe.
- Move the playhead to the desired endpoint of the rotation animation.
- Adjust the rotation parameter to the desired rotation angle at that specific time. Premiere Pro will automatically add a new keyframe at that point.
To further refine the animation, let's expand the video track. Right-click on the track and select "Show Clip Keyframes" from the bottom of the pop-up menu.
Then choose "Motion" and "Rotation." Now, the video track will display the keyframes for the rotation animation we just set, as shown in the image below:
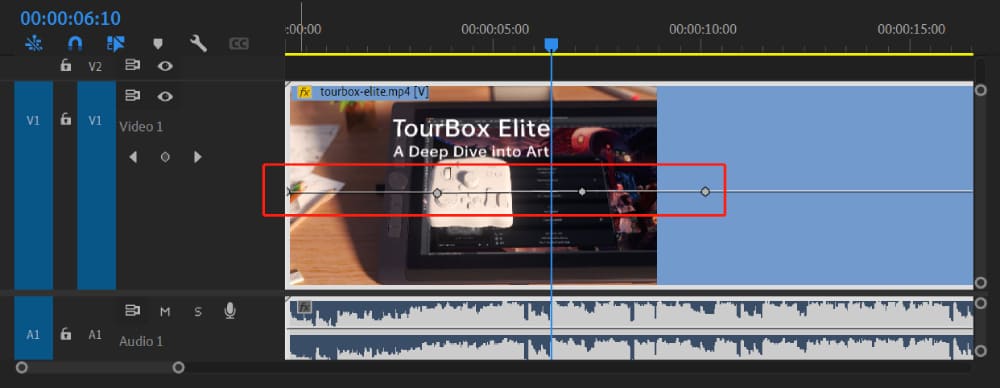
We can continue enhancing the animation. To create a smooth rotation animation, follow these steps:
- Move the playhead to a new point on the timeline.
- Adjust the rotation parameter to set the desired rotation angle at that specific time.
- Repeat this process as needed, adding more keyframes and refining the animation.
- Make any necessary adjustments to the keyframes or rotation angles to achieve the desired animation effect. Keep previewing and fine-tuning until you are satisfied with the rotation animation.
Extra Tip:
The Anchor Point is a powerful tool within the Rotation effect in Adobe Premiere Pro. Understanding how to use the Anchor Point correctly can greatly enhance your video editing skills.
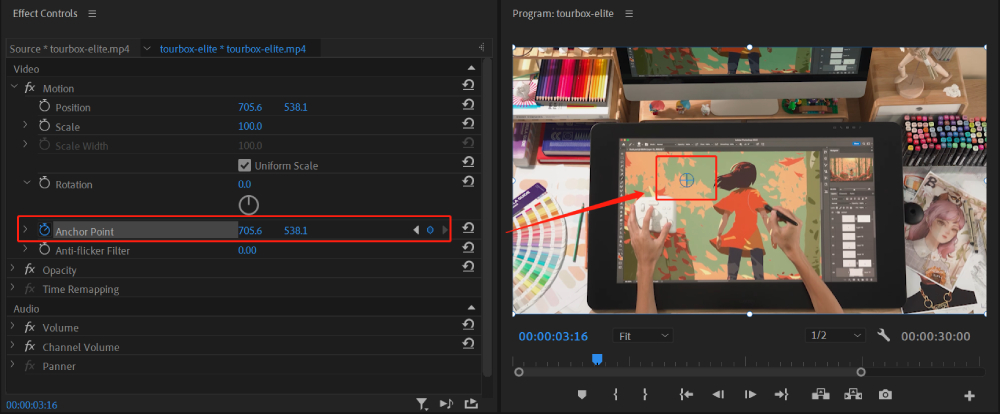
Click on the numeric value next to the Anchor Point parameter. A crosshair cursor will appear on the Program Monitor. Click and drag the crosshair to reposition the Anchor Point on the video clip.
As you adjust the Anchor Point, notice how it affects the rotation behavior. The Anchor Point acts as the pivot or center point around which the rotation occurs.
The Anchor Point allows you to precisely control the rotation axis of an object. Experiment with different Anchor Point positions to see how it changes the rotation dynamics.
For example, setting the Anchor Point at the bottom of a video clip can simulate a spinning motion around that point. Moving the Anchor Point to the center can create a rotation effect that appears more balanced and controlled.
To further enhance your rotation effects, you can keyframe the Anchor Point parameter. Move the playhead to a specific point in the timeline where you want to adjust the Anchor Point.
Click on the stopwatch icon next to the Anchor Point parameter to add a keyframe. Move to another point in the timeline and adjust the Anchor Point to create a different rotation axis.
Repeat this process to add more keyframes and create dynamic rotation animations.

Step 6: Adjust the Frame (Optional)
If rotating the video leaves empty spaces in the frame—commonly known as "black bars"—you may want to resize the video or change the sequence settings to match the video's new orientation.
To resize the video, adjust the "Scale" control in the Effect Controls Panel. To change the sequence settings, right-click the sequence in the Project Panel, select "Sequence Settings," and alter the frame size.
Step 7: Export Your Video
Once you're satisfied with the rotation, you can export your video by clicking "File" > "Export" > "Media." Choose your desired format and settings, then click "Export" to save your rotated video.
Let's take a moment to recap some key points from the following YouTube video (made by Javier Mercedes) on "How to Rotate a Video in Premiere."
Tips for Video Rotation in Premiere
We've traveled quite a distance in this tutorial, and I hope it's given you a clear grasp of how to rotate video in Premiere.
It may seem challenging at first, but with practice, this powerful feature can be mastered, adding another tool to your video editing arsenal.
Here are a few additional tips to make the process even smoother:
- The 'Motion' effect is your best friend when it comes to rotating a video. It's not just for rotation, but also for scaling, positioning, and other transformations.
- If you want your video to rotate gradually over a certain duration, don't forget to use keyframes. They allow for smooth, controlled rotations.
- Always preview your rotation before exporting the video to ensure it looks as expected.
- Premiere Pro is a robust program, but like any software, it can sometimes crash. To avoid losing your work, save your project frequently, especially after making significant changes like rotating a video.
Lastly, we would like to share a tool that's been a game-changer in video editing workflow - the TourBox.

This console is designed specifically for creatives and works seamlessly with Premiere Pro. It's like a mini editing panel right at your fingertips, allowing you to execute commands without having to navigate through menus.
By offloading repetitive tasks and providing tactile controls for frequently used editing functions, TourBox helps increase your productivity in Premiere Pro.
With TourBox at your fingertips, you can focus more on the creative aspects of your editing process, resulting in a smoother and more enjoyable workflow. From rotating videos to adjusting layers, this can make your work significantly more efficient.
Rotating videos in Premiere Pro is just one of the many techniques you'll use in your video editing journey. Keep exploring, keep experimenting, and most importantly, keep creating.