10 Tips to Boost Speed and Performance in Lightroom Classic
Whether you're a professional photographer or a photography enthusiast, we all know that you want your Lightroom Classic to run faster and smoother.
But have you ever considered that you can significantly speed up Lightroom's performance by making some simple adjustments and optimizations?
In this article, we'll share 8 handy tips to boost the performance of Lightroom and make it run like a breeze! So, without further ado, let's dive right in and get started!

In this article, you will learn:
- Tip 1: Import Settings
- Tip 2: Optimize Catalog
- Tip 3: Use Graphics Processor
- Tip 4: Camera Raw Cache Settings
- Tip 5: Choose the Right Standard Preview Size
- Tip 6: Disable XMP
- Tip 7: Render 1:1 Previews Before Editing Photos
- Tip 8: Try to Keep the Number of Photos in a Catalog below 10,000
- Final Thoughts About How to Speed up Lightroom
Tip 1: Import Settings
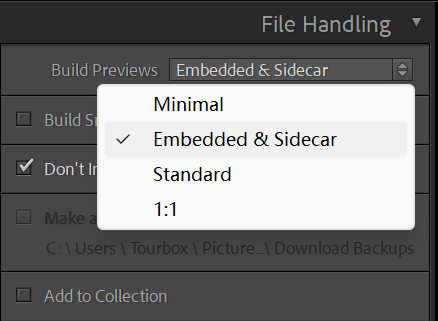
When importing photos in Lightroom Classic, in the "File Handling" panel on the right side of the dialog box, make sure to select "Build Previews" as "Embedded & Sidecar".
By doing this, the photos you import will be browsable in the Library module much faster.
Extra Tip:
Once the photos enter the Develop module, they are no longer in embedded preview mode (lower quality), but rather displaying the original image, which naturally slows down the speed.
You can also set the "Build Previews" option to Minimal, ensuring that Lightroom renders preview images quickly while importing new photos. However, keep in mind that this high-performance mode may result in lower-quality previews in the Library module.
If you need to import hundreds or even thousands of photos at once, this setting can save you a significant amount of time (rendering time depends on your computer speed and preview size).
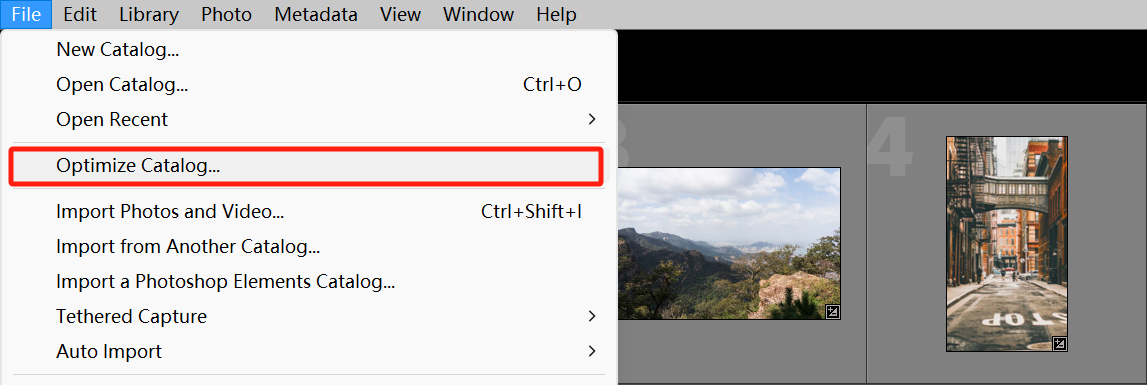
Tip 2: Optimize Catalog
Click on "File" in the top menu bar. Then select "Optimize Catalog" and wait a few minutes.
Regularly optimizing your catalog can significantly improve the performance of Lightroom, especially if you notice it running slower. We recommend performing this catalog optimization once a month.
Extra Tip:
In general, when your Lightroom catalog contains more than 10,000 photos, you may notice that Lightroom runs very slowly.
In this case, optimizing your catalog is essential to improve Lightroom's performance. This situation often occurs when you've been using a single default catalog.
However, if you use multiple catalogs for different projects, you usually don't need to optimize your catalogs as much since each catalog contains fewer photos. Nevertheless, it's still a good habit to regularly optimize your catalogs.
Tip 3: Use Graphics Processor
Using a graphics processor can speed up your Lightroom processing, but your graphics processor must meet the minimum system requirements for Lightroom Classic.
If your Lightroom GPU acceleration is disabled and you encounter error messages, it may be because your GPU hardware, driver version, or operating system version doesn't meet the minimum requirements.
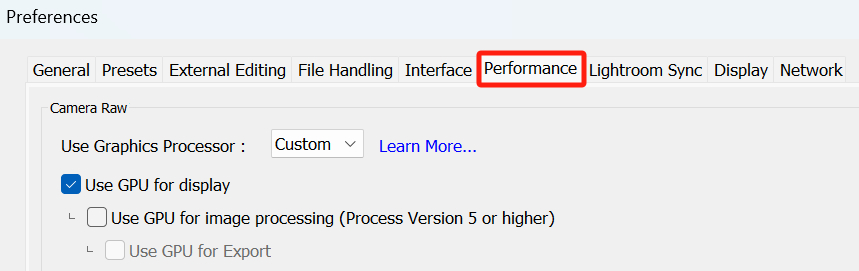
To access the graphics processor settings, click on "Edit" (or "Lightroom" for macOS) in the menu bar at the top of the Lightroom interface, then select "Preferences", and go to the "Performance" tab.
Here's a simple explanation of the GPU acceleration options in Lightroom:
- Auto: This option automatically determines the appropriate level of GPU support based on your system's hardware and operating system configuration. It's the default setting and recommended for most users.
- Custom: With this option, you can manually select the level of GPU support for display, image processing, and exporting. It allows you to customize the GPU usage according to your preferences and system capabilities.
- Off: Choosing this option disables GPU acceleration altogether. If you're experiencing issues with GPU hardware, driver compatibility, or performance, it's advisable to switch to this setting for smoother operation.
Tip 4: Camera Raw Cache Settings
In the Performance tab, you can find the Camera Raw Cache settings under "Use Graphics Processor." Here, you can configure the Location and Maximum Size of the cache.

1. Cache Location
It's best to set the cache location on the fastest hard drive on your computer. For example, if you have both an SSD and an HDD, you should choose a folder on the SSD.
If you have additional non-system drives on your computer, it is recommended to set the cache folder on one of those drives instead of the system drive.
However, it is crucial to avoid setting the cache folder on a portable hard drive as it can significantly slow down Lightroom's performance.
2. Maximum Size
The Camera Raw Cache folder in Lightroom houses preview files for all the images you're editing. This folder enables Lightroom to swiftly retrieve preview data for image display. The larger the cache, the more thumbnail images it can hold.
Our suggestion is to set the maximum size to around 20% of the remaining disk space on your hard drive, or even larger if possible. For example, if you have 60 GB of free space, you can set the "Maximum Size" to 10 GB.
If you have sufficient hard drive space, you can set an even larger cache size. However, for users with SSDs, space is precious, so it's important to carefully consider a cache size that suits your needs.
Tip 5: Choose the Right Standard Preview Size
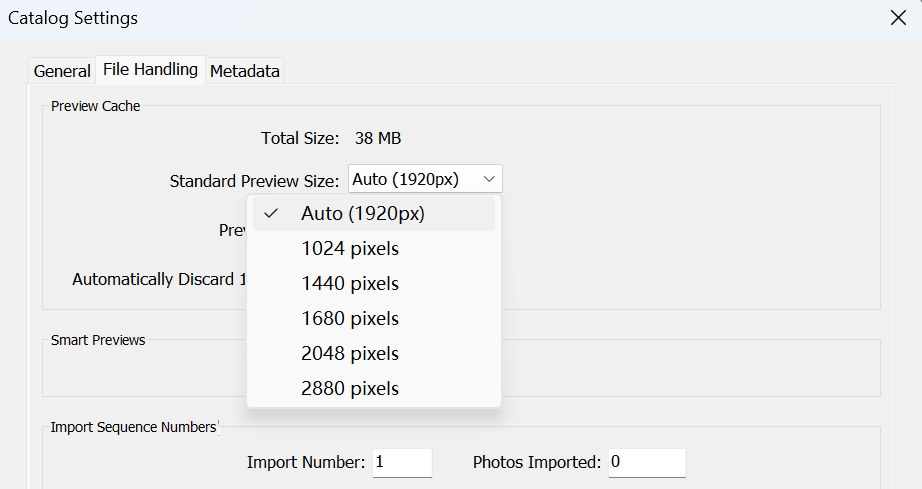
Lightroom uses standard previews in the preview area of multiple modules. Setting the standard preview size too high doesn't have any benefits and only slows down system responsiveness.
To adjust the standard preview, go to the "Edit" menu in the top menu bar of Lightroom and click on "Catalog Settings." Remember that the catalog settings apply to each individual catalog, so you need to set it for each catalog separately.
For users with a 24" monitor and a resolution of 1920x1200, the standard preview size can be set to 2048 pixels with high preview quality. However, for most users, this setting may be too high.
You can set the preview size to 1440 or even 1024 pixels. The choice of standard preview size depends on your monitor size and resolution. For the majority of users, 1024 pixels with medium preview quality is sufficient.
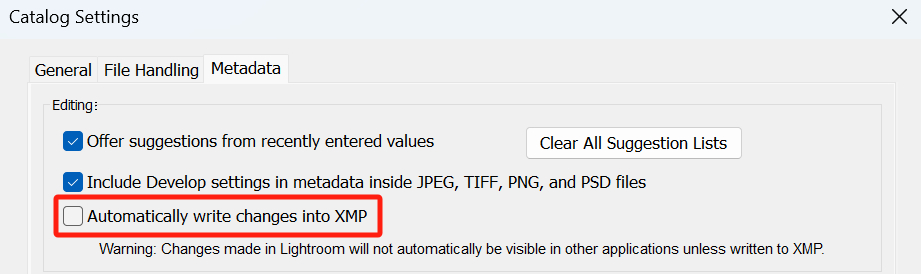
Tip 6: Disable XMP
In the "Catalog Settings" interface, under the "Metadata" tab, uncheck the option "Automatically write changes into XMP."
Unless you specifically need XMP files, you should not enable this feature. When XMP is enabled, the software writes data to the sidecar files every time you make changes to a file.
While this may not make a noticeable difference when editing photos one by one, it can double the processing time when batch-processing multiple files. It's likely that 99% of users do not need to use XMP files.
Tip 7: Render 1:1 Previews Before Editing Photos
You may often come across the "Loading..." message in Lightroom Classic's Develop module, especially when zooming in on a photo to full size.
This is because Lightroom is rendering 1:1 previews in the background. The solution to this issue is to have the software render 1:1 previews before you start editing your photos.
To do this, go back to the Library module and select the photo(s) you want to render in advance (you can also select multiple photos), or simply select the folder containing the photos you want to render.
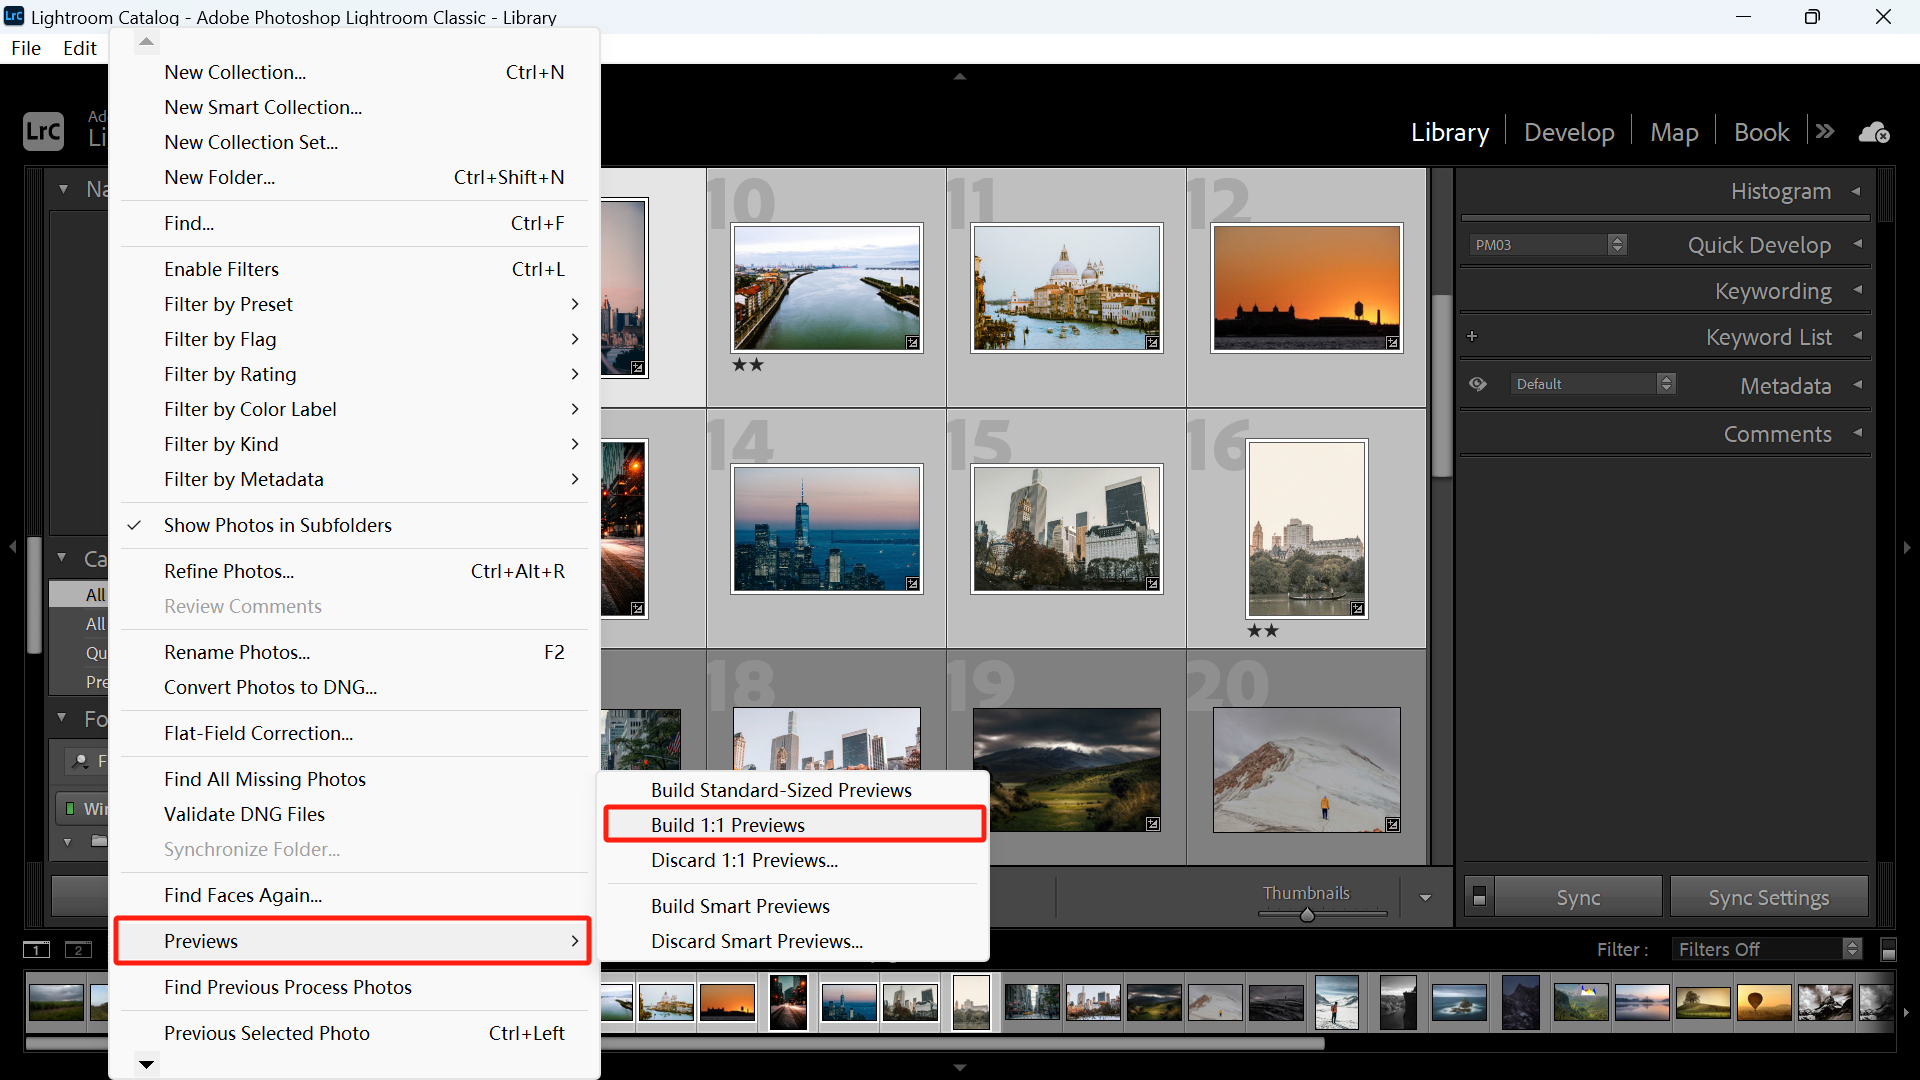
Then, in the top "Library" menu, click on "Previews" and select "Build 1:1 Previews." In the pop-up window, choose "Build Selected" or "Build All" based on your needs.
By doing this, Lightroom will render 1:1 previews for each displayed photo. This process takes some time. Rendering 100 photos can take around 5-10 minutes, depending on your computer's configuration and disk speed.
If you're rendering thousands of photos at once, this process may take several hours. You can do it during a time when you don't need to use your computer.
Although it may be time-consuming, rendering previews before editing allows you to work on your photos without any waiting time. Therefore, it is highly recommended.
Tip 8: Try to Keep the Number of Photos in a Catalog Below 10,000
Many people stick with the default catalog in Lightroom, resulting in a large accumulation of photos. As the catalog grows larger, Lightroom's speed can slow down.
You can optimize the catalog, but it's best to establish different catalogs based on certain categories. For example, create a new catalog for each photo shoot. After all, unless necessary, there's no reason to have tens of thousands of photos stored in a single catalog.
Final Thoughts About How to Speed up Lightroom
In this tutorial, we've shared 8 tips on how to speed up Lightroom and improve its performance.
But besides these tips, there are other actions you can take to speed up Lightroom and achieve optimal performance. These include regularly updating your graphics drivers, freeing up disk space, and defragmenting your hard drive (except for SSD drives, as defragmenting can reduce their lifespan).
If you want to make your Lightroom experience even smoother, why not give TourBox a shot? TourBox makes every step of your photo editing process easier and more efficient. Check out the video below to see firsthand how TourBox can transform your workflow.
Whether managing photos, adjusting colors, or batch editing in Lightroom Classic, you can easily control TourBox with just one hand. To learn more information, you can visit our dedicated photo editing page.

If TourBox has caught your interest, take a look at our latest offering, TourBox Lite. It provides fantastic value for its price and is an excellent choice for anyone trying TourBox for the first time.

And that concludes our article on how to speed up Lightroom and achieve optimal performance. Now, when you encounter the issue of Lightroom running slow, you'll know exactly what to do.