How to Speed up Playback in DaVinci Resolve?
We all know that video editing is a process that requires patience and precision. However, it can be incredibly frustrating when you're in the creative zone and find that the video playback is slow, disrupting your workflow.
That's why it's essential to find ways to speed up playback. In this tutorial, we'll share several methods to accelerate playback speed in DaVinci Resolve, making your editing process smoother and allowing you to focus more on your creativity. Let's dive in and get started!

In this article, you will learn:
- How to Speed up Playback in DaVinci Resolve?
- Fast Review and Jog Wheel in Cut Page
- How to Speed up Playback by Optimizing DaVinci Resolve Performance?
- Final Thoughts About Speeding up Playback in DaVinci Resolve
How to Speed up Playback in DaVinci Resolve?
Most video editing software allows you to use the spacebar to stop or play the video, and they also support the J/K/L keys for playback control.
DaVinci Resolve is no exception, and it emphasizes playback functionality. It provides a dedicated playback menu bar in the interface, along with features like Full Screen, to help you observe details while playing videos.
You can use the J/K/L keys to control video playback in DaVinci Resolve. So, what do these keys do?
Here is a brief explanation:
- J: Play in Reverse
- K: Stop
- L: Play Forward
You can find the J/K/L playback options in the Playback menu at the top of DaVinci Resolve. However, it can be cumbersome to navigate there. In most cases, simply pressing J, K, or L directly will enhance your editing experience.
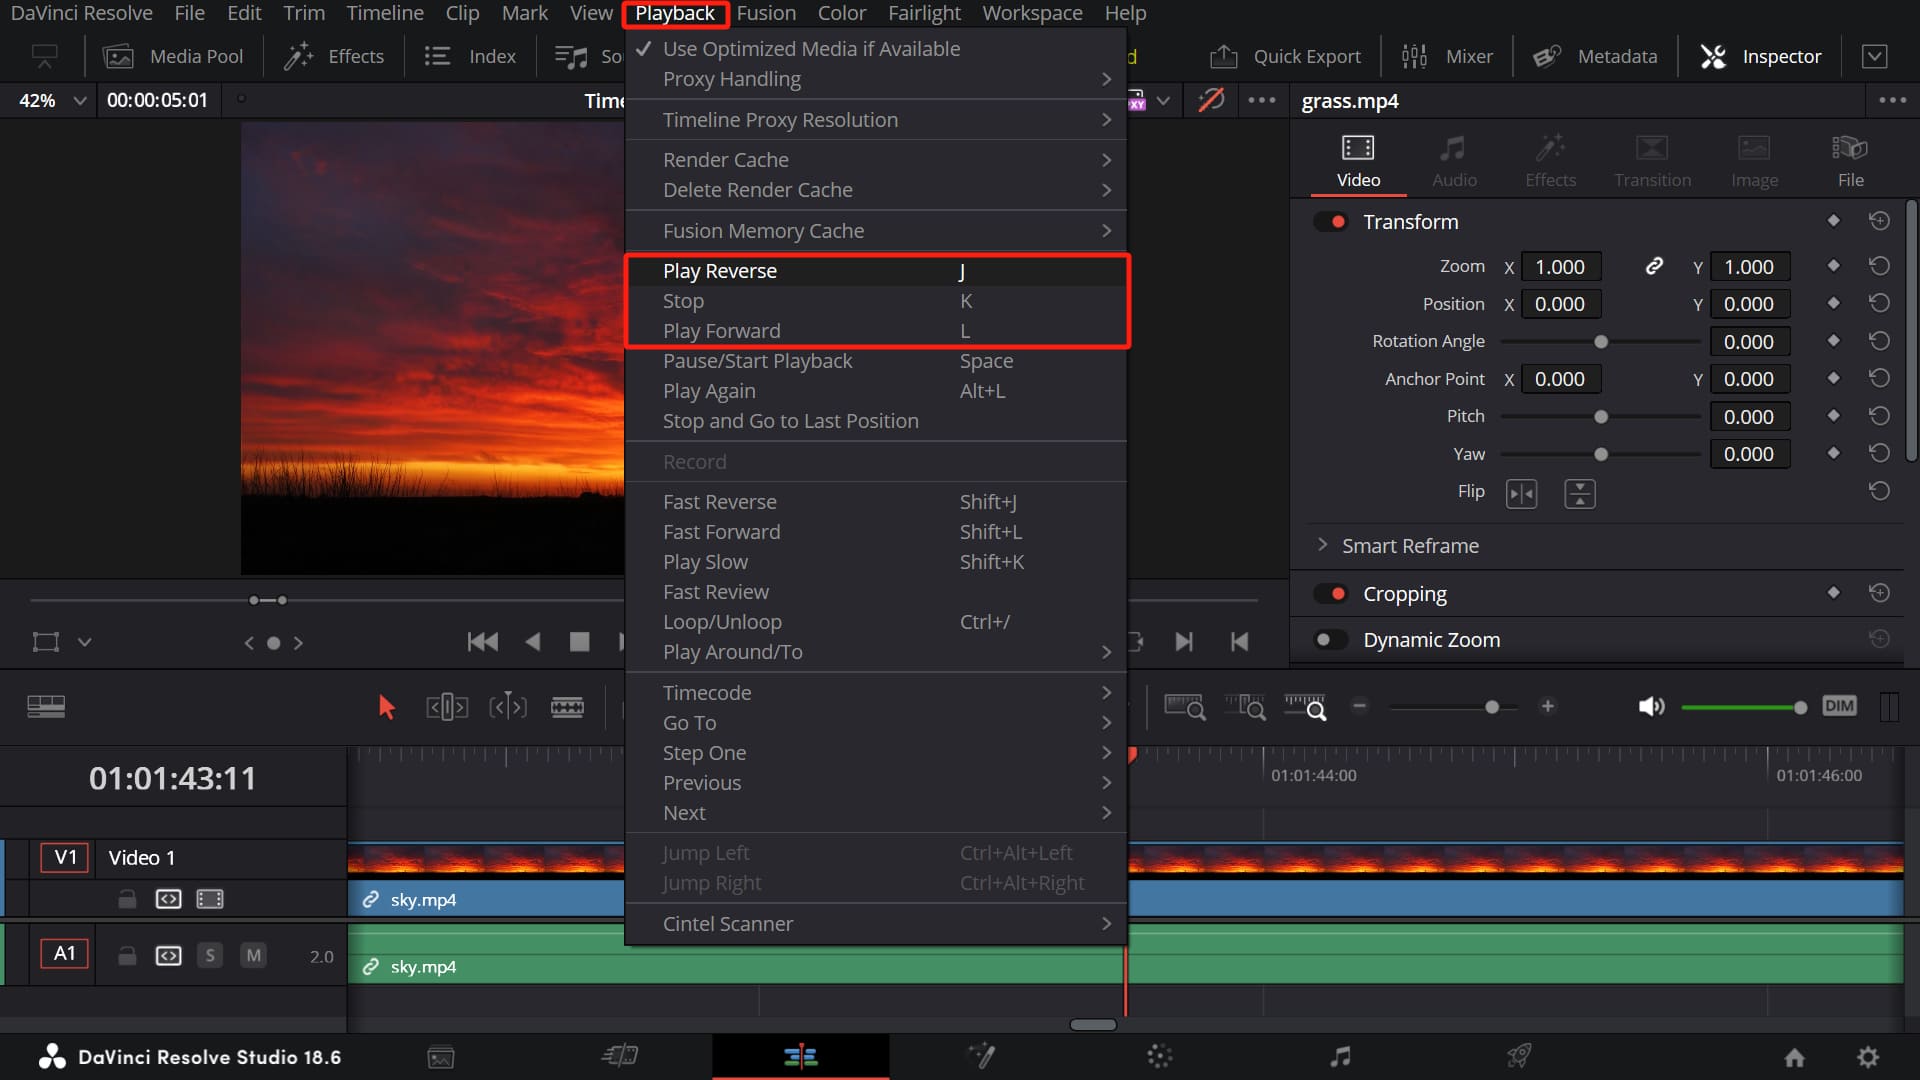
Now, here's the crucial part: you can speed up video playback in DaVinci Resolve using the J/K/L keys.
For example, when playing forward, pressing the L key for the second time will double the playback speed. Pressing L for the third time will quadruple the speed, and so on, allowing you to accelerate the video up to 64 times the original speed.
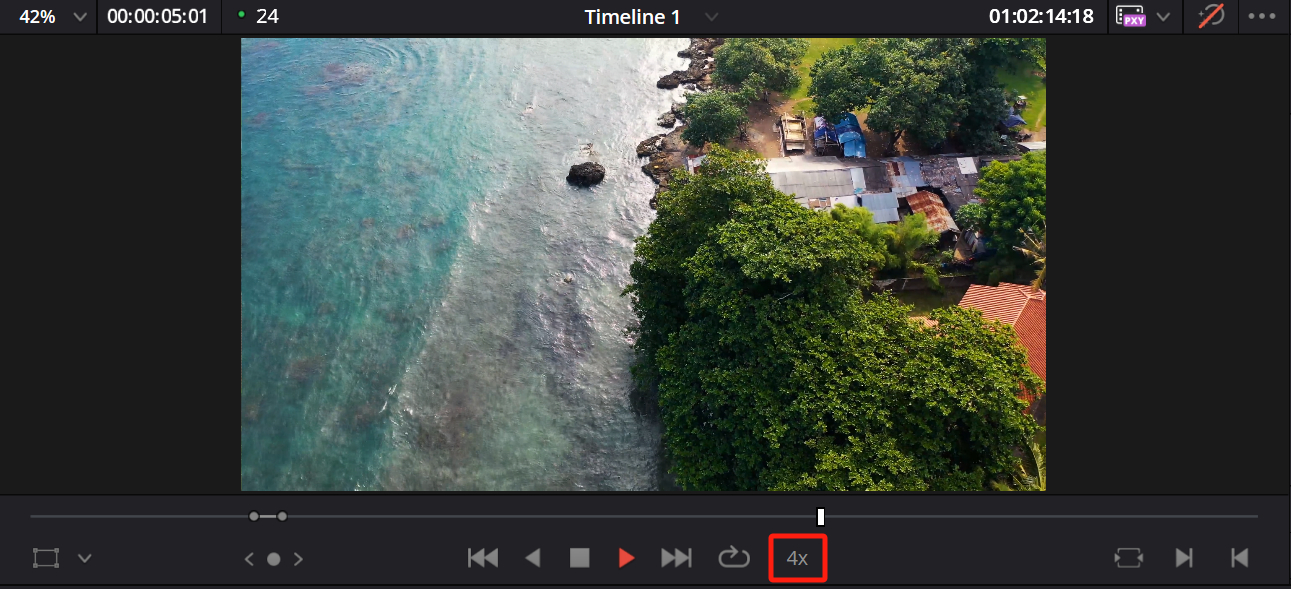
The same applies to reverse playback. Pressing the J key for the second time will double the reverse playback speed. And just like forward acceleration, the speed of acceleration will be displayed below the Viewer workspace.
In addition to the methods mentioned above, there are a few more useful keyboard shortcuts related to playback speed that you might find handy:
- Play Reverse on Frame: Hold down the K key and then press J
- Play Forward on Frame: Hold down the K key and then press L
- Play Slow: "Shift + K"
- Fast Reverse: "Shift + J"
- Fast Forward: "Shift + L"
- Play Again: "Alt/Opt + L"
It's worth noting that the Fast Reverse and Fast Forward shortcuts have the same effect as pressing J and L multiple times. They are just different keyboard shortcuts for the same functionality.
Additional Tips:
If you want to restore the playback speed, simply press the K key. This will pause the video, and any acceleration in either forward or reverse playback will be reset.
Both fast forward and reverse are based on doubling the existing playback speed. Additionally, you can also decrease the speed by pressing the "Shift + K" keys, for example, reducing the speed from 16x to 8x.
In addition to using keyboard shortcuts to speed up playback in DaVinci Resolve, you may also consider using TourBox, a creative tool loved by digital artists and content creators.

You can assign the J/K/L keys and other commonly used DaVinci Resolve shortcuts to the buttons on TourBox or group them in the TourMenu.
You can accomplish various tedious tasks more quickly with fewer commands, and TourBox's ergonomic design ensures that your hand movements and interaction patterns are closely integrated during video editing. This provides more precise control and an immersive editing experience.
Check out our video editing page to learn more about TourBox and its features.
Fast Review and Jog Wheel in Cut Page
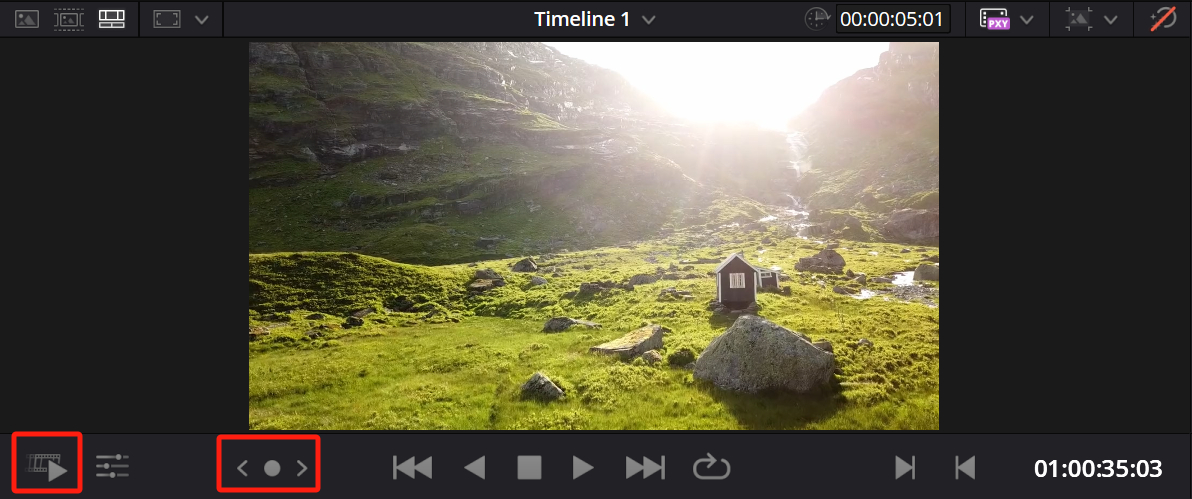
You'll find two unique playback speed features on DaVinci Resolve's Cut page: Fast Review and Jog Wheel.
- Fast Review: By selecting a clip on the timeline (does not work under the "Sync Bin"), this playback button automatically adjusts the speed based on the duration of the clip. Longer clips play faster, allowing you to review a large amount of footage efficiently.
- Jog Wheel: By pressing and dragging this button, you can precisely or quickly navigate through the content of the selected clip.
As shown in the image below, you can locate these features in the Viewer workspace of the Cut page in DaVinci Resolve.
How to Speed up Playback by Optimizing DaVinci Resolve Performance?
In addition to manually controlling playback speed, you can speed up playback and reduce lag and potential software crashes in DaVinci Resolve by improving its real-time performance.
1. Generate Optimized Media
While DaVinci Resolve supports various media formats, not all formats deliver optimal playback performance. To enhance playback speed, consider converting your media files to formats that DaVinci Resolve handles more efficiently, such as DNxHR, ProRes, or Cineform.
Steps:
- Select the file(s) you want to convert in the Media Pool.
- Right-click on the selected file(s) and choose "Generate Optimized Media."
DaVinci Resolve will automatically convert the file(s) to the optimized format. By optimizing your media files, you can ensure smoother playback performance in DaVinci Resolve.

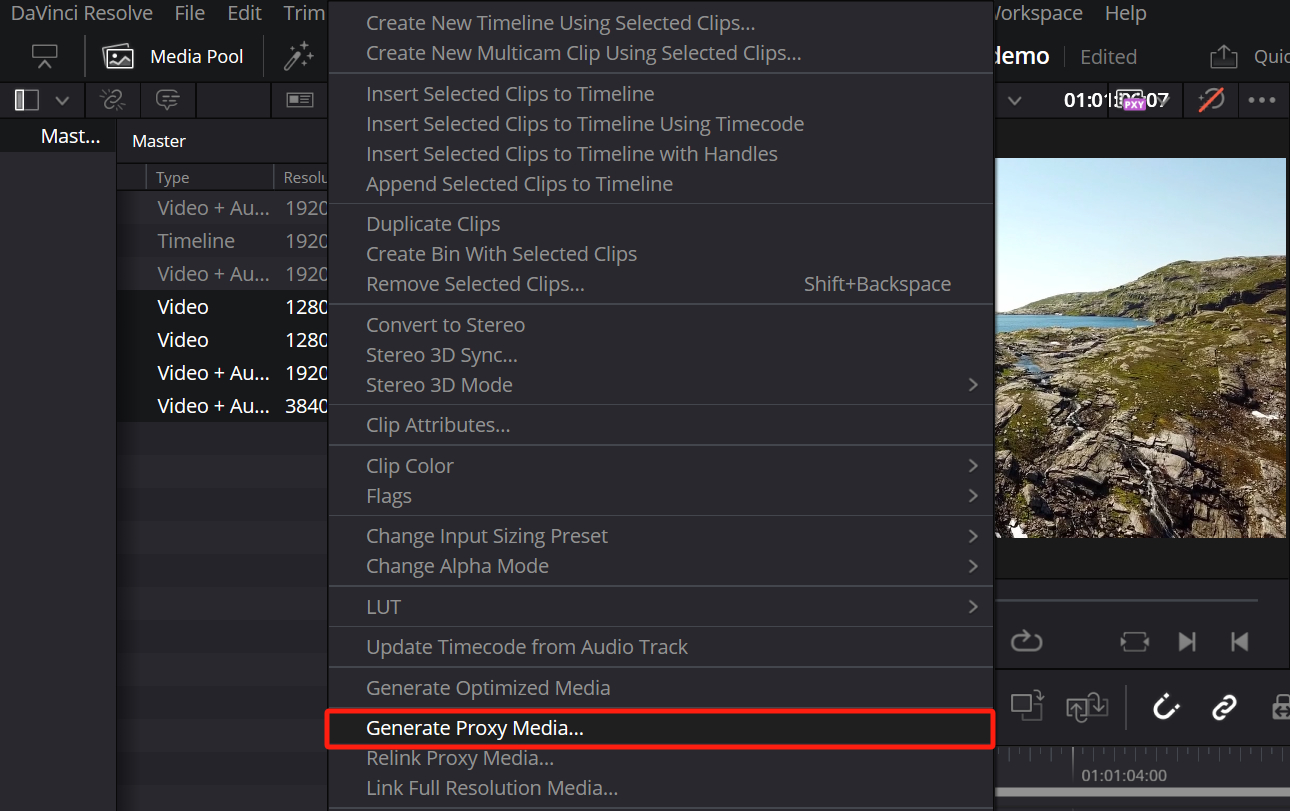
2. Generate Proxy Media
Proxy media is a lower-resolution version of the original file obtained by transcoding. This allows for smooth playback of media files and facilitates easy file movement.
Most mirrorless cameras, DSLR cameras, drones, and action cameras can capture high-resolution and high-speed footage. However, these videos are often compressed using highly compressed codecs such as H.265 (HEVC) or H.264 to save storage space.
Due to the reduced frame rate, playing these files within DaVinci Resolve can often result in lag. This is especially noticeable when working with footage that has numerous effects, and your computer may even freeze.
To address this issue, DaVinci Resolve provides an option to generate proxies, enabling you to use lower-resolution videos for playback and editing, significantly improving playback speed.
Steps:
- In the Media Pool, select all the source files that you want to convert to proxies.
- Right-click and choose "Generate Proxy Media."
- DaVinci Resolve will display a "Generate Proxy Media" window indicating the progress of proxy file generation.
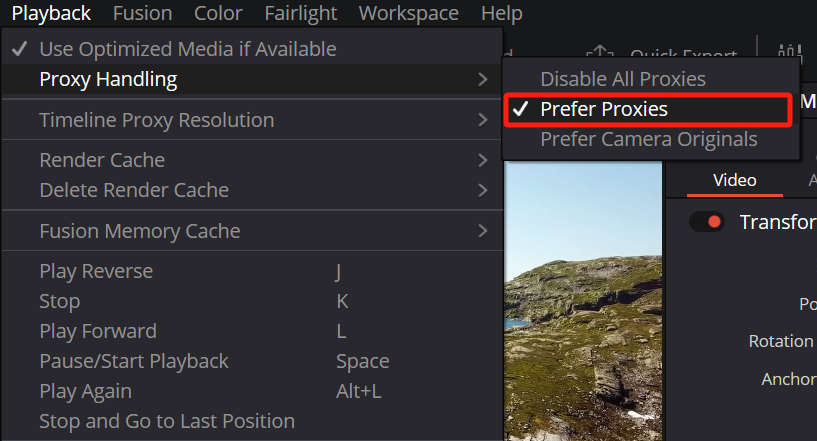
Once DaVinci Resolve completes generating proxy media, you can click the Playback menu at the top of the page and select "Proxy Handling." In the menu options that appear, make sure "Prefer Proxies" is selected.
This way, DaVinci Resolve will prioritize the proxy versions of the files rather than the original ones.
3. Disable Unnecessary Effects
If your project contains many effects, it can slow down the playback speed. To improve the speed, you can try disabling some unnecessary effects.
4. Increase Hardware Performance
If the above methods do not meet your needs, you may need to consider upgrading your hardware. This could involve adding more RAM, using a faster hard drive, or upgrading your graphics card.
5. Use Performance Mode
Performance Mode intelligently analyzes your computer's hardware configuration and automatically adjusts DaVinci Resolve's image processing. This ensures smooth playback without compromising the final output's resolution or bitrate.
In other words, even if your computer is slightly outdated, Performance Mode can provide better performance and a smoother creative experience without sacrificing the overall video quality.
By default, Performance Mode is automatically enabled, but you can adjust or completely disable it in DaVinci Resolve > Preferences > Users > Playback Settings.
We recommend using the "Hide UI Overlays" and "Minimize interface updates during playback" options in this menu.
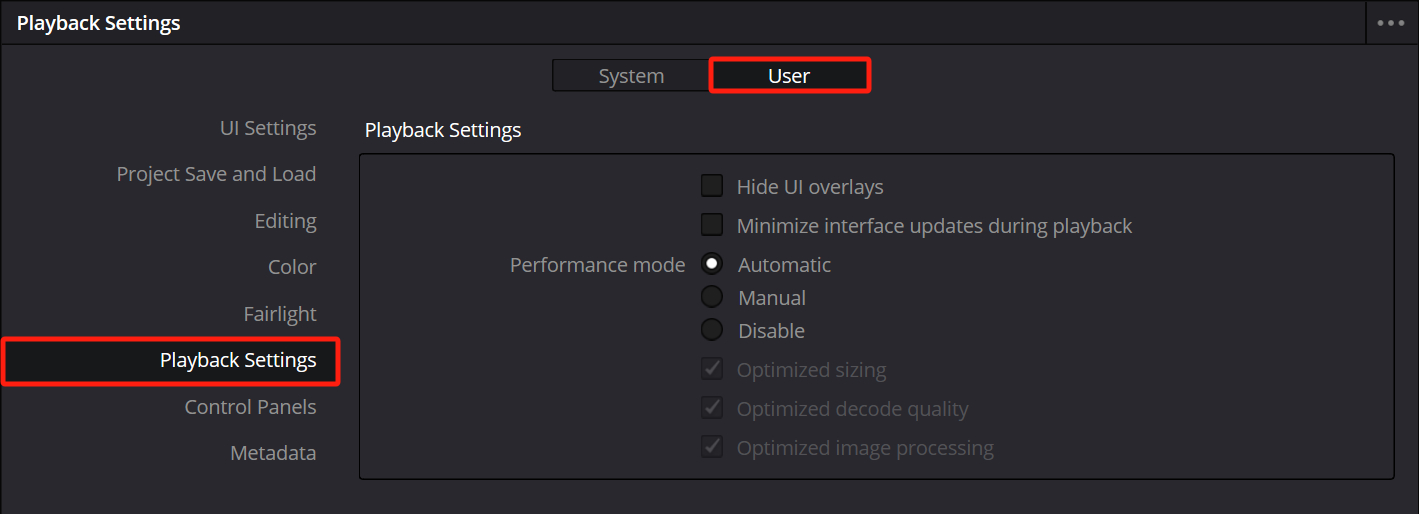
These options may sacrifice some control operations on the playback interface, such as mouse movements, power window adjustments, or window splitting. These effects often consume additional FPS from the GPU.
6. Upgrade to DaVinci Resolve Studio
While the free version and DaVinci Resolve Studio are quite similar, the latter offers better utilization and hardware acceleration for common compression codecs like H.264 and H.265. This can significantly speed up playback, transcoding, and exporting.
However, the free version does not include these features, so performance may be slightly reduced when using these codecs.
Therefore, if you can't tolerate slow playback speeds, upgrading to DaVinci Resolve Studio may provide a boost in your playback speed.
Final Thoughts About Speeding up Playback in DaVinci Resolve
In this tutorial, we explored various techniques to enhance the playback speed in DaVinci Resolve. We hope that this guide has helped you address any issues you may have encountered with slow playback in DaVinci Resolve, making your video editing workflow smoother.
If you're looking to unleash the full potential of DaVinci Resolve, you might consider checking out the latest product from TourBox, the TourBox Lite.

With its excellent value for money, the TourBox Lite is perfect for first-time users of TourBox, offering a great addition to your editing setup.