How to Stabilize Video in DaVinci Resolve?
Nowadays, more people are getting into shooting short videos, vlogs, and travel films. Many are stepping out with their cameras to record their experiences, but much of the footage doesn't look as good as it could.
One big reason is that a video's quality mostly depends on its footage, and shaky shots can really hurt that quality.
In this tutorial, we'll show you how to quickly stabilize your video using DaVinci Resolve. In just 3 minutes, you can fix your shaky clips.

In this article, you will learn:
- Can DaVinci Resolve Completely Fix Shaky Footage?
- How to Stabilize Video in DaVinci Resolve?
- Conclusion
Can DaVinci Resolve Completely Fix Shaky Footage?
Let's start by looking at the raw clip. You can see the footage is very shaky.
Now, check out the clip after DaVinci Resolve stabilizes it. It looks much better. The before and after are completely different.
DaVinci Resolve crops part of your clip to give it a steadier look. This might add black bars to your video, so you can zoom in slightly to remove them.
But does that mean we can fix all shaky footage using DaVinci Resolve or any other video editor's stabilization tool?
The answer is no. Whether it's DaVinci Resolve or another editor, the stabilization feature is just an algorithm.
Further Reading:
It works well for short clips, but longer, more complex shots can still have strange issues.
So, our advice is to use a stabilizer when you shoot your video. That's the best way to avoid shaky footage.
How to Stabilize Video in DaVinci Resolve?
DaVinci Resolve has two ways to stabilize your video. In fact, both methods do the same thing — they just take different paths. Let's check them out.
Method 1: Stabilizer on the Color Page
After you import your clip into the timeline, switch to the Color Page. Then, click the Tracker tab.
At the top right of the Tracker panel, you'll see a few small icons. Click the Stabilizer icon to open the Stabilizer panel.

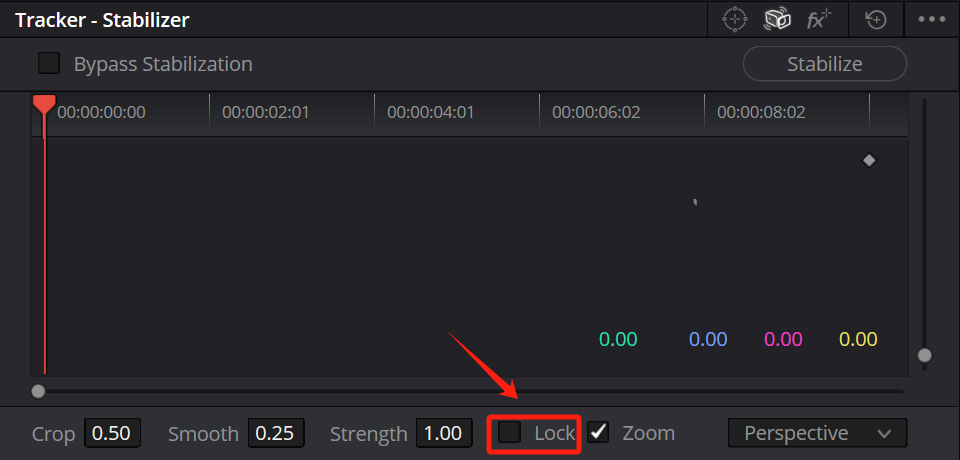
Next, make sure the Lock option at the bottom is unchecked (this is the default).
If you check it, DaVinci Resolve keeps the camera fixed, so the shot stays completely still. This can lead to background distortions and make the video look odd. Only use the Lock option in very rare cases.
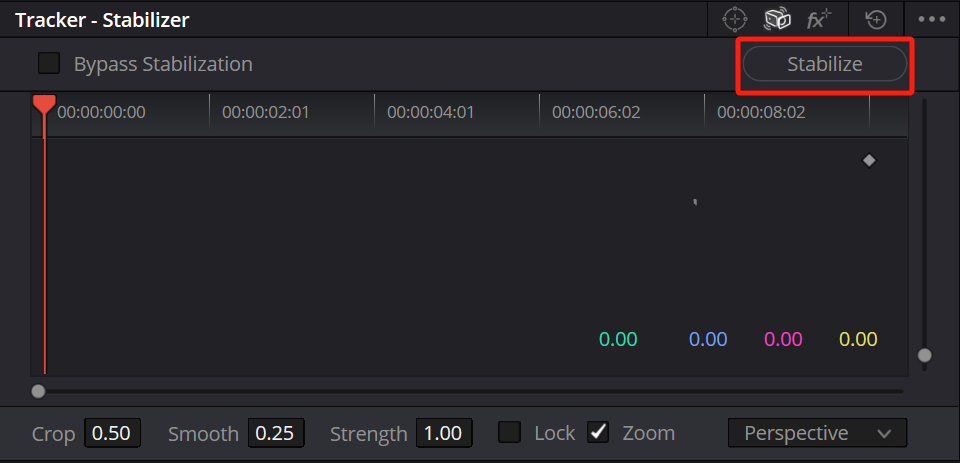
Next, just click the Stabilize button in the panel and wait a moment for DaVinci Resolve to work.
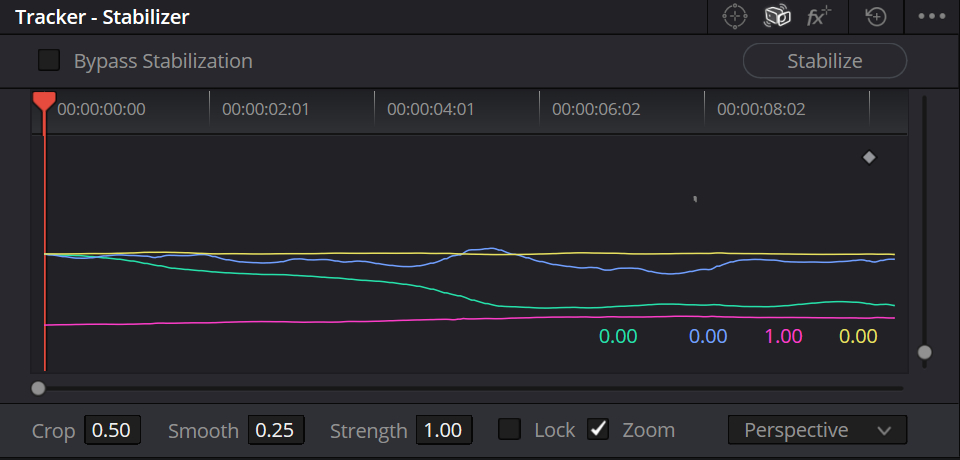
You'll see some curves appear in the panel. When you preview the clip again, you'll notice that part of the main image is cropped, and the shot is a bit more stable.
If you're not happy with the stabilization, change the Smooth setting from 0.25 to 0.5 and click the Stabilize button again. That should improve the result.
As you can see, the stabilizer panel has several settings you can adjust. Let's go over them briefly.
First, there's the Crop setting. Its range is from 1 to 0.25. If you set it to 1 and click Stabilize, the image won't be cropped, but you also won't get any stabilization. So, in most cases, just stick with the default value.
Next is Smooth. It also ranges from 1 to 0.25. When set to 1, more of the video gets cropped, but you get the best stabilization. Setting it to 0.5 works well too, so we recommend using 0.5.
Then there's Strength, which ranges from -1 to 1. This value affects how much of the image gets cropped. Again, the default value is usually fine.
There are also the Lock and Zoom options. Most of the time, you should leave these at their default settings.
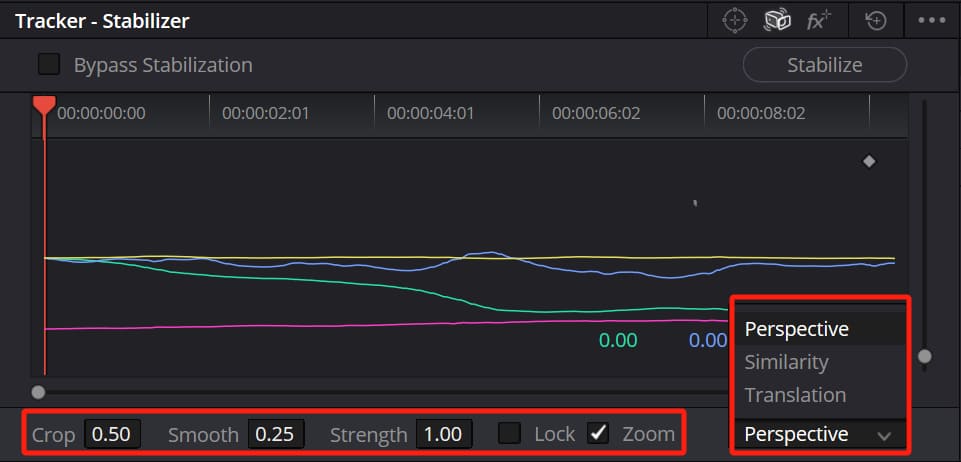
Finally, on the right side of the panel, you'll see a list of options: Perspective, Similarity, and Translation. These are different stabilization algorithms in DaVinci Resolve. For most users, you don't need to worry about how they work. Just test each option on your clip and choose the best one.
Method 2:Stabilizer on the Edit Page
Before DaVinci Resolve 16, we could only stabilize videos using method 1 mentioned above. But with DaVinci Resolve 16 and later, you don't have to switch to the Color page anymore. You can do it right on the Edit page.
On the Edit page, look for the "Stabilization" option in the Inspector panel (Path: Edit page > Inspector panel > Video tab > Stabilization). When you open it, you'll see that the settings are exactly the same as those on the Color page.
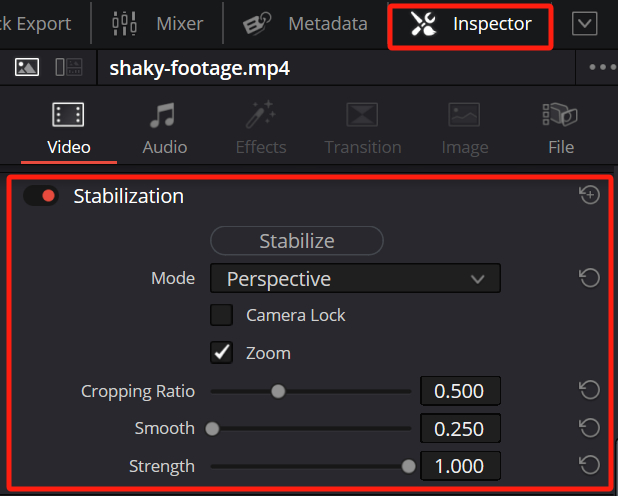
Just like on the Color page, make sure the "Camera Lock" is unchecked, adjust the "Smooth" value as needed (for example, set it to 0.5), and leave everything else at its default.
Finally, click the "Stabilize" button to finish stabilizing your video. You can try both methods, and you'll notice that they give you the same result with the same settings. In reality, they're just two different ways to access the same tool in DaVinci Resolve.
Conclusion
The above are the two ways to quickly fix shaky footage in DaVinci Resolve. We hope you find our tips helpful.
When you edit video in DaVinci Resolve, you'll notice it has powerful, full-featured tools. But switching tools, changing settings, and doing repetitive tasks can break your focus and interrupt your creative flow.
Video creation needs inspiration and patience. Why waste energy on tedious tasks?
That's why we recommend TourBox. It can replace many of your keyboard shortcuts with tactile physical buttons and dials, so editing and color grading feel more natural.

TourBox also includes a built-in feature called HoverAdjust, made for DaVinci Resolve's color workflow. It gives you the feel of a pro color console — at a much more affordable price.

Click on our video editing page to learn more about how TourBox can help.