How to Stabilize Video in Premiere Pro?
In this tutorial, we will show you how to use the Warp Stabilizer effect in Adobe Premiere Pro to stabilize shaky video footage.
This feature helps reduce camera shake, giving your videos a more professional and polished look. Next, we'll walk you through some simple steps to get you started quickly.

In this article, you will learn:
- What to Consider While Shooting?
- How to Stabilize Video in Premiere Pro?
- Hidden Tips for Stabilizing Video in Premiere Pro
- Final Thoughts About Stabilizing Video in Premiere Pro
What to Consider While Shooting?
If you can anticipate the need for stabilization during post-production (for example, when shooting without a tripod), there are two things to keep in mind:
- Wider Composition: Capture a slightly wider frame as larger shakes may require more room for stabilization, ensuring that important elements remain within the frame.
- Shutter Speed Adjustment: Without compromising the overall consistency of the shot, consider reducing the shutter speed.
How to Stabilize Video in Premiere Pro?
Let's reveal the answer quickly. If you want to stabilize videos in Premiere Pro, the "Warp Stabilizer" effect is definitely your go-to option.
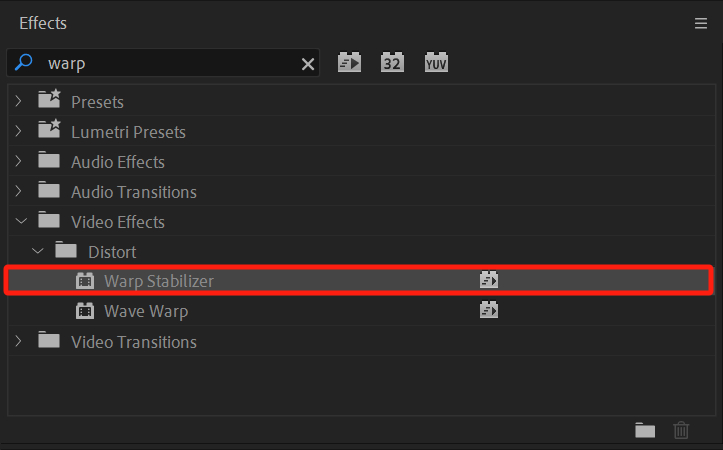
First, you need to drag the Warp Stabilizer effect from the Effects panel directly onto the clip on the timeline. Warp Stabilizer can be found under the Video Effects category, but a quicker way is to search for "Warp Stabilizer" in the search box.
Premiere Pro will then start analyzing automatically. The analysis process may take some time and can be influenced by factors such as clip length, frame rate, and resolution. Naturally, analyzing 4K footage will take longer than 1080p.
While Premiere Pro is analyzing, shift your attention to the Effect Controls panel. Here, you will find the settings options for Warp Stabilizer.
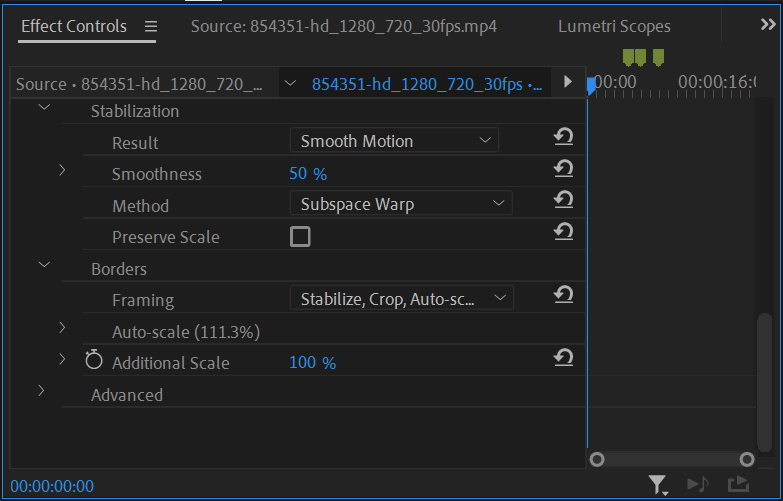
If you choose the Smooth Motion mode in the Warp Stabilizer, there are three main parameters to adjust:
- Smoothness: Determines the strength of stabilization. The default value is 50%, but it may not be the most optimal. It's often better to reduce stabilization moderately and maintain some natural motion.
- Method: Determines the method of analyzing motion. Subspace Warp is commonly used to analyze and stabilize camera movement and lens distortion. This method is beneficial for footage captured with wide-angle lenses and is considered the best option.
- Framing: Premiere Pro may create black borders or edges when stabilizing the video. The size of the borders increases with a more significant camera shake. Framing addresses how to handle these edges.
Extra Tip:
The default setting for Framing is "Stabilize, Crop, Auto-Scale," which removes the black borders by scaling up the footage.
If you prefer to keep the size of the frame unchanged, you can try "Stabilize, Synthesize Edges." This method fills the edges using content-aware techniques but may not work well with complex scenes.
If you want the stabilized clip to resemble a static shot without any camera movement, you can switch the Result option of Warp Stabilizer to "No Motion."
However, keep in mind that this option is not suitable if your footage includes panning or tilting movements because "No Motion" will lock the frame to the initial perspective and won't follow any subsequent camera movements.

In addition to the basic settings of Warp Stabilizer mentioned above, you can also adjust some advanced settings:
- Detailed Analysis: This option allows for a more detailed analysis of the footage, but it can increase the file size and require more processing power from your computer.
- Crop Less <-> Smooth More: The default value is 50%. This setting determines the balance between "less cropping" and "smoother stabilization."
- Synthesize Edge Settings: If you previously set the Framing option to "Synthesize Edge" in the basic settings, you can further customize it in the Advanced dropdown menu. Here, you can adjust the Range, Edge Feather, and Edge Cropping for the framing.
- Hide Warning Banner: When checked, this option removes the Warp Stabilizer status banner from the screen, providing a cleaner view of your footage.

Hidden Tips for Stabilizing Video in Premiere Pro
In the previous section, we covered the basic and advanced settings of Warp Stabilizer in Premiere Pro. However, there are some hidden tips and tricks for using Warp Stabilizer that you might not be aware of. Let's explore them together.
1. What's the Order of Applying Effects in Premiere Pro
While you may know the combined effects of applying filters, you often overlook the importance of the "order" of filters. Similar to After Effects, effects are applied from top to bottom, with Warp Stabilizer being a top priority.
Why is this important? If Warp Stabilizer is in a lower position, any slight changes in the parameters of the effect above it will trigger a "source change" and require Warp Stabilizer to reanalyze the footage.
Especially with filters like Lumetri Color that adjust colors, which often require fine-tuning, they should not be placed above Warp Stabilizer.

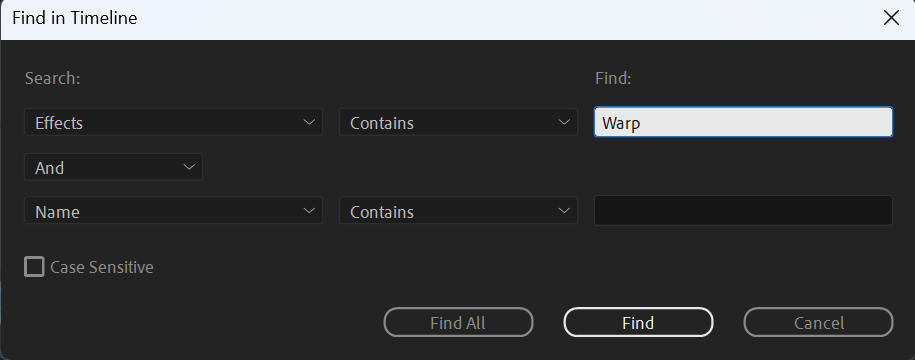
2. How to Quickly Locate Clips with Applied Warp Stabilizer Effect?
Sometimes, you want to identify clips that have been stabilized in your sequence. To do this, press "Ctrl + F" ("Cmd + F" on Mac) in the sequence panel, select "Effect contains" or "equals," and type "Warp Stabilizer."
This allows you to quickly find the clips with the applied effect. Of course, you can use this method to search for other effects as well.
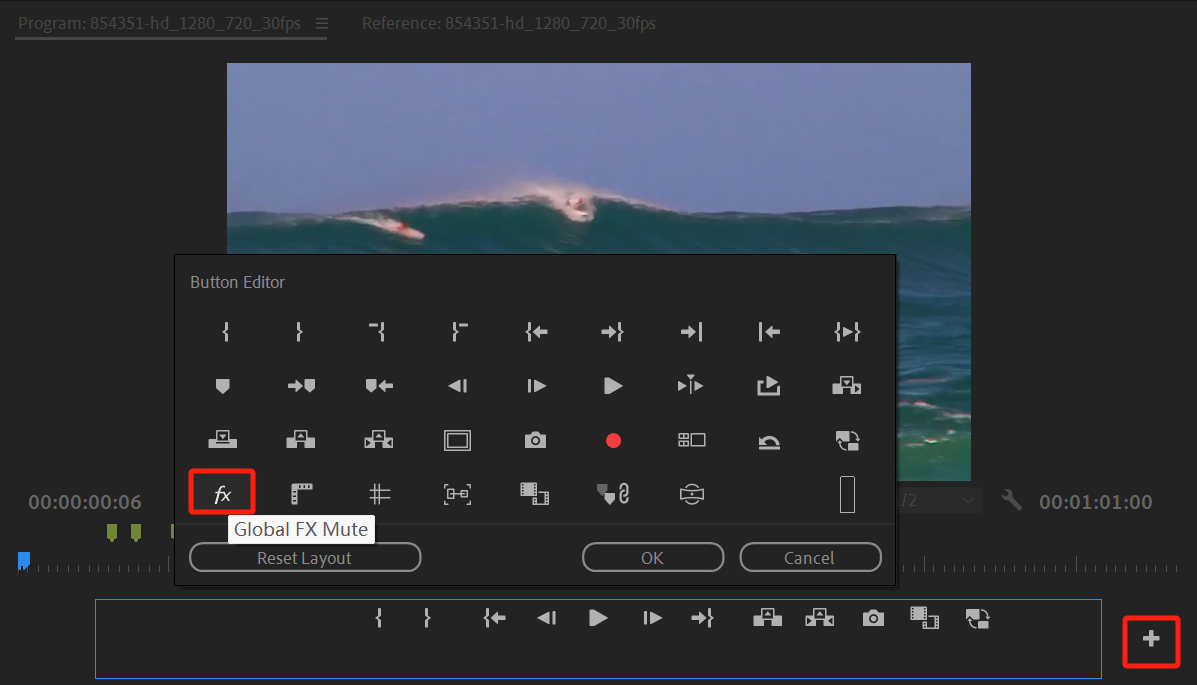
3. How to Disable All Effects?
In the Program panel of Premiere Pro, you can add the "Global Fx Mute" button by clicking the "+" icon in the bottom right corner (Button Editor).
We're introducing this feature mainly for efficiency purposes. The Global Fx Mute function is used to "disable all effects," including Warp Stabilizer.
Apply Warp Stabilizer during the editing process and experience extremely choppy playback. You can use this function to temporarily disable all effects until your computer has idle time to process them.
However, remember to turn off this function before exporting your video clips. Otherwise, the exported footage will lack any effects.
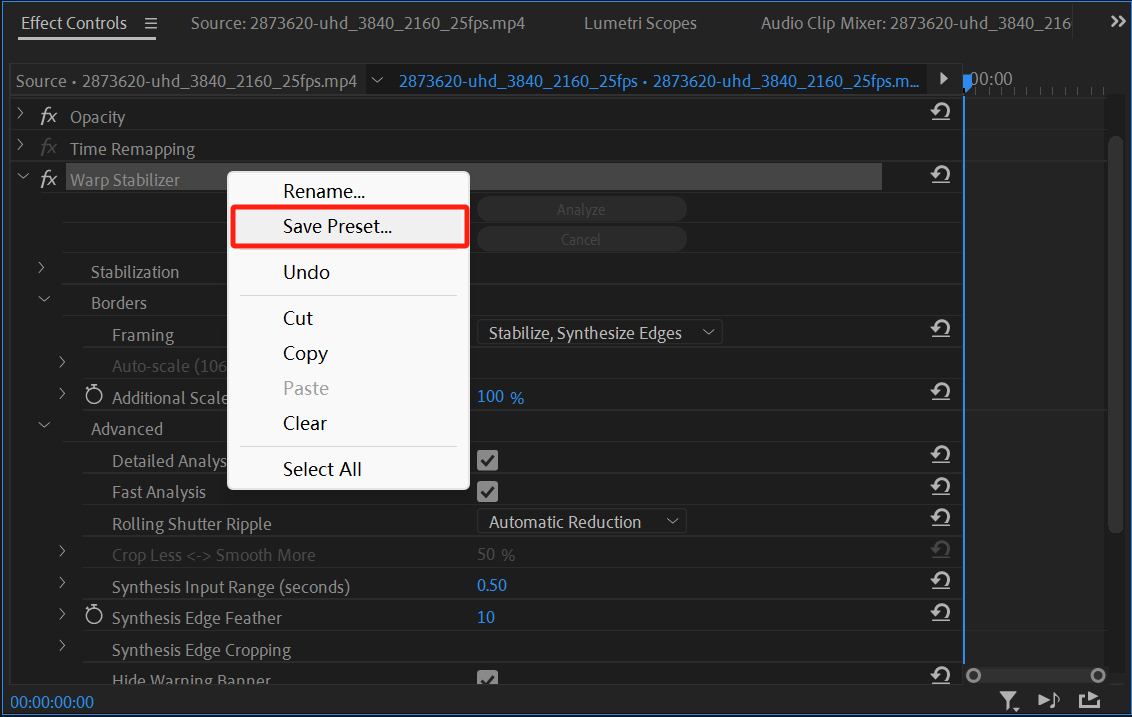
4. How to Save Effects Preset?
For frequently used Warp Stabilizer parameters, you can right-click on the Warp Stabilizer effect in the Effect Controls panel and save it as a preset. This way, you won't have to readjust the parameters every time.
Just remember that each time you apply the preset, you need to reanalyze the footage. Also, if the length of the clip changes or if you trim it, you'll need to reanalyze it as well.
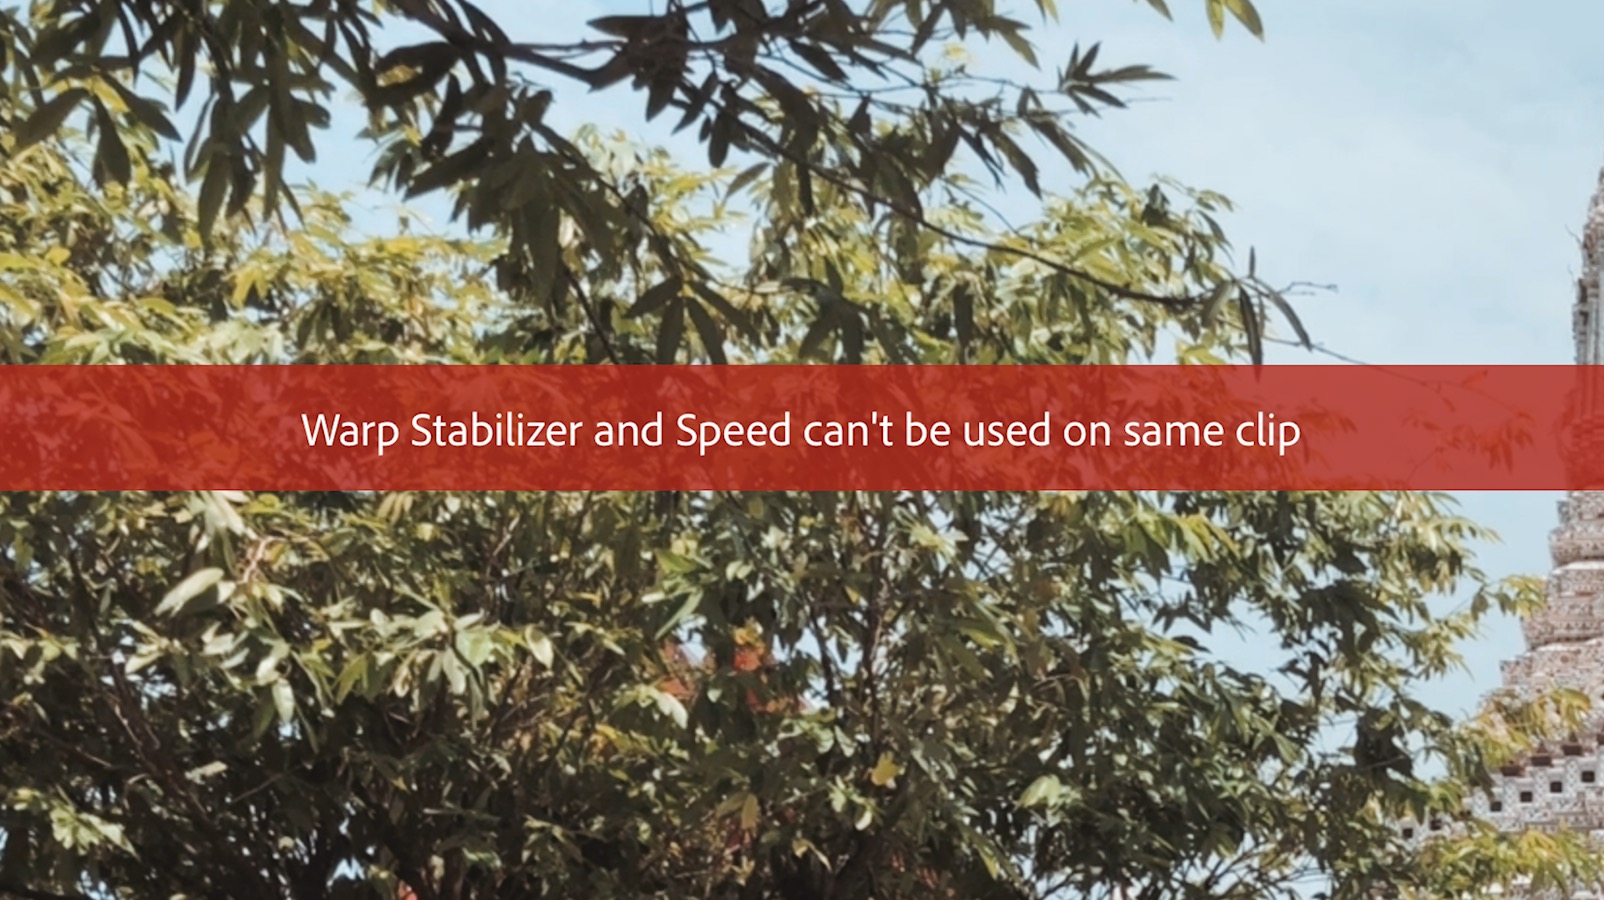
5. What to Do If You Can't Use Warp Stabilizer?
If you encounter the message "Warp Stabilizer and Speed can't be used on the same clip" while applying Warp Stabilizer, it means that the clip has been scaled or the playback speed has been adjusted. In such cases, stabilization won't work smoothly.
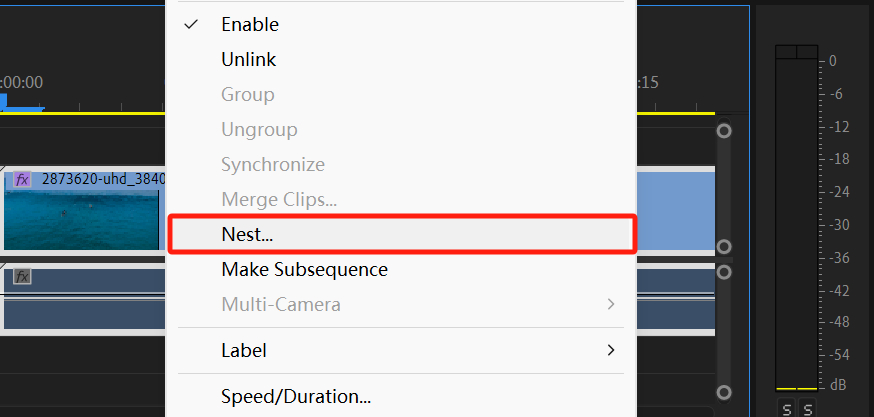
To overcome this issue, you can use the Nest feature to convert the problematic clip into a separate sequence. Right-click on the clip and select "Nest" from the popup menu. This will create a nested sequence.
In the nested sequence, you can handle the scaling or speed adjustments as needed. Once you've completed the necessary modifications within the nested sequence, you can return to the original main sequence and apply Warp Stabilizer to the clip.
6. How to Use Proxy for Video Stabilization?
The purpose of using proxy media is to reduce the computational load on your computer. However, once you apply Warp Stabilizer to a clip in Premiere Pro, the software automatically switches it back to the original quality, which means you can't use proxies.
Final Thoughts About Stabilizing Video in Premiere Pro
In this tutorial, we have covered how to stabilize video in Premiere Pro. By now, you should have a good understanding of the Warp Stabilizer effect and its related techniques.
If you're looking to enhance your editing experience in Premiere Pro, we would like to recommend TourBox, a creative tool loved by digital artists and content creators.

TourBox simplifies every step of the video editing process, greatly improving your workflow efficiency. With TourBox's tactile feedback, you'll feel like you're using a game controller, immersing yourself in a creative experience while working.
No longer do you need to memorize countless keyboard shortcuts or search through menus filled with numerous commands. With just one hand operating TourBox, you can achieve precise control in video editing without any hassle.

Check out our video editing page to learn more about TourBox and how it can elevate your editing skills.