Digital Painting Beginner's Guide: How to Start Your Artistic Journey
Dear art enthusiasts, the world of digital painting welcomes everyone, regardless of your artistic background. You might have thought that creativity is limited to those with innate talent, but in reality, getting started with digital painting is much easier than you think.
In this tutorial, we will walk you through the basics and techniques of digital painting, making it easy for you to dive in and embark on a brand-new creative journey.
Whether you're a beginner or have some experience, here you will find the guidance and inspiration you need. Are you ready? Let's embark on this exploration of the world of digital painting together!

In this article, you will learn:
- Preparations for Getting Started in Digital Art
- Phase One: Establish the Basics of Digital Painting
- Phase Two: Master Coloring Techniques in Digital Painting
- Phase Three: Elevate Your Aesthetics
- Final Thoughts About Getting Started in Digital Art
Preparations for Getting Started in Digital Art
1. Choose the Right Equipment
- Graphics Tablet: Various brands and models of graphics tablets are available, such as Wacom, XP-Pen, Huion, and more. Beginners can opt for a cost-effective entry-level graphics tablet.
- Drawing Software: Common drawing software includes Photoshop, Clip Studio Paint, Corel Painter, and others. Beginners may prefer user-friendly and feature-rich software like Krita or Procreate.
- TourBox Controller: TourBox can significantly enhance your creative efficiency, allowing you to immerse yourself in a seamless creative process. Visit our digital painting page to learn how TourBox can elevate your painting experience.

2. Set Up Your Painting Environment
- Workspace: Make sure your workspace is tidy, comfortable, and well-lit to help you focus on painting for extended periods.
- Graphics Tablet Configuration: Configure the shortcut keys and pressure sensitivity of your graphics tablet in the drawing software to significantly boost your painting efficiency.
3. Stay Relaxed
Learning digital painting isn't as difficult as it may seem, so don't stress yourself out by overcomplicating it.
Many suggest that learning traditional drawing is a prerequisite for digital painting, but it's not necessary.
Whether it's digital or traditional art, building a solid foundation is key. So, focus on improving your skills rather than getting caught up in the tools.
Phase One: Establish the Basics of Digital Painting
We recommend following this learning process: Line Drawing → Perspective → Sketching → Human Figure → Color
1. Line Drawing Practice
Even without a background in sketching, you can still learn digital painting, but practicing line drawing is essential.
As a beginner in digital painting, you might find it challenging to get used to using a graphics tablet for drawing. The most common issues you may encounter are drawing shaky lines, struggling to pinpoint spots accurately, and facing difficulties with hand-eye coordination.
Therefore, the first step is to practice steadying your hand and mastering pen control.
You can start by drawing a few squares, focusing on drawing straight lines from left to right without crossing the square's boundaries, training yourself to stop precisely.
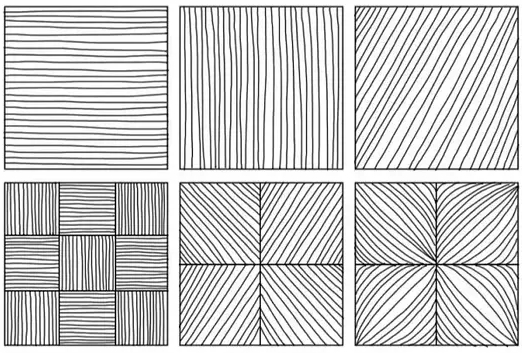
Once you've mastered drawing straight lines, practice combining various types of lines like straight, curved, broken, and dashed lines. Aim for smooth, continuous movements to avoid creating fragmented lines.
For short lines, use your wrist's strength, and for long lines, utilize your elbow's strength.
We don't recommend using the anti-shake feature in drawing software initially. Adjust it after you've become proficient with your practice.
2. Learn Perspective
The basic principle of perspective is simple:
- Objects closer appear wider, while those farther away seem narrower.
- Objects closer look larger, while those in the distance appear smaller.
- Nearby objects seem solid, while distant ones appear more ethereal.
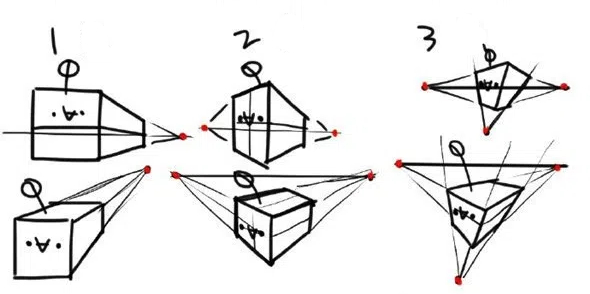
Perspective can be categorized into three types:
- One-point perspective: Involves a single vanishing point, often used for creating dynamic and deep compositions.
- Two-point perspective: Features two vanishing points, both located on the horizon line.
- Three-point perspective: Building upon a two-point perspective, it introduces a high or low viewing angle.
While the terminology might appear confusing at first, perspective is one of the easiest concepts to grasp because it mirrors how we see the world.
If you're struggling to depict perspective with your drawings, apart from practicing drawing geometric shapes from different angles, you can also start by sketching simple objects like plants, flowers, buildings, small animals, or even food.
Progress gradually to drawing figures and scenes. With dedication, you'll quickly enhance your understanding of perspective.
3. Master Sketching
Once you have a strong grasp of line work and perspective, you can move on to sketching. Sketching plays a crucial role in shaping the foundation of your artwork.
It's often said that a well-executed sketch is already halfway to success.
If you're new to sketching, you can start with tracing exercises. Tracing can help you quickly get accustomed to using a digital tablet, ensuring smooth transitions between strokes.
While tracing, pay attention to and learn from others' brushstrokes to improve the fluidity of your lines. Avoid simply copying without understanding, as this type of practice lacks meaning.
After gaining a certain level of control over your lines, you can gradually transition to copying sketches.
During this phase, observe the structure of the objects you are drawing, and learn how others depict the layers of lines to create depth and volume in their artwork.
For instance, draw thin lines in light areas and thicker lines in dark areas, use thinner lines for distant objects and thicker lines for closer ones, and emphasize shadows at points of change.
It's worth mentioning that both tracing and copying are initial steps to help you quickly improve your skills and become familiar with line work and object structures.
Eventually, you will need to shift towards semi-copying exercises and eventually embark on creating your own original artwork.
You can learn how to draw sketches by watching the video shared on YouTube by the artist Aaron Rutten.
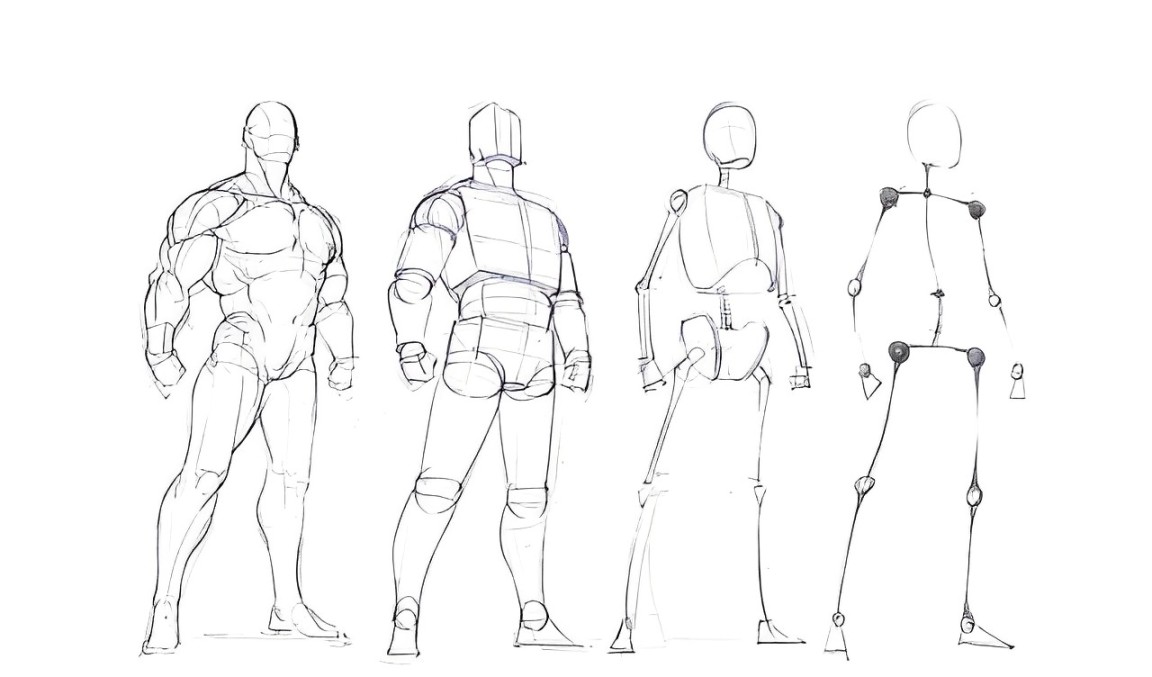
4. Understand the Human Body
The human body can be divided into basic and dynamic aspects. As a beginner, it's sufficient to focus on mastering the fundamentals of skeletal structure and proportions. Dynamic figures can be more challenging and can be practiced later on.
In realistic adult drawings, the typical proportion is 7-9 heads tall, while for cartoons, it's usually 7-8 heads tall, and for chibi-style cartoons, it's 2-3 heads tall.
You can start by practicing with a "stick figure." The method involves marking key points and dividing the body into 12 points (4 major points for the torso and 8 minor points for the limbs), which helps in determining proportions more easily.
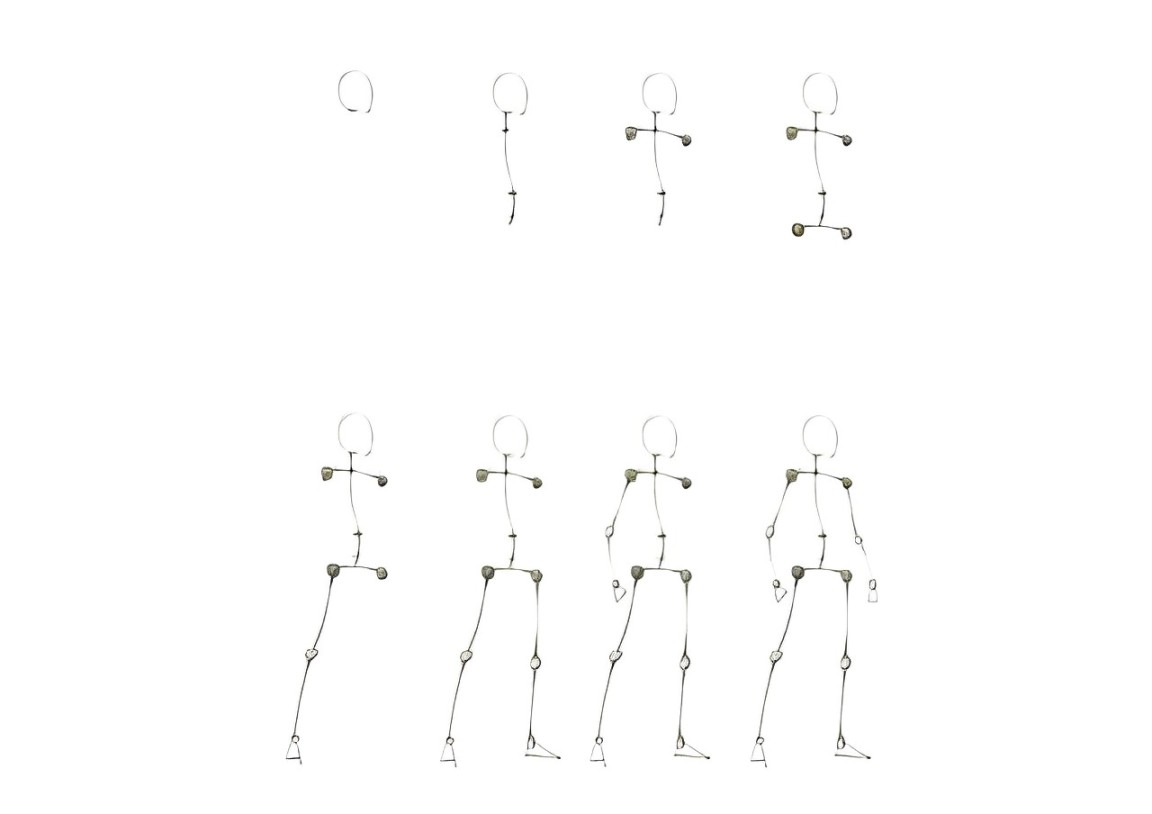
Through continuous practice, you'll eventually be able to draw proportions accurately without consciously thinking about those 12 key points.
Next, progress from flat to three-dimensional representations. This step ties back to perspective, essentially breaking down the human body into various cubes and cylinders and combining them with considerations of perspective relationships.
There are no shortcuts in this step—just consistent observation and practice.
The image below illustrates a simplified process from left to right, representing a thought process. Conversely, from right to left, it embodies a sculpting process and drawing procedure.
By following this method, you can better understand the importance of key points in human figure drawing and how the analysis and evolution of your approach can aid your digital art development.
5. Develop an Understanding of Color
Understanding color is often considered one of the most challenging steps in the foundational aspects of digital art. For beginners who haven't delved into traditional drawing, sensitivity to color might initially be average.
Colors play a crucial role in determining the recognizability and richness of artwork. Mastering the relationship between color and light is essential.
Only when you have a solid understanding of color can you move away from simply imitating others' color choices. By following your own understanding of color, you can gradually develop your unique style, which can be incredibly rewarding and fulfilling.
Phase Two: Master Coloring Techniques in Digital Painting
In digital painting, there are generally three main rendering techniques: flat coloring, thick painting, and semi-tick painting.
1. Flat Coloring (Cell-Shading)
Flat coloring is the most beginner-friendly way to add color to digital painting! It involves filling shapes or areas with solid, uniform colors, without gradients or shadows.
This method helps you quickly establish a character's color scheme and overall composition, serving as a fundamental step commonly used in digital painting.
The key feature of flat coloring is its simplicity in applying colors with clear boundaries between different shades. By leveraging relationships between color blocks (such as light and dark contrasts, color harmonies, and purity levels), it creates a cohesive visual impression.
However, flat coloring requires precise linework and clear structures with well-defined perspectives to be effective.
2. Thick Painting (Impasto)
Thick painting tends to lean towards realism and is commonly used in game art. It creates rich textures and depth by employing heavy brush strokes and multiple layers of colors.
This technique emphasizes color blending and expressive brushwork, often prioritizing form and lighting over intricate details.
Thick painting doesn't require highly detailed line work. You simply layer colors on a basic outline until it's completely covered.
Due to its ability to enhance the three-dimensional aspect of artwork and the rich application of colors, thick painting results in a final image that closely mimics realistic textures.
3. Semi-Thick Painting (Semi-Impasto)
This technique falls between flat coloring and thick painting. It adds more texture compared to flat coloring but doesn't require the same level of precision as thick painting.
Using the semi-thick painting technique gives characters a more three-dimensional appearance, moving away from a flat look.
By enhancing flat coloring with subtle transitions and highlights, a sense of volume naturally emerges in the artwork.

Phase Three: Elevate Your Aesthetics
Phase three is arguably the most challenging part of your journey towards becoming a digital art master.
Aesthetics, unlike technical skills, are intangible and not as easily improved in the short term through practice alone.
Developing a keen aesthetic sense requires long-term cultivation. In essence, it involves appreciating and learning from various sources, gradually shaping your unique sense of beauty.
You can explore a multitude of digital artworks in online communities, websites, or offline exhibitions.
However, it's not just about looking at them. It's about analyzing what makes these pieces exceptional, comparing them to your work, and identifying areas for improvement.
Final Thoughts About Getting Started in Digital Art
If you were to ask a digital art expert how to improve your drawing skills, the most common answer you'd likely get is: "Practice more, you're not drawing enough."
The truth really is that simple: if your art isn't great, it's probably because you haven't put in enough time. So, there's not much else to say—just start drawing! Don't expect instant mastery in digital art. No skill can be mastered overnight.
Digital art is a gradual process. In this journey, TourBox can be your best companion on your artistic endeavors.

Similar to using a game controller for playing video games, TourBox allows you to ditch the cumbersome keyboard and execute various complex commands more easily and efficiently in your artistic creations.
Through our testing, TourBox has been shown to boost your drawing efficiency by 270%. It lets you focus on the art itself, freeing you from the constraints of tedious software operations.
As we wrap up this article on how to start digital art, we want to leave you with this: keep your curiosity alive, love the world around you, hold onto your beliefs, and believe that your journey in digital art will surely lead to success!