Brighten Your Smile: How to Whiten Teeth in Photoshop
Ever taken a photo you absolutely adore, only to realize that your teeth are looking anything but pearly white? We've all been there. Whether it's caused by stained teeth or poor lighting, yellow teeth can ruin an otherwise perfect shot.
Fortunately, with the power of Photoshop, you can easily brighten your smile without ever stepping foot in a dentist's office.
In this tutorial, we'll show you how to whiten teeth in Photoshop, so you can confidently show off your brightest smile in every photo. Let's get started!

In this article, you will learn:

Three Best Methods to Whiten Teeth in Photoshop
Whitening teeth in photographs is a common editing task that can greatly enhance the appearance of your subjects. In this section, we'll introduce three effective methods for teeth whitening using Adobe Photoshop. Follow these step-by-step guides to make your subject's smile shine!
Method 1: Hue/Saturation Adjustment Layer
- Open your image in Photoshop. Press Ctrl + O (Windows) or Cmd + O (Mac) to locate and open the image you want to edit.
- Create a selection of teeth. Use the Lasso Tool (L) or any other selection tool to carefully outline the area of the teeth you want to whiten.
- Add a Hue/Saturation adjustment layer. With the teeth selected, click on the Adjustment Layer icon at the bottom of the Layers panel and choose "Hue/Saturation."
- Adjust the settings. In the Properties panel for the Hue/Saturation adjustment layer, select the "Yellows" channel from the dropdown menu. Reduce the Saturation slider to remove yellow tones and increase the Lightness slider to brighten the teeth. You may also need to adjust the "Master" channel to fine-tune the overall brightness.
- Deselect and review your changes. Press Ctrl + D (Windows) or Cmd + D (Mac) to deselect the teeth. Review your adjustments and make any necessary changes.
This is one of the most highly recommended methods for whitening teeth in Photoshop. However, if you find it difficult to follow the text instructions, we find a video tutorial on YouTube that provides step-by-step guidance and makes it easier to understand. Let's take a look at the video and see exactly how it's done.
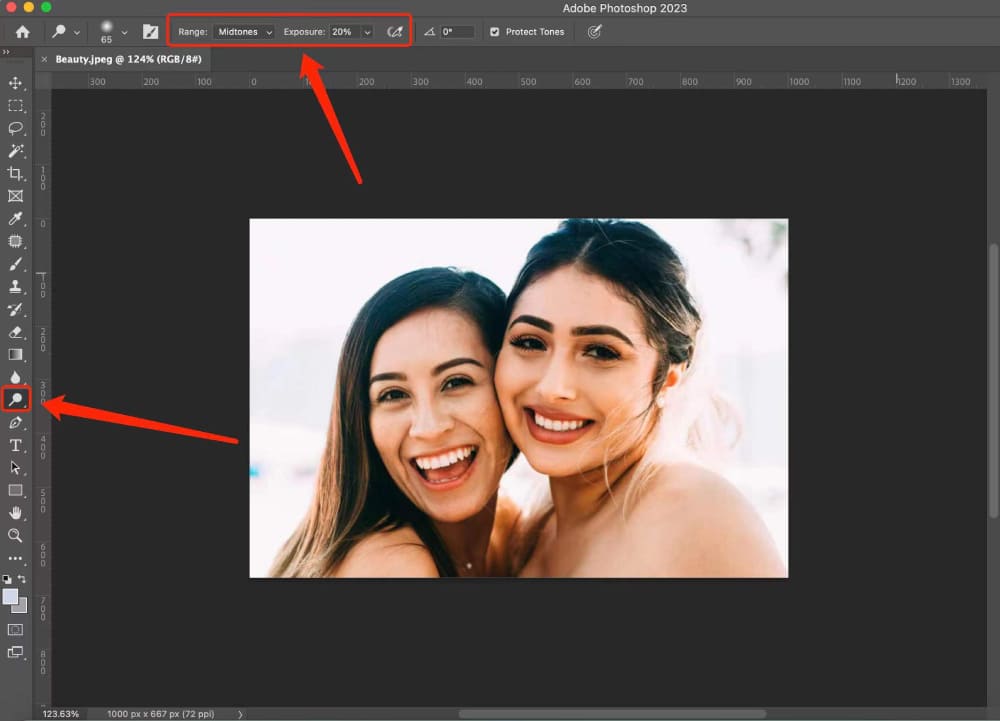
Method 2: Dodge Tool
- Open your image in Photoshop. Press Ctrl + O (Windows) or Cmd + O (Mac) to locate and open the image you want to edit.
- Duplicate the background layer. Press Ctrl + J (Windows) or Cmd + J (Mac) to create a copy of the background layer. This allows you to edit non-destructively.
- Select the Dodge Tool. In the toolbar, choose the Dodge Tool (O). In the Options bar, set the Range to "Midtones" and adjust the Exposure to around 10-20% to start.
- Paint over the teeth. Zoom in on the teeth and gently paint over them with the Dodge Tool. The teeth will gradually become lighter. Adjust the brush size and Exposure as needed for the desired effect.
- Review your changes. Toggle the visibility of the duplicated layer on and off to compare the original image with your edited version. Make any necessary adjustments.
Method 3: Curves Adjustment Layer
- Open your image in Photoshop. Press Ctrl + O (Windows) or Cmd + O (Mac) to locate and open the image you want to edit.
- Create a selection of teeth. Use the Lasso Tool (L) or any other selection tool to carefully outline the area of the teeth you want to whiten.
- Add a Curves adjustment layer. With the teeth selected, click on the Adjustment Layer icon at the bottom of the Layers panel and choose "Curves."
- Adjust the curve. In the Properties panel for the Curves adjustment layer, click and drag the curve upward to brighten the teeth. Be careful not to overdo it, as this can cause the teeth to look unnatural.
- Create a clipping mask. Alt-click (Windows) or Option-click (Mac) on the line between the Curves adjustment layer and the layer below it to create a clipping mask. This ensures that your adjustments only affect the teeth.
- Deselect and review your changes. Press Ctrl + D (Windows) or Cmd + D (Mac) to deselect the teeth. Review your adjustments and make any necessary changes.
If you're not familiar with Photoshop's curves adjustment, here's a thorough tutorial we found on YouTube about curves:
Experiment with these three methods to find the one that works best for your specific image and desired outcome. With a little practice, you'll be able to whiten teeth in Photoshop like a pro!
How to Be More Productive With Photoshop
Whether you're editing photos, creating designs, or retouching images, Photoshop is a powerful tool that can help you achieve your creative vision. However, with so many tools and features at your disposal, it's easy to get overwhelmed and lose productivity.
In this section, we'll share some tips and tricks to help you be more productive with Photoshop. By following these guidelines, you can improve your workflow, save time, and achieve better results.
- Organize your files: Before you start editing, make sure your files are organized and easy to find. Create a folder for each project and label your files clearly.
- Use shortcut keys: Photoshop has a lot of keyboard shortcuts that can save you time and make your workflow more efficient. For example, pressing "Ctrl+Z" will undo your last action, and "Ctrl+S" will save your work.
- Customize your workspace: Photoshop allows you to customize your workspace to fit your needs. You can rearrange panels, create custom toolbars, and even save your workspace for future use.
- Use batch processing: If you have a lot of images to edit, you can use batch processing to apply the same adjustments to multiple images at once. This can save you a lot of time and effort.
- Use ToolBox: TourBox is a creative tool that's designed to help artists and designers work more efficiently in Photoshop and other creative applications. With TourBox, you can customize its buttons and dials to perform different actions in Photoshop, such as adjusting brush size, zooming in and out, and switching between tools.

If you're wondering how to whiten teeth in Photoshop, it can effectively enhance your photos and create a brighter, more confident smile. By using the techniques outlined in this article, you can achieve natural-looking results that enhance the overall quality of your images.
However, it's important to remember that teeth whitening is just one aspect of photo editing. To create truly stunning images, you need to have a solid understanding of Photoshop and its many tools and features.
By practicing and experimenting with different techniques, including how to whiten teeth in Photoshop, you can develop your skills and take your editing to the next level.
So, whether you're a professional photographer or just starting out, don't be afraid to experiment with teeth whitening and other photo editing techniques in Photoshop.
With practice and patience, you can create beautiful, eye-catching images that capture the essence of your subject and leave a lasting impression on your audience.