3 Effective Methods: How to Zoom In on CapCut?
This straightforward tutorial will explore how to zoom in on CapCut and make your videos more captivating. No need for complicated maneuvers - follow our step-by-step instructions, and you'll master it effortlessly.
Please note that this tutorial focuses on the PC version of CapCut. Let's embark on this journey together and discover the endless possibilities of CapCut!

In this article, you will learn:
- Method 1: Use the Scale Feature to Zoom In
- Method 2: Use Keyframe to Zoom In
- Method 3: Use the Zoom In Effect
- Final Thoughts About Zooming In on CapCut
Method 1: Use the Scale Feature to Zoom In
In CapCut, you can zoom in on your clip using the Scale feature. Drag the desired clip onto the timeline panel in the CapCut interface.
Now, shift your attention to the top-right corner, where you'll find an adjustable panel called the Adjustment panel. If you don't see this panel, you can click on the selected clip on the track to activate its corresponding Adjustment panel.
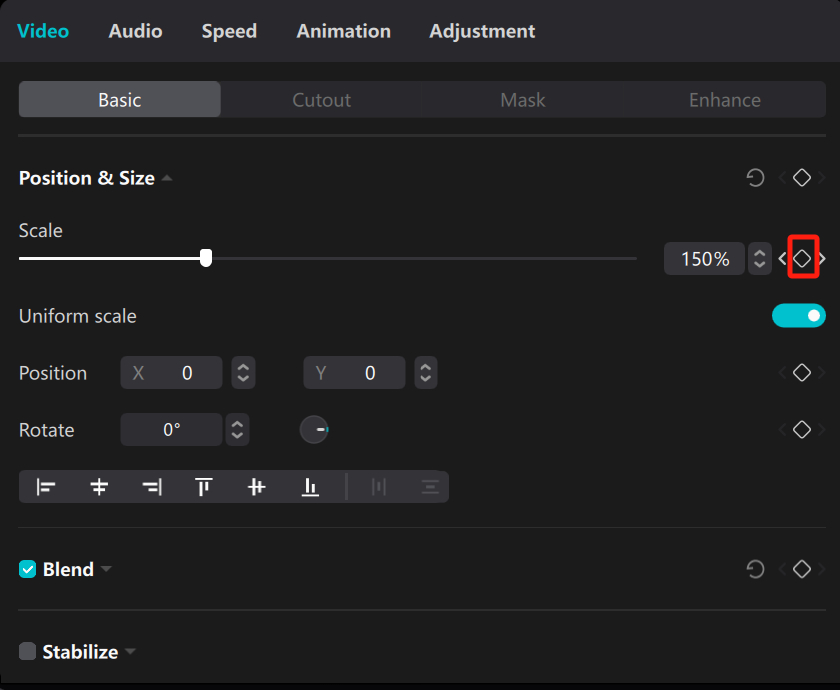
You'll find a Scale slider under the "Basic" section in the "Video" tab of the Adjustment panel. You can drag the slider to zoom in or out, or directly input specific values to adjust the frame size.
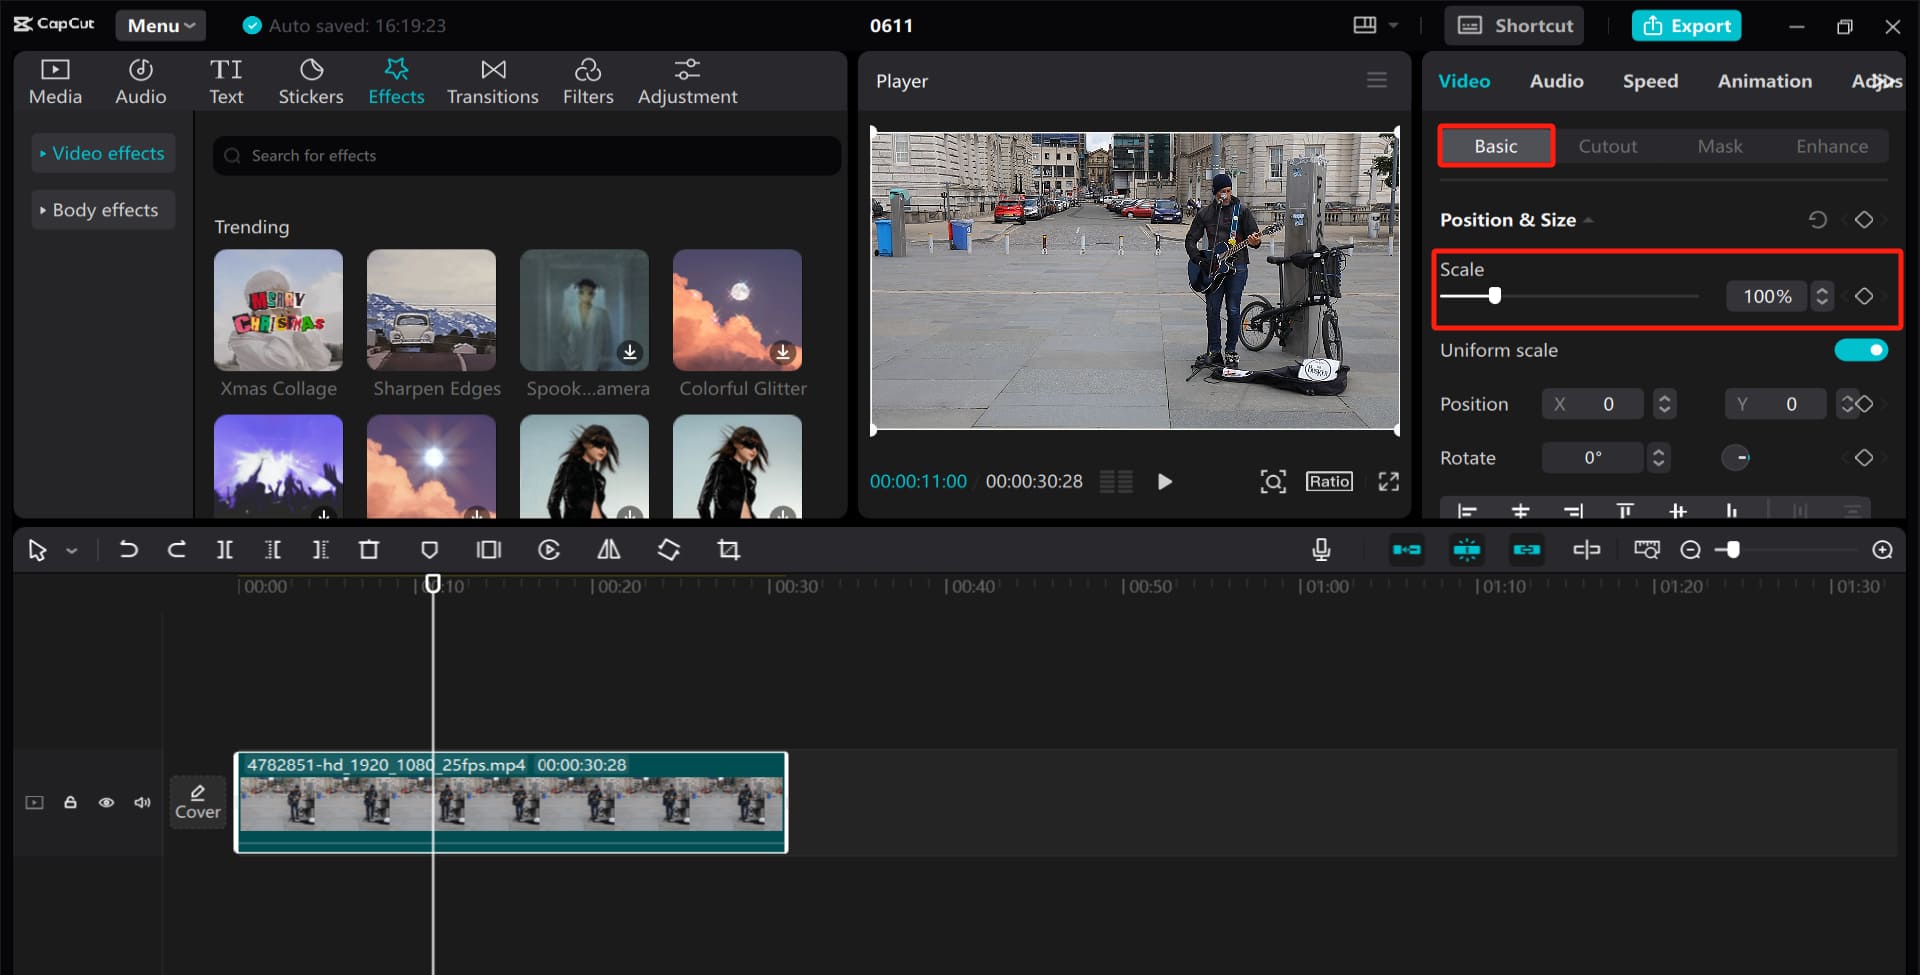
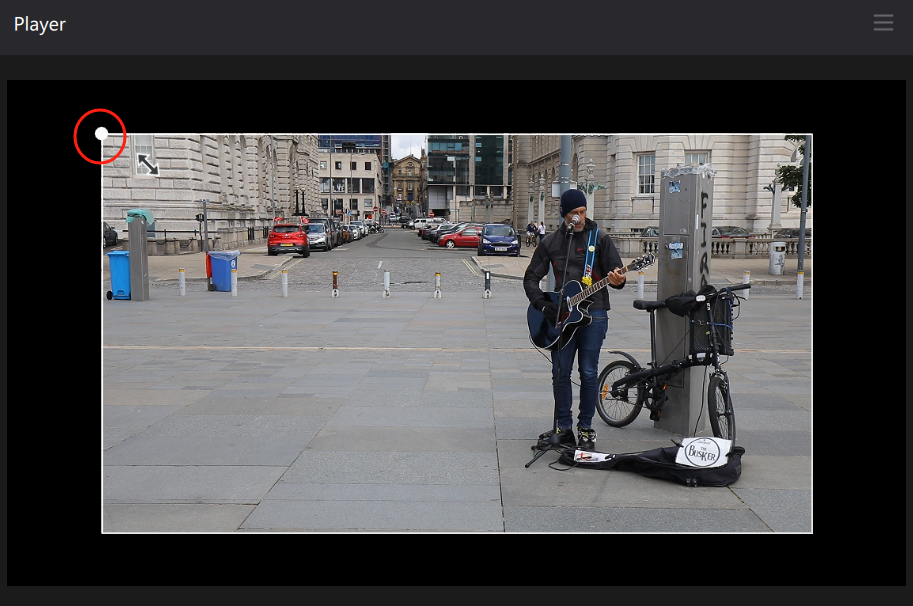
Alternatively, for a more intuitive approach, click on the video frame within the Player panel. You'll notice a resizable zoom box, similar to adjusting image size in Photoshop. Use this box to resize your video.
You may have noticed that the entire clip's size changes regardless of the playhead's position on the timeline when you zoom in on a video.
However, when editing videos, you often need to zoom in on a specific area (a portion of the frame) to highlight the focal point. So, how can you zoom in on a specific area of a video using CapCut?
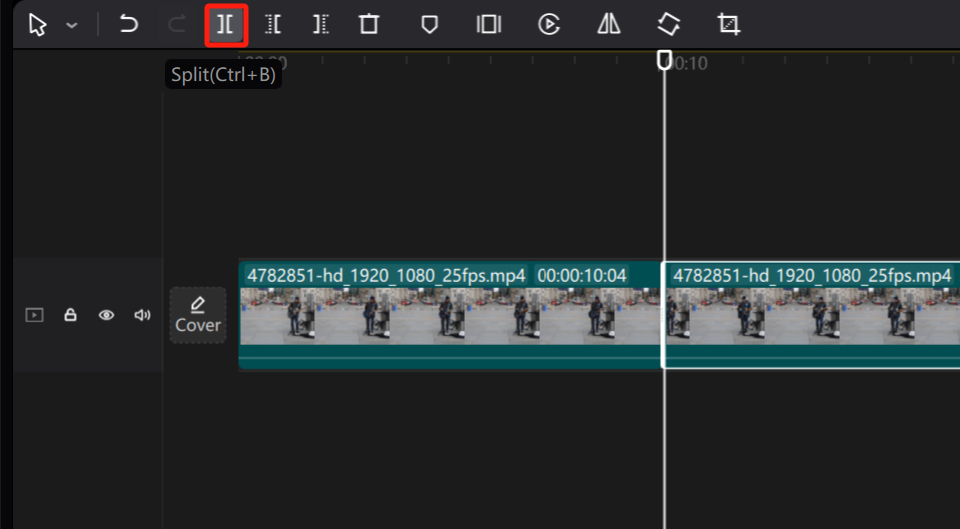
This requires using the Split tool on the timeline panel. Position the cursor on the video track where you want to start zooming in, then click the "Split" button on the toolbar above the timeline panel.
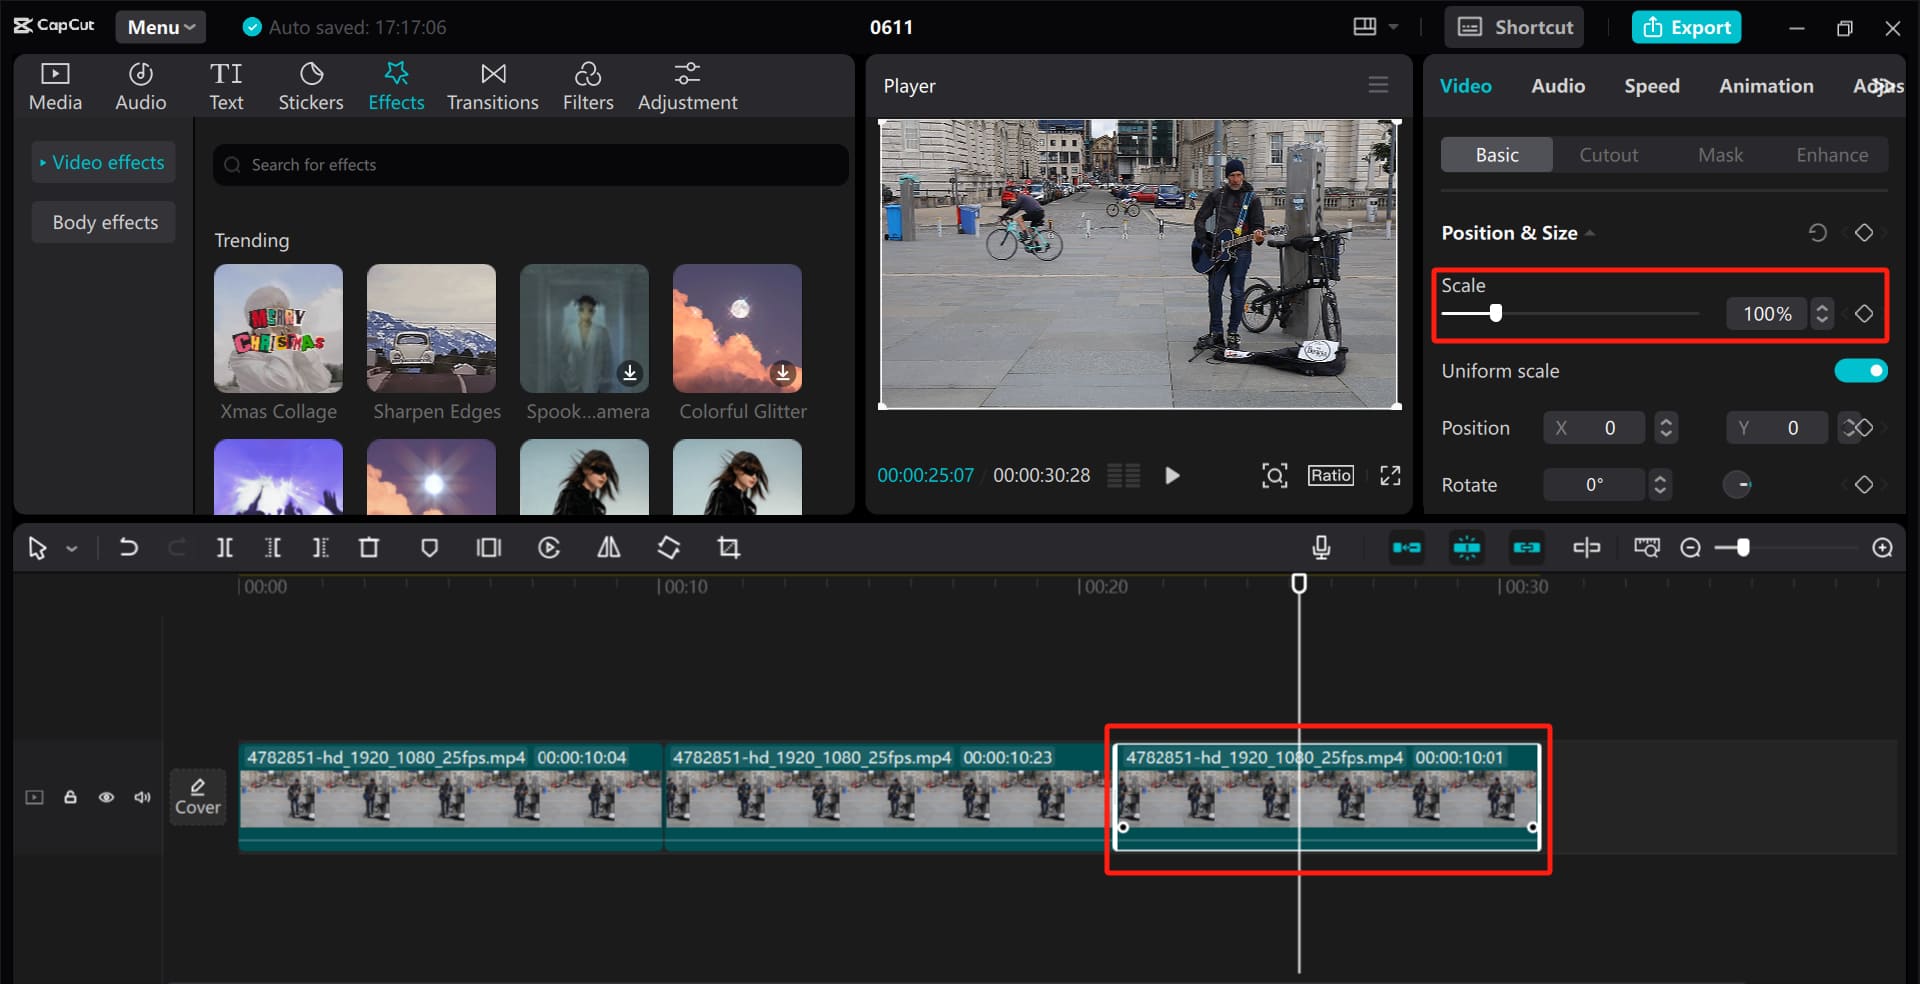
Next, adjust the Scale slider under the "Video" tab in the Adjustment panel located on the top right, according to your desired zoom level.
Once again, on the video track, position the playhead where you no longer want to zoom in, and then click the "Split" button on the toolbar above the timeline panel.
At this point, the newly split segments on the track will have the adjusted zoom level you set. If you want to restore the zoom level of the segments back to 100%, you need to select the second segment and adjust its Scale slider to 100%.
This zoom effect is achieved by using the splitting function to zoom in on a specific part of the segment while keeping the rest of the segment unchanged in size.
Method 2: Use Keyframe to Zoom In
You may have noticed that using Method 1 to zoom in on a clip results in a sudden and unnatural change in the footage. If you want to achieve a smooth zooming effect, how should you proceed?
You can use CapCut's keyframes to create a zooming animation. Keyframes are commonly used in video editing to make precise adjustments to specific parts of a video.
In CapCut, you can use keyframes to control properties such as the size, position, and rotation of video frames.
You'll notice that to the right of the sliders for these properties, there's a diamond-shaped icon, which is CapCut's "Add keyframe" button.
Within the section of the clip where you want to add a zooming animation, add a starting keyframe and an ending keyframe, and adjust the corresponding slider values (no need to split the clip). With these simple steps, you've added a natural zooming animation effect to your clip.
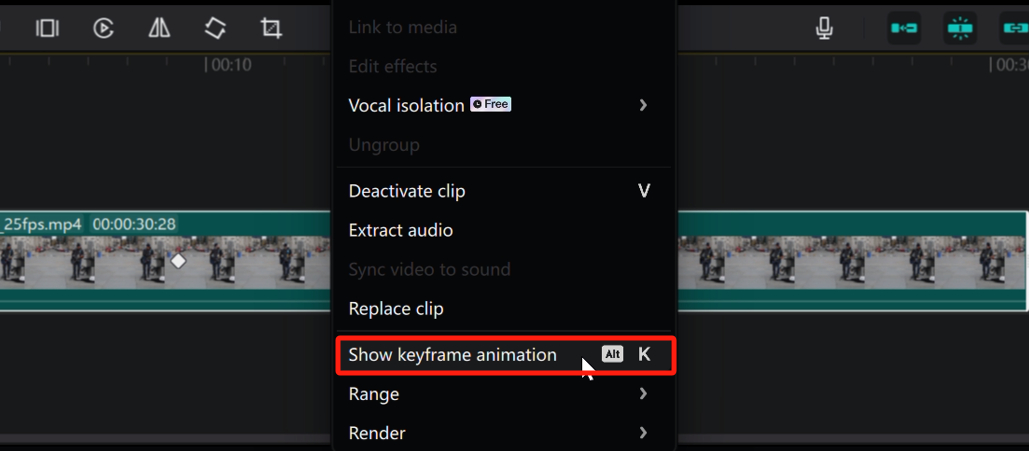
If you're new to working with keyframes in CapCut, you might feel a bit confused at this point. Although you've added keyframes, it seems like there haven't been any changes to the clip on the timeline.
The reason is that CapCut hides the keyframe panel by default. After setting the keyframes, you need to right-click on the clip and select "Show Keyframe Animation" from the pop-up menu. Alternatively, you can use the keyboard shortcut "Alt/Option + K" for a more direct approach.
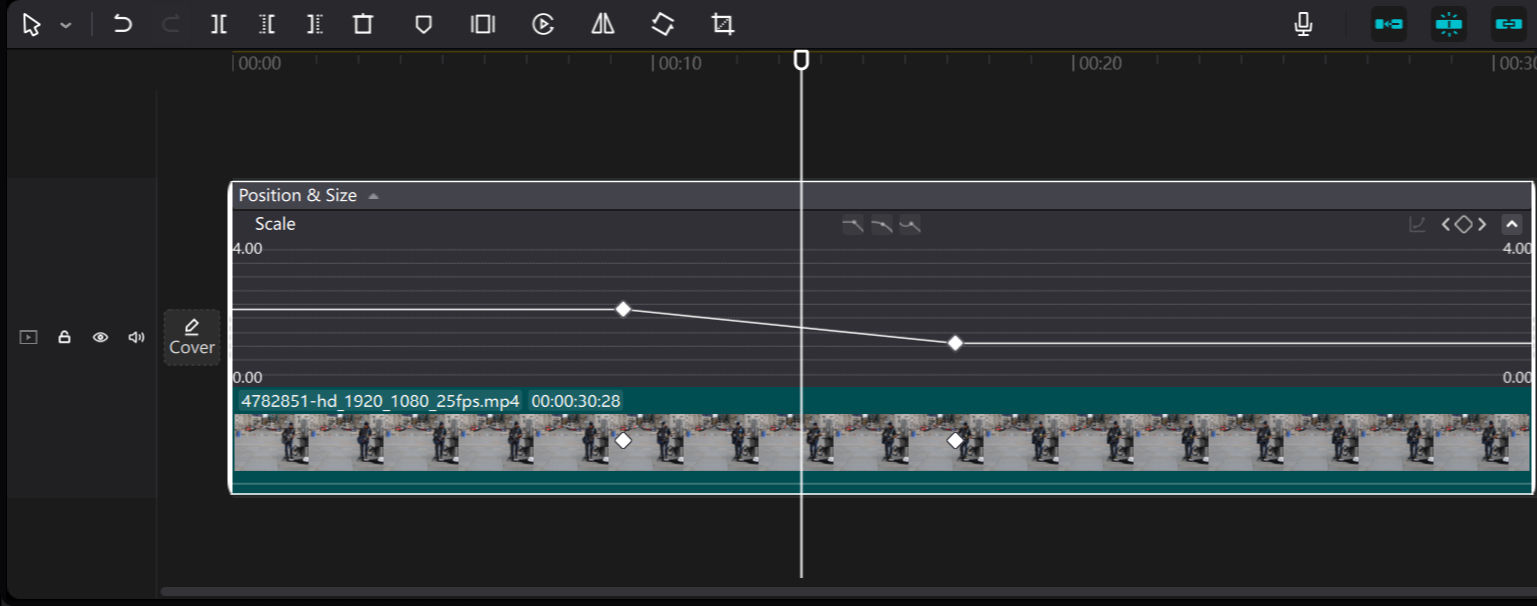
You'll notice an additional horizontal bar representing the keyframe animation above your clip. But that's not all—clicking the "Show keyframe graphs" option in the top-right corner of the bar will open the keyframe animation settings panel.
In this panel, you can customize the keyframe animation settings. Keyframes are a powerful feature that, when combined with keyframe animation, allows you to create natural and engaging effects in your videos.
However, you may have also realized that despite CapCut's user-friendly interface, the process of moving the playhead, adding keyframes, adjusting parameter sliders, and opening the keyframe animation panel can still be quite cumbersome, impacting your creative experience.
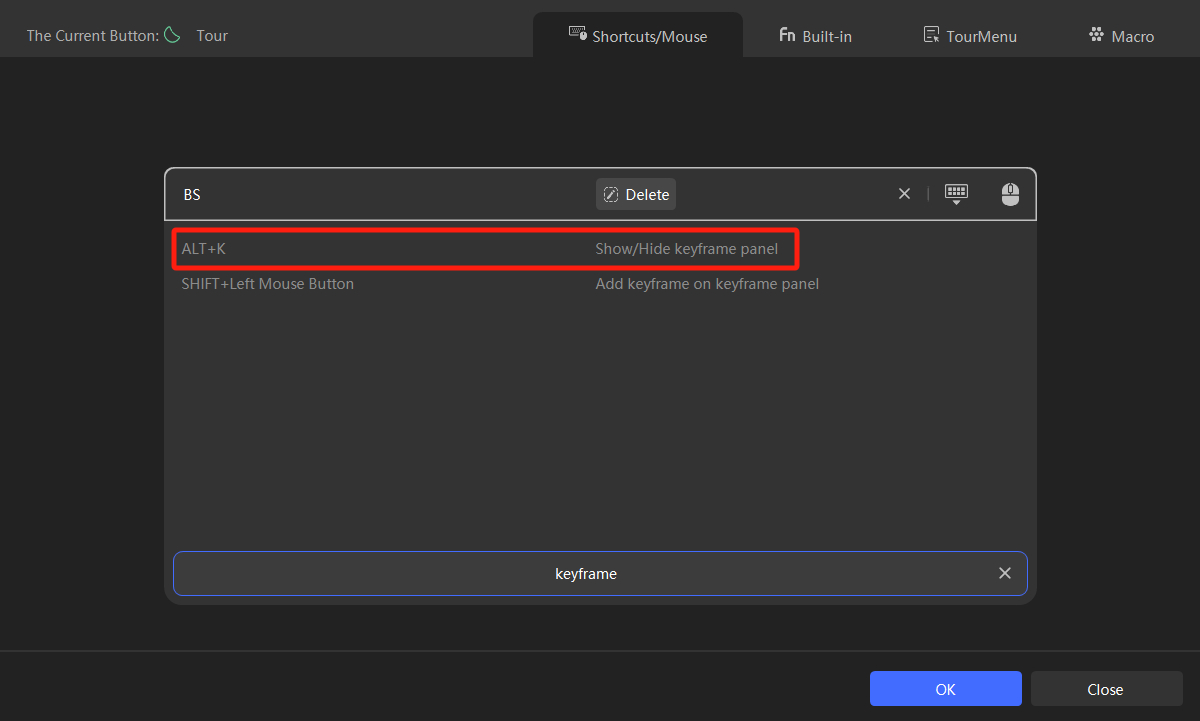
This is where you might consider using TourBox, a creative tool loved by digital artists and content creators alike. You can assign all of the aforementioned tasks to TourBox, controlling them with one hand and turning the editing process into an art form.

For instance, regarding the mentioned task of opening the keyframe panel, you don't even need to know its shortcut. In the TourBox Console, the software for configuring TourBox, simply search for "keyframe" and you can quickly set it up.
TourBox is undoubtedly a fantastic assistant that greatly enhances your efficiency and creative experience. Check out our video editing page to learn more about TourBox and how it can benefit you.
Method 3: Use the Zoom In Effect
Apart from the previous two methods, you can also achieve a zooming effect by using the Zoom Lens feature.
Zoom Lens is a popular visual effect in movies that helps draw the audience's attention to a specific detail in the frame.
To zoom in on a video clip, select the clip in the timeline panel, and then click the "Effects" button in the top left corner of the Media panel on the screen.
Next, in the effects editing interface that appears, search for "Zoom in" in the search bar, and you'll find the "Zoom Lens" effect.
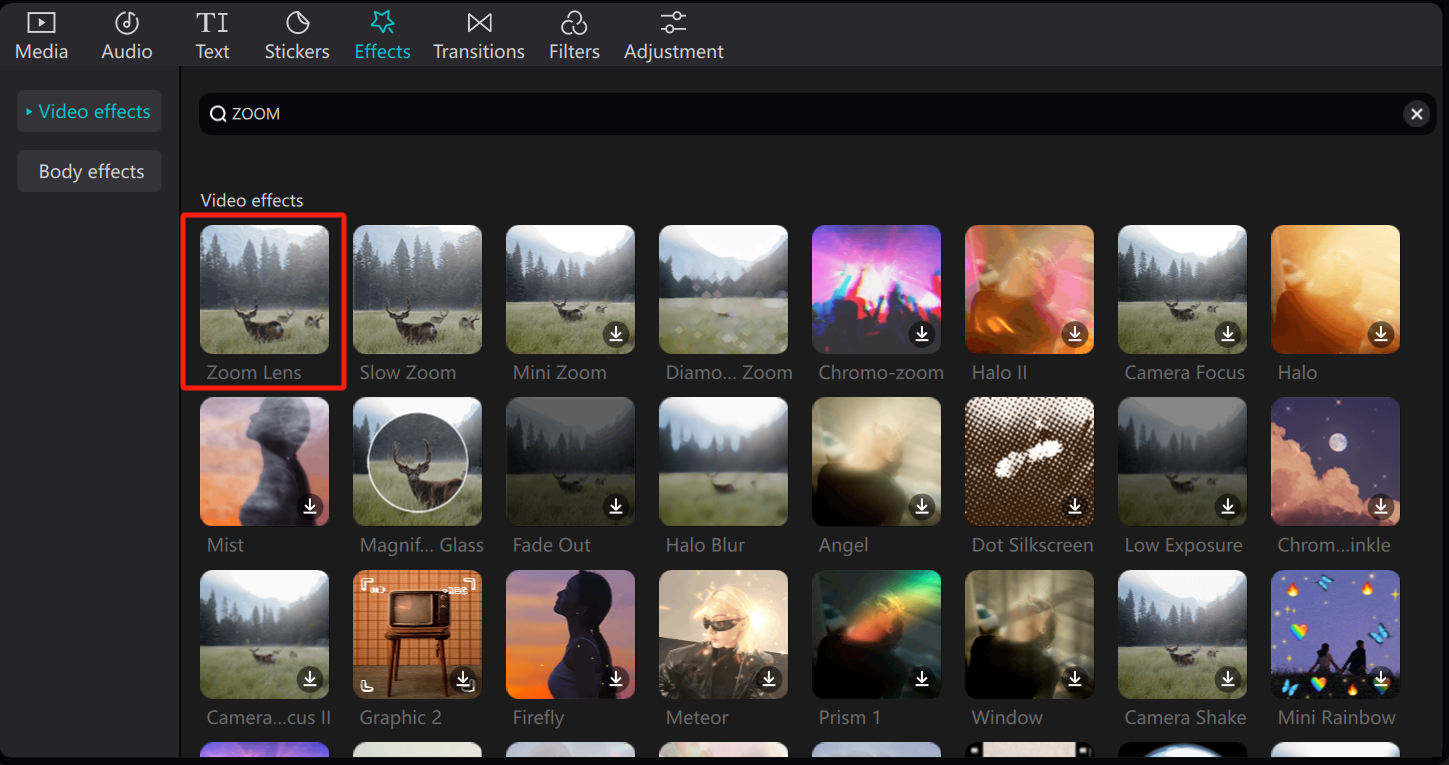
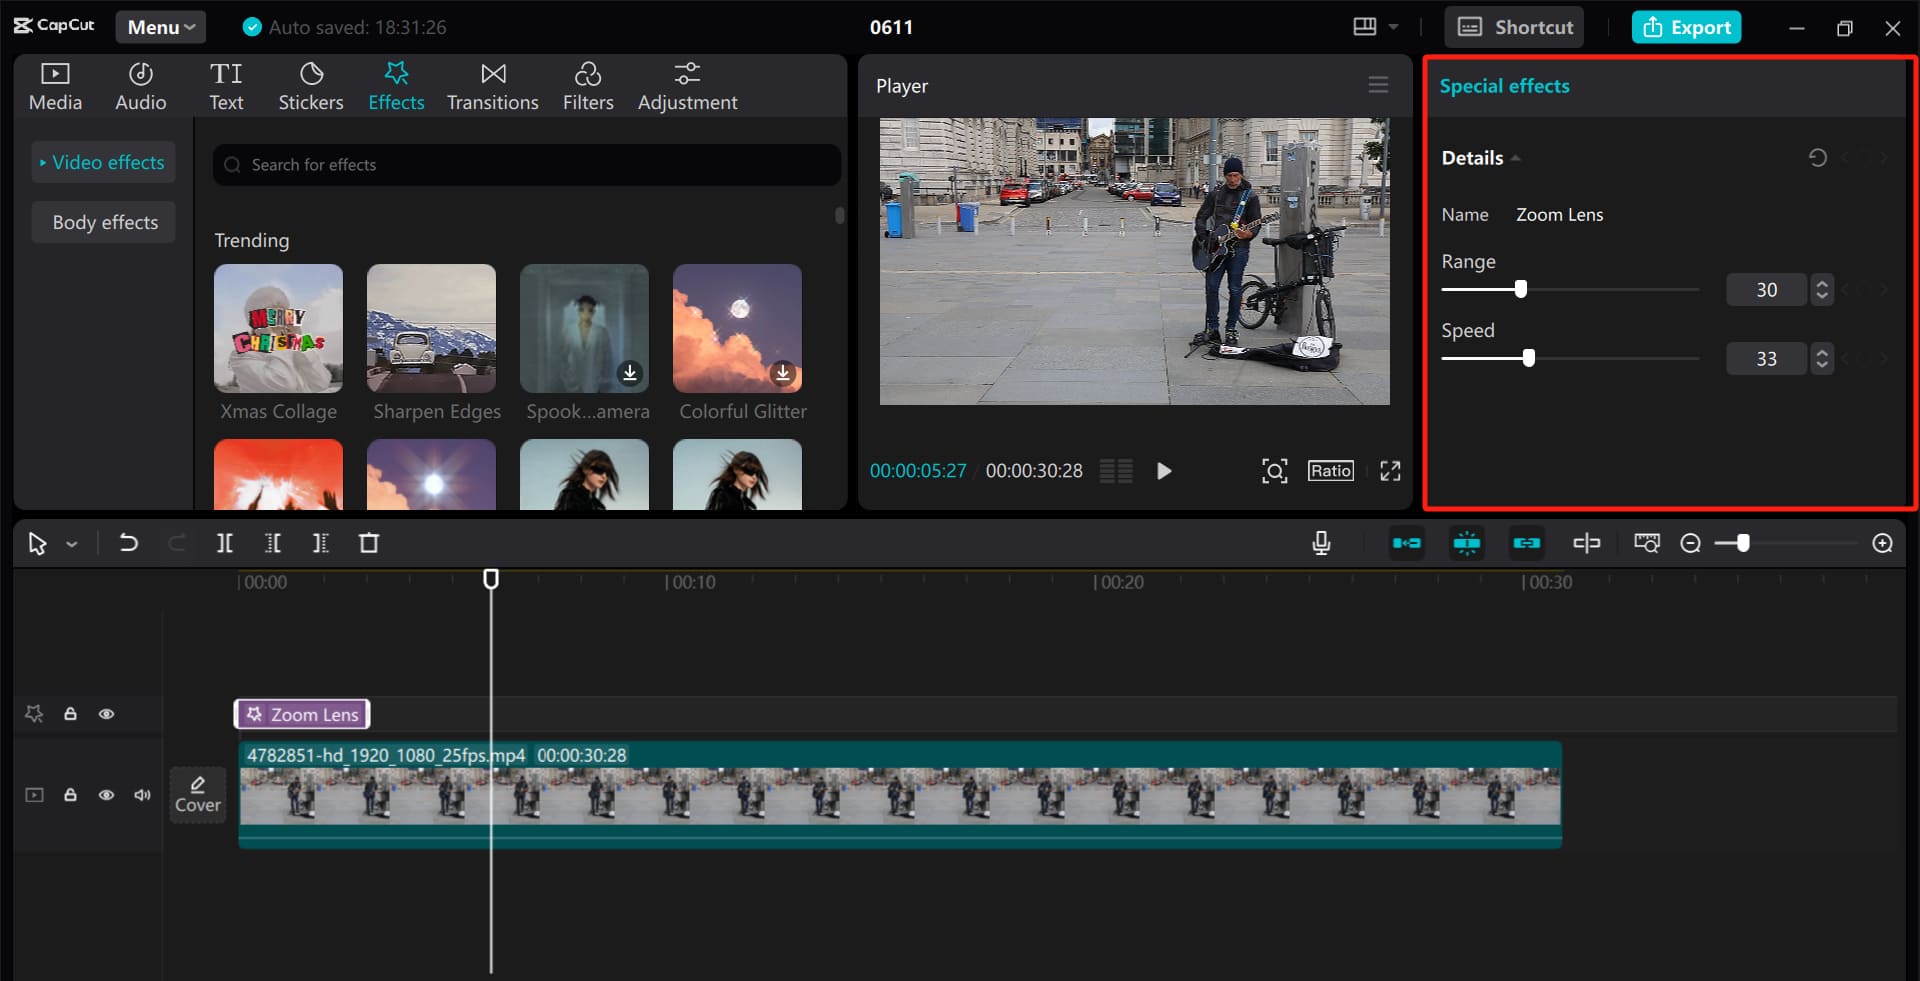
Click the "Add to track" button in the bottom right corner of the Zoom Lens effect, and it will automatically be added above the clip on the timeline.
You can adjust the length of this newly added effect track on the timeline and set the Range and Speed of zoom in the Special Effects settings panel in the top right corner of the screen.
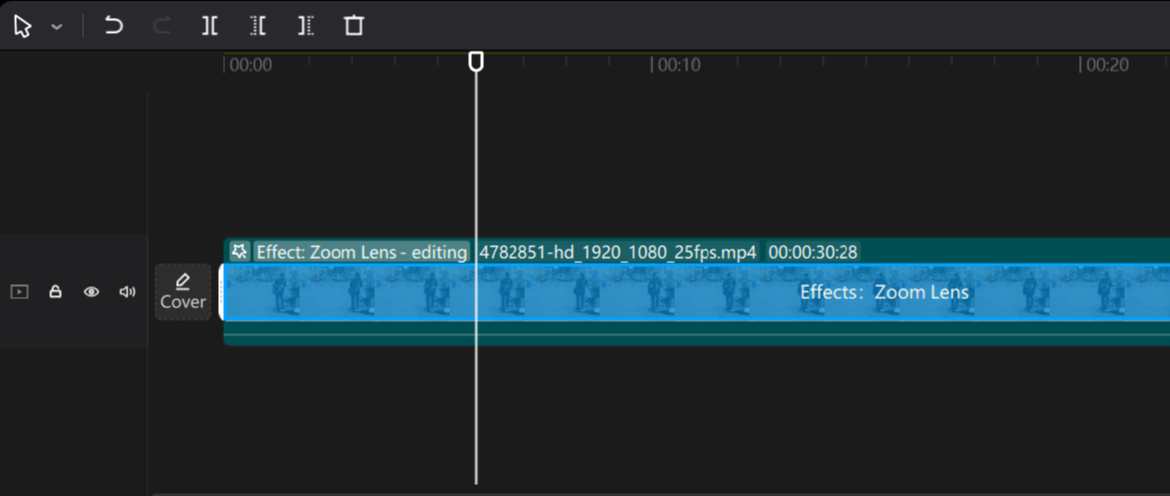
Alternatively, you can simply drag and drop the Zoom Lens effect onto the clip in the timeline, which will transform the clip to look like the image below.
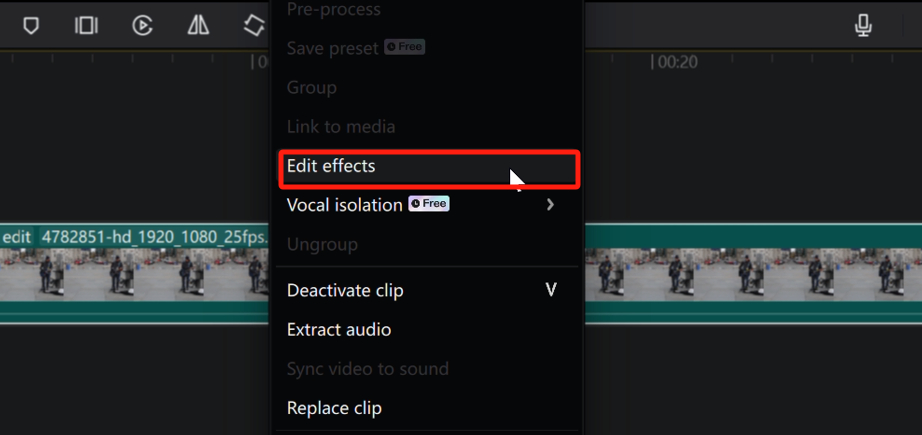
At any time, you can right-click on the clip and choose "Edit effects" to access the effects settings panel for that specific clip.
In addition to the Zoom Lens effect, CapCut offers many other exciting zoom-in effects like Magnifying Glass and Slow Zoom. Give these fun zooming effects a try, and you're sure to enjoy them.
Final Thoughts About Zooming In on CapCut
In summary, CapCut offers three methods to achieve the zoom-in: scaling, keyframes, and the zoom-in effect.
Each method is suitable for different scenarios, and you can choose the one that best suits your needs to achieve the desired editing effect.
Product Recommendation:
If you're interested in TourBox, we recommend starting with our latest product, TourBox Lite. It offers excellent value for money, and you'll surely enjoy its intuitive operation experience.
