How to Zoom In on Photoshop - A Step-by-Step Tutorial
Whether you're a seasoned graphic designer, a skilled photographer, an aspiring artist, or a beginner in the creative field, you know the power of Adobe Photoshop in bringing your creative visions to life.
But to truly unleash the software's potential, you need to master some of its essential skills, such as knowing how to zoom in and out to work on the finer details of your projects.
In this tutorial, we'll show you how to zoom in on Photoshop like a pro! We'll guide you through various methods that you can use to zoom in on your images, making your editing process more efficient and effective.

In this article, you will learn:
How to Zoom in on Photoshop
One of the most fundamental operations in any image editing software is the ability to zoom in and out of your image. Zooming in allows you to get a closer look at the details of your image while zooming out lets you see a broader view of your work.
In Photoshop, there are several ways to zoom in and out, each with its own advantages depending on your needs. Whether you're working on a detailed retouching project or creating a large-scale design, mastering the zooming tools can help you work more efficiently and accurately.
In this section, we'll explore the different methods you can use to zoom in and out of your images in Photoshop. You'll learn how to zoom with ease and precision, taking your Photoshop skills to the next level.
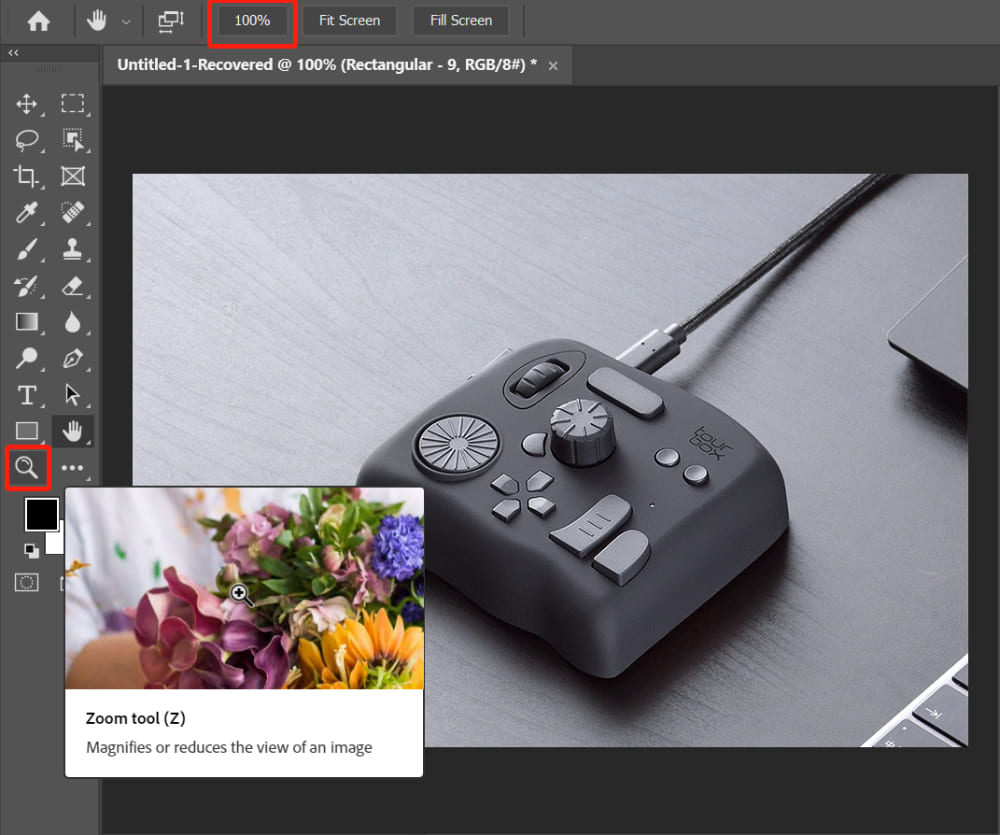
1. Use Zoom Tool in Photoshop
The most straightforward method to zoom in on Photoshop is by using the Zoom Tool. Follow these steps:
- Launch Photoshop and open your desired image.
- Select the Zoom Tool from the toolbar on the left side of the screen. The icon looks like a magnifying glass. Alternatively, press the Z key to activate the Zoom Tool quickly.
- Click on the area of the image you want to zoom in on. Each click will zoom in closer to the image. By default, the zoom increments are set at 100%, 200%, 400%, and so on.
- To zoom out, simply hold the Alt key (Windows) or Option key (Mac) and click on the image.
2. Use Keyboard Shortcuts in Photoshop
Keyboard shortcuts are a quicker and more efficient way to zoom in and out in Photoshop. Here are some commonly used shortcuts:
- Zoom in: "Ctrl" + "+" (Windows) or "Cmd" + "+" (Mac).
- Zoom out: "Ctrl" + "-" (Windows) or "Cmd" + "-" (Mac)
- Fit the image to the screen: "Ctrl" + "0" (Windows) or "Cmd" + "0" (Mac)
- View the image at 100% (actual size): "Ctrl" + "Alt" + "0" (Windows) or "Cmd" + "Option" + "0" (Mac)
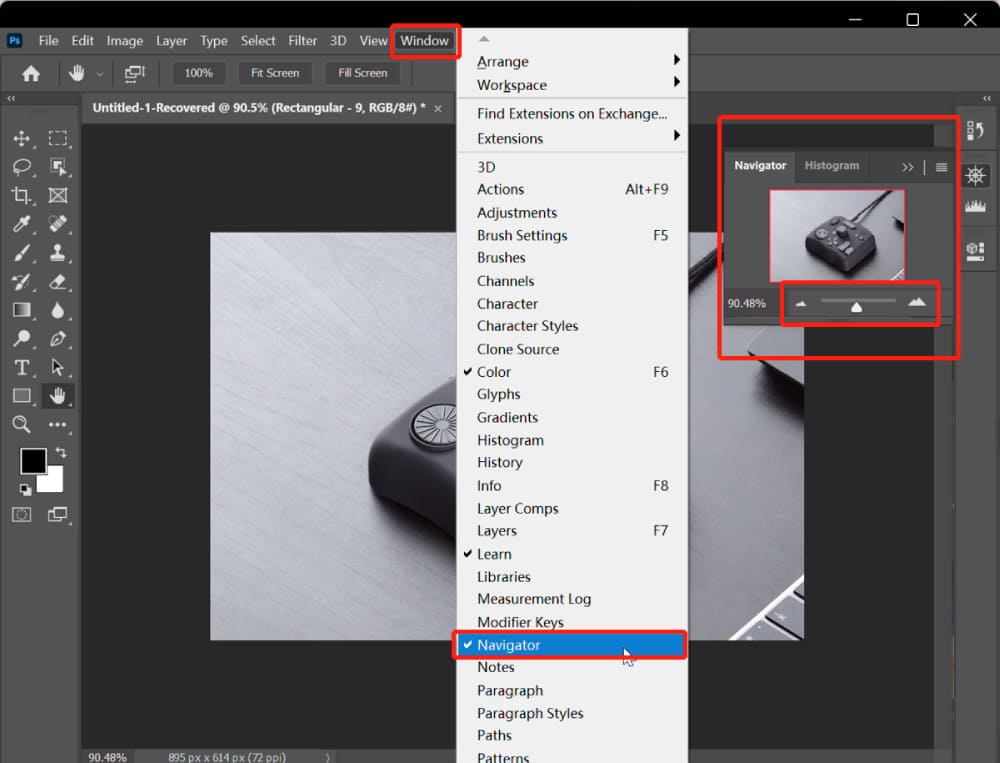
3. Use Navigator Panel in Photoshop
The Navigator Panel is another useful method for zooming and navigating around your image. To use the Navigator Panel, follow these steps:
- Open the Navigator Panel by clicking on Window > Navigator from the top menu.
- Adjust the zoom level by moving the slider at the bottom of the Navigator Panel. Sliding it to the right will zoom in while sliding it to the left will zoom out.
- You can also click and drag the red box inside the Navigator Panel to move around your image while maintaining the current zoom level.
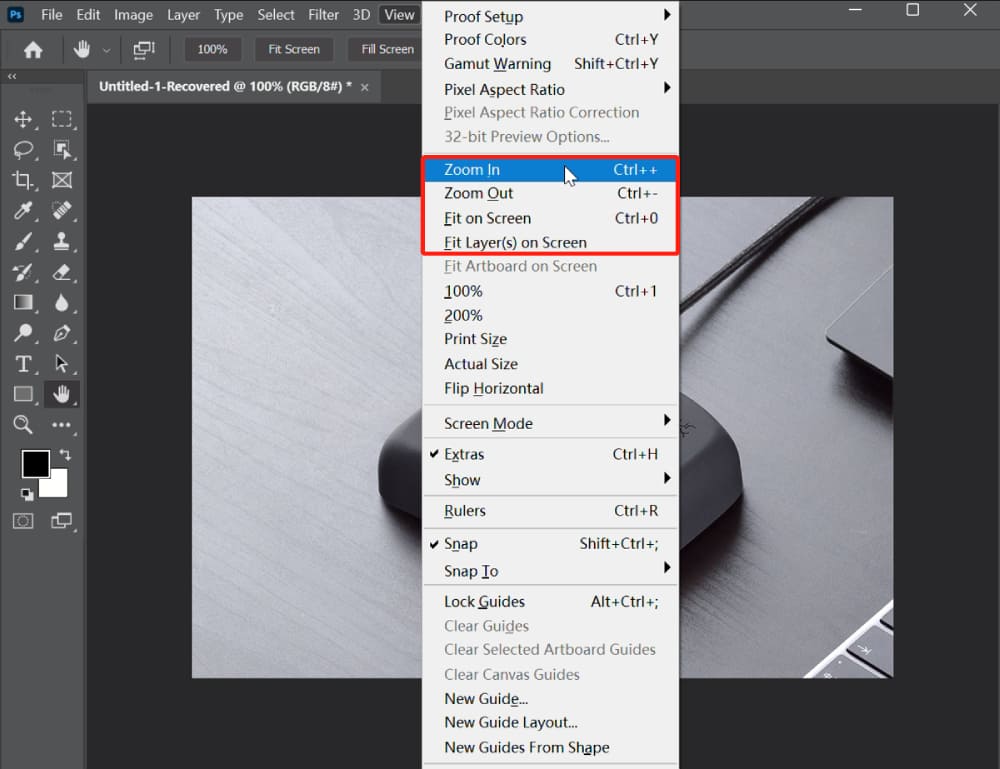
4. Use View Menu in Photoshop
The View Menu provides additional zoom options. Here's how to access and use them:
Click View in the top menu to open the View Menu and use the following options to control the zoom level:
- Zoom In: Increase the zoom level by one step.
- Zoom Out: Decrease the zoom level by one step.
- Fit on Screen: Adjust the zoom level to fit the image within the available screen space.
- Actual Pixels: Display the image at 100% zoom level.
Zoom Preferences and Tips in Photoshop
As a savvy Photoshop user, you already know that zooming in and out of your images is a crucial part of your workflow. But did you know that you can customize your zoom preferences in Photoshop to make your editing process even more efficient and effective?
In this section, we'll show you how to customize your zoom preferences in Photoshop, so you can enhance your workflow and take your image editing to the next level.
- To enable animated zoom for a smoother zoom experience, click on Edit > Preferences > Tools (Windows) or Photoshop > Preferences > Tools (Mac), then check the Animated Zoom box.
- To change the zoom increments, click on Edit > Preferences > General (Windows) or Photoshop > Preferences > General (Mac), then adjust the Zoom Resizes Windows and Zoom with Scroll Wheel options.
Here are some additional tips for using the zoom feature in Photoshop:
- To quickly zoom in or out using the scroll wheel on your mouse, hold down the Ctrl key (Windows) or Cmd key (Mac) while scrolling.
- To zoom in on a specific area, you can use the Zoom Tool to click and drag a rectangle around the area you want to zoom into.
If you're looking for other ways to enhance your zooming experience in Photoshop, you may want to consider using a tool like TourBox.

TourBox is a compact, customizable controller that can help streamline your workflow and make your image editing process more efficient. With TourBox, you can map various zoom functions to its buttons and knobs, allowing you to zoom in and out of your images with greater precision and speed.
You can zoom in with your index finger and rotate with your thumb on the dial to smoothly manipulate images throughout the retouching process.
This can be especially useful when working on high-resolution images or when performing intricate edits that require a lot of zooming in and out.
Congratulations! You now know how to zoom in on Photoshop like a pro! By mastering these essential zooming techniques and tools, you can make your editing process more efficient and effective, and bring your creative visions to life.
Keep practicing and exploring new ways to use the zoom feature in Photoshop, and you'll be amazed at the results you can achieve. Happy editing!