Lightroom Point Color: How to Precisely Adjust Colors on an Image?
The latest versions of Adobe Lightroom Classic 13 and Adobe Camera Raw 16 introduced a new feature called Point Color. This handy addition allows for precise and convenient color adjustments on your images.
So, how to make the most of this Point Color feature? In this tutorial, we'll use the Point Color tool in Lightroom Classic as an example to quickly familiarize you with this interesting new feature. Without further ado, let's get started.

In this article, you will learn:
- How to Find Point Color?
- How to Use Lightroom Point Color?
- Frequently Asked Questions About Lightroom Point Color
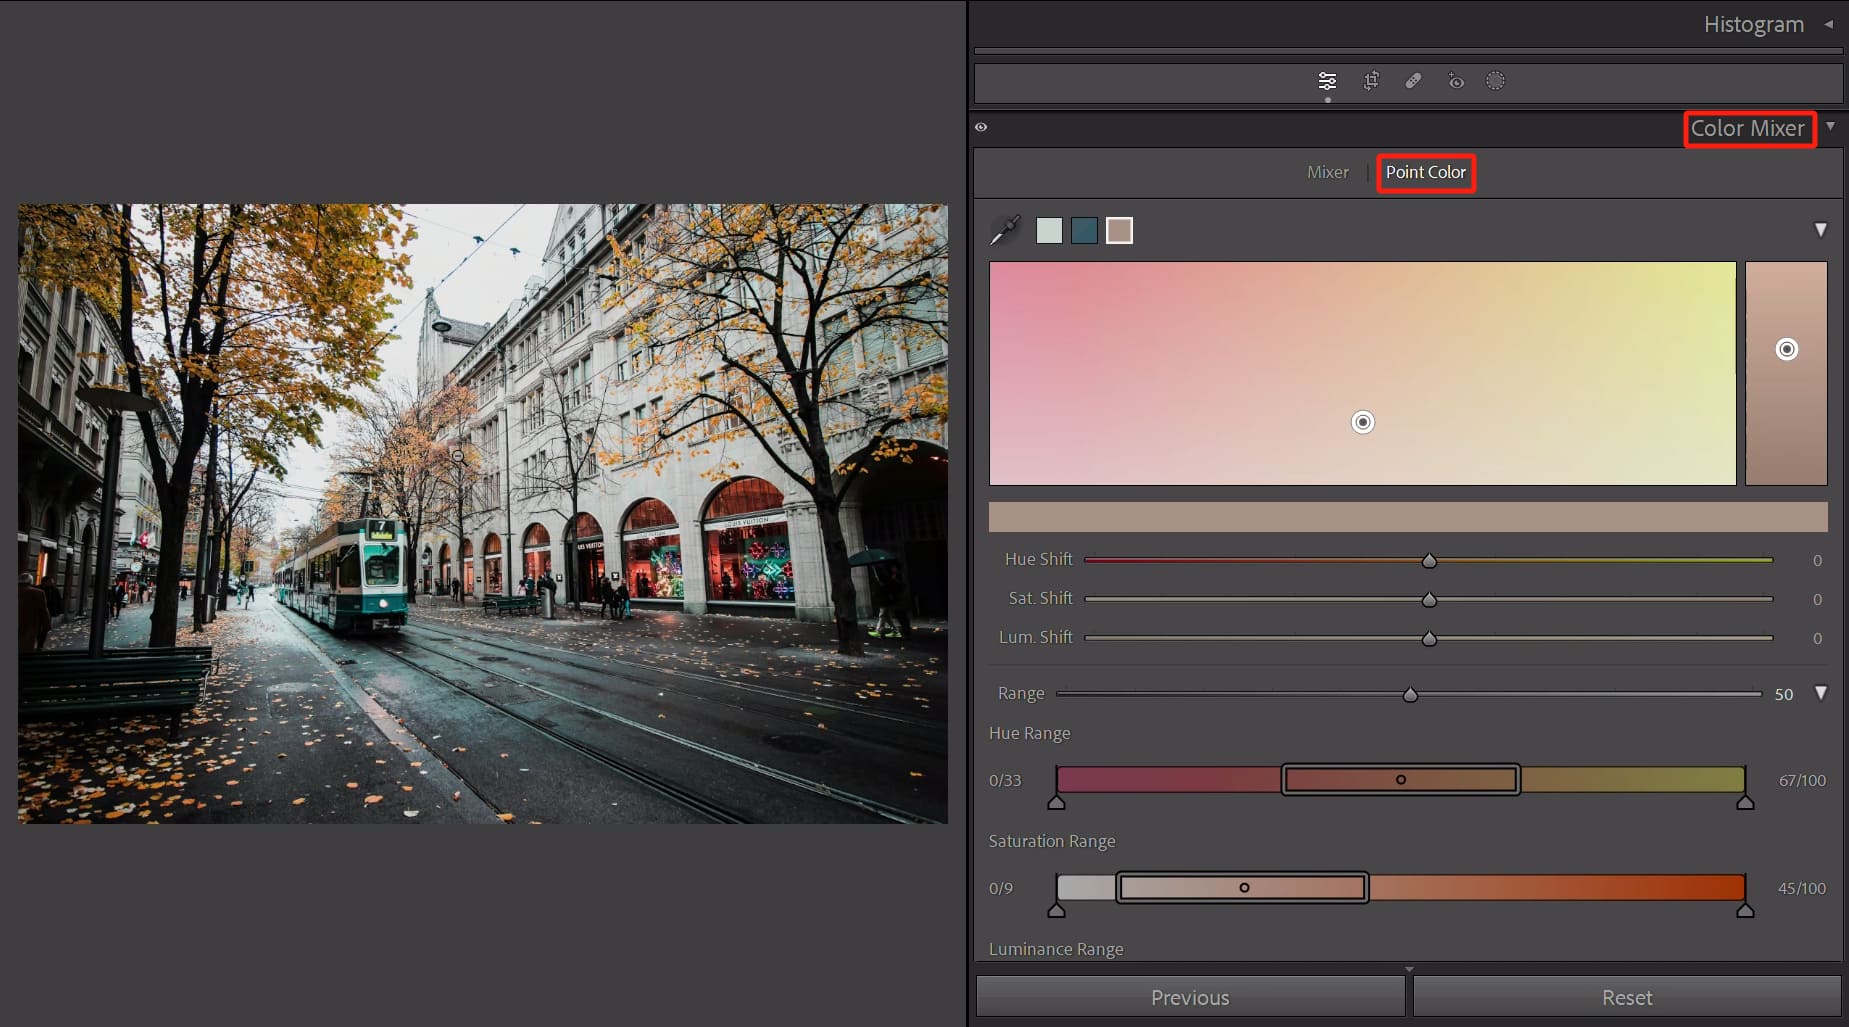
How to Find Point Color?
You can easily find the Color Mixer panel in the Develop module of Lightroom Classic and the Camera Raw filter in Photoshop. Above the Color Mixer panel, you can switch to the Point Color tab effortlessly.
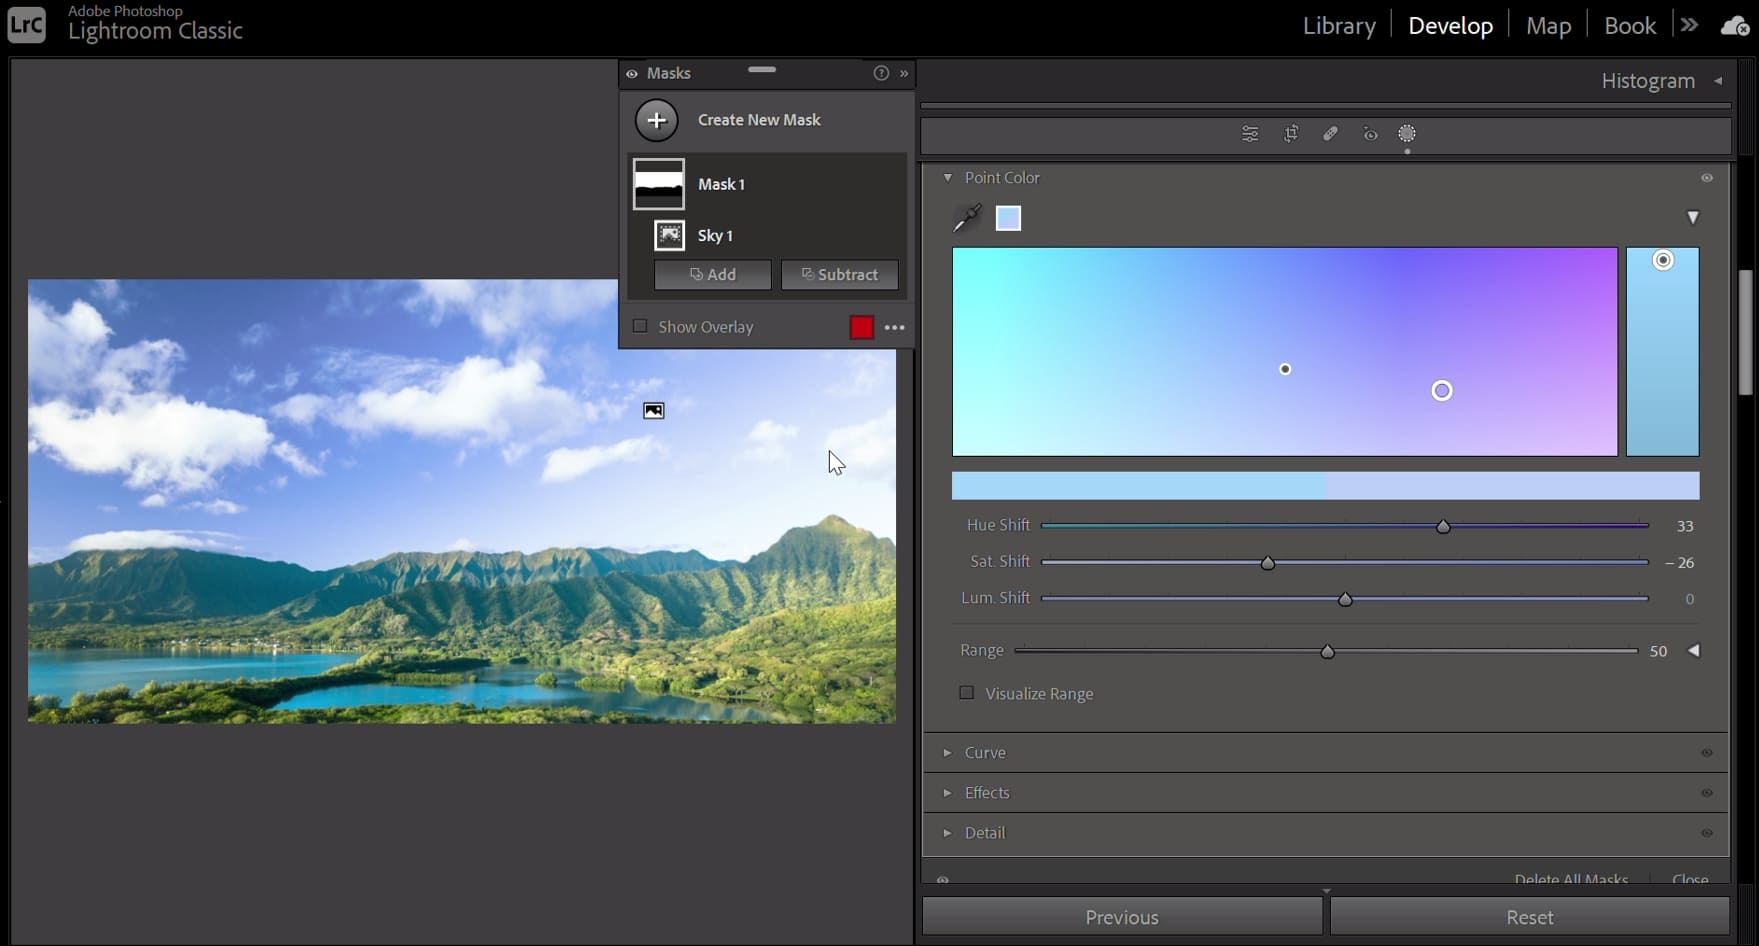
In addition to finding Point Color directly in the Color Mixer panel, the masking feature in Lightroom Classic and Photoshop Camera Raw filters also integrates the "Point Color" functionality, making localized color adjustments incredibly convenient.
For instance, if you want to remove any unnatural color, such as green, from a person's skin, you can simply create a mask specifically for the skin area and then use the "Point Color" feature to address and adjust the green color.
Similarly, if you want to add a mask to the sky area of a photo, using Point Color allows you to change the blue color in the sky without affecting the blue color in other areas of the image. It's similar to the example shown in the image below.
How to Use Lightroom Point Color?
The Point Color panel is divided into three sections: the Sample Spot Color tool and color swatches, the target color adjustments, and the selected color range adjustments. Let's take a closer look at each of them.
1. Sample Spot Color Tool and Color Swatches
You can use the Sample Spot Color tool to select colors from your image, which will create a color swatch of your chosen color right beside it. Once you've done that, you can proceed with setting the target color and adjusting the selected color range.
Extra Tip:
You can create and store up to eight color swatches using the Sample Spot Color tool. If you want to delete a swatch, simply right-click on the swatch and choose "Delete Swatch" or "Delete All Swatches" based on your needs.

2. Target Color Adjustments
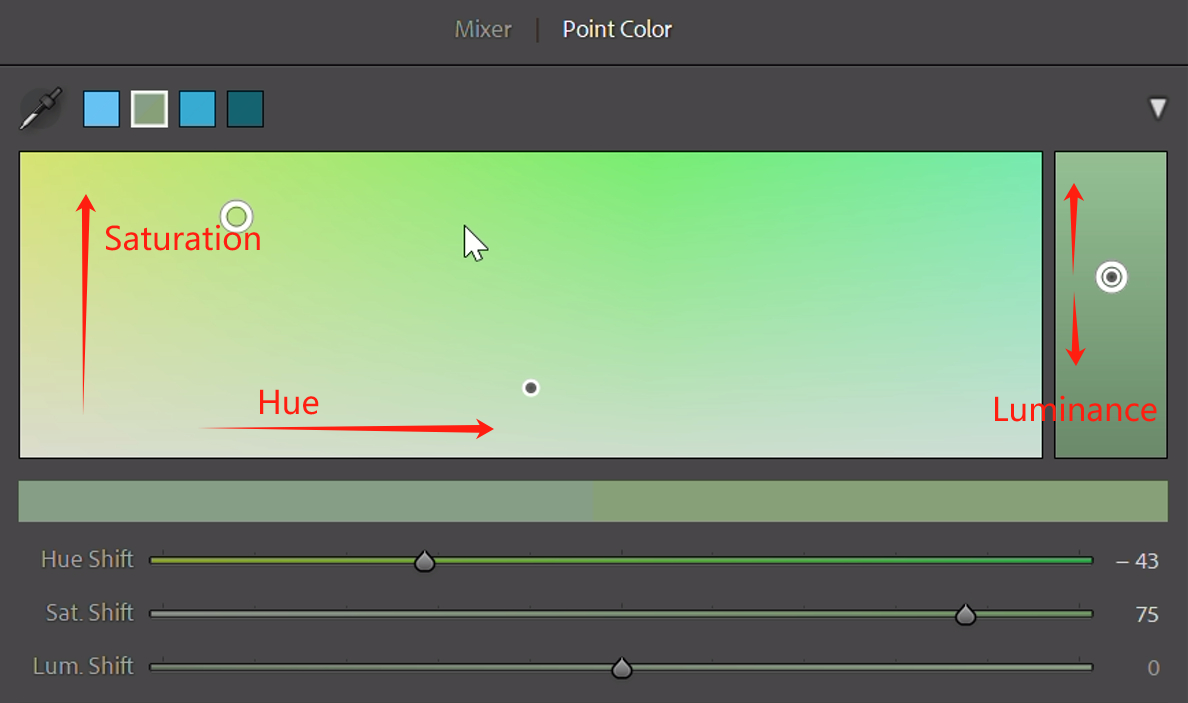
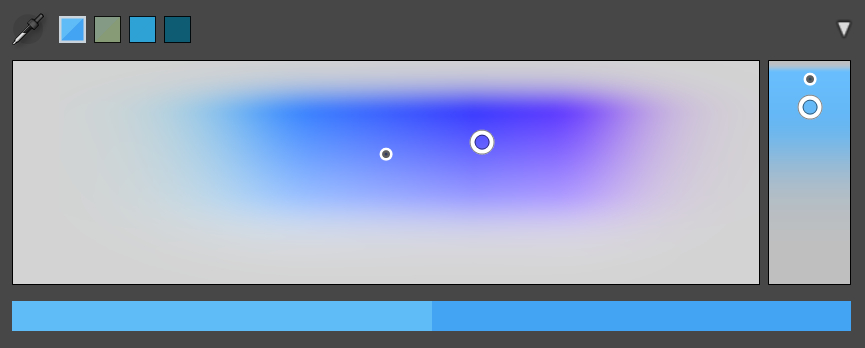
The next section of Point Color is the color range area where you can set the target color. You can directly adjust the hue and saturation of the target color in the color range panel and adjust the luminance of the target color in the luminance panel.
In the color range panel, the small white circle represents the selected color, while the larger white circle represents the target color.
As shown in the image below, you can horizontally move the large white circle in the color range panel to adjust the hue and vertically move it to adjust the saturation. In the adjacent luminance panel, you can adjust the luminance of the target color by moving the large white circle up or down.
Extra Tip:
While dragging the large white circle, holding down the Ctrl key will only adjust the hue (horizontal movement), while holding down the Shift key will only adjust the saturation (vertical movement).
You can also use the Hue Shift, Sat. Shift, and Lum. Shift sliders below to adjust the target color of the Point Color. Whether you prefer using the color range panel or the sliders for adjustments depends on your preference and workflow.
3. Selected Color Range Adjustments
In the final section of the Point Color panel, you can further fine-tune the range of the selected color (not the target color).
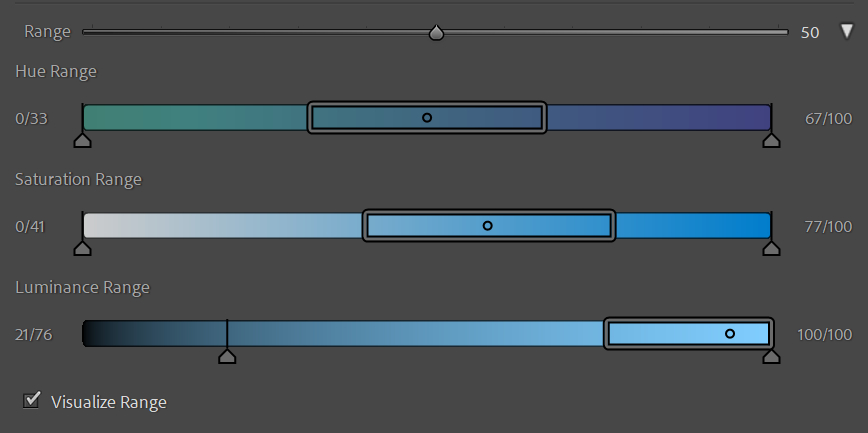
To begin, you can check the "Visualize Range" option at the bottom. This allows you to see the areas of the image affected by your current color selection, while the unaffected areas appear as desaturated (black and white), as shown in the image below.
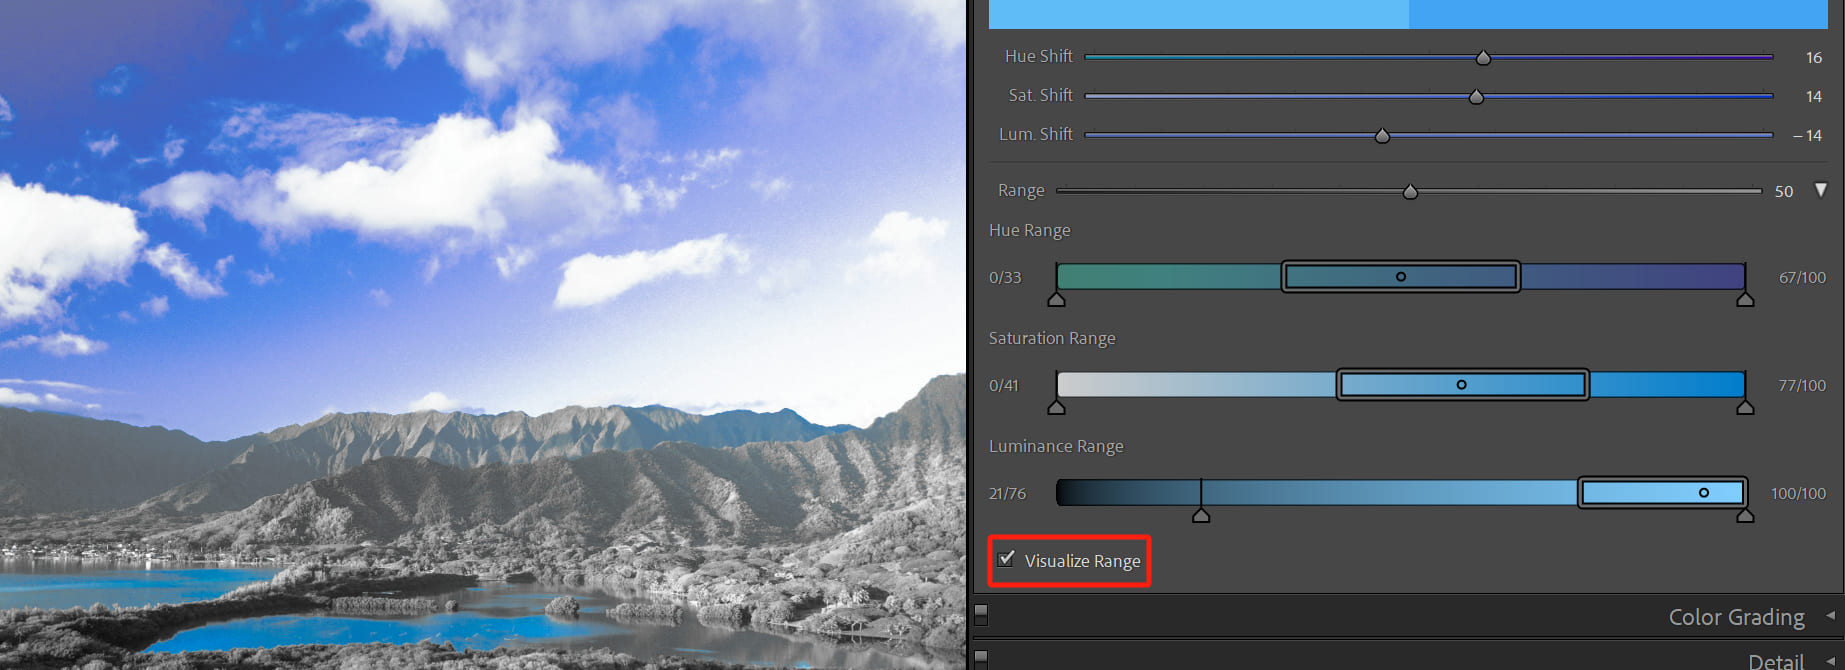
You can use the Range slider to expand or narrow the overall range of the selected color. Additionally, you can individually control the range of hue, saturation, and luminance using the Hue Range, Saturation Range, and Luminance Range sliders below.
In addition to dragging the sliders, you can also adjust the range and tolerance (falloff) by manipulating the "Lower falloff" and "Upper falloff" at the ends of the slider.
Extra Tip:
A helpful tip here is to observe the changes in the range preview in the color range panel to make adjustments. This can assist you in judging the desired range of modifications.
Frequently Asked Questions About Lightroom Point Color
Question: What Is the Point Color Tool Used for?
The Point Color tool is primarily used to select specific colors in an image and adjust them. You can use it to change the brightness, saturation, and other properties of specific colors in the image.
Question: Can I Adjust Multiple Colors Simultaneously?
Yes, you can use the Point Color tool to select and adjust multiple colors in an image. Each time you select a new color, the previous color adjustments will not be overwritten.
Question: Does Using the Point Color Tool Affect the Image Quality?
Generally, using the Point Color tool does not degrade the quality of the image. However, extreme adjustments to colors may result in color distortion.
Product Recommendation:
If you're looking to simplify every step of photo editing, you might want to check out TourBox, a creative tool that can streamline your workflow.

If you're a photographer or photography enthusiast who frequently uses Lightroom Classic or Photoshop, you're probably curious about how TourBox simplifies every aspect of photo post-processing.
With easy customization, you can manage photos, adjust colors, and edit in batches using just one hand. Say goodbye to complicated keyboard shortcuts and mouse clicks. By using fewer command actions on TourBox, you'll greatly enhance your efficiency.
The ergonomic design of TourBox makes it feel like an extension of your hand while using it. If you're interested in TourBox, take a look at our latest and cost-effective TourBox Lite, which is perfect for first-time users of TourBox.

That concludes our article about the Lightroom Point Color tool. We believe you'll enjoy this interesting new feature.