A Guide to Understanding LOG Footage
Have you ever seen footage that looks flat and washed-out, but becomes stunning after color grading? The secret behind it is LOG footage. Read on to learn what LOG footage is.

In this article, you will learn:
- What Is LOG Video?
- Benefits of using LOG
- Why Convert LOG to Rec. 709 in Color Grading?
- LOG Shooting and Post Workflow
- Conclusion
What Is LOG Video?
A camera turns light into electrons and then into digital signals. In theory, a camera sensor can capture a huge amount of data. For example, one uncompressed RAW photo can be about 50 MB.
To make files easier to store and move, the camera drops some of that data — the result is the JPG files we know. After the data is dropped, the picture still looks fine to watch, but it gets harder to change in post.
So for photos, pick RAW if you want the original data. Pick JPG if you want a ready-to-use file. For video, keeping the original means saving thousands of RAW frames. That needs a lot of processing power and storage.
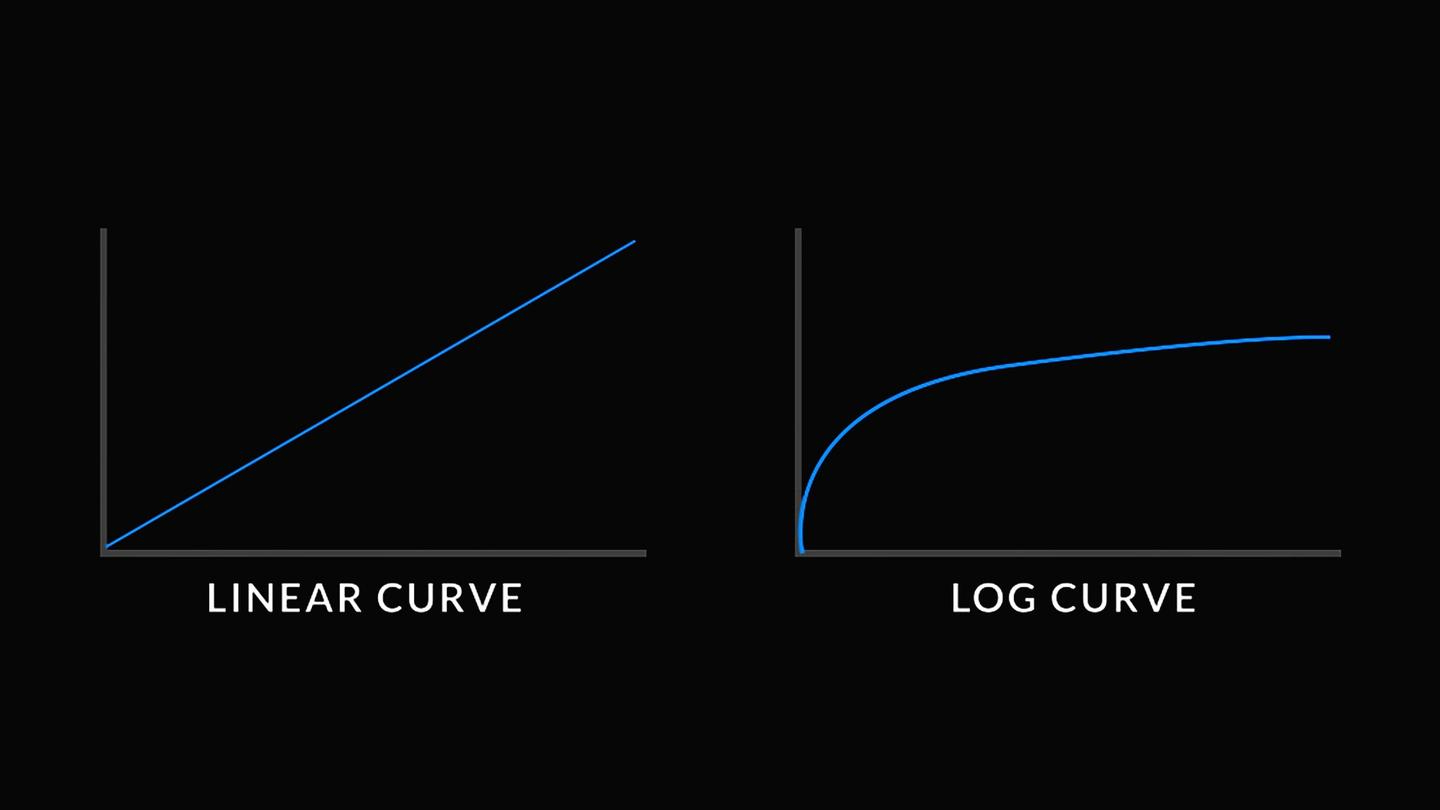
LOG (Logarithmic Gamma Curve) video sits between RAW and standard video. LOG uses a special gamma curve to record the image. The footage looks gray, low-contrast, and low-saturation, but it actually saves more image information. For example, Sony's S-Log, Canon's C-Log, FUJIFILM's F-Log, and Nikon's N-Log.
Unlike RAW, LOG files are already processed by the camera and do not keep the raw sensor data. Compared with standard video, LOG keeps more highlight and shadow detail for color correction and grading.
LOG strikes a balance between image quality and file size. It saves more detail and is easier to store and edit than RAW, giving you more flexibility in post and results that can come close to RAW while using smaller files.
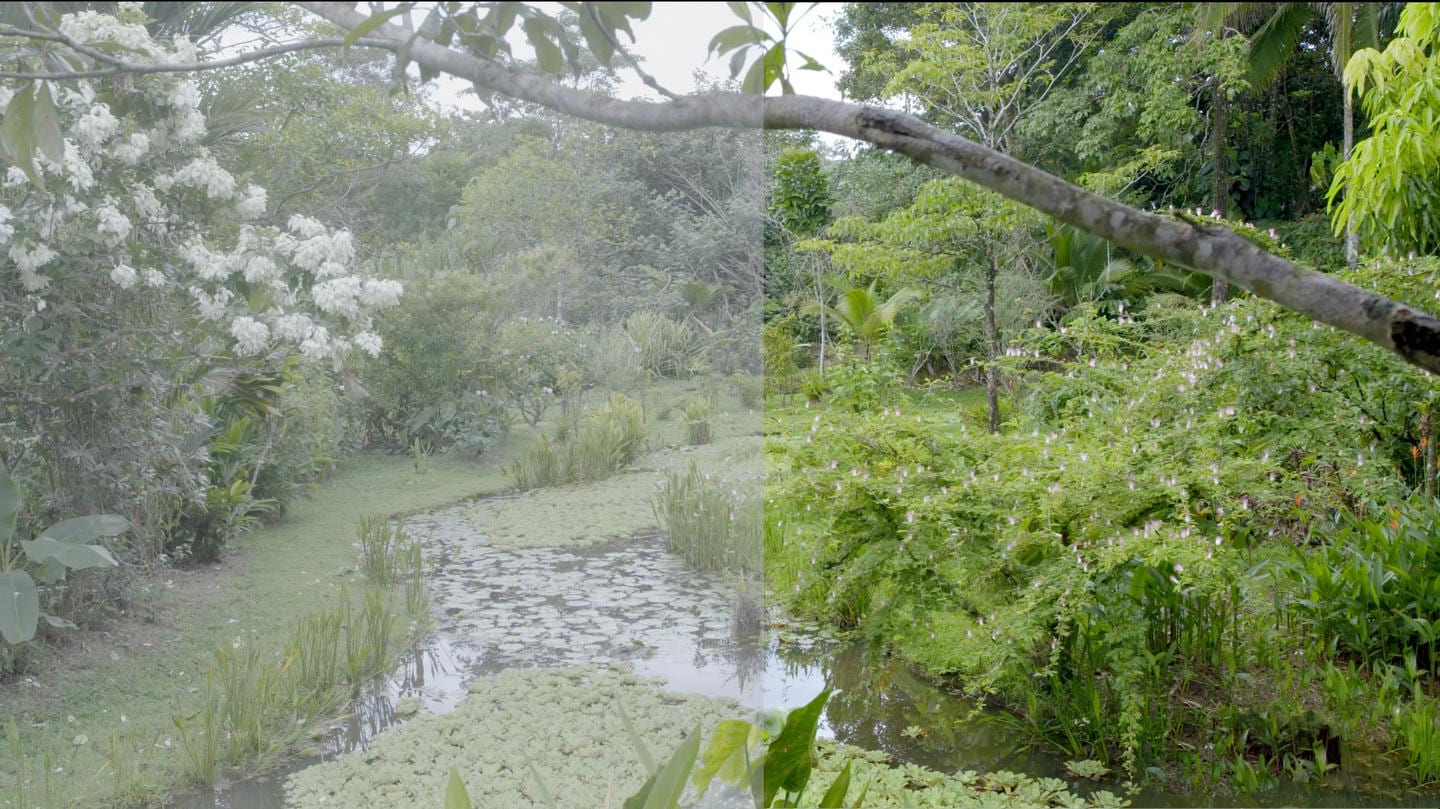
You can clearly see the difference between LOG and Rec.709 in the photo below. The left side is LOG, and the right side is Rec.709.
Also, don't confuse color-encoding formats with compression codecs. Use this simple breakdown to tell them apart:
- Container / video file format (determines playback compatibility): MP4, MOV, MXF, AVI
- Codec / compression format (determines compression quality): H.264, H.265, ProRes, DNxHR
- Color encoding / how color is recorded (determines the color space for grading): Rec.709, LOG, RAW
Benefits of Using LOG
So why use LOG?
- Wider dynamic range: LOG keeps more highlight and shadow detail. In high-contrast scenes (like bright sun or strong backlight), you're less likely to get blown-out whites or crushed blacks. In post, you can often recover detail from overexposed or underexposed areas.
- More room for color grading: LOG footage looks neutral and doesn't have a built-in style. In post, you can craft a cinematic look, cool or warm tones, vintage styles, and more. Color changes look more natural and are less likely to cause banding or other artifacts. That makes LOG ideal for commercials, films, and high-end short videos.
- Higher tolerance for exposure mistakes: If you slightly over- or under-expose while shooting, LOG gives you a better chance to fix it later. Standard video can be hard or impossible to recover once highlights are blown. LOG is friendlier for beginners and for risky shooting situations.
- Easier to match multiple cameras: If several cameras all shoot LOG, you can use the same grading steps or a single LUT to make the footage match. That avoids color mismatches and makes collaboration and editing smoother. It's great for documentaries, multi-camera livestreams, corporate videos, and similar projects.
Of course, LOG footage isn't without drawbacks. First, LOG has low contrast and flat color. You must do color correction and color grading in post to restore a normal-looking image. Also, many cameras use a higher base ISO in LOG modes, so noise can be more noticeable when shooting LOG.
Even though LOG looks flat, you still need to get white balance right on set. If white balance is off, fixing it later can be a pain—LOG does not auto-correct color temperature. In short, LOG is a trade-off: it gives you more flexibility in post, but it requires more careful shooting and color work.
Why Convert LOG to Rec. 709 in Color Grading?
When we grade LOG footage, you'll often hear people say "restore to Rec. 709." So what is Rec. 709?
Put simply, it's a color standard that helps different screens show the same colors. TVs, phones, and projectors all have different color ranges. A common standard makes sure the colors look close on most devices.
Rec. 709 (also called BT.709 or ITU-R BT.709) is the broadcast color standard used widely in TV and film. It's meant for images that are ready to view on a normal screen. ITU-R is the body behind the BT.709 name.
Rec. 709 defines the key color and image settings for HD (and UHD) video. That lets creators be confident that colors and images will stay consistent from editing, to delivery, to final playback.
LOG Shooting and Post Workflow
1. On-Set Shooting Tips
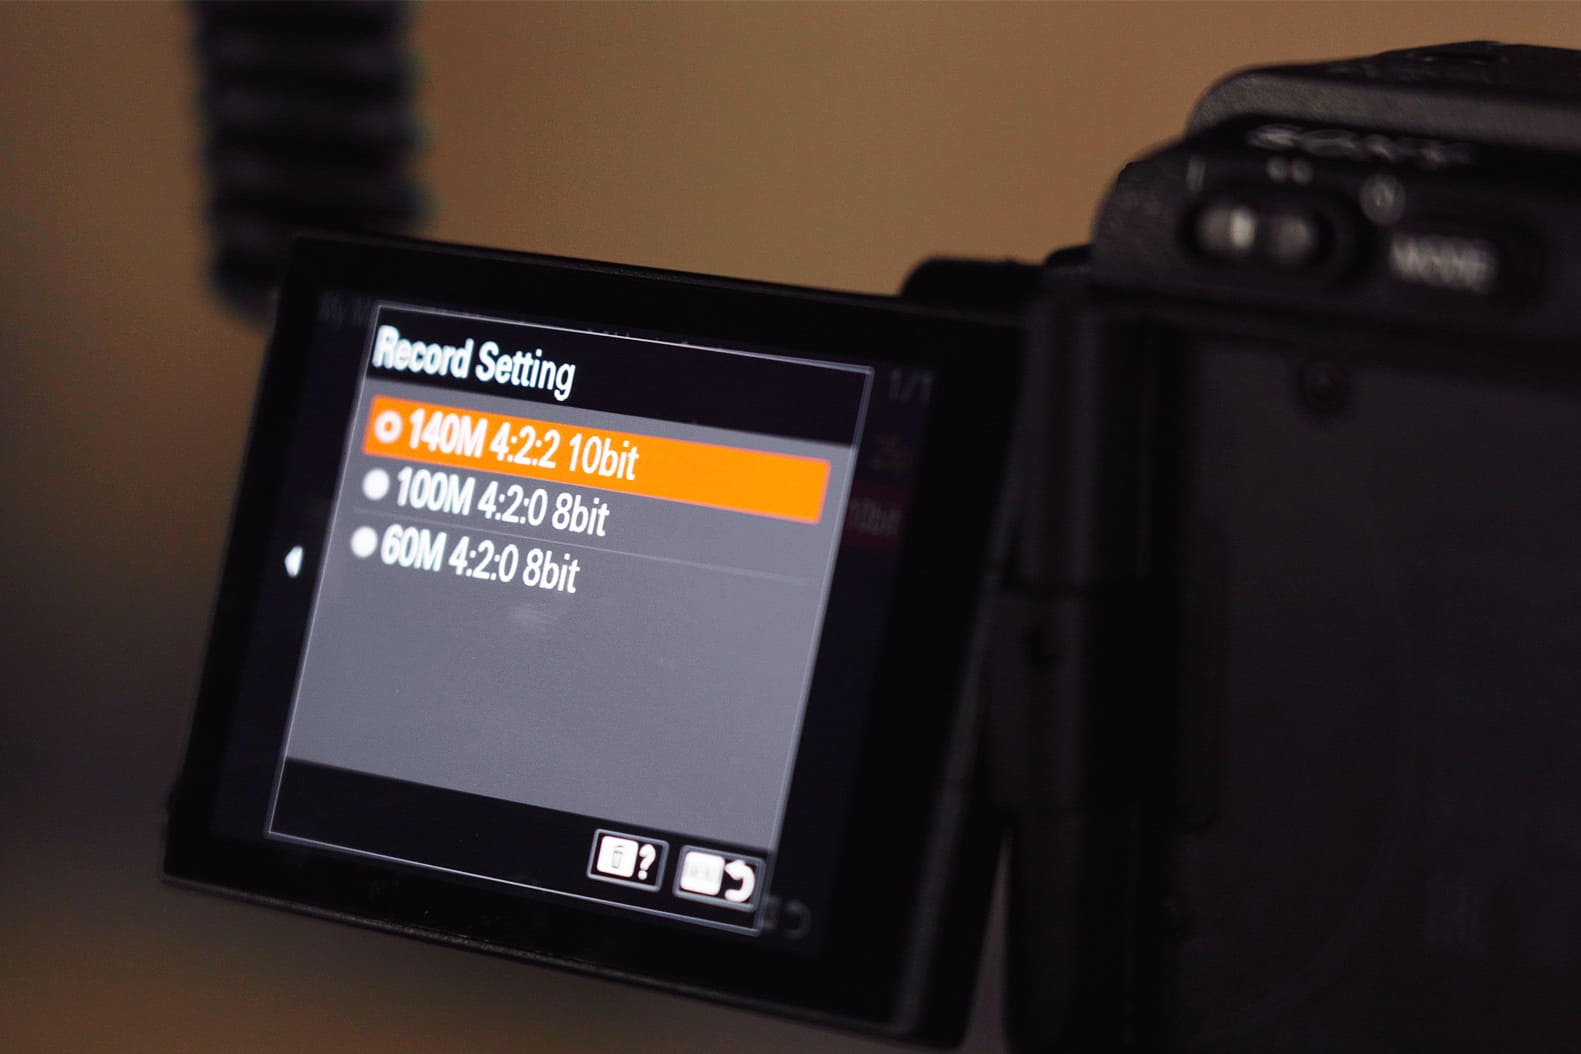
(1) Try to Use 10-Bit Recording When You Can
This helps avoid banding and color break-up in grading. If you shoot LOG in 8-bit, color problems are more likely in post. Most consumer DSLRs and mirrorless cameras only record 8-bit internally. Professional recorders usually support 10-bit. For example, Sony's A7 III and A7R III don't record 10-bit internally, but the A7S III does.
(2) Slightly Expose to the Right (ETTR)
Many LOG workflows use ETTR. That means a little overexposure to protect shadow detail. About +1 to +1.5 EV is a common safe range. Always check the waveform — don't rely only on what you see with your eyes.
(3) Don't Underexpose in Very Contrasty Light
LOG looks flat. If the shadows are too dark on set, you may not be able to recover them later. LOG isn't magic — very dark areas can still be lost.
(4) Use a LUT or an External Monitor for Preview
LOG footage looks gray to the eye. That makes it hard to judge exposure, skin tone, and composition. Use a technical or viewing LUT on your monitor so you can see a preview of the final look. Many cameras and devices (for example, DJI) let you load a monitor/LUT in camera.
(5) Set White Balance on Set
LOG is not RAW. You can tweak white balance in post, but the range is limited. Use manual white balance instead of auto WB when possible.
(6) Keep ISO in the Recommended Range
Each LOG curve has a suggested base ISO (for example, S-Log3 often lists ISO 800 or 640 as a starting point). Too low an ISO can cut dynamic range. Too high an ISO increases noise. Most cameras will limit LOG modes to ISO values at or above the recommended base.
2. Post Workflow
Here, we use DaVinci Resolve as an example for handling LOG footage.
(1) Import the Footage
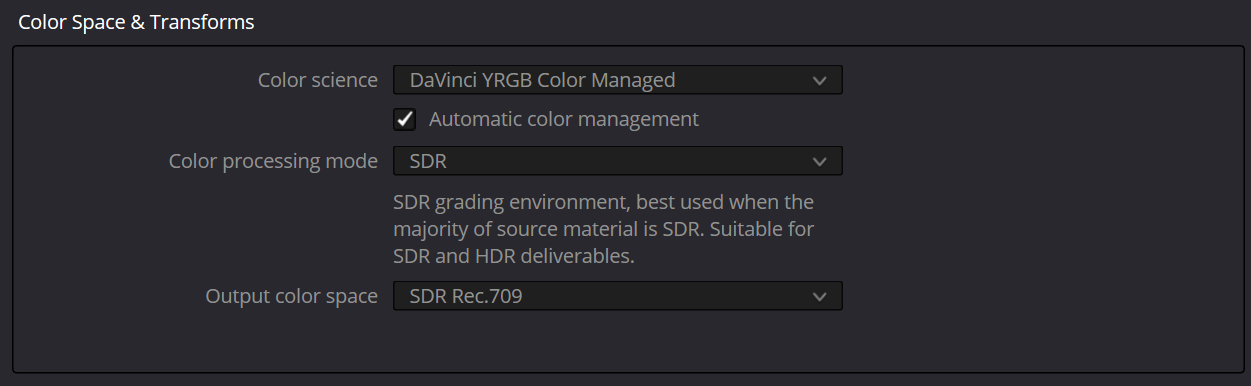
Create a project in Resolve and set the project color space. If you want Resolve to manage color transforms and make delivery easier, pick DaVinci YRGB Color Managed. If you want full manual control, pick DaVinci YRGB. If you follow the industry ACES workflow, pick ACESCCT / ACES (ACES is an industry color-management standard). Then import your LOG clips.
(2) Apply a LUT
To get a standard color baseline fast, apply a technical LUT to the LOG clips. Camera makers often provide official LUTs (for example, Sony SLog3 to Rec.709). You can also use a generic conversion LUT. A LUT turns LOG into an image that looks closer to normal contrast and color in Rec.709.
(3) Basic Color Correction
After the LUT, do basic fixes: adjust exposure, contrast, and white balance so the image looks natural (check skin tones and a white card). This step is color correction. The goal is to remove the flat look LOG gives and make the color balanced.
(4) Creative Grading
Once the clip is corrected, do creative grading: increase saturation or contrast, add a film emulation, or use custom curves to build the final look. LOG's wide dynamic range gives you more room to push shadows and highlights and shift colors without obvious banding or break-up.
Conclusion
LOG video gives you a lot of room for creative work in post. But it also asks more from both the shooter and the editor. If you are a beginner, you do not need to learn the math behind a LOG gamma curve.
To use LOG well, do two things: control exposure and white balance carefully on set, and learn to use LUTs and basic color correction in post. Practice on real projects and you will get better at using LOG.
We also want to recommend a post-production tool, TourBox. In any creative software that supports keyboard shortcuts, you can use TourBox to speed up your work and make editing easier.

You can map your favorite shortcuts to TourBox's physical buttons and dials. You can also use its built-in features and macros to simplify many editing steps. With TourBox, your hands feel more connected to the work. Its haptic feedback even lets you sense your project's "heartbeat."

If you are interested in TourBox, click our link to learn more.