Low Angle Shot: A Practical Guide to Shooting & Editing
Most of the time, we look at things from standing eye level and rarely crouch down to see them from below. In photography, though, shooting from a low angle can create different visual effects and give you more ideas for shots.
In this article, we share tips on low-angle shots. We hope this simple guide helps you.

In this article, you will learn:
- What Is a Low-Angle Shot?
- Low Angle Shooting Tips
- Post-Processing Workflow for Low Angle Shots
- Common Mistakes and Fixes (Quick Checklist)
- Conclusion
What Is a Low-Angle Shot?
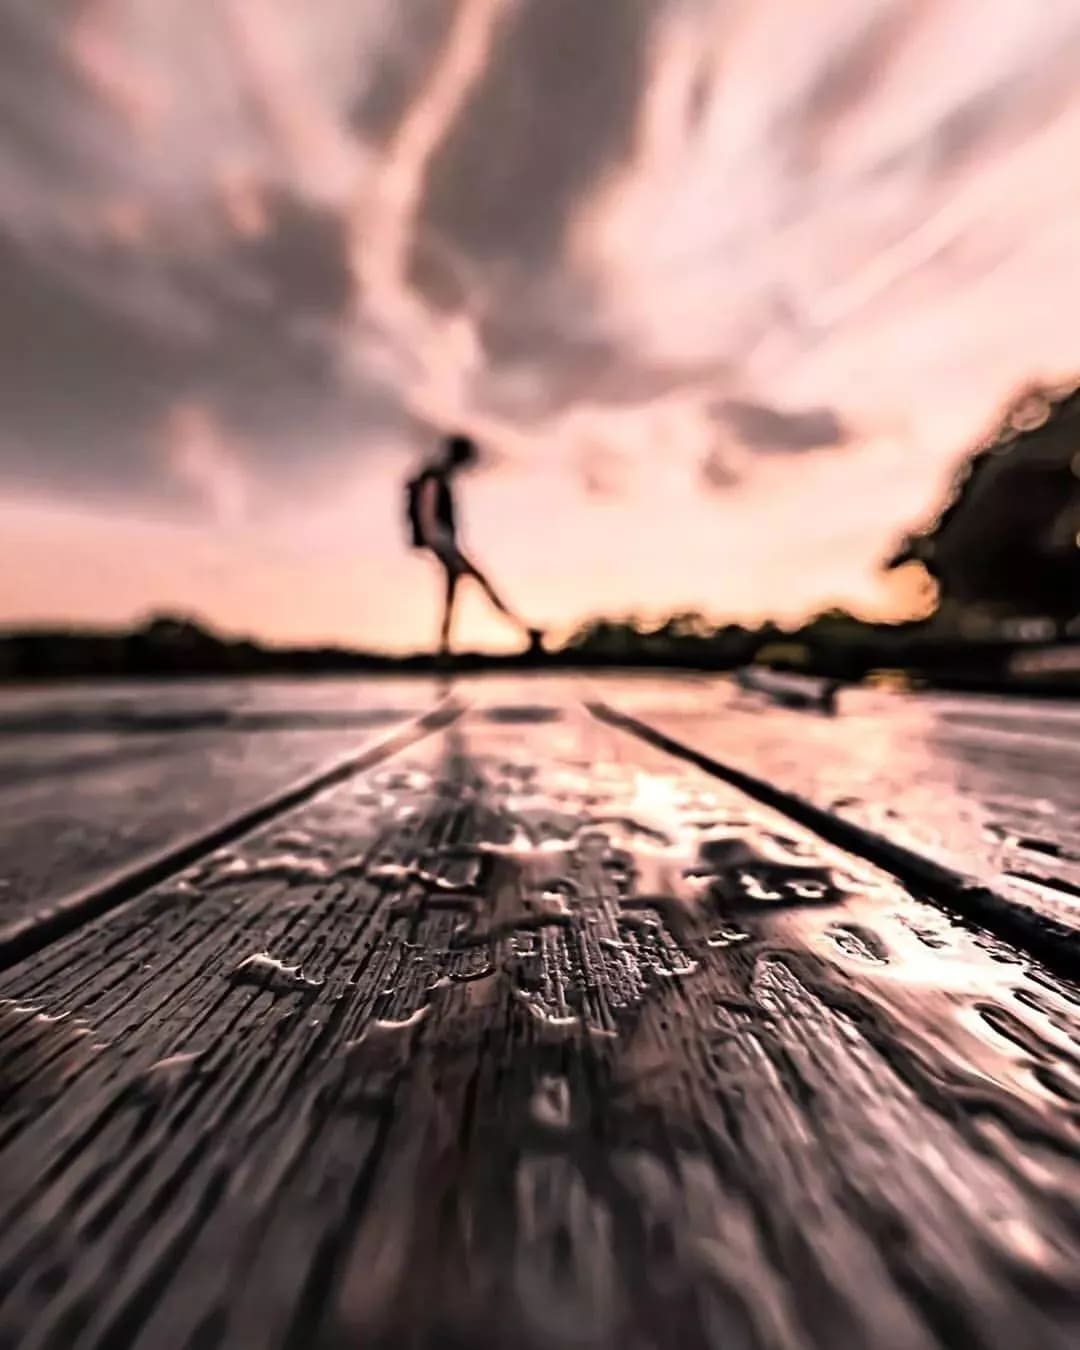
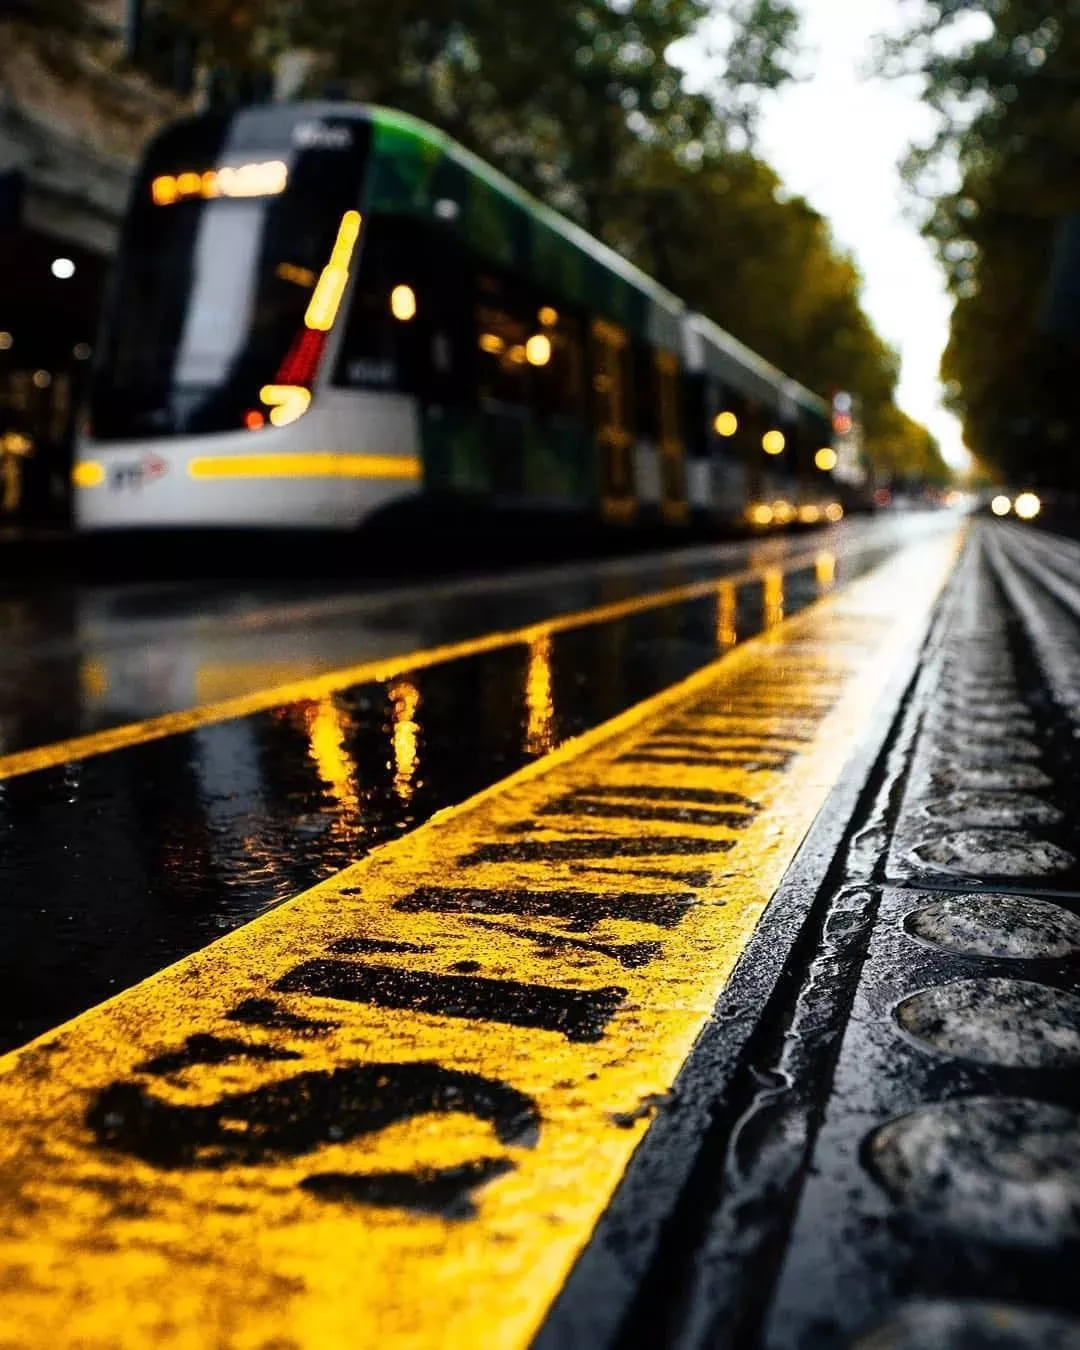
A low-angle shot means placing the camera lower than the subject, often near the horizon or right on the ground, and shooting upward to capture the scene.
Putting the lens low causes two clear effects: it makes the foreground look bigger and it stretches depth. Near objects appear larger, and distant objects look farther away.
This view pulls the viewer closer to the ground and can instantly make an everyday scene feel dramatic and powerful. Photographers use it to emphasize a subject's size, create a sense of awe, or build strong perspective and layers.
Think of two images: looking straight at a statue, and looking up from the statue's base. The second shot feels more impressive and reverent. Likewise, a low angle can make buildings look grander, streets feel deeper, and people appear more commanding. It's not just a technical choice. It's a way to show the world the way you want others to see it.
So, when to use it?
- When you want to amplify foreground detail (texture, pavement, grass) and use it to lead the eye.
- When you want to increase a subject's sense of size or power (people, sculptures, cars, buildings).
- When you want to create motion or tension through exaggerated perspective.
- When you have limited space and want to use a wide-angle lens to produce more depth.
A low angle isn't "the lower the better." It should be "low for a reason." Before you drop the camera to the ground, ask: What do I want to highlight? What mood do I want to convey? With a purpose in mind, find a foreground, adjust your composition, and let low-angle shooting become a strong storytelling tool.
Low Angle Shooting Tips
Low-angle shots can turn a familiar scene into something bold and dramatic, and make the subject more striking. But to get great photos, try to be steady and precise while you shoot. Here are some tips you might use during the shoot.
1. Focus Choice
Where you focus changes the whole look when the camera is on or near the ground.
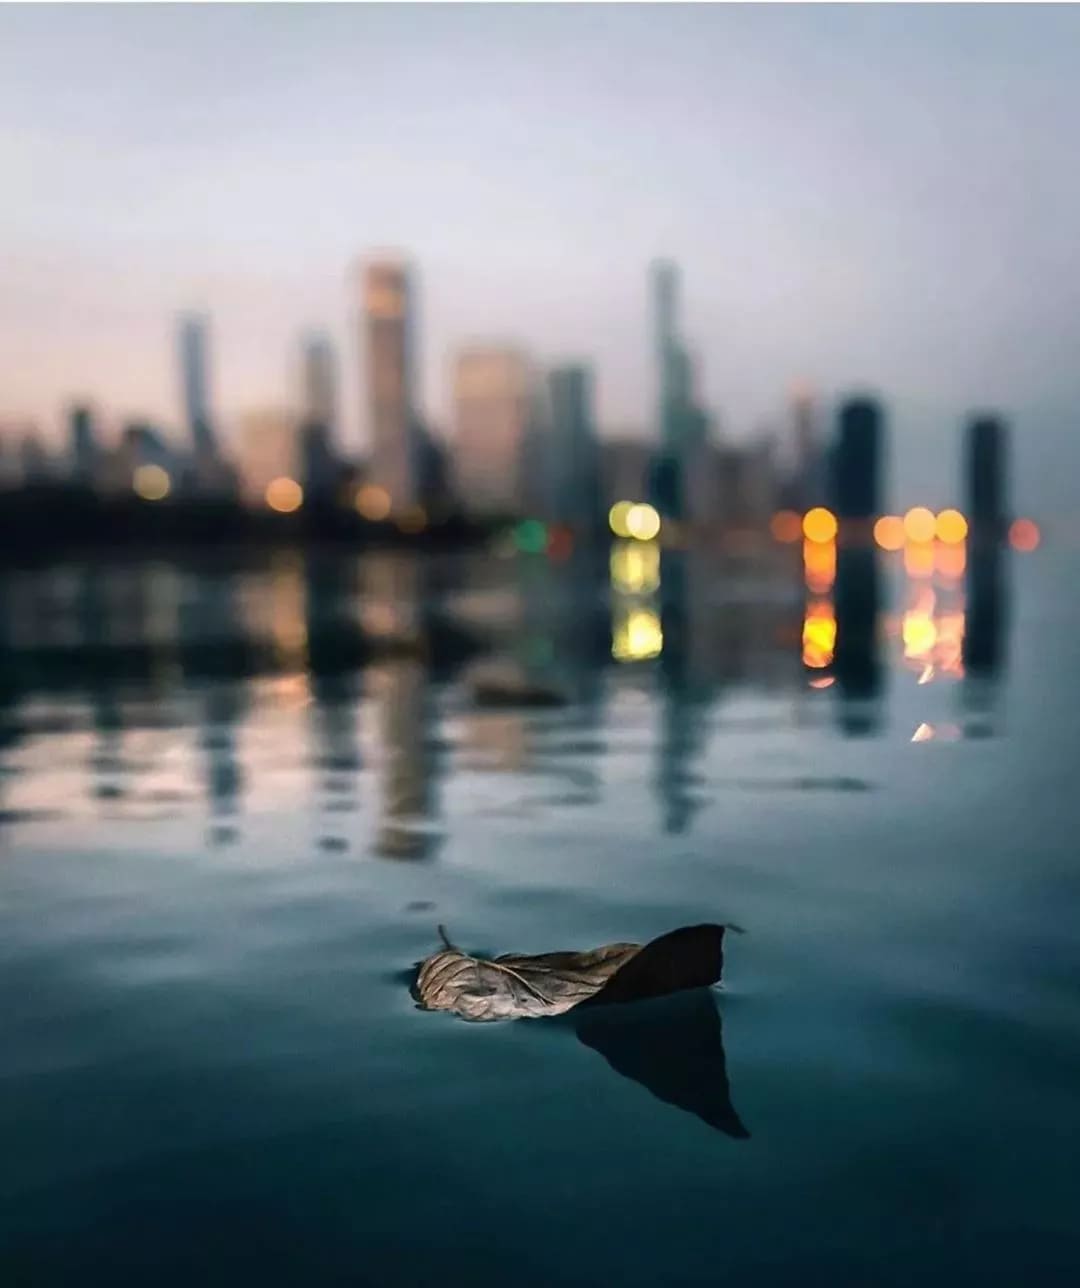
Focus on the foreground, and the background will blur.
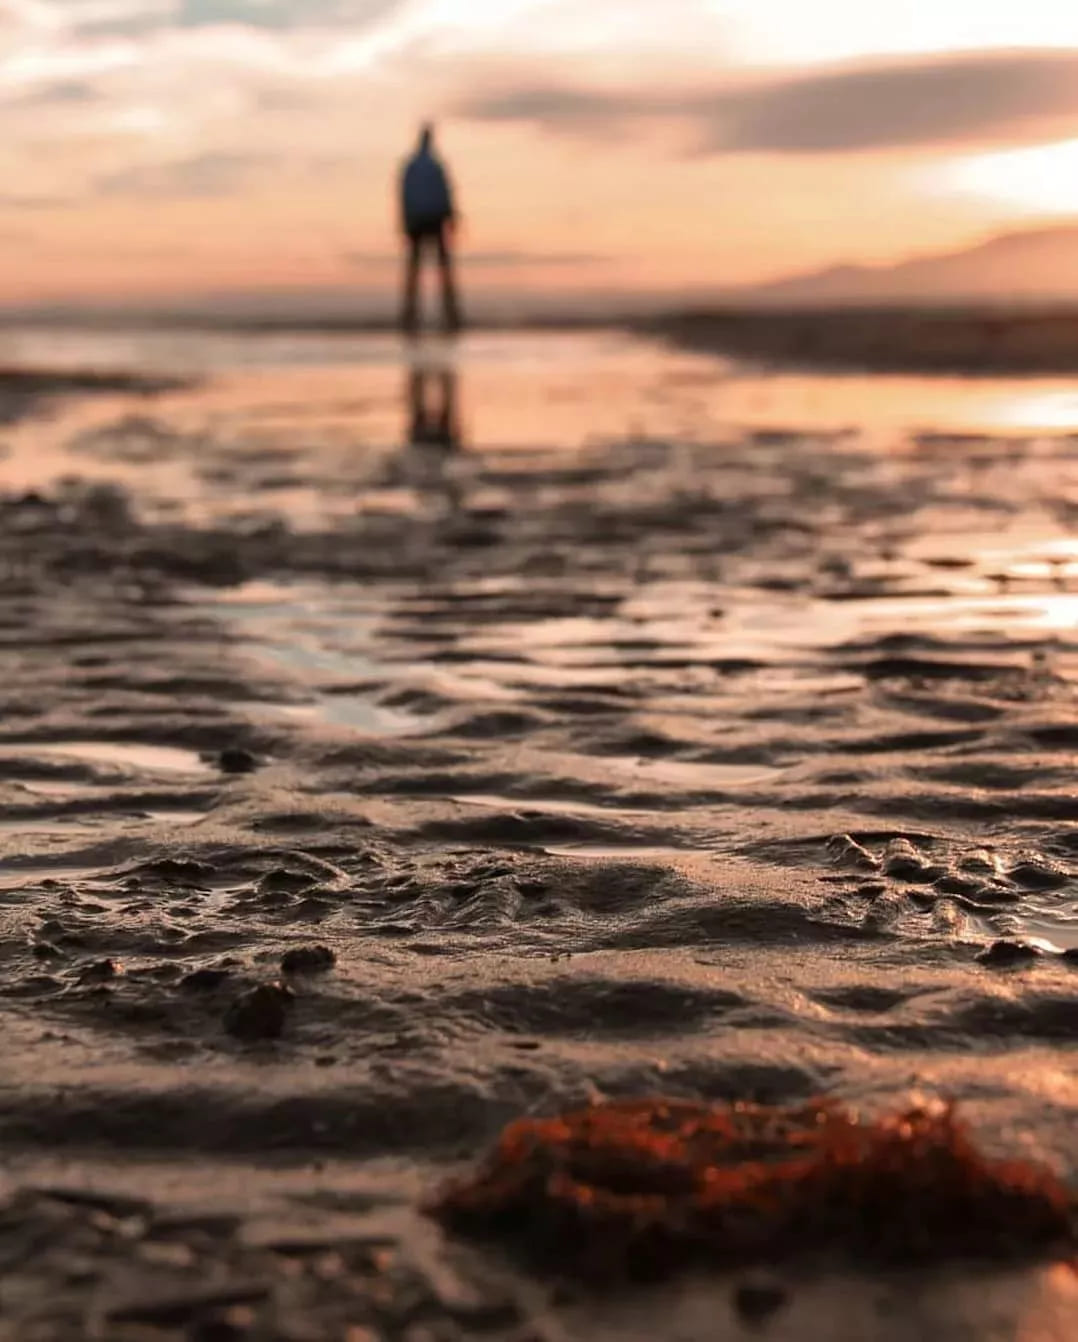
Focus on the midground, and both foreground and background will blur.
Focus on the background, and the foreground will blur.
You can get a nice blur even with a phone. Just tap the screen to pick your focus point.
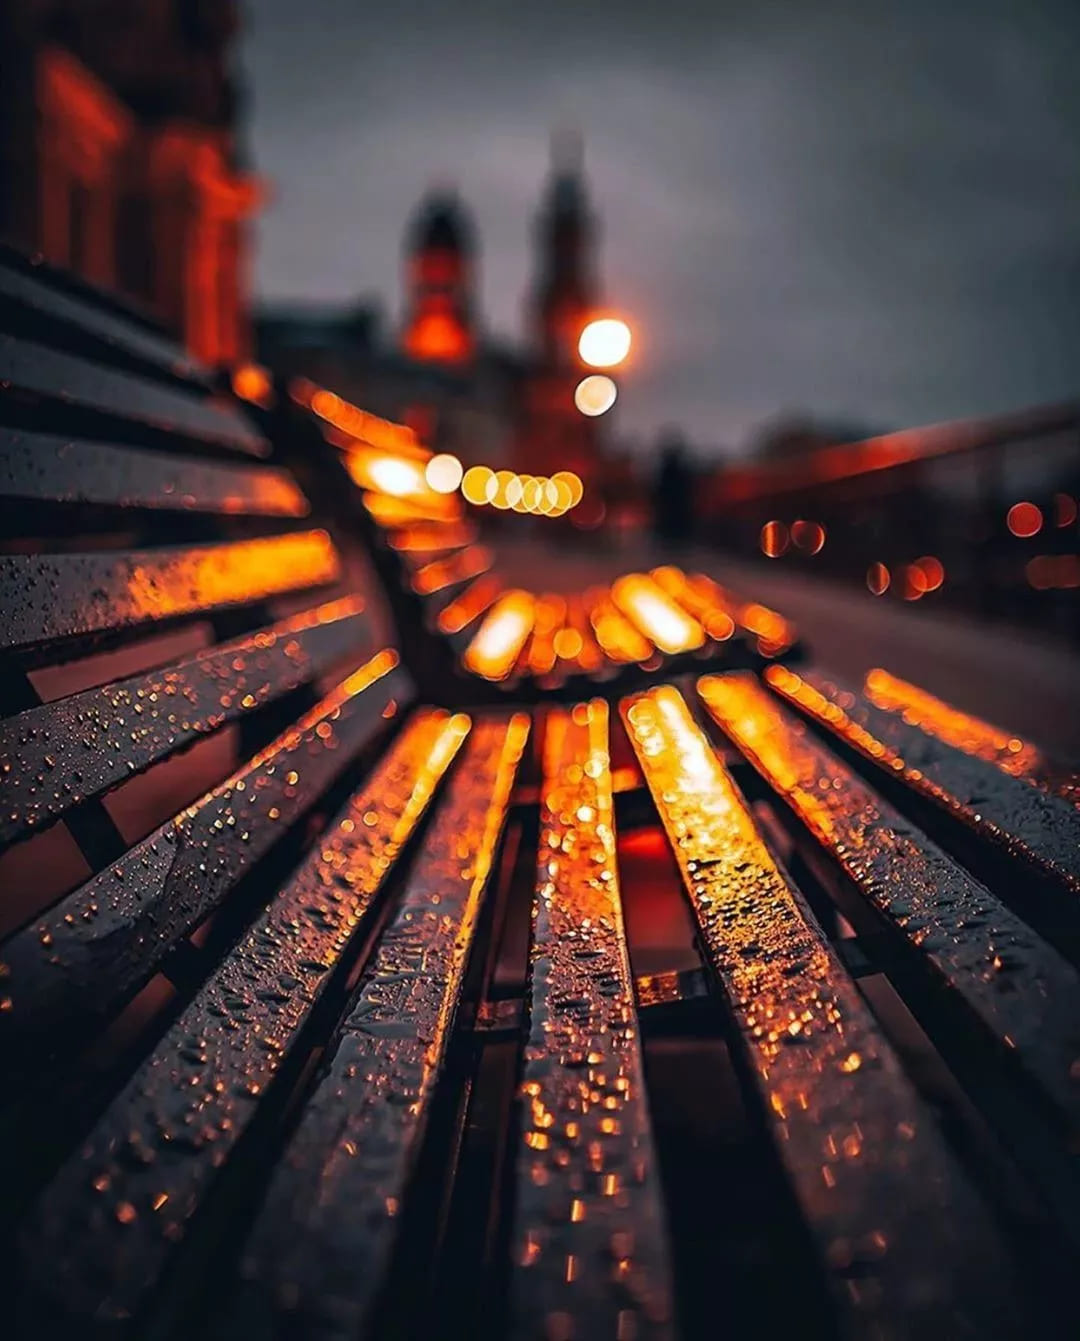
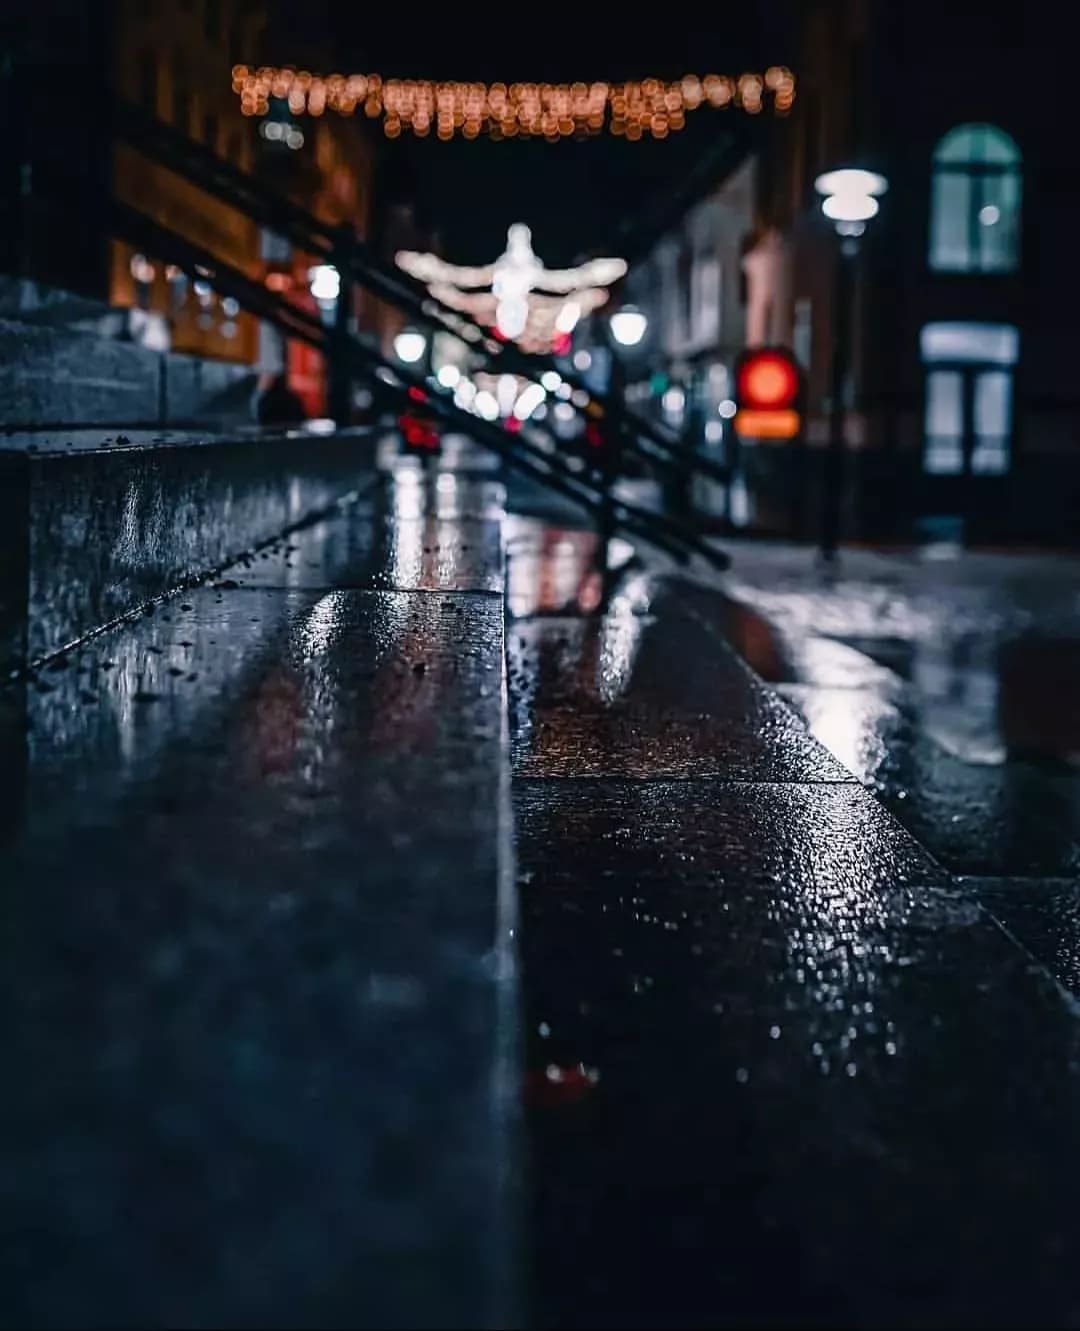
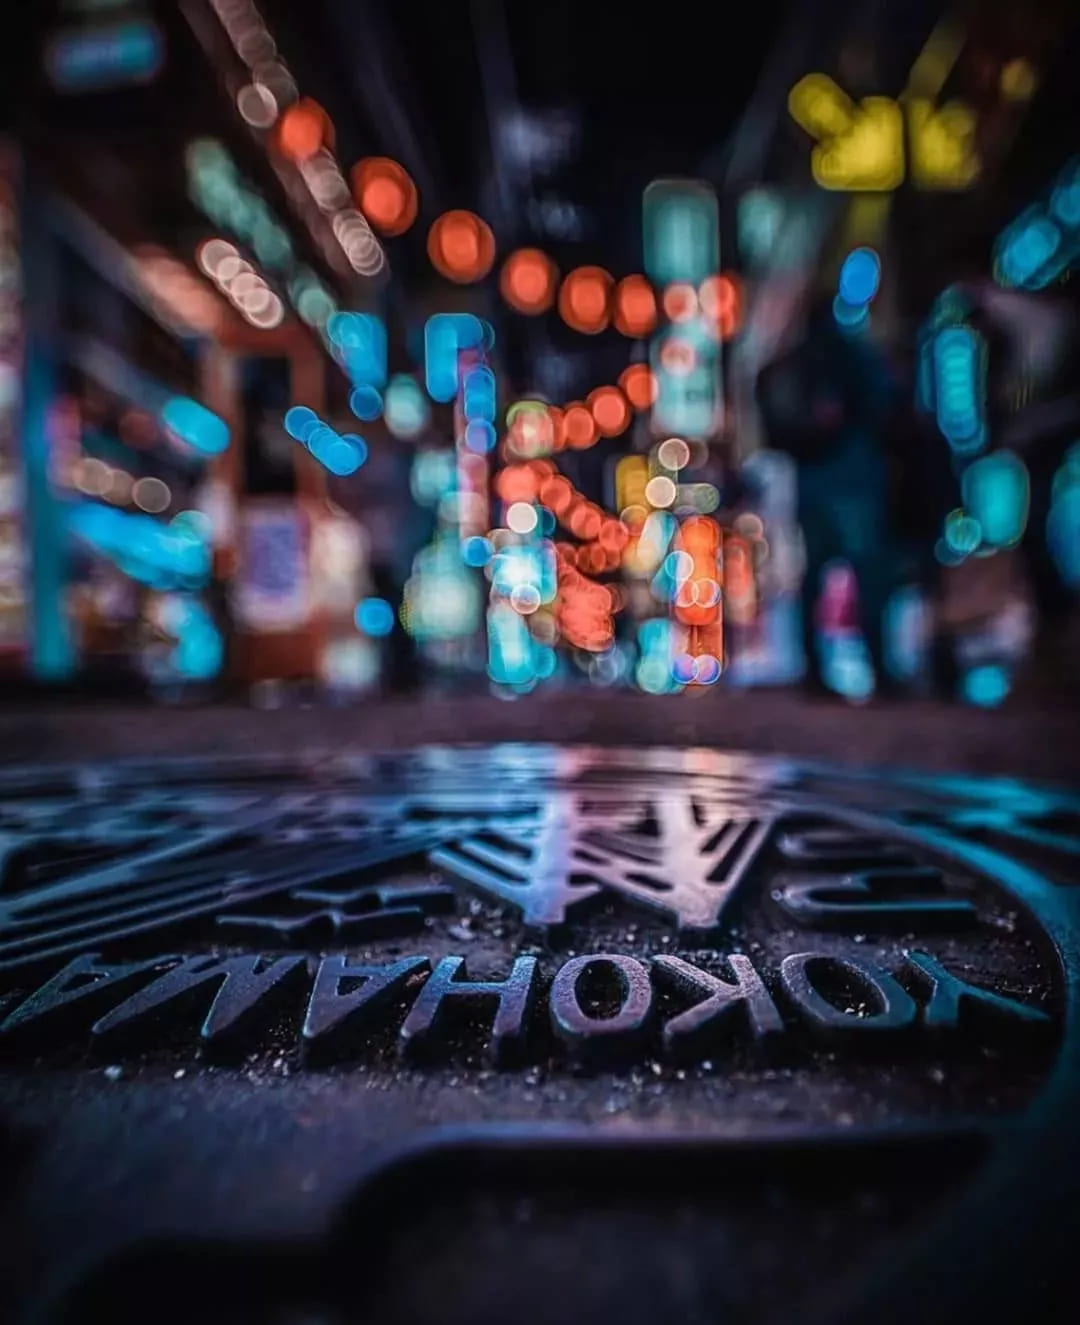
2. Use Leading Lines
There are many ground lines you can use: crosswalks, stairs, tactile paving, etc. Put the camera low, pick a focus point, and use those lines to lead the viewer's eye.
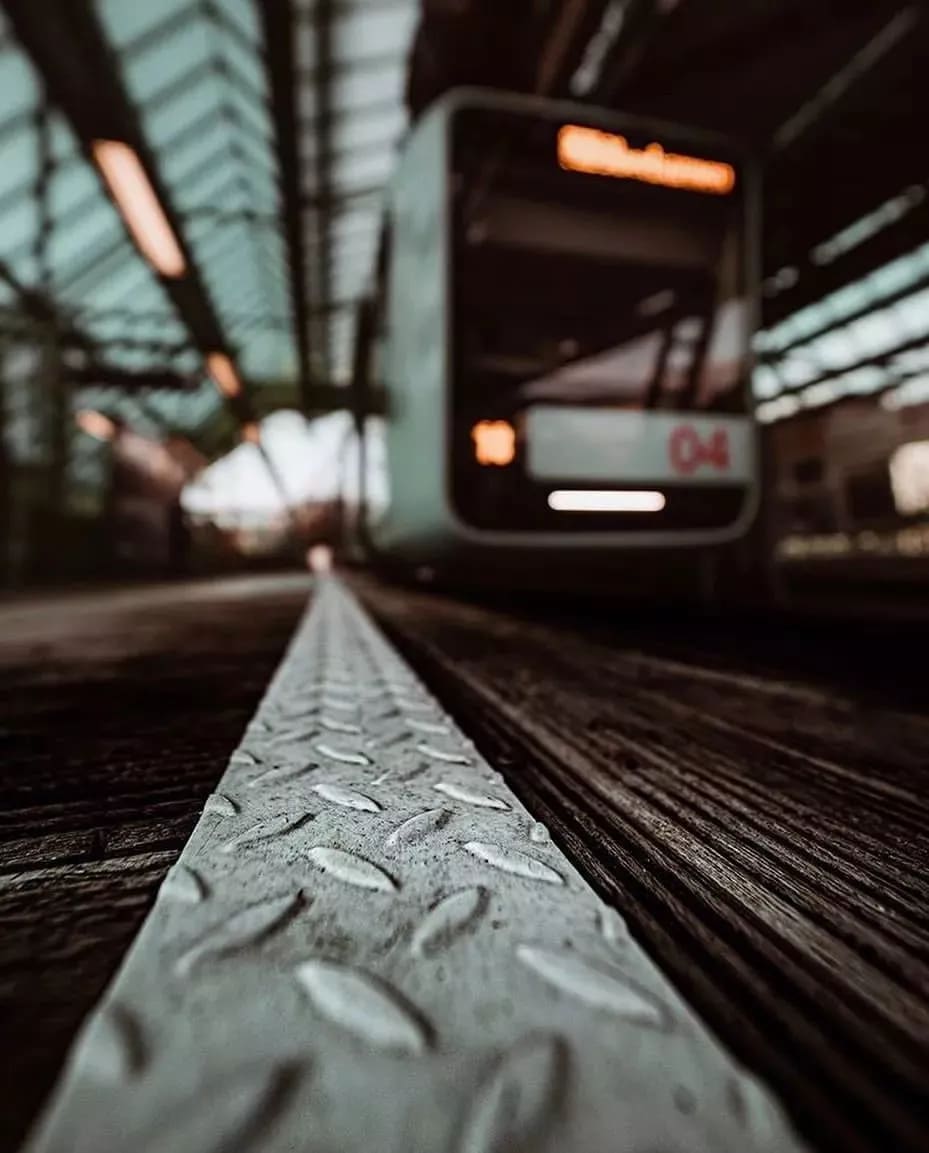
Because leading lines draw the eye into the frame, add something in the background, like a person or a light, to give the photo more story and avoid empty space.
3. Create Dreamy Bokeh
If you focus on the foreground or midground and there are small point lights in the background, you'll get a soft, dreamy bokeh effect. Small lights work best.
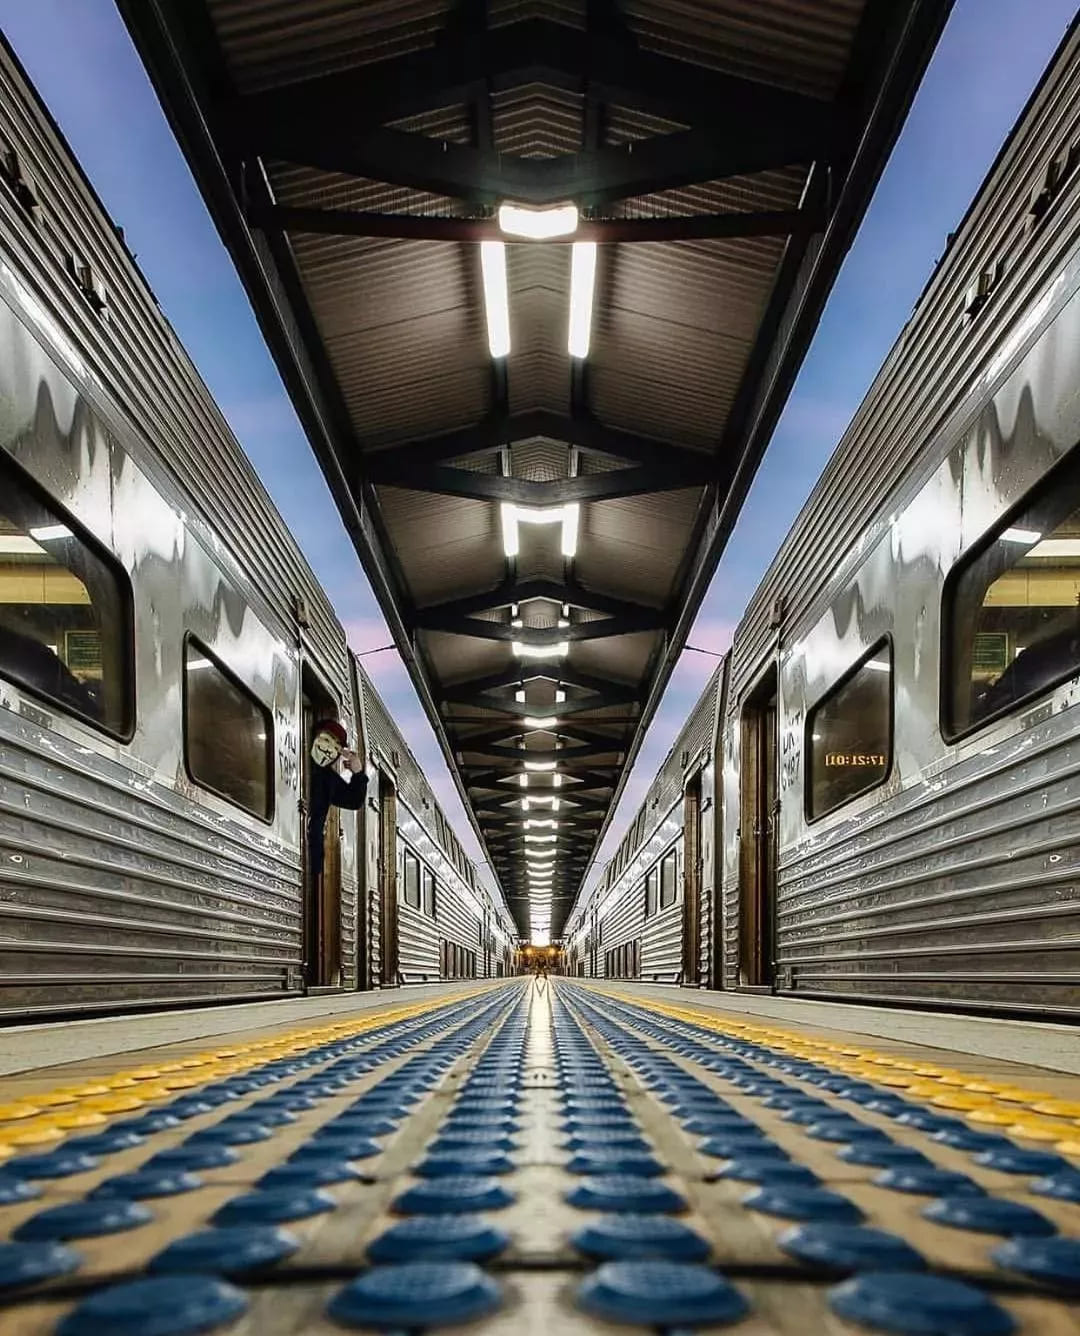
4. Keep the Horizon Level
For low-angle work, the horizon has to be steady. If it's even a little off, the whole frame can fall apart. If you tilt the camera on purpose to add energy or drama, that's fine. Just do it intentionally.
If you need to get very low, use a mini tripod, a ground-level tripod, a camera stabilizer, or set the camera right on the ground. When handholding, don't use too slow a shutter speed: a good rule is at least 1 ÷ (effective focal length) (for example, 1/50s for a 50mm equivalent).
Also, clear distracting foreground clutter (trash, wires), or use those elements deliberately in your composition.
5. Lens Choice and Focal Length
Wide-angle lenses are the go-to for low-angle shots. They fit more of the scene and make near objects look bigger while distant objects look smaller, which boosts the sense of perspective. Common choices:
Full-frame:
- 14–35mm for low-angle exaggeration.
- 14–24mm for a very dramatic perspective.
- 24–35mm if you want a more natural wide look.
APS-C:
- 10–24mm or 12–35mm (these give similar equivalent views to the full-frame ranges above).
Note: the wider you go (for example, less than 16mm), the more edge distortion you'll get. Faces and straight lines can stretch, so ultra-wide lenses aren't right for every subject.
Post-Processing Workflow for Low Angle Shots
An important rule for post work on low-angle shots: fix geometry and composition first (straighten, correct, crop). Then adjust overall color and make local enhancements. Finish by optimizing details for export (sharpening, noise reduction).
1. Straightening
If the camera wasn't perfectly level during the shoot, you can straighten the image in software. Be aware that straightening often requires cropping. Try to leave a safe margin when you frame your shot.
2. Color Adjustments
With low-angle shots, you can safely boost saturation and contrast to strengthen light and shadow. This makes the image more visually striking.
3. Crop as Needed
If parts of the shot are distracting or not ideal, crop to tighten the composition. Cropping helps emphasize the subject and cleans up the frame.
4. Emphasize Contrast and Perspective
Exaggerated perspective is a big advantage of low-angle shooting. In the post, you can highlight that effect. Use sharpening and contrast adjustments so the foreground stands out more.
Common Mistakes and Fixes (Quick Checklist)
Problem: The frame is clearly tilted when shooting
Use a tripod, a small ground tripod, or a stabilizer (gimbal) when you can. Also, use your camera's electronic level or a bubble level. Straightening in post often causes heavy cropping, so try to keep the camera level while shooting.
Problem: People or objects at the edges look stretched with ultra-wide lenses
Use less aggressive distortion correction, move your subject away from the edge, or switch to a slightly narrower focal length. You can also fix shapes locally in post with retouching or warp tools.
Problem: Foreground is messy or distracts from the subject
Change your shooting position or clear the foreground when possible. If you can't, remove distractions in post with spot-removal or content-aware tools.
Problem: After straightening, the subject looks smaller, or the composition feels off
Re-evaluate your crop and composition while editing. To avoid this when shooting, leave extra space around the subject or shoot a bit wider so you still have room to straighten and crop.
Conclusion
Low angle shooting gives you a fresh way to see things. It opens up new ideas. When standing height doesn’t give you the result you want, try crouching and shooting from a low angle.
The power of low-angle shots is that they can make ordinary scenes feel dramatic. Great photos come from a mix of good shooting and smart editing.
While you shoot, try different focal lengths, distances, and aperture settings: small changes can make the perspective and mood feel completely different. In post, don't be afraid to experiment with sliders and settings until the image feels right.
We'd like to recommend a creative console that can speed up your photo editing: the TourBox creative controller. Map your most-used tools and actions to the TourBox and work like you would with a game controller — faster and easier.

Unlike other controllers, TourBox can also help improve the final result. For example, the TourMenu feature lets you work in full-screen mode so sidebars don't distract you. The physical knobs on TourBox give finer, more precise control than dragging sliders with a mouse. You won't have to stare at tiny slider positions — the tactile feedback makes fine adjustments simple.

If you're curious, check out our Photo Editing page to learn more.