How to Use the Magic Wand Tool in Photoshop: A Beginner’s Guide
Do you want to learn how to select and edit parts of your image quickly and easily? In this tutorial, you will discover how to use the Magic Wand tool in Photoshop, one of the most powerful and versatile selection tools.
You will learn how to configure the Magic Wand tool and how to make and refine selections in Photoshop. By the end of this tutorial, you will be able to use the Magic Wand tool to create stunning images with just a few clicks.

In this article, you will learn:
- What Is the Magic Wand Tool in Photoshop?
- Where Is the Magic Wand Tool in Photoshop?
- How to Use the Magic Wand Tool in Photoshop?
- Additional Tips for Using Photoshop Magic Wand Tool
What Is the Magic Wand Tool in Photoshop?
The Magic Wand tool in Photoshop is basically a tool for selecting similar colors. In other words, when you click on a specific color in an image, Photoshop automatically selects the surrounding areas that have the same color, putting them in a selected state.
- Applicable Scenarios: It is suitable for images and backgrounds with noticeable color differences, backgrounds with a single color, or images with clear boundaries.
- Principle: It works by creating a selection based on the color you click on. It automatically selects the surrounding areas that have a similar color, putting them in a selected state. This allows you to manipulate or edit those selected areas separately.
- Drawbacks: It may not work well with images that have scattered hair or require precise edges. It may not provide satisfactory results in such cases.
- How to Use it: To use it, you simply click on the "Magic Wand" tool, adjust the "Tolerance" value, click on the background color to create a selection, then invert the selection and use the copy command to extract the desired image.
Overall, the Magic Wand tool in Photoshop is widely used and is a tool that both professional designers and avid Photoshop enthusiasts will come across. However, despite its powerful functionality, the Magic Wand tool does have its limitations.
For example, it can be challenging for Photoshop beginners as it requires a certain level of skill and precision in selecting areas. It is not uncommon to accidentally select the wrong areas during the selection process.
Where Is the Magic Wand Tool in Photoshop?
The Magic Wand tool in Photoshop is a commonly used selection tool, which can usually be found in the left toolbar of Photoshop. However, due to the large number of tools in Photoshop, many similar tools are grouped together in the toolbar.
By default, Photoshop remembers the most recently used tool in the toolbar. If it is your first time using Photoshop, the default tool will be the first one in the grouping.
In Photoshop, the Magic Wand tool is grouped together with the Object Selection Tool and the Quick Selection Tool. You can refer to the image below to see the associated tool icons that go along with the Magic Wand tool, making it easier for you to find and select them later.
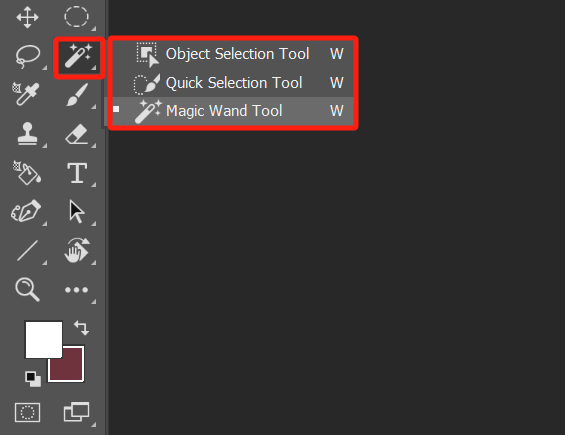
If you still can't find the Magic Wand tool, you can click on the "Edit Toolbar" button above the color picker in the left toolbar. It is represented by an ellipsis icon.
Here, you will find the Extra Tools that are not included in the above tool groupings, as they are tools that Photoshop assumes you may use less frequently and have a lower priority.
By clicking on the "Edit Toolbar" option at the top of the pop-up menu, you can access the Customize Toolbar panel. Here, you can customize the toolbar based on your preferences and usage habits.

How to Use the Magic Wand Tool in Photoshop?
The Magic Wand tool selects objects based on their color in the image. To use it, simply click the left mouse button on the desired color, and the colors close to the clicked point will be selected.
To master the Magic Wand tool in Photoshop, you only need to understand two important parameters: "Tolerance" and "Sample only contiguous pixels".
In the following examples, we will explain how to use the Magic Wand tool in Photoshop by combining the meanings of these two parameters.
1. Tolerance of the Magic Wand Tool
Let's use the following colored pencil image for demonstration.

Suppose you want to select all the pencils, but you find it challenging to select them directly. However, this image has a characteristic where the background color is uniform.
Therefore, you can use the Magic Wand tool to select the background and then invert the selection to select the pencils.
Let's give it a try. Select the Magic Wand tool and then click on the background.
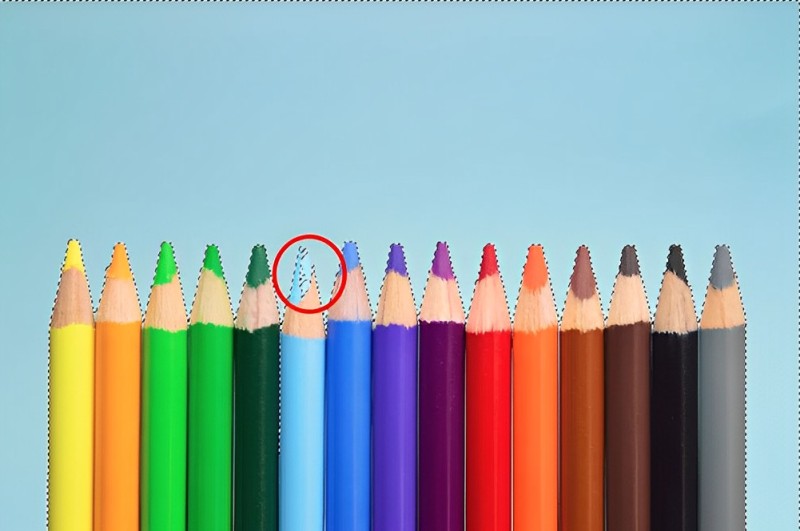
How can you select only the background without including the blue pencil? Here, you can use a parameter of the Magic Wand tool called "Tolerance". (You can find and adjust this parameter in the toolbar above)

You can think of tolerance as the allowed color difference. The larger the value, the greater the allowed color difference, and the selection will include more colors that are similar to the sampled point.
Since we've accidentally selected some non-background blue, it means our tolerance for color difference is somewhat high. So, let's try reducing the tolerance and change it from 30 to 15, then click on the background again.
Although we didn't select the blue pencil this time, the background is still not fully selected.

It seems that the tolerance value is a bit too small. Let's continue increasing the tolerance and see what happens. As the tolerance value increases, more of the background is selected, and there are more blue colors included in the selection.
However, when the tolerance value reaches 17, the background is still not completely selected, and a portion of the blue pencil is selected. This is because the color of the blue pencil is very close to the background color.
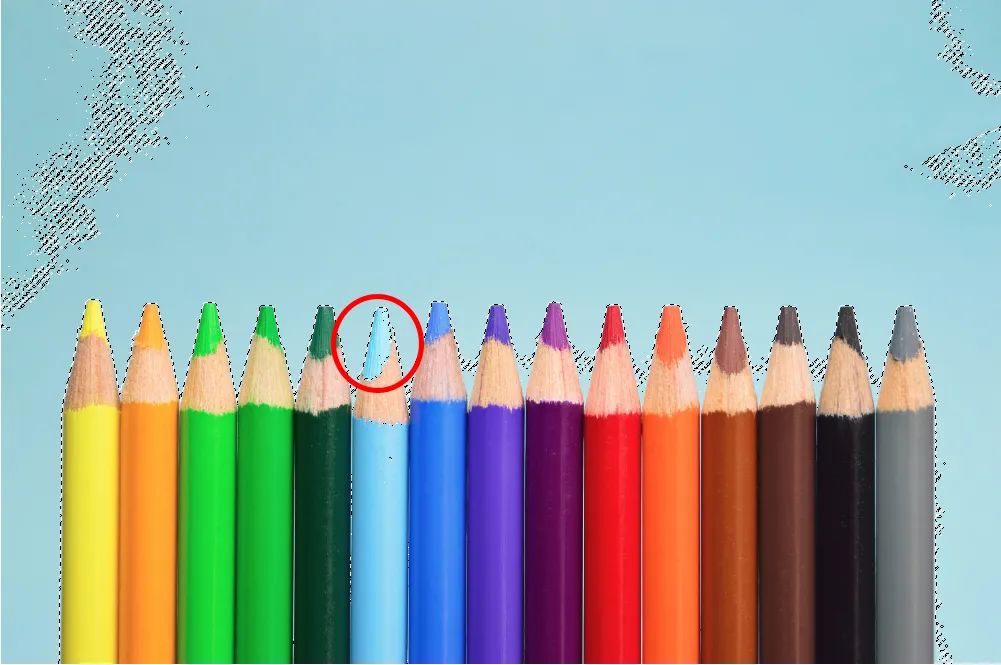
Can't you use the Magic Wand tool to select these pencils then? Of course, you can! Let's try a different approach. Instead of trying to select the entire background with a single click, you can add to the selection gradually until all of the background is selected.
Let's change the tolerance value back to 15, click on the background, and then hold down the Shift key (the shortcut for adding to the selection).
Click on the areas that are not yet selected. This will add more of the background to the selection. Repeat this process until all of the background is selected. (When using this method, it's better to set the tolerance to a smaller value.)

Finally, all you need to do is invert the selection (Ctrl+Shift+I), and now all the pencils will be selected. Create a new mask, and you will successfully extract the pencils.

2. Sample Only Contiguous Pixels of the Magic Wand Tool
Once you understand "Tolerance," another important parameter is "Sample only contiguous pixels."
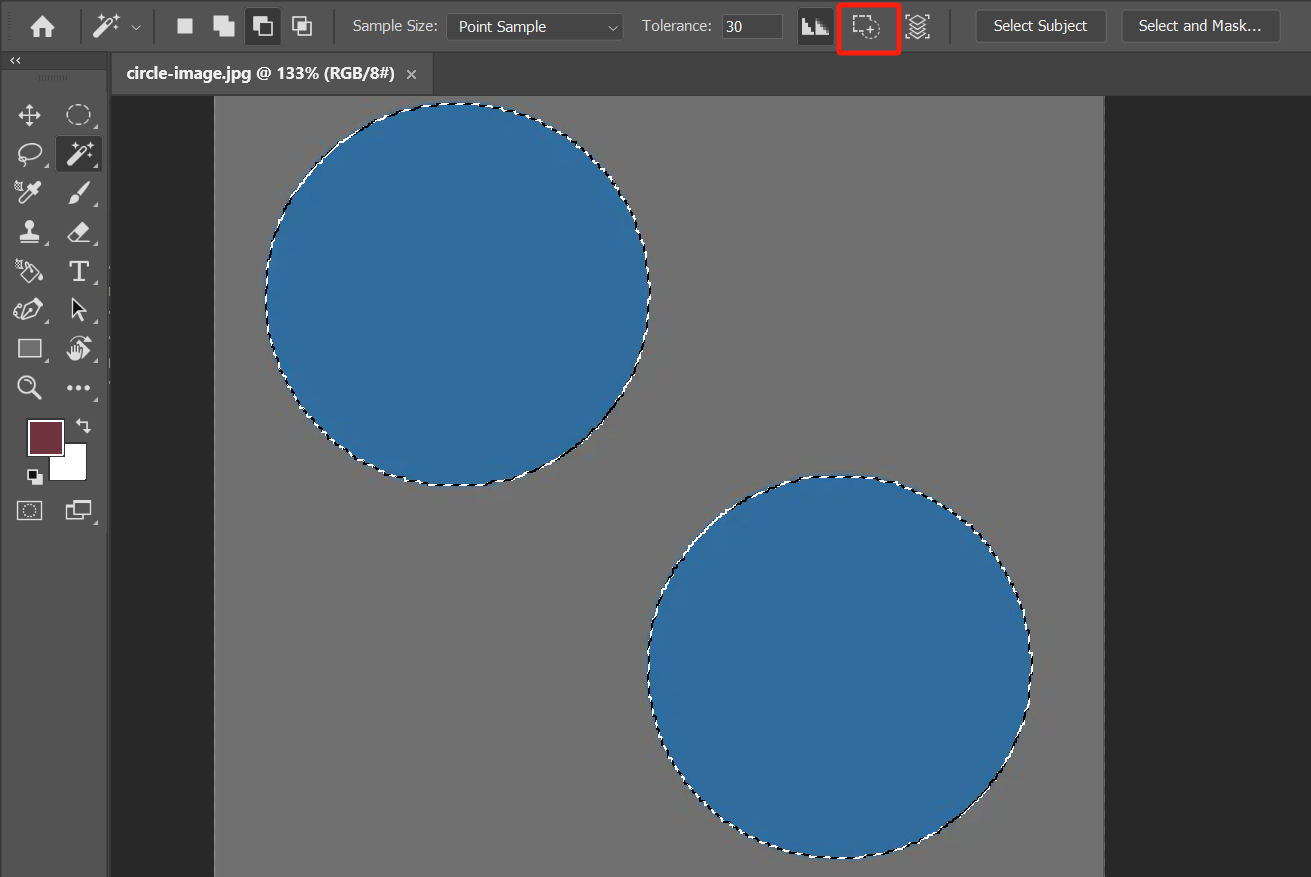
When "Sample Only Contiguous Pixels" is selected, and you use the Magic Wand tool to select a color, if parts of that color are separated by other colors, they will not be selected. On the other hand, if it is not selected, regardless of whether the color is separated or not, it will be selected.
As shown in the image below, if you want to select the two blue circles, you can first select "Sample only contiguous pixels" and use the Magic Wand tool to click on one of the circles. Although the adjacent circles have the same color, they are separated by the gray color background, so they are not selected.
![]()
Next, you can try unselecting "Sample only contiguous pixels" and click on one of the circles. You will notice that both circles are selected, even though they are separated by the gray color.
3. Other Parameters of the Magic Wand Tool
Selection Method:
Like other selection tools, the Magic Wand tool also has options for "Add to selection", "Subtract from selection", and "Intersect with selection". The keyboard shortcuts and usage methods are the same. You just need to master adding and subtracting from the selection.
Sample Size:
As the name suggests, it refers to the size of the sample point. You should choose the sample point size based on the image. If the image has a lot of noise, using the default "Point Sample" setting may include unwanted noise colors.
In such cases, you can choose "Average" and select different average sizes based on the noise and image dimensions. Generally, using the default "Point Sample" or a 3 by 3 Average is sufficient. Larger averages don't necessarily provide better results.
Smoothes Edge Transition
This parameter does exactly what it implies - it helps to eliminate jagged edges and make the selection look more natural. In most cases, it is fine to leave it selected by default.
Sample Colors From Composite Image
This one is self-explanatory. If unchecked, it samples colors from the current layer only. If checked, it samples colors from all layers, considering the entire image.
Select Subject & Select and Mask
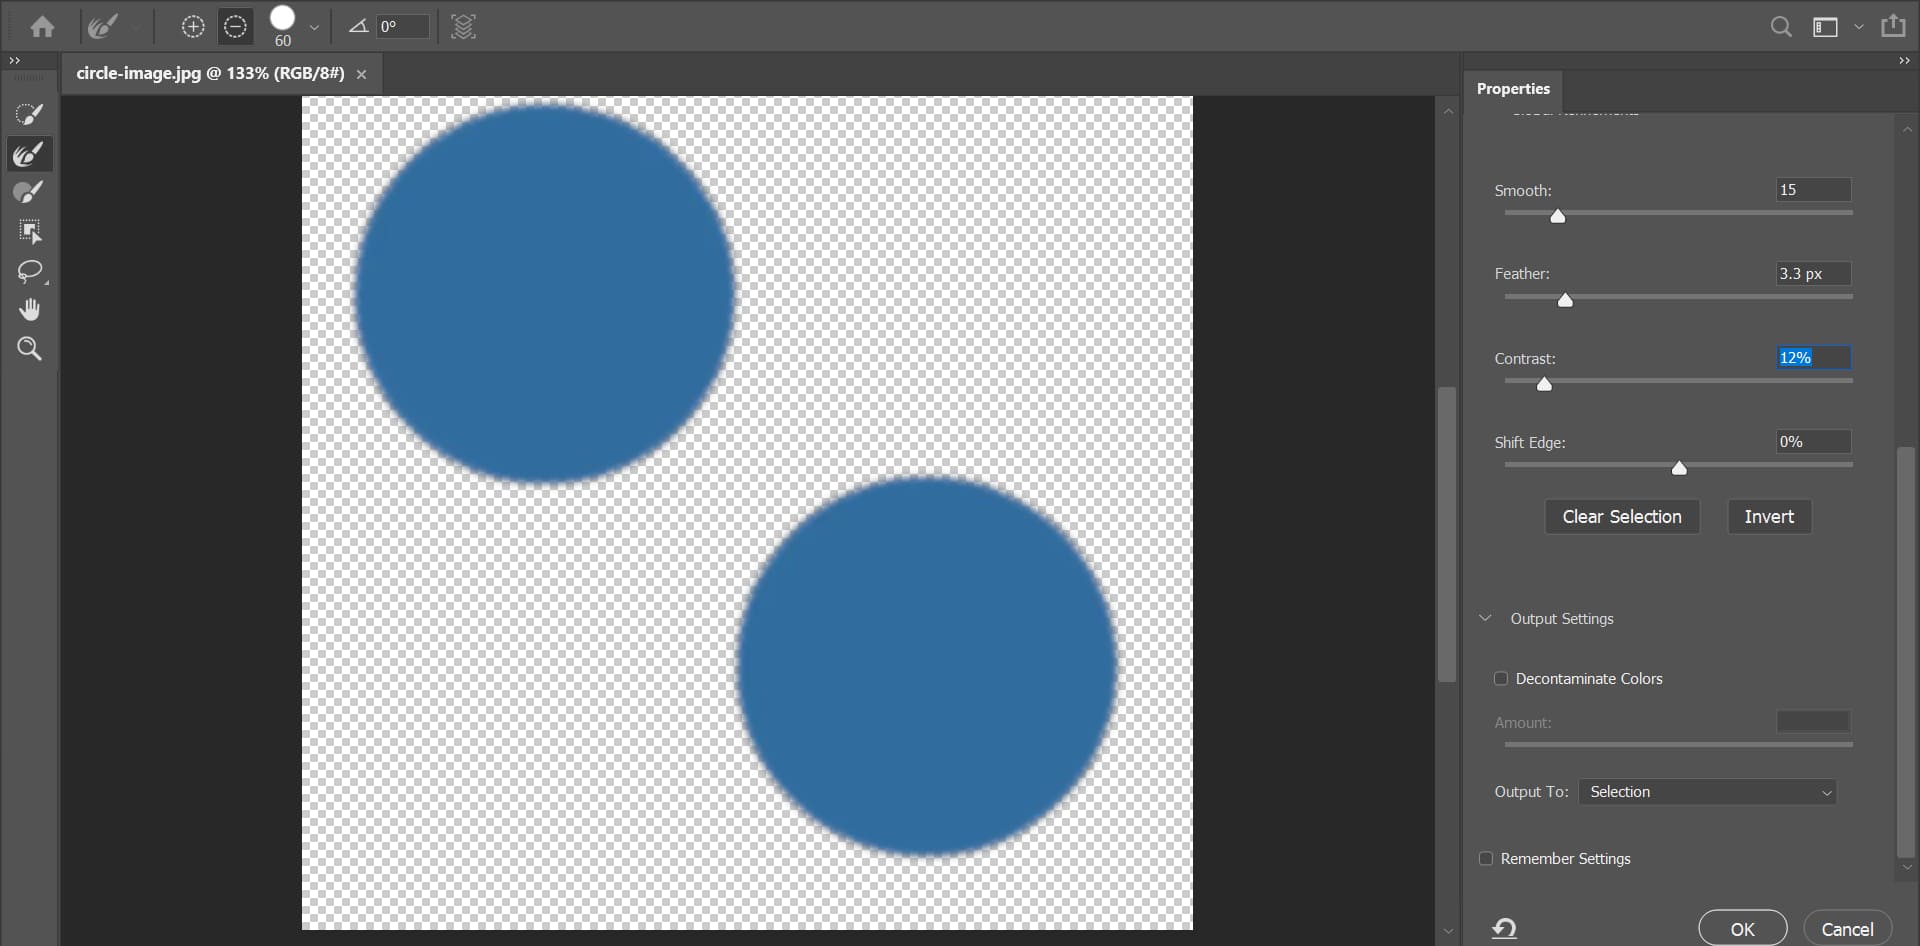
These two parameters are found in various selection tools, and they can be considered as independent selection tools themselves. You can further refine the selection using the Select and Mask option.
Additional Tips for Using Photoshop Magic Wand Tool
In the final section of our Photoshop Magic Wand tutorial, we would like to provide some additional tips for using the Magic Wand tool:
- One common problem with the Magic Wand tool is that sometimes it doesn't select things correctly. This usually happens when there isn't a clear difference between what you want to select and what you don't want to select. Besides the techniques we mentioned earlier, you can also try using other tools in Photoshop to help you get the results you want.
- When using the Magic Wand tool, it's important to note that Photoshop has relatively high requirements for the image. If the image has low pixel density, it may affect the effectiveness of the Magic Wand tool.
- During the selection process of many images, it is also necessary to properly refine the edges of the selection. Without edge refinement, the final result can appear very harsh and unnatural.
Product Recommendation:
If you're looking to take your Photoshop skills to the next level and optimize your workflow, we highly recommend giving TourBox a try. It's a game-changer that can significantly improve your editing process and help you achieve your creative vision more efficiently.

TourBox is a powerful and intuitive tool designed specifically for creative professionals working with software like Photoshop. It provides customizable buttons and rotating controls that can be easily set to perform various tasks and shortcuts, making your workflow more efficient and streamlined.
With TourBox, you can assign commonly used functions, such as adjusting brush sizes, zooming in and out, or navigating through layers, to its physical controls. This eliminates the need to constantly switch between your keyboard and mouse, allowing for a more seamless and intuitive editing process.
And that concludes our tutorial on the Photoshop Magic Wand tool. We hope it has been helpful to you on your creative journey.