Mastering Neutral Gray in Photoshop: Achieving Perfect Control
If you've ever struggled with achieving accurate color balance in your images, the Neutral Gray Layer technique is here to save the day.
Whether you're a professional photographer, graphic designer, or digital artist, understanding how to utilize this powerful tool will elevate your work to new heights.
In this tutorial, we will walk you through the process of creating and utilizing Neutral Gray Layers in Photoshop, allowing you to achieve impeccable color accuracy and make your images truly stand out.
In this article, you will learn:
- Understanding Neutral Gray and Its Application
- How to Create a Neutral Gray Layer in Photoshop?
- How to Use a Neutral Gray Layer in Photoshop?
- Final Thoughts About Neutral Gray
Understanding Neutral Gray and Its Application
Welcome to the first section of our comprehensive guide on Neutral Gray in Photoshop. For those keen on mastering the art and science of this powerful tool, you've come to the right place!
1. What Is Neutral Gray?
In the realm of color theory and digital imaging, Neutral Gray is often synonymous with mid-gray and represents a perfect balance of tones. It is a shade of gray that sits neither on the extreme ends of black nor white and lacks any inherent hue.
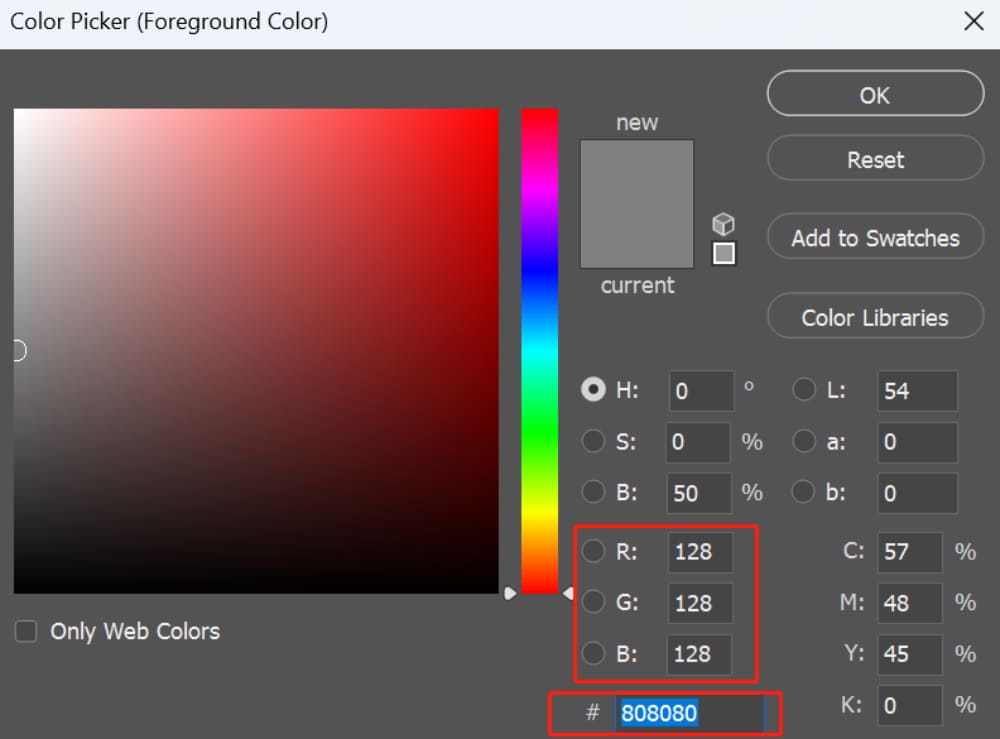
Its RGB values are equal (R=G=B), with each channel having a value of half: RGB(128,128,128).
Positioned precisely in the middle of the grayscale spectrum, it is referred to as "Neutral Gray."
2. The Principle of Neutral Gray
The principle behind Neutral Gray is rooted in its visual and technical neutrality:
- In terms of lightness, it's halfway between absolute black (0% brightness) and absolute white (100% brightness), giving it a brightness level of approximately 50%.
- In terms of color, it's devoid of saturation, meaning it contains no hue, and so it doesn't lean towards any color on the color wheel.
This neutrality makes it a perfect reference point in visual arts and digital imaging. For instance, in photography, an 18% gray card is used to help set the correct exposure and white balance.
3. Applications of Neutral Gray in Photoshop
When it comes to Photoshop, a tool known for its extensive capabilities, Neutral Gray plays a crucial role in several ways:
- Blending Modes: Neutral Gray is a "neutral" element in Photoshop's blending modes. For example, when you use modes like Overlay, Soft Light, or Hard Light, painting with Neutral Gray will have no effect, as these modes ignore this color. This property can be leveraged to create complex effects and textures without altering certain parts of an image.
- Dodging and Burning: Neutral Gray layers are a popular choice for non-destructive dodging and burning. This technique allows you to lighten (dodge) or darken (burn) areas of an image without directly affecting the original layers.
- Color Correction: A Neutral Gray layer set to difference mode is used to find the darkest (black point) and lightest (white point) areas in an image, which is essential for color correction and setting the correct white balance.
- Creating Gradients: Neutral Gray is often used as a midpoint in creating gradients for backgrounds and overlays, providing a smooth transition between colors or tones.
In the upcoming chapters, we will delve deeper into Neutral Gray to enhance your Photoshop expertise. Stick around and prepare to master the many uses of Neutral Gray in Photoshop!

How to Create a Neutral Gray Layer in Photoshop
Before diving into the significance of Neutral Gray layers in Photoshop, let's explore how to create them. There are three common methods for doing so:
- Keyboard shortcuts for filling
- keyboard shortcuts for creating a new fill layer
- Filling with the foreground color
These methods provide you with different approaches to making a Neutral Gray layer in Photoshop, allowing you to achieve precise color balance and enhance your image editing workflow.
Below, we provide a brief overview of each method's steps.
Method 1: Keyboard Shortcut for Filling
- Select the desired layer or area where you want to create the Neutral Gray layer.
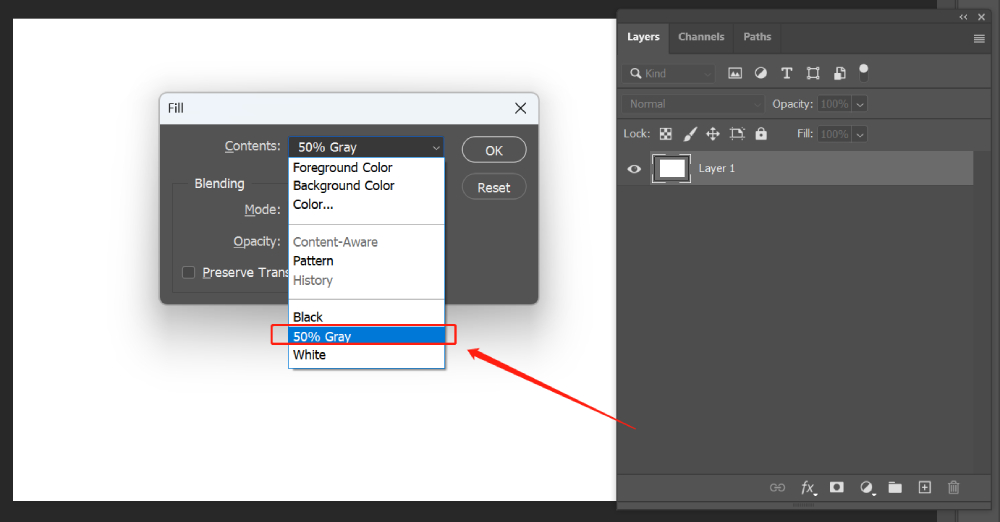
- Press Shift + F5 (or Shift + Backspace) on your keyboard to bring up the Fill dialog box.
- In the Contents section, choose "50% Gray" from the drop-down menu.
- Click OK to apply the Neutral Gray fill.
Method 2: Keyboard Shortcut for Creating a New Fill Layer
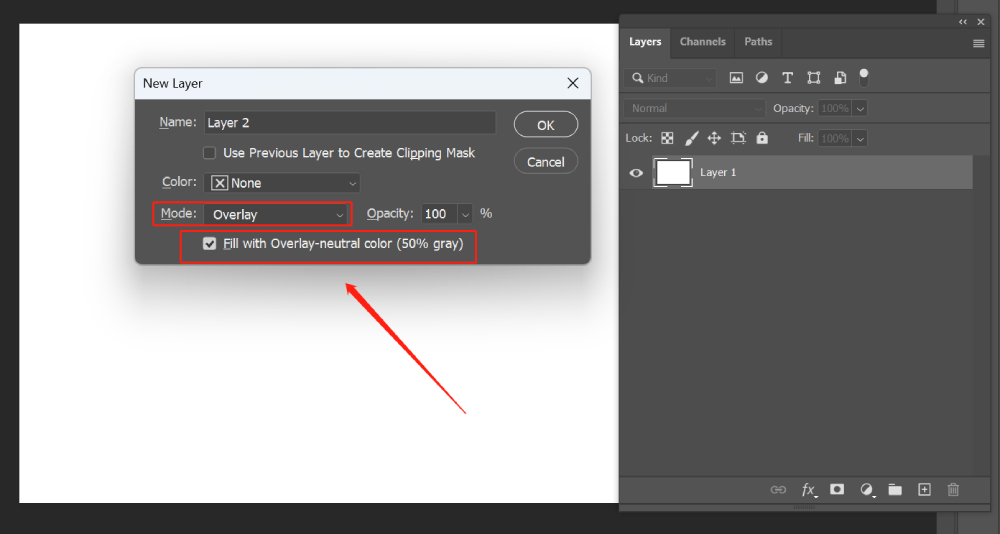
- Ensure that the desired layer or area is selected. Press Shift + Ctrl + N (Windows) or Shift + Command + N (Mac) to create a new layer.
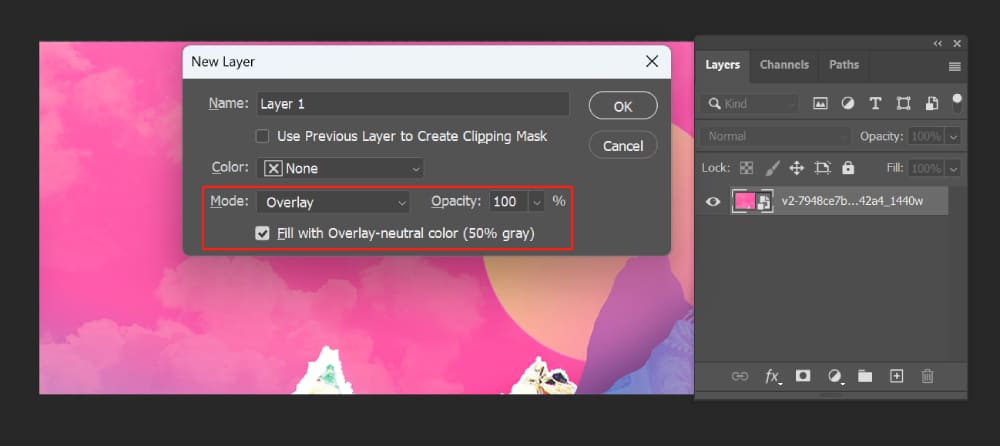
- In the New Layer dialog box, select "Overlay" from the dropdown menu labeled "Mode" in the popup panel. Check the box that says "Fill with Overlay-neutral color (50% gray)."
- Click "OK" to create a new Neutral Gray layer.
Method 3: Filling with Foreground Color
- Select the desired layer or area to apply the Neutral Gray fill.
- Set the foreground color to RGB(128,128,128) or #808080 (hex code) to represent 50% Gray.
- Choose the Paint Bucket Tool from the toolbar or press G on your keyboard to activate it.
- Click within the selected layer or area to fill it with the set foreground color, creating the Neutral Gray layer.
How to Use a Neutral Gray Layer in Photoshop?
When working on photo retouching in Photoshop, one of the biggest concerns is avoiding damage to the original layer. Therefore, tools like Dodge/Burn and the Sponge Tool are often sparingly used, especially when the quality of the artwork is crucial.
The Dodge/Burn tools may seem simple to use, allowing direct adjustments to light and dark areas, but they have a non-reversible effect that can potentially harm the original layer.
However, by leveraging the properties of a Neutral Gray layer, we can transform the Dodge/Burn tools into a reversible and non-destructive aid.
Here are the step-by-step instructions:
Create a new layer in Photoshop by clicking on the "New Layer" button in the Layers panel. In the New Layer dialog box, choose "Overlay" from the "Mode" dropdown menu.
Check the box that says "Fill with Overlay-neutral color (50% gray)." Click "OK" to create the Neutral Gray layer.
Set the foreground color to white (#FFFFFF) and the background color to black (#000000).
Select the Dodge Tool or the Burn Tool from the toolbar. Adjust the brush size, range, and exposure settings according to your editing needs.
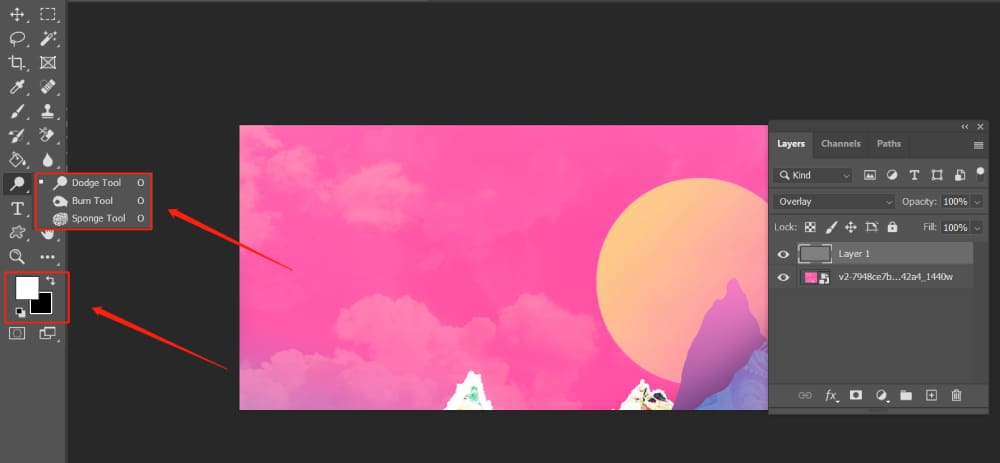
With the Neutral Gray layer selected, start painting over the areas you want to dodge or burn.
To lighten the areas, use the Dodge Tool and paint with white. To darken, use the Burn Tool and paint with black.
If you make a mistake or want to adjust the intensity, simply switch the foreground and background colors and paint over the affected areas again.
Let's take a look at the before-and-after comparison of the results.
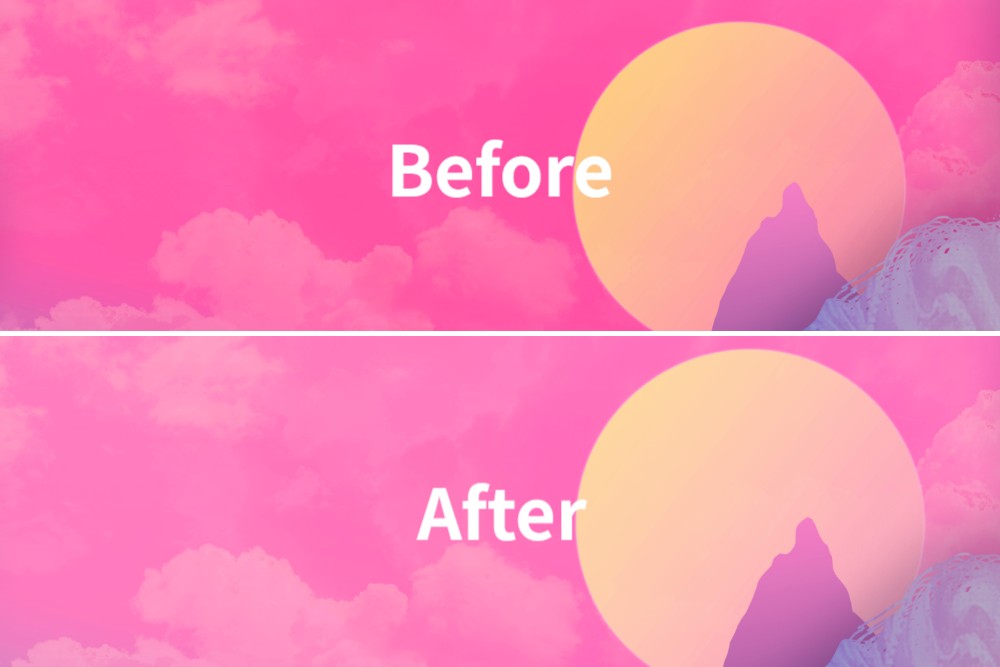
By following these steps, you can effectively utilize the Neutral Gray layer to transform the Dodge/Burn tools and Sponge Tool into a reversible and non-destructive aid, ensuring the preservation of the original layer while achieving the desired editing effects.
Final Thoughts About Neutral Gray
In this final section, let's refine our understanding of neutral gray layers with some pro tips:
- Blend Mode Magic: Try different blend modes with your neutral gray layer. Overlay and Soft Light can yield interesting results by subtly enhancing the textures and contrasts in your image.
- Opacity Adjustments: Don't forget to play around with the opacity of your neutral gray layer. A small adjustment can often make a big difference.
- Gradient Maps: Pairing a neutral gray layer with a gradient map can add color and depth to your image. It's a creative way to give your composition a unique look.
Now, imagine having a tool that could make these adjustments and many more, all at your fingertips...
Enter the TourBox, a versatile controller specially designed for creative professionals like you. It adds a new dimension to your Photoshop experience, particularly when working with neutral gray layers.
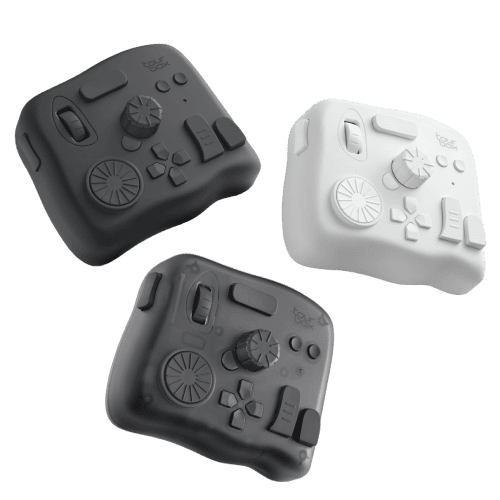
With TourBox, you can finely adjust your brush size, opacity, and flow without having to constantly reach for your keyboard. This makes the process of painting on your neutral gray layer a whole lot smoother.
TourBox offers an array of customizable buttons, knobs, and wheels that you can assign to any Photoshop function. Imagine having a dedicated button for instantly adding a neutral gray layer or changing the blending mode – a real time-saver!
In conclusion, mastering the art of the neutral gray layer in Photoshop is a skill that takes time and practice. But with the right tools at your disposal, like the TourBox, this journey can be a much more enjoyable and productive one.
As an artist, you're always looking for ways to express your vision with more precision and creativity. With its customizable functions, precision controls, and seamless integration, the TourBox might just be the game-changer you've been looking for.


