Light Metering Basics: A Beginner's Guide for Photographers
In photography, light metering sets the exposure of your photos. Using the right metering method helps you capture details accurately in any light, keeping your images natural and clear.
So, what is light metering in photography, and how do you do it? Let's explore this.

In this article, you will learn:
- What Is Light Metering?
- The Principles and Types of Light Metering
- What Is Exposure Value (EV)?
- What Are the Limits of Light Metering?
- How to Use Light Metering for Creative Expression?
What Is Light Metering?
Why do we need to meter our photos? It's a fascinating question.
1. The Essence of Light Metering
We all know that the three key factors of exposure (aperture, shutter speed, and ISO) are used to determine how a photo is exposed.
Light metering is a tool that tells your camera which settings to use for the current lighting.
For example, when you head to a beautiful seaside scene (as shown in the picture), do you really know what aperture, shutter speed, and ISO will give you a perfectly exposed shot?

Unless you're very experienced, you might be able to guess a few numbers, but most photographers have no idea.
So how do you nail the exposure when you don't know the settings? Don't worry. The camera does.
It meters the light and gives you a set of numbers for the aperture, shutter speed, and ISO. All you have to do is press the shutter, and you've got a perfectly exposed photo.
Simply put, light metering helps you find the best baseline settings for the aperture, shutter speed, and ISO. (Keep in mind that these are just starting points—you can adjust them later based on the idea of equivalent exposure.)
By using light metering, your sensor (or film) gets the right amount of light. This ensures that bright areas aren't blown out and dark areas still have detail.
In short, light metering is all about avoiding underexposure and overexposure. So, what do those terms mean?
Below is an underexposed picture of a Kitten.

This next picture is overexposed.

And this one shows proper exposure.

2. Light Metering and 18% Gray
When we talk about light metering, we often mention one key standard: 18% gray.
In nature, most objects reflect about 18% of the light. That's why many light metering systems assume the average brightness of a scene is neutral 18% gray — about the same brightness as concrete or dry asphalt.
Also, because our eyes see light in a non-linear way, 18% gray appears to be a middle tone. This matches our natural sense of "neutral."
For most scenes, using 18% gray as the baseline works fine.
However, in extreme cases—like scenes that are mostly white or mostly black (for example, snowy landscapes, coal mines, or a big black cat) — some meters still assume an overall 18% gray.
This can lead to incorrect exposure, making the image either underexposed or overexposed. In these cases, you'll need to adjust the exposure manually.
The basic rule for compensation is: add for whites, subtract for blacks.
- Add for Whites: If a scene is mostly light (like snow, clouds, or light-colored buildings), the camera might think it's overexposed. It then lowers the exposure, which can wash out the bright areas. To fix this, you need to add exposure so the light areas remain bright and detailed.
- Subtract for Blacks: On the other hand, if a scene is mostly dark (like night scenes, black backgrounds, or dark clothing), the camera might think it's underexposed and raise the exposure too much. This can cause dark areas to lose detail and look faded. In these situations, you need to lower the exposure to keep the details in the shadows.
The Principles and Types of Light Metering
Next, we might cover some pretty dry topics. But don't worry. We'll break them down so they're easy to understand instead of just copying Wikipedia.
1. The Principle of Light Metering
To meter light, you need to know how strong the light is.
Usually, digital cameras have built-in light metering systems. If you're a film camera fan or have special photography needs, you can also use a dedicated light meter.
The key to light metering is a light-sensitive element, a device that reacts to light.
Modern cameras often use data from their CCD or CMOS sensors to analyze how light is distributed. This method uses complex algorithms to pick the best metering mode for different shooting situations.
On the other hand, standalone light meters usually use a silicon photodiode. This device converts light intensity into an electrical signal and is both highly sensitive and fast.
2. Types of Light Metering
Based on the metering method, there are two types: incident light metering and reflective light metering.
(1) Incident Light Metering
Incident light metering means directly measuring the light falling on the subject, without considering the subject's reflective properties (as shown in the picture below).
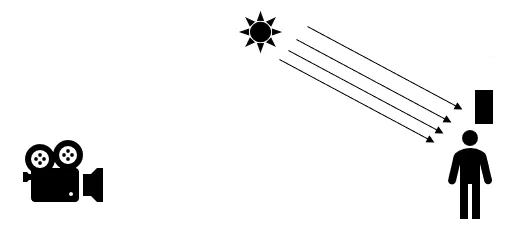
This method is usually used with an incident light meter.
When metering, point the meter's white lumisphere dome (which simulates the subject's surface) toward the camera and place it close to the subject. If you can't get close enough, you can measure the light in the same environment.
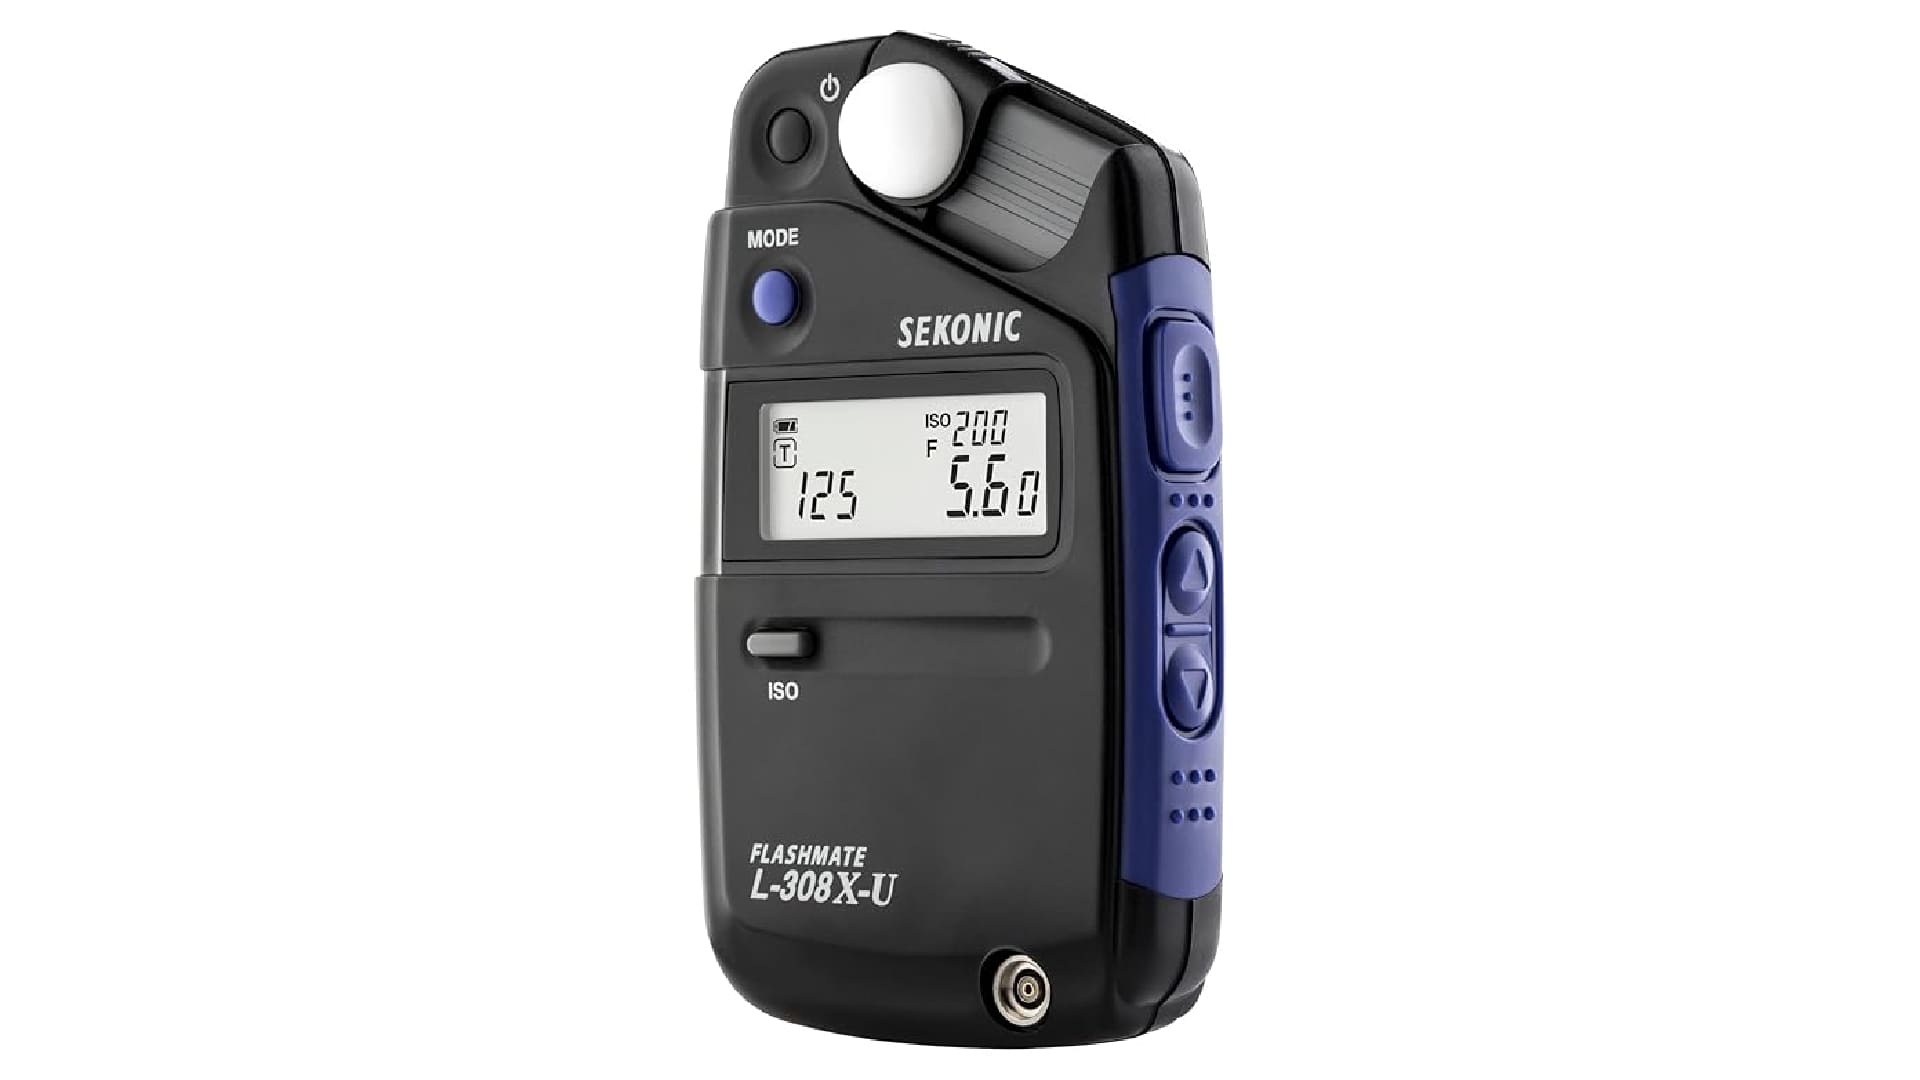
The advantage is that the results are accurate and not affected by the subject's color, making it ideal when you need precise exposure.
The downside is that professional incident light meters can be expensive (as seen in a screenshot from Amazon).

(2) Reflective Light Metering
Reflective light metering measures the light bouncing off the subject and assumes that the scene's average reflectance is 18% gray (as shown in the picture below).
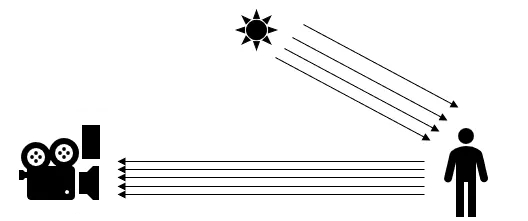
This method is common in lower-cost light meters and built-in camera metering systems.
The problem is that if the subject's actual reflectance differs from 18% — like in very bright snowy scenes or dark backgrounds — the metering can be off, causing the image to be too dark or too bright.
For example, this method might try to turn a black cat into an 18% gray cat.
What Is Exposure Value (EV)?
Let's talk about EV. You can think of EV as the reading from a light meter.
More precisely, EV is a logarithmic scale that measures light intensity. It combines the aperture (f-stop), shutter speed, and ISO into one number. This helps photographers quickly understand how light relates to exposure settings.
The main idea behind EV is to simplify how these settings work together so you can adjust them easily.
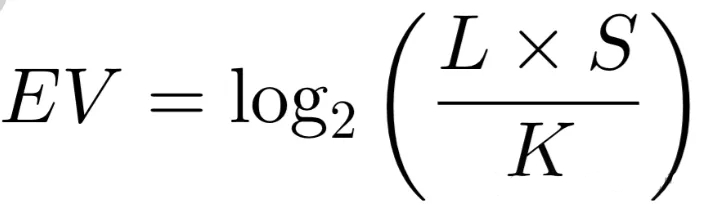
Where:
- L is the scene brightness (in cd/m²).
- S is the ISO sensitivity (like ISO 100).
- K is a calibration constant (usually 12.5, depending on the meter design).
In theory, you can use an inexpensive light meter to measure L and then calculate EV using your camera's ISO. In practice, professional light meters have many extra features, which we won't cover here.
Once you have an EV value, you can pick a set of exposure settings that match. You can use these settings directly or adjust them while keeping the exposure equivalent.
For example, for EV 13, you might use F8, 1/125s, and ISO 100. You can use these or change them if needed. In the same light, you might open the aperture by one stop and shorten the shutter speed by one stop, like F5.6, 1/250s, and ISO 100.
Also, when using a reflective light meter, you might need to apply exposure compensation by adding or subtracting EV.
EV and exposure involve many complex ideas. In this article, we'll stop here for now.
What Are the Limits of Light Metering?
Of course, light metering has its limits.
First, there are extreme reflectance scenes, as mentioned earlier. This mainly affects reflective metering, not incident metering.
Second, mixed light sources (like neon lights or stage lighting) can confuse the meter, so you might need to take several test shots.
Another special case is a scene with a high contrast ratio, where bright and dark areas differ greatly. In these cases, simple metering may not give you a good shot. You might need to bracket your exposures and blend them in post.
How to Use Light Metering for Creative Expression?
Whether you use a professional incident light meter or your camera's built-in reflective meter, these three simple tips can help:
- Know the Brand Differences: Different camera brands may use different names for their metering modes (for example, Nikon calls it "Matrix Metering" while Canon calls it "Evaluative Metering").
- Shoot in RAW: Shooting in RAW keeps more exposure data, giving you greater flexibility for adjustments later.
- Build Your Experience: Experiment with different metering modes, check your histogram and final shots, and soon you'll develop a feel for different lighting conditions.
Even though we've talked a lot about light metering, sometimes you need to break away from strict rules.
For example, sometimes photographers intentionally overexpose to create a bright, fresh mood. They might also underexpose to bring out shadows and add a touch of mystery.
Many well-known photographers don't always achieve perfect exposure, yet their photos still move us.
So when shooting, don't follow the meter's reading blindly. Use it as a starting point, decide what kind of photo you want, and then adjust your settings.
Moreover, if you shoot in RAW, you can easily adjust the exposure later using editing software. You can also tweak the colors to your liking and create images that match your personal style.
We would like to recommend TourBox, a creative console that many photographers and artists love. If you're fed up with clunky keyboard and mouse shortcuts during editing, TourBox lets you edit and color correct your photos with fewer moves and more ease.

It's just like using a game controller to play video games. You're sure to enjoy the experience. Click our photo editing page to learn more about what TourBox can do.

After all, the light metering gives you a guide, but you create the art.
Technology should serve art. Don't let its limits stop you from making something beautiful.