Mastering Quick Masks in Photoshop: A Comprehensive Tutorial
In the vast world of Photoshop, mastering the Quick Mask mode can feel like a daunting task.
Have you ever been frustrated trying to make precise selections? Are you struggling with getting that feathered edge just right? Or maybe you've wasted precious time painstakingly trying to isolate complex shapes?
Fear no more. This guide is about turning the Photoshop Quick Mask mode from your biggest headache into your secret weapon.
Get ready to unlock the true potential of Photoshop, simplify your workflow, and elevate your design game to the next level. No more dread, no more wasted time - let's dive in and master Quick Mask together!

In this article, you will learn:
- What Is Quick Mask Mode in Photoshop?
- The Principle of Photoshop Quick Masks
- Practical Applications of Photoshop Quick Masks
- How to Use Quick Mask in Photoshop?
- Final Thoughts About Photoshop Quick Mask
What Is Quick Mask Mode in Photoshop?
The Quick Mask mode is a powerful Photoshop feature that allows you to create a temporary mask effect on your image rapidly. It's commonly used to create precise selections, enabling the separation and manipulation of specific image areas.
Quick Mask mode allows you to create and adjust selections using paintbrush techniques. Rather than manually drawing around the area with a selection tool, you can use a brush to paint the areas you wish to select.
This is especially helpful when working with complex objects or irregular shapes that would be cumbersome to select with traditional tools.
In simple terms, the purpose of the Quick Mask mode is to create selections. But it's not just any ordinary selection tool; it's a unique one that leverages the power of the brush tool to create these selections.
This means the type of selection you create can vary greatly depending on the brush you use. The more proficient you become with the brush tool, the more versatility and creativity you can bring to your selections with the Quick Mask mode.
The Principle of Photoshop Quick Masks
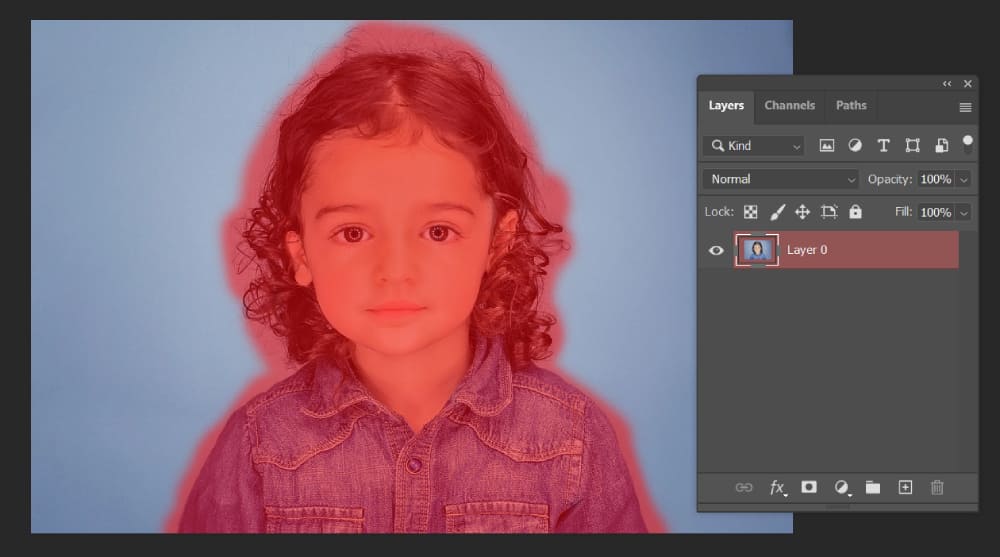
The principle behind Quick Masks is simple yet ingenious. When you enter Quick Mask mode, your canvas turns into a 'mask'—areas not selected appear shaded in a semi-transparent color (usually red), while selected areas remain their normal color.
The mask operates on grayscale values. Painting with black adds to the mask (indicating unselected areas), and painting with white subtracts from the mask (indicating selected areas).
The beauty of this tool lies in its flexibility—you can use any brush or editing tool to modify your mask, allowing for very precise and organic selections.
Practical Applications of Photoshop Quick Masks
Quick Masks open up a world of opportunities in Photoshop, including:
- Complex Selections: Quick Masks allow you to make intricate selections with ease, particularly useful when dealing with complex shapes or detailed objects such as hair or fur.
- Non-Destructive Edits: Using Quick Masks, you can create selections that can be modified at any time, allowing for non-destructive editing. This means you can go back and adjust your selection without permanently altering the image.
- Layer Masks: Quick Masks can be converted into Layer Masks, giving you control over the visibility of specific portions of a layer. This is useful for creating composite images, adjusting exposure in specific areas, or applying effects selectively.
- Selection Visualisation: Quick Masks provide a visual way to see your selection as a semi-transparent overlay. This allows you to better understand what's selected and make precise adjustments.
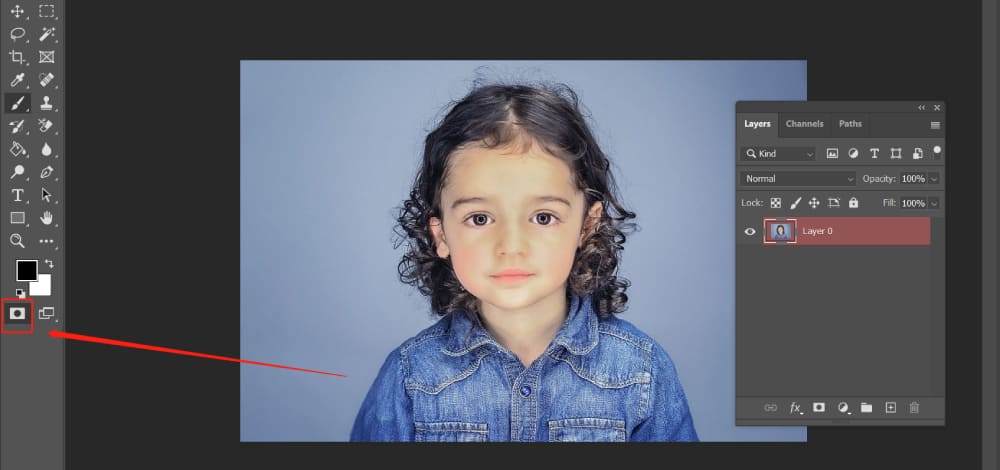
In the next section, we're going to use the following image of a little girl as an example to walk you through the process of creating complex selections using Quick Mask.
By leveraging the capabilities of Quick Mask, we'll show you how to isolate the little girl's figure from the background while also preserving the delicate details of her hair. Let's dive in!

How to Use Quick Mask in Photoshop?
Before we dive into our step-by-step tutorial, here are some key tips on using Quick Mask that we need to highlight:
- When you use Quick Mask to convert a selection into a temporary mask, you can use any paint tools or filters to edit and modify it. Once you exit Quick Mask mode, the mask will automatically revert to a selection.
- In Quick Mask mode, the foreground and background colors in the toolbox automatically switch to black and white.
- When you paint with white, you erase the mask, reducing the red area, and thus, expanding your selection. Conversely, painting with black increases the masked area, expanding the red overlay, and consequently, reducing your selection.
Let's get started with our process of creating complex selections using the Quick Mask mode.
Open up your image, then click the Quick Mask button. The Quick Mask button can be found just below the Color Picker (Foreground & Background Color Panel) in the left-hand toolbar of Photoshop.
Grab your brush tool and roughly select the person in the photo, as illustrated below.
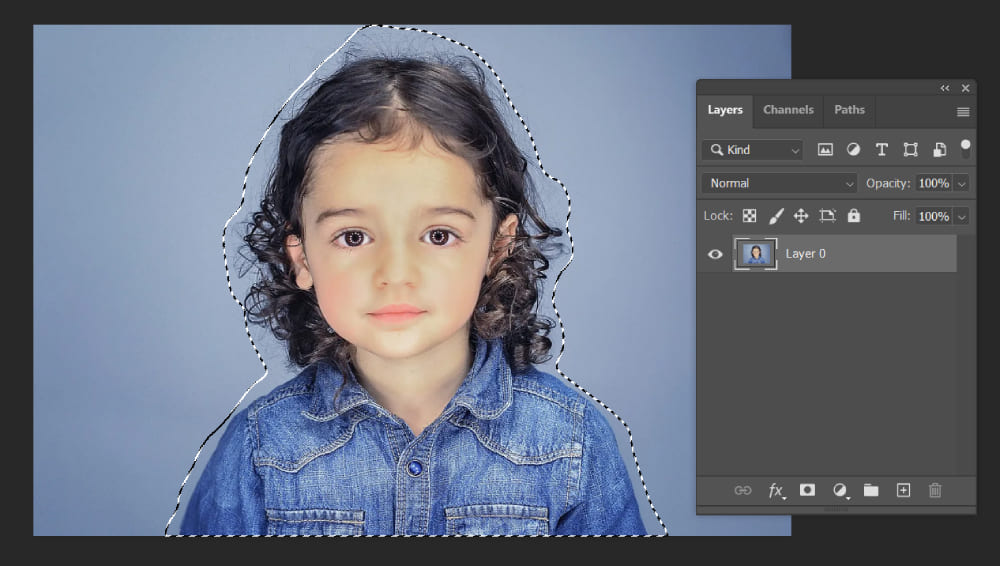
Click the Quick Mask button again to exit Quick Mask mode. Then, use the Ctrl+Shift+I keyboard shortcut to invert your selection.
Why do we need to invert the selection? Well, in Quick Mask mode, the red areas that you paint represent unselected areas—areas you don't want to include in your selection.
However, in practical Photoshop projects, when using Quick Mask to cut out a person from a photo, it's far simpler and more efficient to paint over the person than to cover a complex background with the brush. Just remember to invert your selection afterward.
In the left-hand toolbar, first click on the Lasso Tool, and then execute "Select and Mask" from the top menu bar.
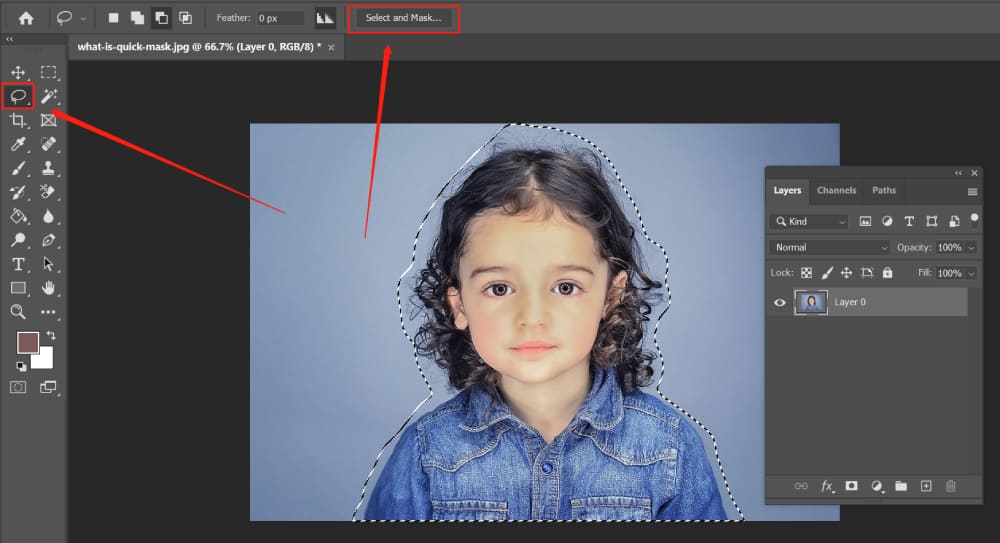
In the Select and Mask panel that pops up, we'll set the Radius in Edge Detection to 60, Shift Edge in Global Refinements to 15, and Amount in Decontaminate Colors to 57.
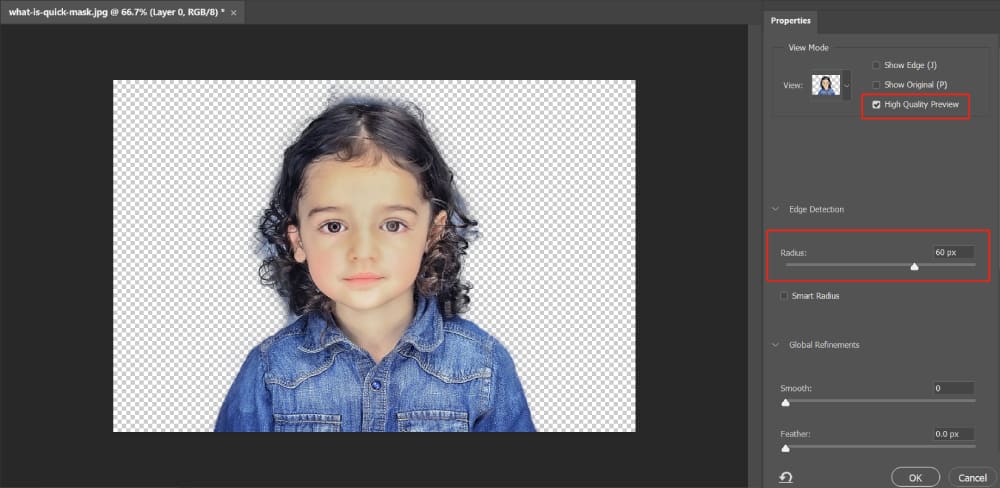
These are merely recommended settings; you should adjust them based on the specific needs of your project.

Next, choose the "Refine Edge Brush Tool" and select "Expand detection area" in the top panel. Then, paint over the areas where the background layer is present.
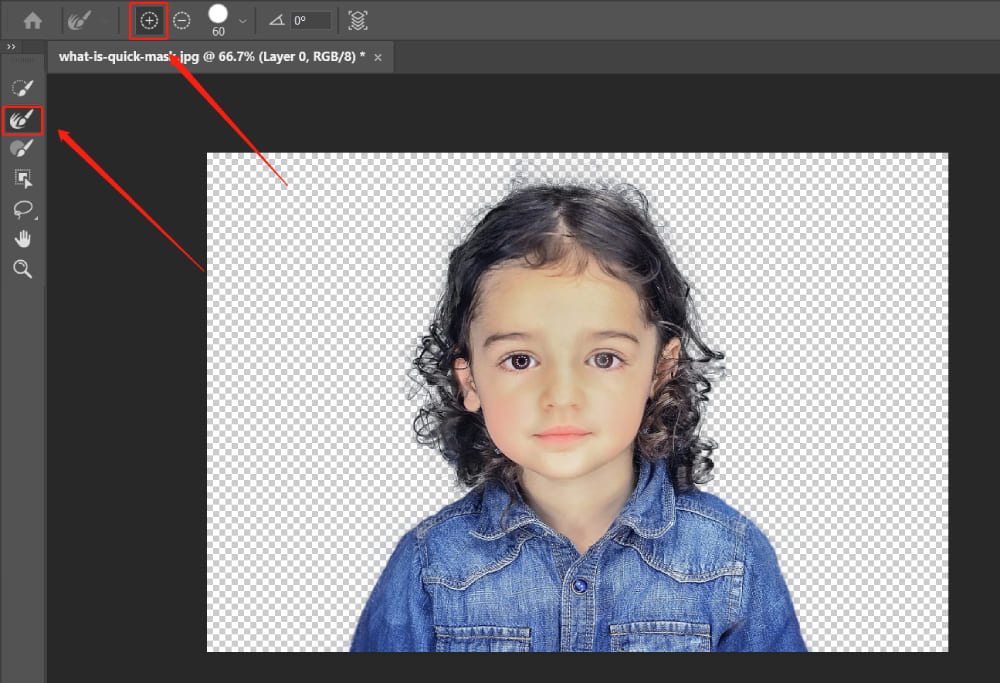
Once you're done, simply click "OK"! Just like that, you've successfully extracted an image of a person, complete with intricate hair details. It really is as simple as that.
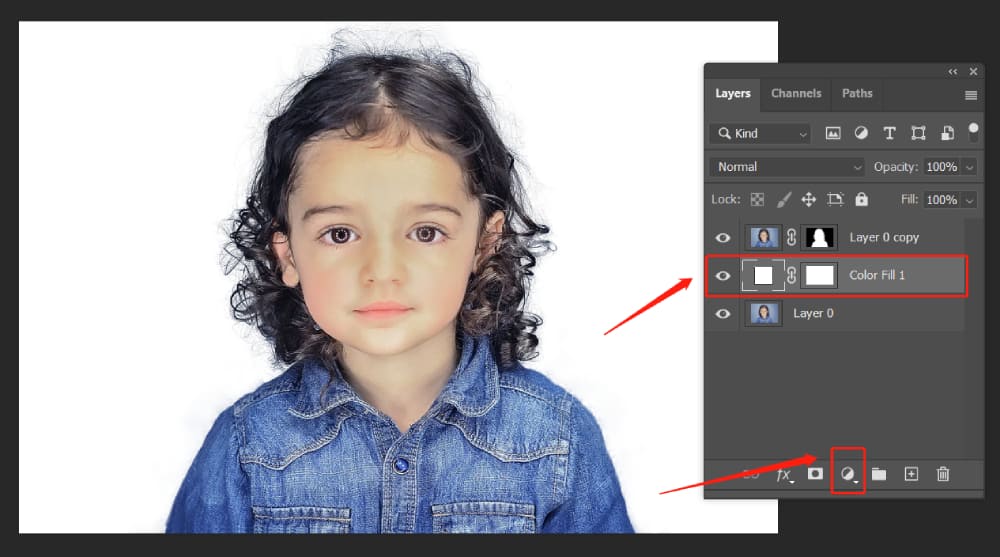
Now, we can add a white background to the image. Click on "Create new fill or adjustment layer" at the bottom of the layer panel and create a solid color fill in white.
Of course, if you'd prefer a different color, feel free to make that change. This is where you can let your creativity run wild.
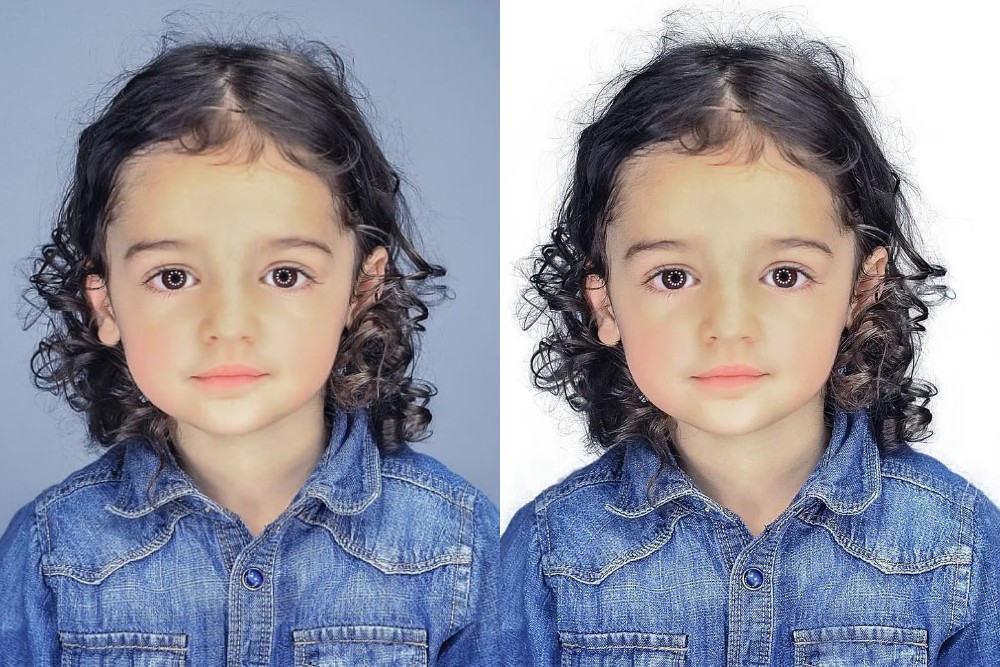
Let's take a look at the before-and-after comparison. You'll see that we've managed to retain most of the person's details, particularly the fine details in the hair.
Final Thoughts About Photoshop Quick Mask
In wrapping up this tutorial on using Quick Masks in Photoshop, we would like to share a few handy tips that can streamline your editing process.
We've explored various aspects of Quick Mask mode, like using the brush tool for masking, refining edges with the Refine Edge Brush Tool, and tweaking parameters for edges.
During these processes, we often need to adjust the brush size, shape, and other parameters frequently. Using a keyboard and mouse for these adjustments can be quite cumbersome and not very intuitive, which can certainly become frustrating.
This is where a product like TourBox comes into play.

TourBox is an innovative tool designed specifically for digital content creators. It offers an efficient, intuitive way to manage your software controls, making it easier than ever to tweak parameters on the fly.
Whether you're adjusting brush size, switching tools, or fine-tuning edge parameters, TourBox allows for seamless transitions and precise control.
Imagine being able to make all your adjustments with one hand, freeing the other to work on your canvas uninterrupted.
With TourBox, you can do just that. It's compatible with software like Photoshop, and it's designed to boost your productivity and streamline your workflow.
In the context of today's tutorial, using TourBox would have made our work with Quick Masks even smoother. Adjusting the brush tool, refining edges, switching between mask modes—all these tasks could be done fluidly with TourBox.
And with that, we conclude our tutorial on Quick Masks in Photoshop. As always, we are eager to see what you create with these new skills and, perhaps, with your new TourBox. Happy editing!