Star Trail Photography: A Beginner's Guide to Shooting & Editing
When you look up at the vast night sky, the stars aren't still. The Earth is turning, and the stars slowly sweep across the sky, leaving graceful trails.
Star trail photography captures that passage of time. It turns motion you can't see into an image you can study, keep, and share. It has the romance of astronomy and the hands-on fun of photography.
In this tutorial, we'll cover both shooting and post-processing to help you get started quickly with star-trail photography.

In this article, you will learn:
- How Star-Trail Photography Works?
- Shooting Tips for Star Trail Photography
- How to Post-Process Star Trails Photos?
- Conclusion
How Star-Trail Photography Works?
The basic idea is Earth's rotation. As the planet spins, the stars appear to move across the sky. By using long exposures, you record the paths the stars trace. Because our eyes can't see this motion, the photos often look magical and mysterious.
Shooting Tips for Star Trail Photography
1. Shooting Time
Pick a clear, cloud-free night. Also, watch the moon. Shoot on moonless nights or near the crescent phase when possible. Bright moonlight will wash out many stars and make the trails thin and faint.
A handy trick is to plan around moonrise and moonset so you can use moonlight to light the foreground.
For example, start shooting star trails 1–2 hours before moonrise and leave the camera in place. When the moon rises, take a shot of the foreground without moving the camera. Or do the reverse: shoot the foreground about 30 minutes before moonset, then leave the camera and keep shooting the star trails.
You can also shoot the foreground during the blue hour (just after sunset or just before sunrise) and composite that shot with your star-trail photos in post.
2. Shooting Direction
Go somewhere far from city lights when you can. You can still shoot in a city, but the trails will be sparse and less interesting.
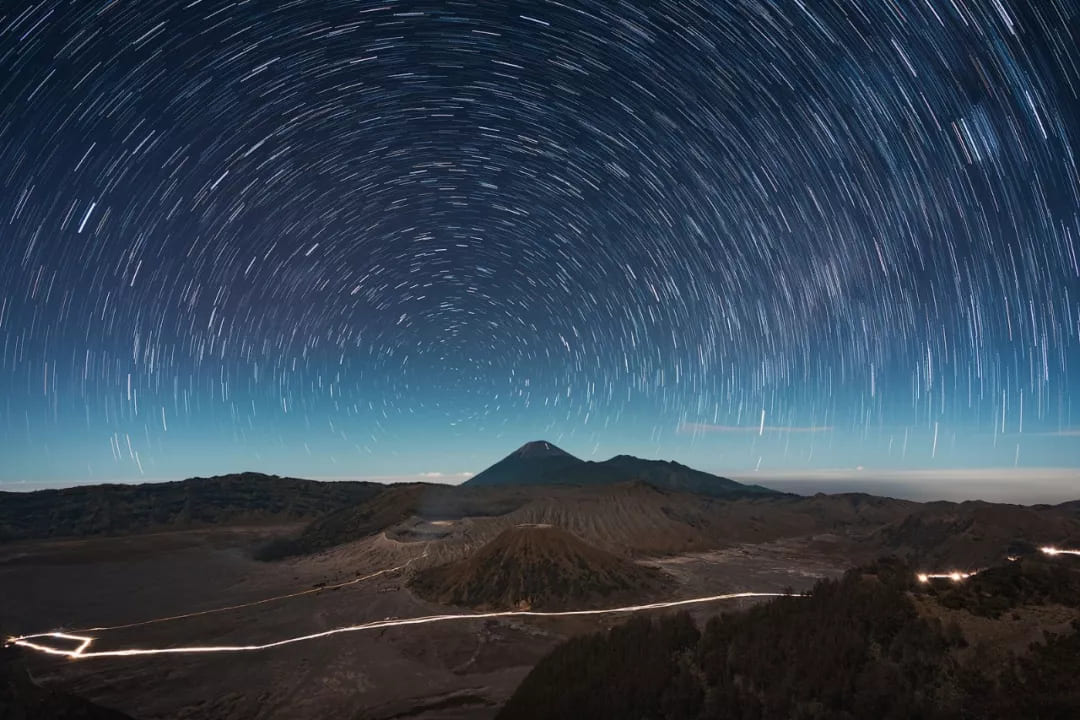
The direction you point the camera changes the shape of the trails. To get concentric circles, face north in the Northern Hemisphere (south in the Southern Hemisphere) so the trails circle around the North Star (Polaris). If you can't find Polaris, use a compass to find true north (or true south in the south).
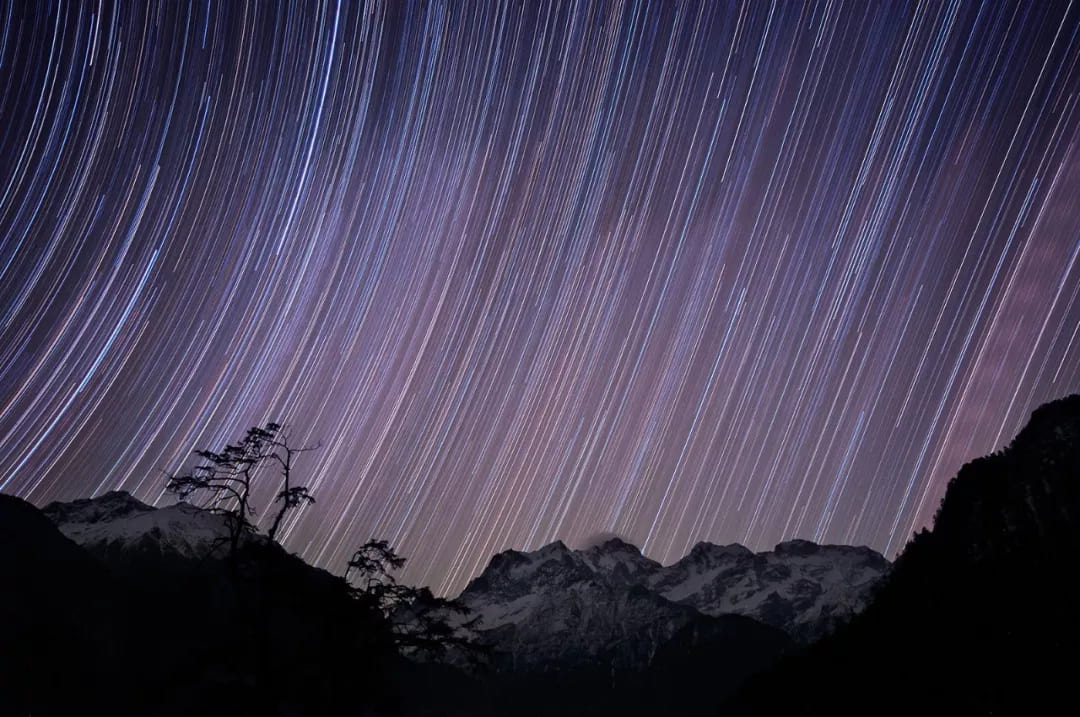
Pointing east or west will give you arced trails.
3. Gear
Star-trail photography doesn't require fancy gear. Wide, standard, and telephoto lenses all work. Ultra-wide lenses can capture full concentric circles, while long lenses will show the trails as arcs.
Most other accessories are the same as for regular night-sky shots, but a shutter release is especially important.
If you want to learn more about shooting the night sky, check out our other article on night-sky photography.
Further Reading:
Night Sky Photography: A Beginner's Guide to Shooting and Editing
You can shoot the night sky without a shutter release, but for star trails, it's best to use a programmable shutter release (intervalometer). It lets you set each exposure time and the number of shots. After you press the shutter, the camera follows the program until it finishes.
If you prefer a single very long exposure, you must use Bulb (B) mode, and you'll need a shutter release to hold the shutter open.
One useful extra is an anti-fog wipe or sheet. In humid places, the lens can fog during long night shoots, which can ruin the photos. Wiping the lens with an anti-fog sheet before you start can help delay fogging.
4. How to Shoot Star Trails?
The old-school way is one single long exposure. To get full concentric circles, you usually need at least 30 minutes, and one hour or more looks better.
But very long exposures bring lots of noise. In-camera long-exposure noise reduction and post-processing can help, but they don't solve everything. Very long exposures can also overexpose the foreground and drain your battery.
A popular digital method is to shoot many consecutive frames (each 30 seconds to a few minutes) and stack them in post.
For example, if you want one hour of total exposure:
- If each shot is 5 minutes, you need 12 photos.
- If each shot is 3 minutes, you need 20 photos.
- If each shot is 30 seconds, you need 120 photos.
What's the best single-shot length? There's no one-size-fits-all answer.
It partly depends on how powerful your computer is. Importing 120 big files into Photoshop at once can be very slow or even crash a mediocre machine. Importing 12 files is much easier for most computers, but if one of those 12 shots fails, the whole trail can have a gap. Different cameras also handle long-exposure heat noise very differently.
So choose the single-shot length that fits your gear and workflow.
A good practical workflow:
- Test first. Use a wide aperture, high ISO, and a short shutter to take quick test shots. This helps you set the composition and check the histogram.
- From the test shot, decide the correct total exposure for both the sky and the foreground.
- Then lower the aperture (stop down) and reduce ISO to improve image quality.
- Use reciprocity calculations to find the new shutter time that gives the same exposure at the new aperture/ISO.
- Shoot multiple frames with that shutter time until the total exposure equals your target (for example, one hour).
Example:
Your test shot that looks good is ISO 12800, f/4, 4 seconds. Treat that as the correct exposure. You want better quality, so change to ISO 400 and f/5.6. Using reciprocity, the needed shutter becomes 4 minutes per shot. To reach one hour total, shoot 15 consecutive 4-minute exposures.
In short: first use [wide aperture + high ISO + short shutter] to quickly set composition and exposure (easy to read the histogram). Then lower the aperture and ISO for better image quality, compute the longer shutter time with reciprocity, and finally shoot many frames to add up to your desired total exposure.
When you use the multi-shot stacking method, turn off your camera's long-exposure noise reduction. That setting doubles the time between exposures (the camera spends extra time processing), which can make the star trails break up.
Apertures between f/2.8 and f/5.6 are common. A wider aperture (smaller f-number) makes brighter trails.
Set ISO based on the scene, typically between 200 and 800. Lower ISO gives less noise and cleaner images.
Like other night-sky shooting, autofocus usually won't work in the dark. Switch your lens to manual focus.
How to Post-Process Star Trails Photos?
Post-processing star-trail photos is pretty simple. You can use dedicated stacking software or do it by hand in Photoshop. Here's an easy method:
- First, make basic adjustments in Adobe Camera Raw or Lightroom. Fix brightness and color — white balance, exposure, contrast, saturation — and run noise reduction.
- Apply those edits to every photo. Use batch or sync so all images match.
- Open Photoshop and go to File > Scripts > Statistics. Load your photos into the stack.
- Set the stack mode to Maximum. Processing time depends on how many photos you have and your computer, so it may take a bit. When it's done, the star trails will appear.
If you want a deeper, step-by-step guide to stacking in Photoshop, check out our other tutorial:
Further Reading:
When you come back from a photo trip with hundreds, or even thousands, of shots, editing them can be a real headache. If you want to speed up your workflow, you might like TourBox, a creative console many photographers love.

Whether you're fine-tuning photos in Photoshop or organizing and color-correcting in Lightroom, TourBox helps you do more with fewer steps. It gives a smooth, intuitive control experience, kind of like using a game controller, so editing feels fun instead of a chore.

If you're curious about TourBox, visit our Photo Editing page to learn more.
Conclusion
Light from stars that left those stars hundreds of millions of years ago crosses the vast universe and arrives here like a gift to us. With a camera, we can stack photos taken over time to make star trails and record the passage of time. It's a truly romantic thing.
And shooting and processing star trails isn't hard. You can even capture them in a city sometimes. Give it a try!