How to Use the Tone Curve in Lightroom Classic?
The Tone Curve in Lightroom Classic can seem quite intimidating. If you've ever felt this way, you're not alone.
With sliders, you can freely adjust the settings and see the immediate effects based on different values. But when it comes to the curve, it can be a bit overwhelming to know where to start.
However, you may have heard about the powerful capabilities of the Lightroom Tone Curve. In this article, let's explore the incredible functionality of the Tone Curve and see how it can enhance your photo editing process.

In this article, you will learn:
- What Is Tone Curve in Lightroom?
- How to Use Tone Curve in Lightroom?
- Frequently Asked Questions About Lightroom Tone Curve
- Final Thoughts About Lightroom Tone Curve
What Is Tone Curve in Lightroom?
In the Develop module of Lightroom Classic, you can easily find the Tone Curve panel located just below the Basic panel.
The Tone Curve allows you to control the brightness levels and colors in your image. Before we dive into how to use the Tone Curve, let's briefly go over the different components of the panel.
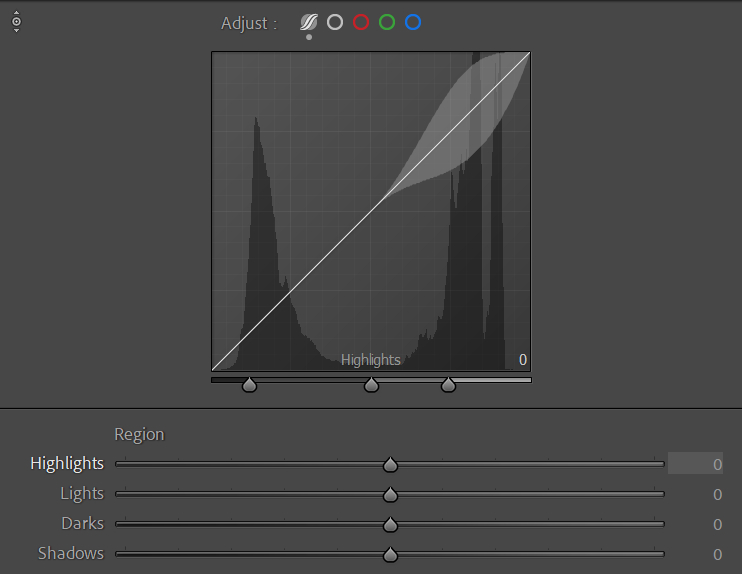
- When you click on the Tone Curve panel, you'll notice that the adjustment mode and channels are placed at the top of the curve. This makes it convenient to switch between modes and channels while making adjustments.
- The middle section of the panel is where the Curve resides. The curve's baseline runs from the bottom left to the top right. Any adjustments above the baseline will brighten the image, while adjustments below the baseline will darken it.
- At the bottom of the panel, you'll find parameter sliders that allow you to make adjustments directly. You can either drag these sliders or manipulate the curve above to achieve the desired results.
Additional Tip:
The curve in the Tone Curve panel may resemble the histogram, as they both have a similar appearance of a coordinate system with a wavy pattern within a quadrant.
They do have some similarities. The horizontal axis represents the transition from black levels (0) to white levels (254) from left to right, and the wavy pattern within the quadrant displays how many pixels the photo has at each brightness level.
By now, you should have a general understanding of the Tone Curve in Lightroom. In the next section, we will continue to share tips on how to use the Tone Curve in Lightroom Classic effectively.
How to Use Tone Curve in Lightroom?
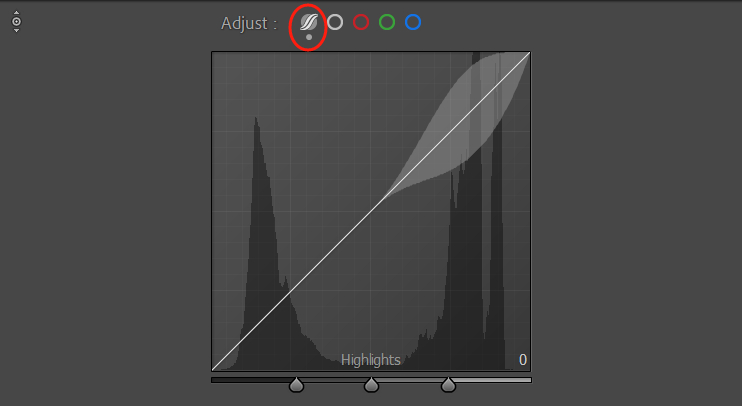
In this section, we will share some tips on how to use the Tone Curve. When you open the Tone Curve panel, the default mode is the Parametric Curve, which is also the easiest mode to work with.
You can find it on the far left of the mode switch with a gray circle and an S-shaped curve symbol.
One key feature of the Parametric Curve is the ability to customize the range and area affected by the tone adjustments. In this mode, you can personalize the dividing points that determine the range of influence.
Below the Curve, three dividing sliders default to evenly splitting the curve into four sections. The values displayed represent the percentage each section occupies, which is set to 25/50/75 by default.
The parameter sliders, namely Highlights, Lights, Darks, and Shadows, correspond to these four sections. Placing your mouse over any of these settings will show you the range it affects on the curve.
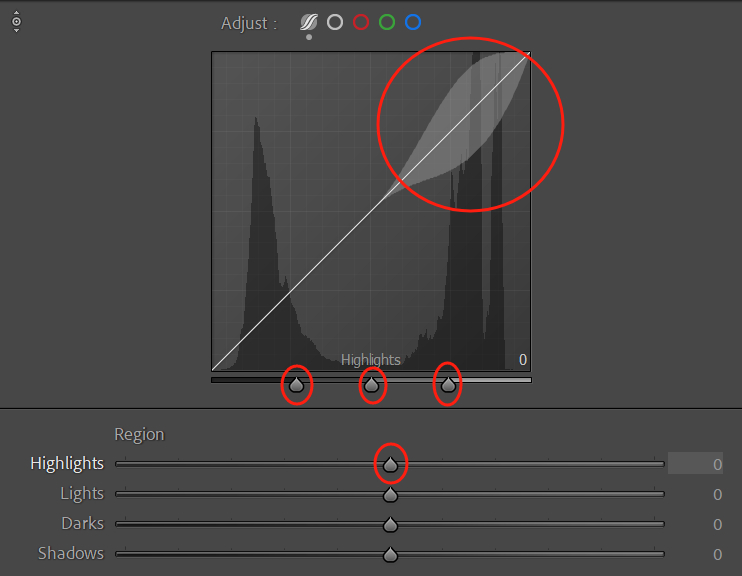
Now, the three dividing sliders we mentioned earlier impact the range of influence for the parameter sliders below. By adjusting the percentage of each slider, you can personalize the adjustments for the affected areas of the tone.
Take this photo below as an example. In the default setting, the center point of the shadow range is positioned at 25, resulting in a significant span on the curve.
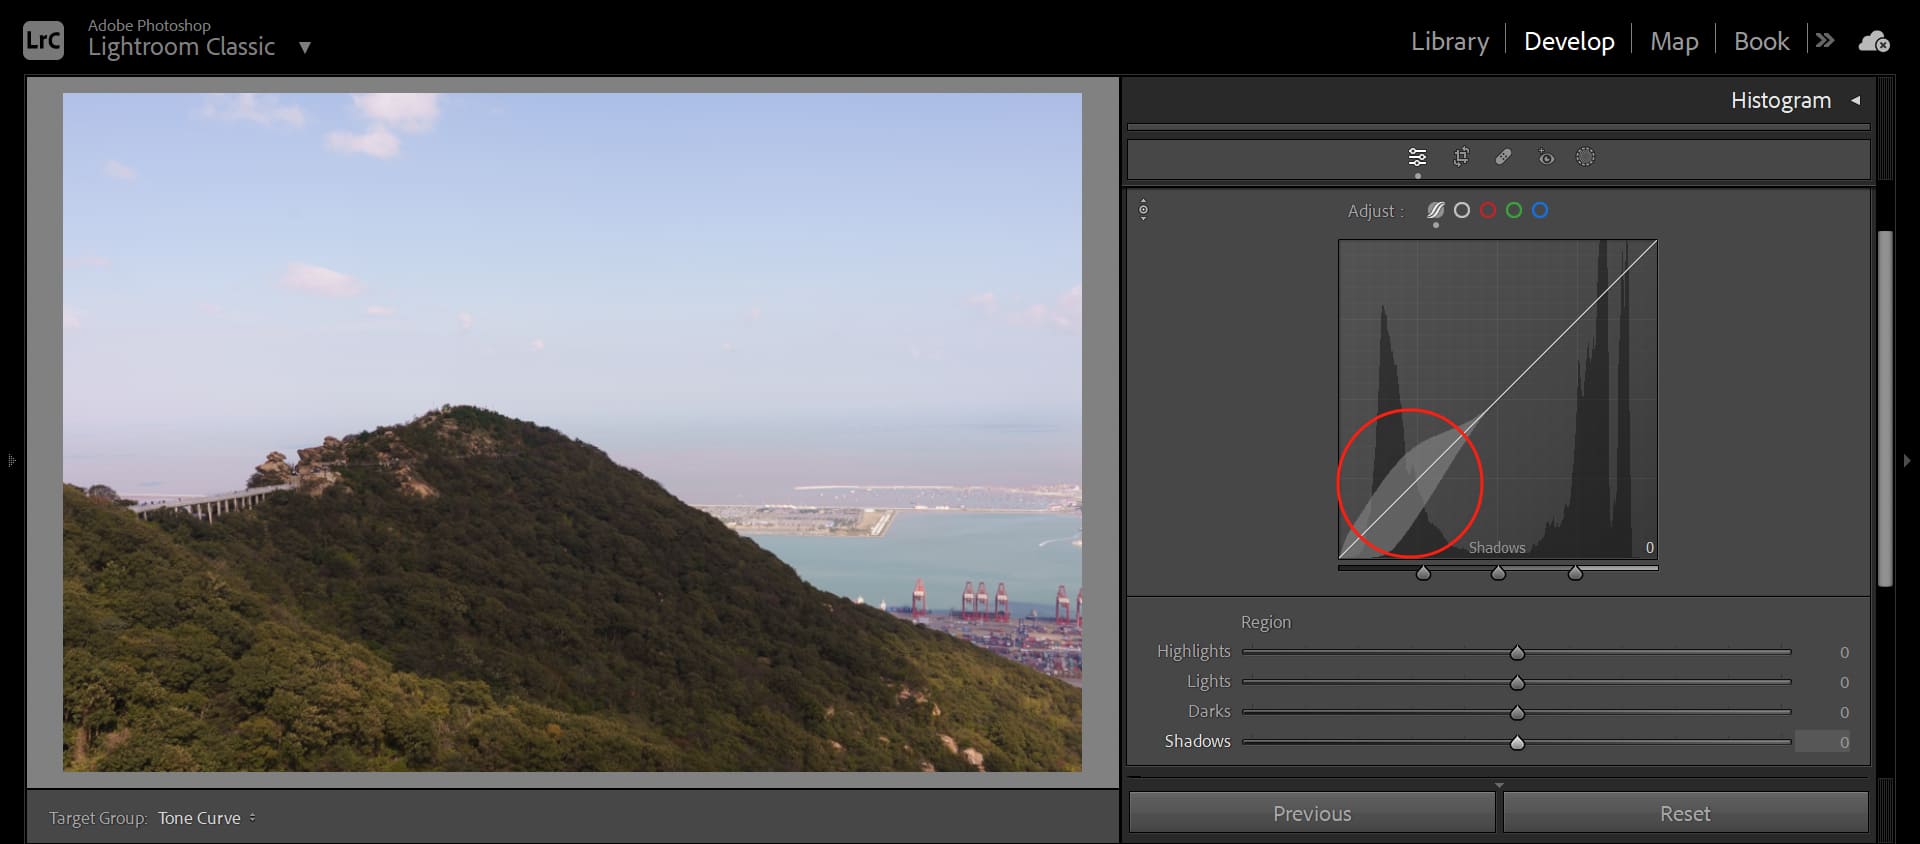
However, if we adjust it to 10, the shadow range becomes narrower. This functionality allows you to make subtle adjustments based on the color characteristics of different photos. Isn't that smart?

It can be overwhelming for beginners in photography or photo editing to hear terms like highlights, shadows, or light and dark tones without knowing where these settings correspond to in a photo.
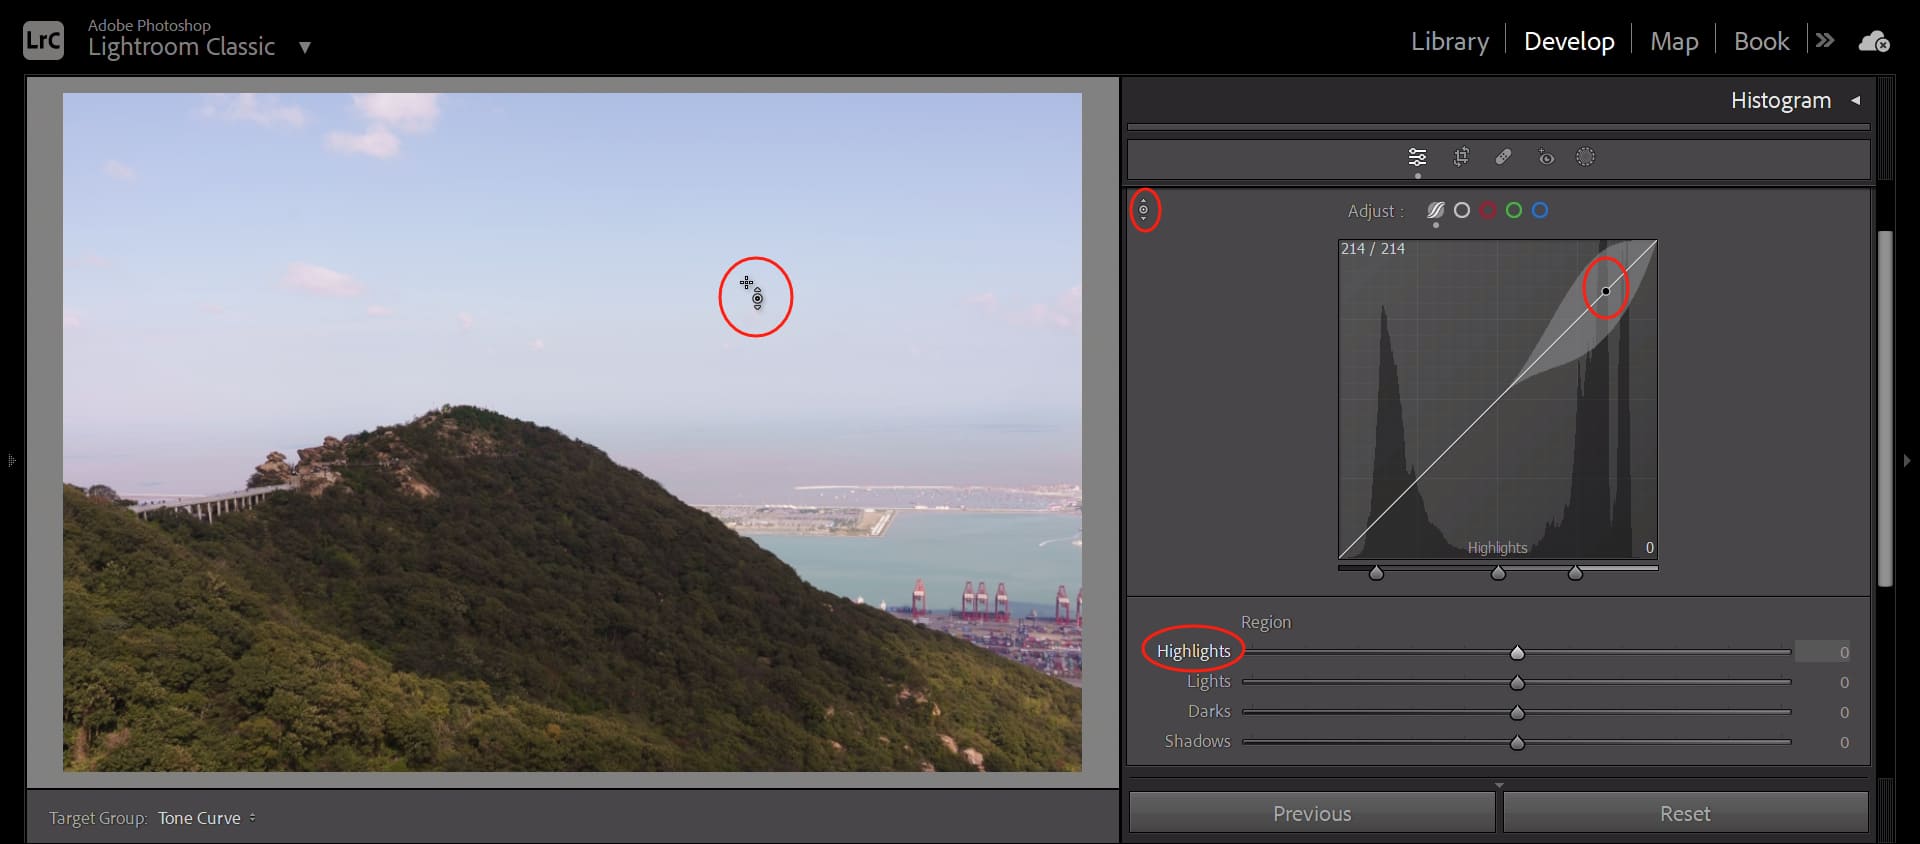
Fortunately, Lightroom Classic provides a handy tool for this. A small circle is in the top left corner of the curve panel. When you click on it, your mouse cursor will turn into an up-and-down arrow.
You can then move it to any position in the photo, and the corresponding area and settings on the curve will light up on the right side.
If you find the above operations a bit cumbersome, you might want to consider using TourBox. TourBox is a creative tool designed for photographers, creative professionals, and content creators.
With TourBox, you can assign the Highlights, Lights, Darks, and Shadows settings in the Tone Curve to TourBox's buttons. Then, you can press the corresponding buttons and use TourBox's rotating controls to adjust the parameters.
This allows you to clearly feel the changes in the Tone Curve values and their impact on your photos, all with just one hand.
TourBox also offers TourMenu and macro settings, which further enrich your options and allow you to perform various adjustments with just TourBox, eliminating the need to remember keyboard shortcuts or perform tedious operations.

In the Tone Curve, you can also use an S-shaped curve to adjust your photos.
The S-curve is the most commonly used curve setting in photo editing. By increasing the highlights and decreasing the shadows, you can easily achieve a boost in contrast. It's called an S-curve because the resulting adjustment resembles the shape of the letter "S".
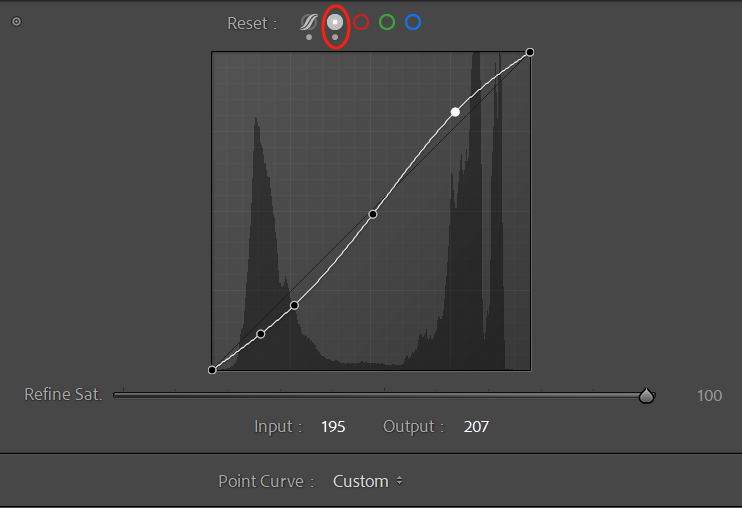
Adjacent to the Parametric Curve in the mode switch at the top, you'll find the Point Curve, represented by a grey circle. Think of it as an advanced, customizable version of the Parametric Curve.
The Point Curve doesn't have the sliders at the bottom. Instead, you can adjust it by dragging the curve or placing points on it. Its advanced feature lies in the ability to add multiple points for exposure lock, allowing for complex multi-point curve adjustments.
You can simply create an S-curve in the Point Curve to quickly enhance the contrast of your photos.
The Tone Curve not only allows you to adjust the tonality of a photo but also enables you to change its colors. Using the curve to color grade a photo is a quick and efficient method.
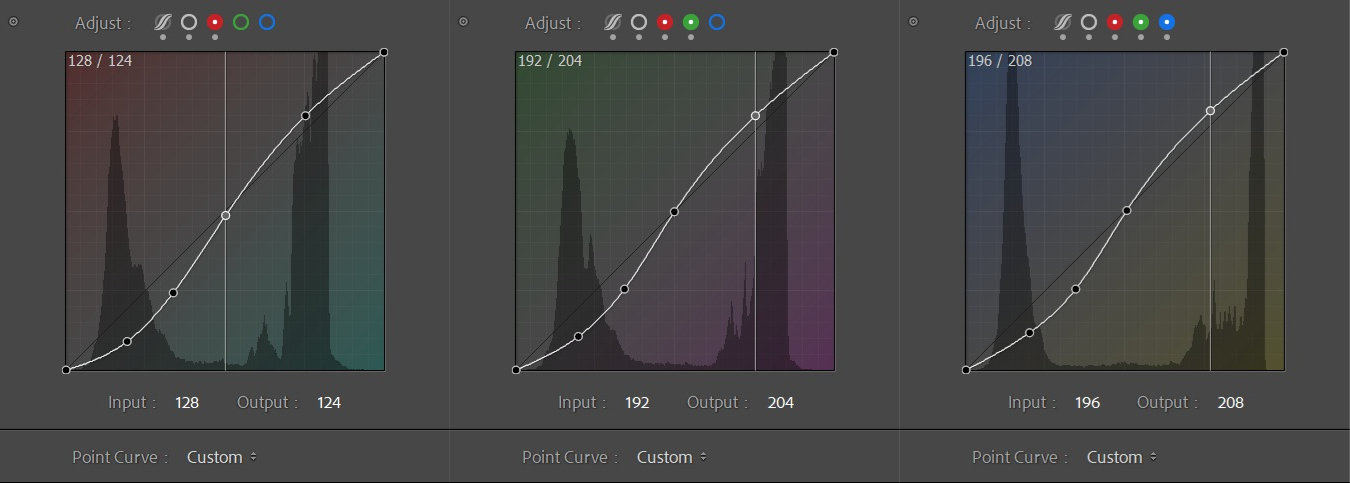
In the mode switch at the top, to the right of the Point Curve, you'll find the Red, Green, and Blue channel curves. These curves provide a fast way to perform color adjustments. Within each color channel curve, you can make multi-level color adjustments to the highlights and shadows.
For example, you can increase the green tint while boosting the exposure of the shadows, or enhance the warm tones while increasing the exposure of the highlights. You can modify the color bias and exposure in different exposure ranges, all within the curves.
So, if there's one feature in Lightroom Classic that can accomplish quick post-processing of a photo, it would be the Tone Curve.
Additional Tip:
If you want to reset your curve settings, double-click on any point on the Point Curve or right-click on the curve and choose "Reset Channel" or "Reset All Channels." Additionally, the right-click menu offers powerful features like "Snap to Grid."
The different adjustment modes in the Tone Curve are interconnected. During post-processing, it's a good idea to start with the Parametric Curve.
If you have more specific requirements, you can switch to the Point Curve and add multiple-point locks for fine-tuning. Finally, you can use the RGB Channel Curve to add color grading to your photo.
Frequently Asked Questions About Lightroom Tone Curve
Question: What Are the Modes of the Tone Curve?
The Tone Curve has five modes: Parametric Curve, Point Curve, and the RGB curves for the Red, Green, and Blue channels.
Question: How to Open the Tone Curve in Lightroom Classic?
In the right-hand panel of the Develop module, locate the "Tone Curve" panel and click on its header to expand it.
Question: How to Use the Tone Curve to Change the Image Colors?
You can select individual Red, Green, and Blue channels at the top of the Tone Curve panel. Once you've chosen a channel, you can add points on the curve and drag them to adjust the colors in the image.
For example, if you want to make the image warmer, you can drag the point upward on the Red channel curve to increase the red component in the image.
Question: How to Use the Tone Curve to Change the Image Contrast?
Generally, if you want to increase contrast, you can drag a point downward in the bottom-left corner of the curve and drag another point upward in the top-right corner, creating an S-shaped curve.
If you want to decrease contrast, you can do the opposite, dragging a point upward in the bottom-left corner and dragging another point downward in the top-right corner, creating an inverted S-shaped curve.
Question: How to Use the Tone Curve to Create Split Tone Effects?
Split tone is a common photography technique that adds different color tones to shadows and highlights, enhancing the visual impact of an image.
To create a split tone effect, you can drag the points in the bottom-left and top-right corners of the Point Curve independently so that the ends of the curve no longer intersect with the axes. This allows you to add some color in the shadows and highlights.
You can also perform the same adjustments on individual color channels to achieve more color combinations.
Final Thoughts About Lightroom Tone Curve
That's all for the tips on using the Tone Curve in Lightroom Classic. There are many different combinations of settings in Lightroom that can achieve similar color grading effects, and that's part of the fun of post-processing.
While there may not be an exact set of parameters that will work for everyone, you can develop your post-processing workflow based on your preferences and habits.
In reality, using Lightroom Classic for photo editing is not complicated. Strip away the unnecessary complexities and focus on the essential steps to simplify the process.
There's no right or wrong in post-processing, as long as you enjoy the results. We hope you can find joy in editing your photos.
Product Recommendation:
As we conclude our tutorial on the Tone Curve in Lightroom Classic, we'd like to recommend TourBox's latest product, TourBox Lite.

TourBox Lite is available at a more affordable price and with simpler settings, allowing you to quickly get started with TourBox. It's perfect for creative professionals, photographers, and content creators who haven't experienced TourBox yet but want to enjoy the one-handed control it offers.
If you're tired of cumbersome keyboard and mouse operations, consider how TourBox Lite can bring a fresh perspective to your photo editing, video editing, and office software work.