What Is Focus in Photography & How to Understand It?
Focus in photography is simple to explain: a scene has many elements, and whatever you focus on will appear sharp. But in real shooting, focusing isn't that easy. There are lots of techniques and little tricks involved. In this article, we'll go over them together.

In this article, you will learn:
What Is Focus in Photography?
Focus means adjusting the lens so its optical focal point matches the distance to your subject. That makes the subject form a clear, sharp image on the camera's sensor (or on film). In other words, focus makes the place you want "clearly visible."
If something is in focus, it will be sharp. But if something is not in focus, it isn't always blurry.
Why not always blurry? There are two main reasons:
- 1. The Focus Plane
In many shots, the scene can be treated as a flat plane. If you focus on any point in that plane, other points that lie on the same plane will also be sharp.

- 2. Depth of Field
Look at the photo of a row of corn below. You can see that even corn that isn't exactly on the same plane can still look fairly clear. That's depth of field.
Things not on the focus plane can be slightly blurred, but our eyes have limited resolving power, so a small blur often still looks sharp. That creates a zone in front of and behind the focus plane where things appear clear. That zone is the depth of field.
Things inside the depth of field look sharp. Things outside it look blurry.

So now you know: to make something sharp, either put your focus on it or make sure it falls inside the depth of field.
How to Focus in Photography?
The idea of focus is simple. Doing it while shooting is not always that easy. So, how do you focus correctly?
First, know this: cameras focus in two ways — autofocus and manual focus:
- Autofocus (AF) means you half-press the shutter and the camera drives the lens to focus where you asked.
- Manual focus (MF) means you turn the focus ring by hand until the image looks sharp.
The difference is clear: one is done by the camera, the other by you.
We usually recommend using autofocus. Overall, AF is faster and more accurate than most people can be by hand.
Think of it like factory work vs. handcraft. A machine trained a little can run fast. To match that speed and consistency by hand, you'd need to be a very experienced pro.
1. Why Does Autofocus Sometimes Miss?
Here are the common reasons:
- The subject is too close: Every lens has a minimum focus distance. If your subject is closer than that limit, the lens can't focus. Check the lens markings — you'll usually see something like "0.XX m – ∞." If your subject is closer than the smallest number, AF won't work.
- There's no contrast where you aim: Autofocus needs something to "see." If you point AF at a flat, single-color surface, the camera can't tell where to lock focus. That's why AF often fails in very dark or uniformly colored areas. A good trick is to aim at an edge or a brighter spot near your subject. For very dark scenes, you can shine a phone light on a spot to help the camera lock, then move back to your subject — or switch to manual focus.
- The autofocus points aren't well-matched to the subject: Many cameras use different types of AF points. The basic kind works like a single line — it detects contrast in one direction (horizontal or vertical). If your subject's detail runs parallel to that line, AF can struggle. Cross-type AF points detect both directions and work better on a wider range of subjects. Check your camera manual to see which points are cross-type and use those when possible.
- The subject is moving too fast: If your subject is wildly moving, the AF system may never finish locking before the subject has moved out of frame. In that case, try pre-focusing on a spot the subject will pass through (so the subject enters your focus plane or depth of field). This is called "trap focusing." If you can't do that, switching to manual focus can sometimes give you a better chance.
Quick recap and tips:
- If the subject is closer than the lens's minimum focus distance, AF won't work — period.
- For low-contrast areas, focus on an edge or brighter spot, or use MF.
- If linear AF points fail, use cross-type AF points (check your manual).
- For fast-moving subjects, try trap focusing or switch to manual focus.
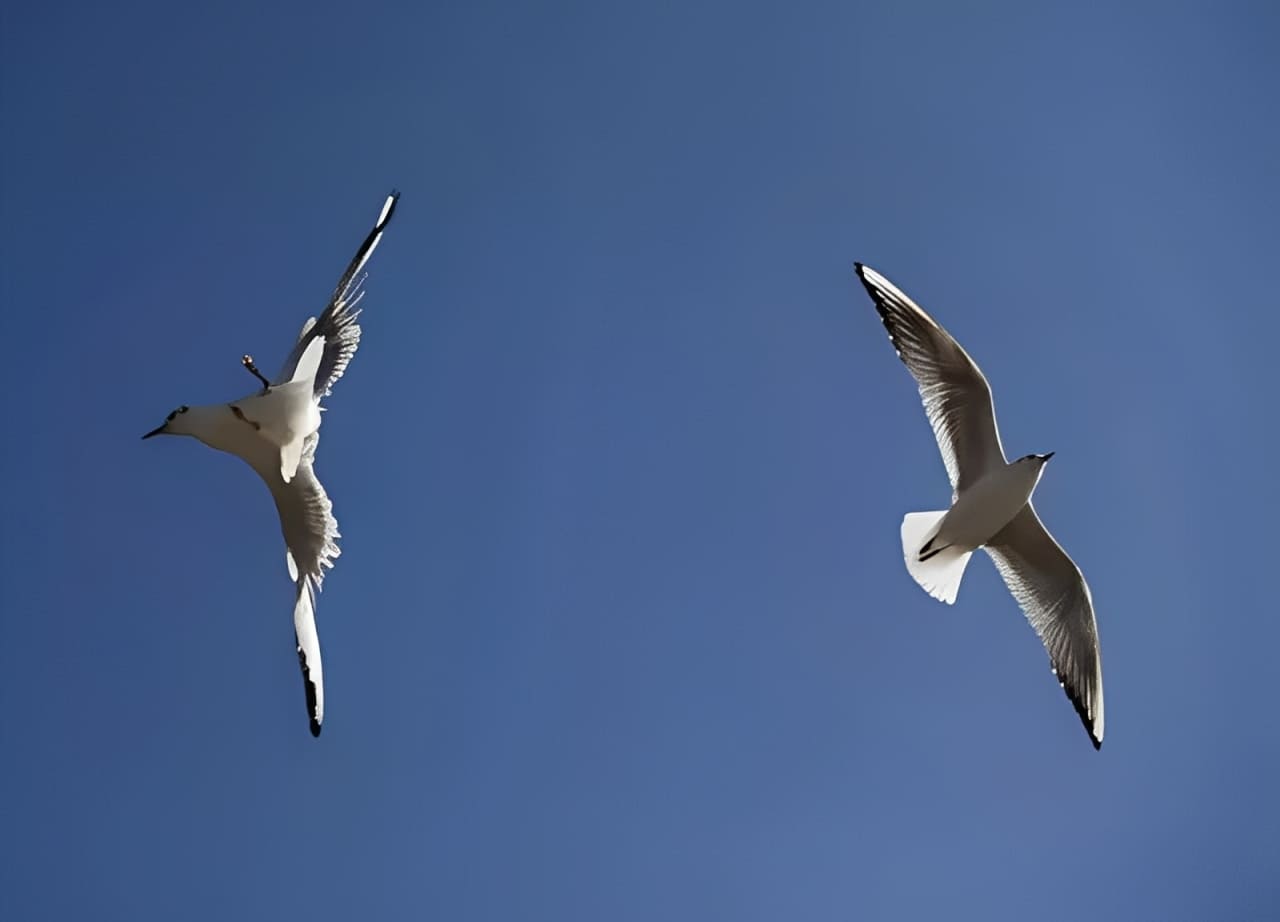
For example, two seagulls flying fast might force you to use manual focus for a better chance of success.
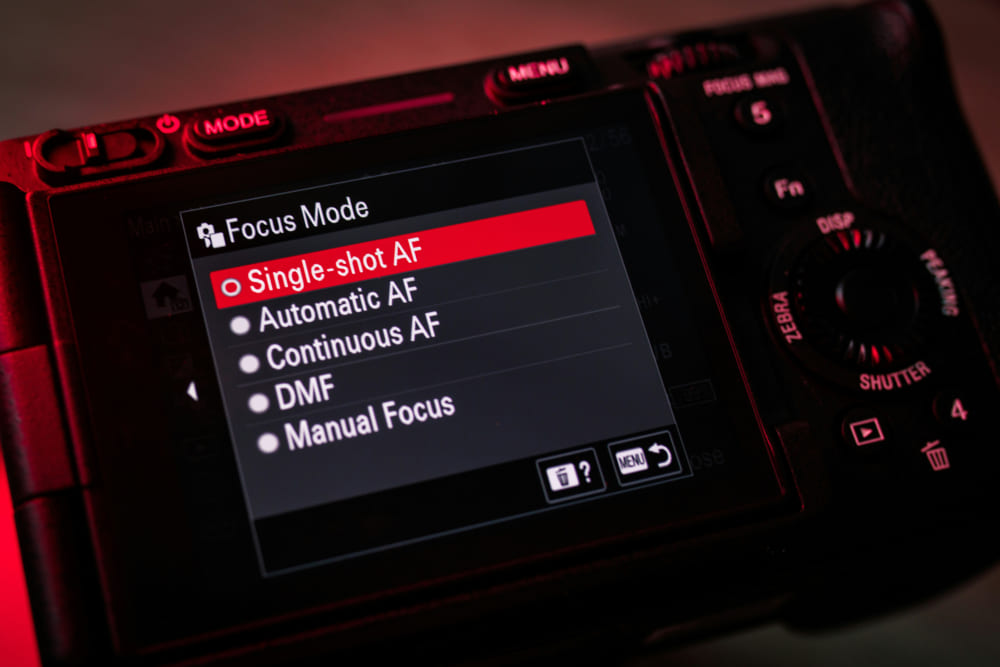
2. How to Understand Focus Modes?
Focus modes are MF, AF-S, AF-C, and AF-A.
MF (Manual Focus):
MF means you focus by hand. When should you use it?
- When your camera only has manual focus, like some Leica M cameras.
- When you use an adapter that disables autofocus.
- When you must focus on a low-contrast area, like a plain white wall.
- For very fast, erratic subjects, manual focus can sometimes work better.
- For macro shots, AF often misses the exact spot, so you focus slowly by hand.
AF (Autofocus) — AF-S, AF-C, AF-A:
AF means the camera focuses for you. There are three AF modes:
- AF-S (single-shot AF): AF-S locks focus when you half-press the shutter. It won't refocus until you release and press again. This is great for still or slow subjects, such as landscapes.
- AF-C (continuous AF): AF-C keeps refocusing while you hold the half-press. Use this for moving subjects.
- AF-A (auto AF): AF-A tries to pick AF-S or AF-C for you. It sounds smart — it may use AF-S for a landscape and AF-C for action. In real use, though, it can get confused.
In most cases MF, AF-S, and AF-C are enough. For everyday shots, AF-S is a good default.
Tracking (Advanced):
Some cameras can track a subject. Once you lock focus on a moving subject, the camera will keep following it as long as the subject stays inside the focus point area.
- Canon calls it EOS iTR (found on models like 1D X, 1D X Mark II, 5DS, 5DS R, 7D Mark II).
- Nikon calls it 3D Tracking (available across Nikon models).
- Sony calls it Lock-on or Subject Lock (available across Sony models).
Tracking is handy for action, but your focus point coverage must be large enough to keep the subject inside it.
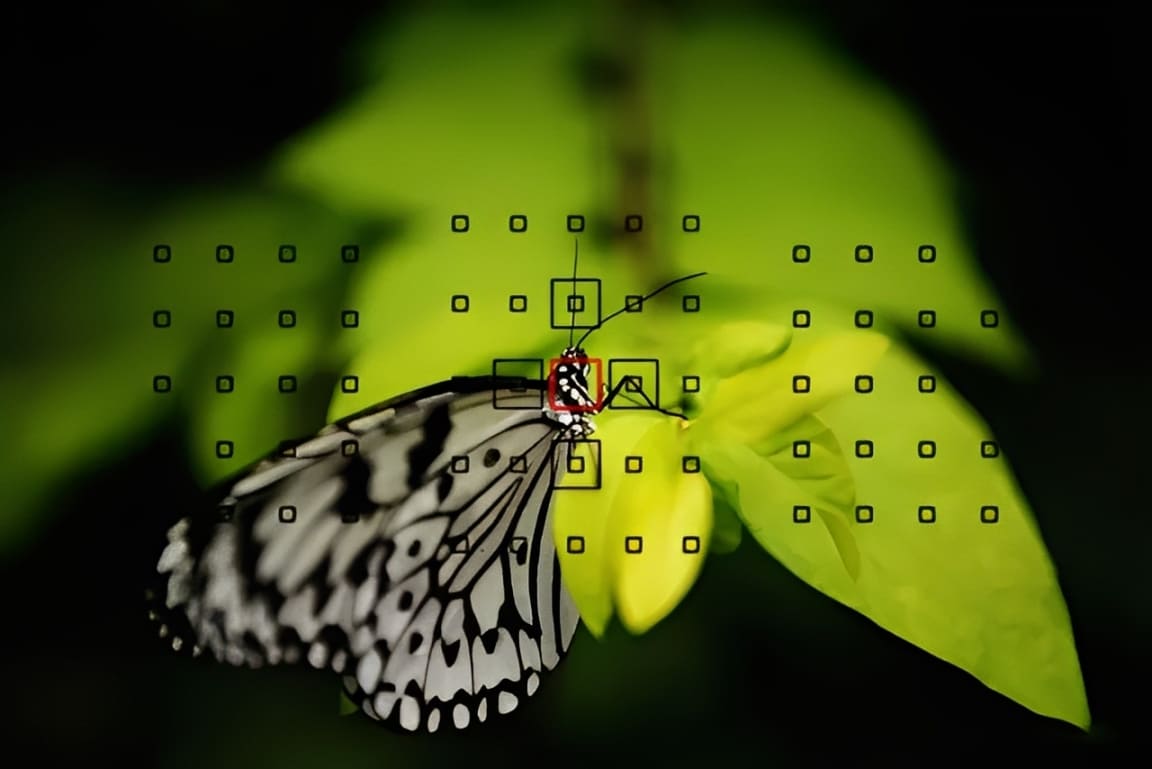
3. How to Understand Focus-Point Selection?
Focus-point selection decides where your camera focuses. The main choices are: single point, expanded (or expanded-area), and zone.
(1). Single-Point Focus
Single-point focus includes the center point and the selectable point. The center point is just the selectable point stuck in the middle, so it's not special.
With single-point focus you pick one AF point and the camera focuses there. Use this when you need precise focus. It's best for small subjects.
(2). Expanded (Expanded-Area) Focus
Expanded focus appears mainly when you use AF-C (continuous AF). The camera treats your chosen point as the main point and also "wakes up" the surrounding points. If the subject moves off the main point, the surrounding points take over and keep tracking.
Think of expanded focus as a boosted single point for AF-C. It keeps more precision than full zone modes.
(3). Zone focus
Zone focus uses a small group of AF points together. Whichever point in that group locks first wins. Don't expect every point in the zone to lock at once — only the point that finds focus first counts.
- Canon and Sony use fixed zones: the same clusters are always a zone, and they can work with face detection.
- Nikon lets you make a zone by grouping nearby points on the fly; it's less tied to face detection.
(4). When to Use Which?
- For small subjects, use single-point (most precise).
- For large subjects, zone can be easier — the camera has more area to grab focus.
- In AF-C (action mode): use expanded for small, moving subjects (keeps precision), and zone for big, moving subjects.
Quick Recommendations:
- Everyday shooting: AF-S + single-point (selectable).
- Shooting action: AF-C + expanded focus.
These two combos cover most situations.
Focus First or Compose First?
In real shooting, you often need precision. That's why we usually use a single selectable AF point. In the viewfinder, it looks like the red box in the example below.
But sometimes the point you want to focus on isn't in the center. In that case, you move the selectable AF point to the spot you want and focus there. You can change the point with buttons + dials, a joystick, or arrow keys.
On cameras with lots of focus points, or when you're shooting quick grab shots, zone focus can be faster to set.
Still, a very common workflow is: focus first, then compose. Here's how that works.
Keep the camera on the center single-point AF. Aim that point at the subject's eye and half-press the shutter. That locks focus. Keep the shutter half-pressed to hold the focus. The subject is now in the center.
Now move the camera left, down, or however you want to reframe. That gives the subject a more interesting composition. Then press the shutter fully to take the shot.

The big advantage is speed. It's great for street shooting. The downside is that focus can be wrong after you recompose. This happens because of the "cosine error."
What is cosine error? A picture makes it clear.
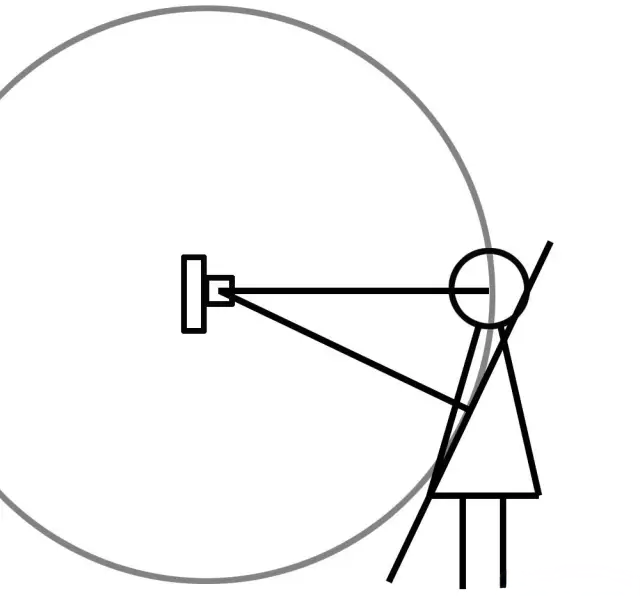
If you focus on the face with the center point, then tilt or shift the camera, the focus can end up on the back of the head instead of the eye.
Why? The sensor is flat, so the focus plane is effectively flat. When you change the angle after focusing, the distance relationships change. That shift causes the cosine error.
How to avoid it? Simple: compose first, then focus. That fixes the problem.
But composing first can slow you down. So another approach is to make sure your depth of field is large enough. Use a smaller aperture or stand a bit farther away so the area you want sharp falls inside the depth of field.
If your depth of field covers the slight distance change caused by recomposing, the cosine error won't matter. That's why focus-first-then-recompose is still useful when you have enough depth of field.
There's also a related trick for predictable motion: trap focus.
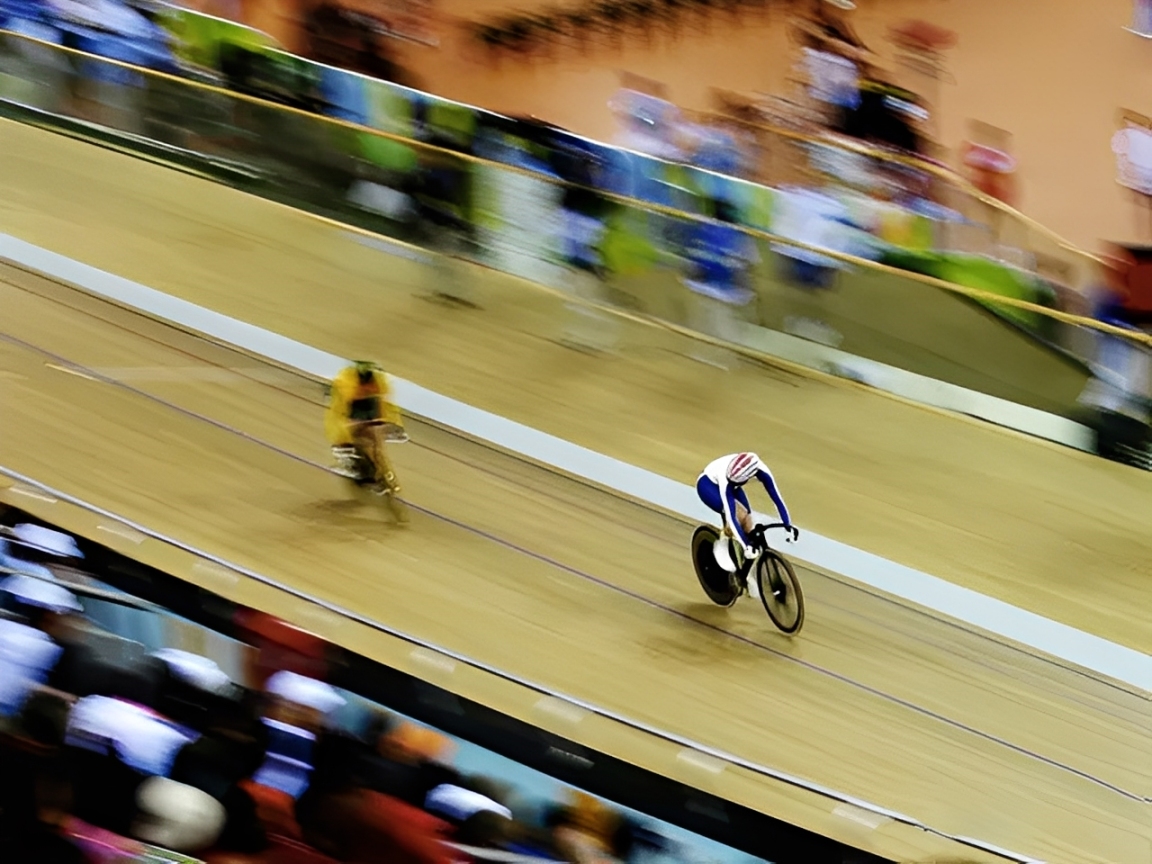
For example, in a track bike race, you know the rider will pass a certain spot. Aim at the floor at that spot and focus on it. Using a small aperture gives you enough depth of field so the rider will be in focus when they cross that spot.
Then switch the lens to manual focus. Now you can release the shutter (you don't need to keep half-pressing). When the rider reaches the spot, press the shutter.
This is like putting the car in neutral at a long red light. You don't need to keep your foot on the brake.
Trap focusing works well because the camera won't waste time hunting for focus. That helps you capture the moment with better timing.
Conclusion
In this article, we shared useful tips about focusing in photography. We hope they help you better understand and control focus when you shoot. Of course, focusing is only one part of making a great photo — color grading and local edits in post also shape the final image.
That's why we want to recommend TourBox, a controller made for creative workflows.

It turns your common shortcuts, sliders, and knobs into physical controls so you can quickly switch brushes and tweak exposure, contrast, and sharpening in Lightroom, Photoshop, and similar apps. That lets you spend more time on the photo itself and less time on repetitive clicks.

TourBox is compact and easy to learn. It's a good fit for photographers and editors who do a lot of post work or who need to tweak settings often. If you want a smoother editing workflow, give TourBox a try. If you're interested, visit our Photo Editing page to learn more.