What Is Chromatic Aberration?
Do you remember the triangular prism from middle school physics class? When white light passes through a prism, it splits into the rainbow colors: red, orange, yellow, green, blue, indigo, and violet.
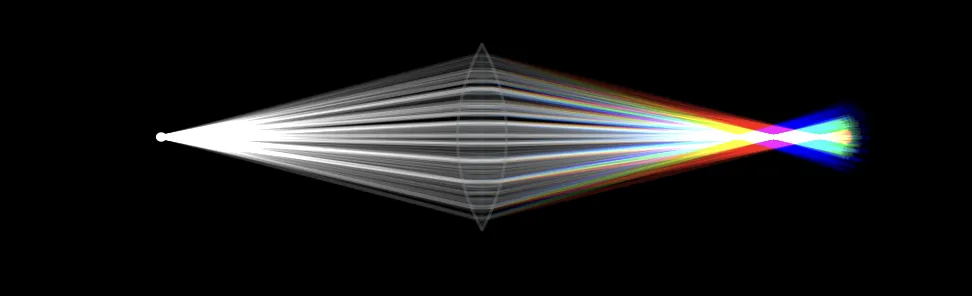
And when white light passes through a lens, blue light is bent (refracted) the most and red light the least. The result is that a lens cannot bring all colors of light to the same point.
In photography, this optical effect causes something called chromatic aberration. In this blog, let's take a look at what chromatic aberration in photography is.

In this article, you will learn:
- What Is Chromatic Aberration?
- Types of Chromatic Aberration
- How Chromatic Aberration Affects Photo Quality?
- Causes of Chromatic Aberration
- How to Remove Chromatic Aberration?
- Conclusion
What Is Chromatic Aberration?
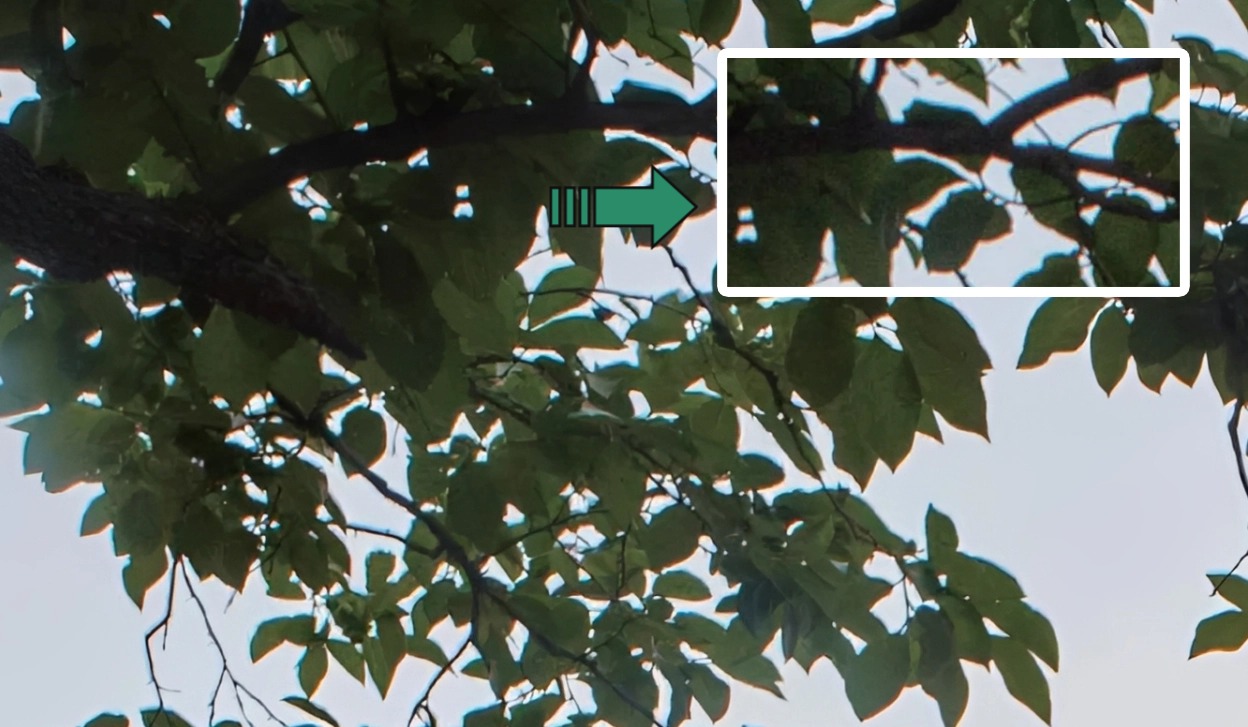
Chromatic aberration means a lens cannot focus all wavelengths of light to the same point. It is caused by light scattering in the lens. Around objects in an image — especially where contrast is high — you may see blur or colored edges (red, green, blue, yellow, purple, magenta). This is called chromatic aberration.
Digital cameras record color using RGB (three color channels). So in photography, we only need to pay attention to the dispersion of red, green, and blue.
We already know red, green, and blue light have different wavelengths. When light passes through a lens, the lens bends the light and the colors spread apart. This makes red, green, and blue hit slightly different spots on the sensor. Those small shifts cause chromatic aberration in photos.
In short, when you take a picture, the light passing through the camera lens should converge and form a clear image on the camera's sensor or film. However, because different wavelengths of light behave differently, they bend by different amounts as they pass through the lens.
That bending keeps the colors from lining up perfectly, so you get colored fringes or unwanted tints around objects in the photo. That is chromatic aberration.
Types of Chromatic Aberration
Now that we understand the concept, let's look at the two main types of chromatic aberration. Based on how wavelengths spread in different planes, chromatic aberration can be split into two types: longitudinal and lateral chromatic aberration.
1. Longitudinal Chromatic Aberration
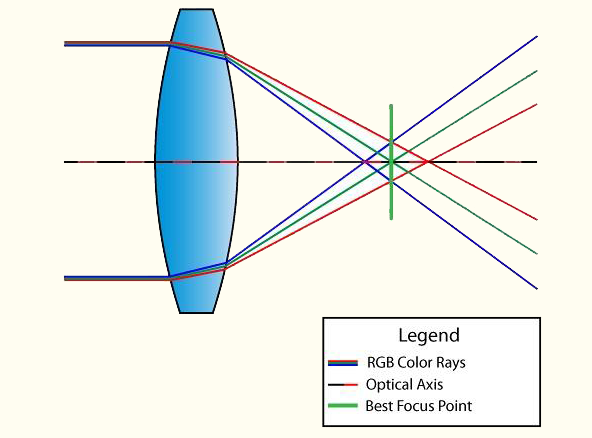
Longitudinal chromatic aberration happens when different wavelengths of light focus at different distances from the lens. This can reduce image sharpness and cause colored fringes, especially in out-of-focus areas.
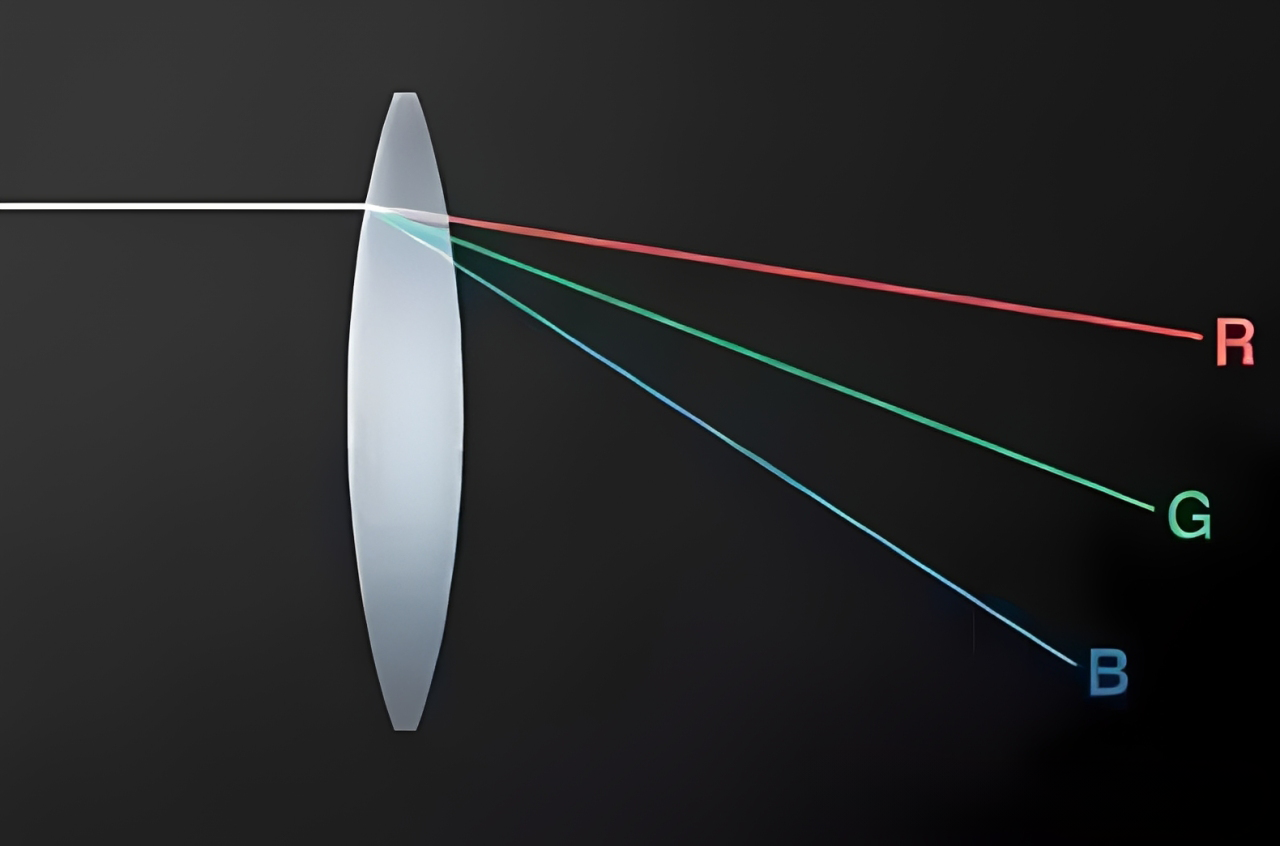
It is caused by different wavelengths bending by different amounts as they pass through the lens. Different wavelengths have different optical properties. For example, blue light bends (refracts) more than red light. That means blue light tends to focus closer to the lens than red light.
Longitudinal CA is often more noticeable in lenses with long focal lengths and in fast lenses with wide apertures. It is also more visible in lenses with lower-quality optical elements.
In images, longitudinal CA can show up as red, green, blue, or mixed color casts around object edges. You can greatly reduce longitudinal CA by stopping down (using a smaller aperture).
2. Lateral Chromatic Aberration
Lateral chromatic aberration is caused by different wavelengths landing at slightly different positions across the image plane. In this case, the three primary colors do focus on the sensor plane, but their magnification or position differs slightly.
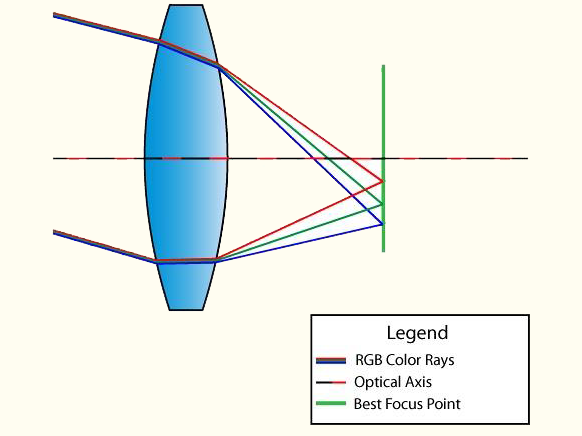
Lateral CA causes colors to spread sideways. This can create colored lines around object edges, especially at high-contrast edges.
Lateral CA does not usually appear in the center of the image. It mainly appears toward the edges and corners. Blue and purple fringes are common with fisheye, wide-angle, and lower-quality lenses. Stopping down the aperture does not remove lateral CA, but it can be corrected in post-processing.
How Chromatic Aberration Affects Photo Quality?
Now that we know what chromatic aberration is and its types, let's look at how it affects the quality of your photos.
- Loss of sharpness and clarity: Chromatic aberration can be a silent killer of image sharpness. Colored fringes around objects make them look less sharp and less clear. When you try to get sharp images, chromatic aberration can be a frustrating obstacle.
- Impact on color accuracy: If you care about accurate colors, chromatic aberration is your enemy. It can shift colors and often causes odd color changes at the edges of objects. A beautiful blue sky may have a hint of magenta. Lush green leaves may show a touch of purple.
- Effect on overall image aesthetics: Beyond the technical problems, chromatic aberration can hurt the overall look of a photo. Those distracting colored lines can pull the viewer's attention away from the subject you want and break the visual harmony you're trying to create.
Causes of Chromatic Aberration
So is chromatic aberration purely an optical problem? Not exactly. Optical factors are the main cause, but some other factors can make it worse.
1. Optical Factors
A large part of chromatic aberration comes from the optical parts inside a camera lens. This includes:
1.1 Refraction and Dispersion
When light enters a camera lens, it bends at different amounts because each color has a different refractive index. This bending is called dispersion. Different colors travel through the lens in slightly different ways, so they end up focusing at slightly different points on the camera sensor or film. That shift in focus causes chromatic aberration.
1.2 Lens Design and Quality
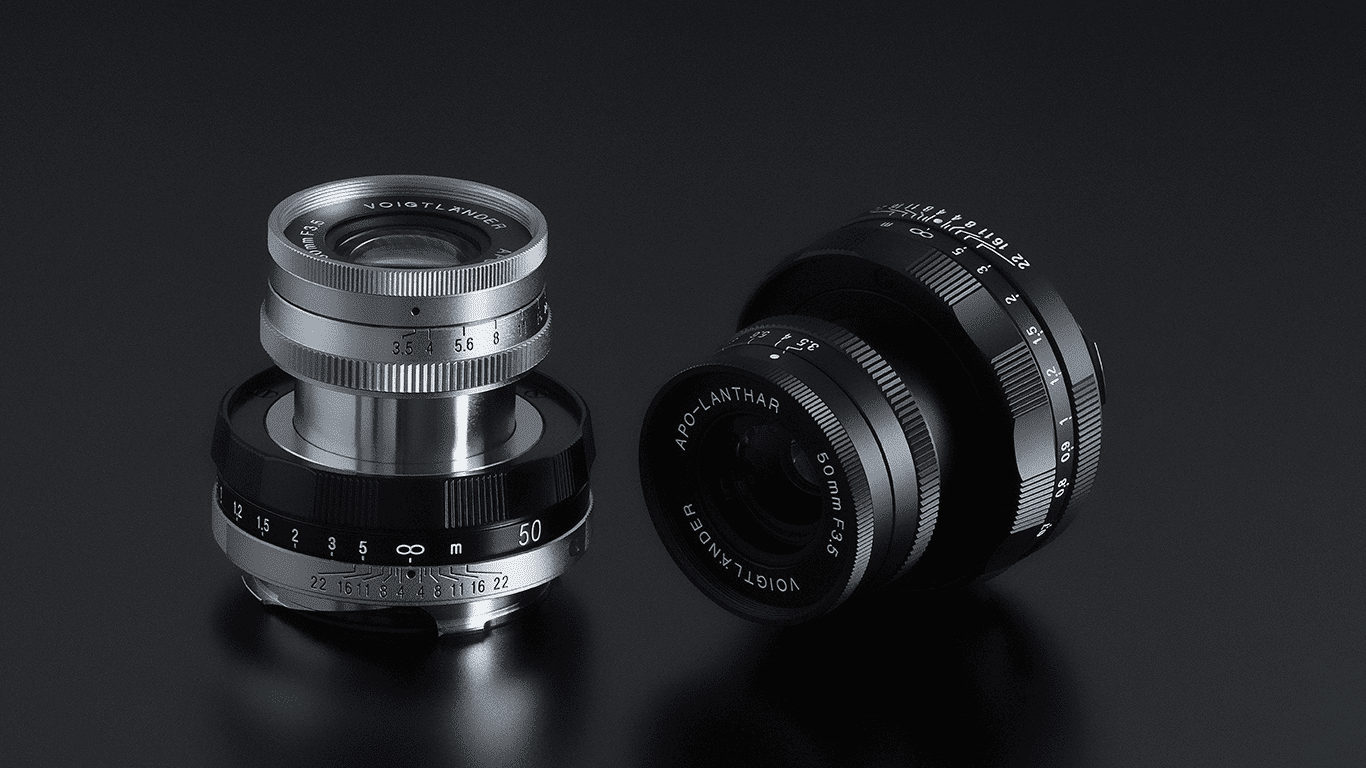
The design and quality of a lens play a big role in how much chromatic aberration appears in a photo. Higher-quality lenses are built to reduce chromatic aberration. They often use special glass elements to do this. One common solution is extra-low dispersion (ED) glass or fluorite elements.
These parts help reduce dispersion, so different colors focus more closely together. Cheaper or older lenses may not have these elements, so they are more prone to chromatic aberration.
2. Environmental Factors
Even though optical factors are the core cause, environmental conditions can also make chromatic aberration worse:
2.1 Temperature and humidity
Believe it or not, the shooting environment's temperature and humidity can affect chromatic aberration. Extreme temperatures can make lens materials expand or contract. That can slightly change the lens's optical properties. High humidity can also change how light passes through the lens.
For example, shooting in very cold conditions can sometimes increase chromatic aberration compared with shooting in warm conditions. Knowing these environmental effects can help you predict and reduce CA when you shoot.
2.2 Lighting Conditions
The quality and direction of light in a scene are key factors in whether chromatic aberration appears and how strong it looks. Harsh, bright light (like direct sunlight) can make CA more noticeable, especially with lower-quality lenses.
By contrast, shooting under soft, diffused light or using backlighting techniques can help make chromatic aberration less obvious.
How to Remove Chromatic Aberration?
We already know that chromatic aberration is a complex interaction of optical and environmental factors. Some of these factors are inherent to camera lenses, but others can be controlled or reduced with careful shooting techniques and gear choices.
But note that chromatic aberration cannot be avoided 100%. Modern camera + lens combinations and post-processing software can, however, reduce it to a level that is barely noticeable in most photos.
Next, we'll share some practical tips to prevent chromatic aberration and keep those annoying colored fringes out of your photos.
1. Choose High-Quality Lenses
Preventing chromatic aberration starts with the lens you pick. High-quality lenses are designed to minimize this optical problem. Here are some tips for choosing the right lens:
- Buy prime lenses: Compared with zooms, prime lenses (fixed focal length) usually show less chromatic aberration. They have fewer glass elements, which lowers the chance of colored fringing.
- Look for ED or APO lenses: Lenses with extra-low dispersion (ED) or apochromatic (APO) elements are made to reduce chromatic aberration. These special elements help control dispersion.
- Check lens reviews: Before you buy, read reviews and user feedback. Look for lenses that get good marks for chromatic aberration performance.
- Consider lens coatings: Anti-reflective coatings on lens elements also help reduce chromatic aberration. Look for lenses with multi-coating to improve optical quality.
2. Tips to Reduce Chromatic Aberration While Shooting
Choosing and caring for a good lens is important, but some shooting techniques can also help reduce chromatic aberration:
- Adjust aperture settings: Chromatic aberration often stands out at extreme apertures, like fully open or very small stops. Choose a middle aperture (for example, f/8 to f/11), where the lens usually performs better for CA.
- Use a lens hood: A lens hood not only blocks stray light. It also reduces the chance of chromatic aberration. It helps stop light from hitting the lens at extreme angles, which can cause CA.
- Avoid harsh direct sunlight: Shooting in bright, direct sunlight can make CA worse, especially with lower-quality lenses. When possible, choose diffused or softer light.
- Try backlighting: Backlighting can reduce chromatic aberration because the light source is behind the subject. That lowers the chance of colored fringes around objects.
3. Remove Chromatic Aberration in Post-Processing
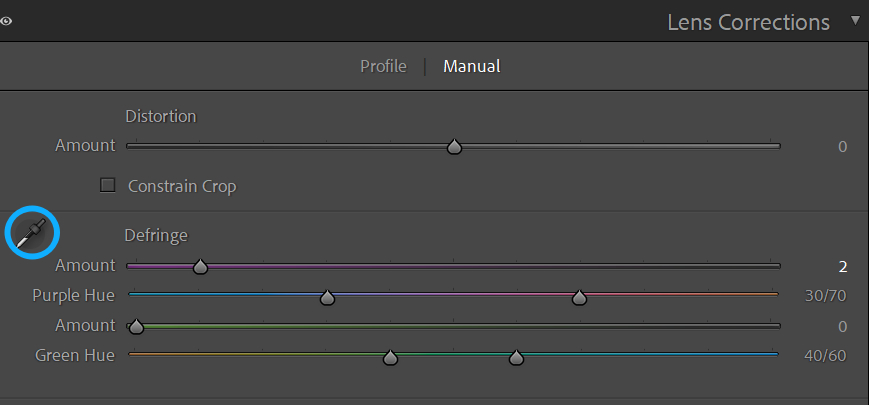
Here, we use Lightroom Classic as an example. Before you remove chromatic aberration, zoom the image to 100%–400% until you can clearly see the colored fringing on edges.
Then, in the Lens Corrections panel under the Profile tab, check the "Remove Chromatic Aberration" box. Lightroom Classic will use the image metadata and built-in profiles to do a good job of removing chromatic aberration.

But when chromatic aberration appears at the edges of images shot wide-open or backlit, the "Remove Chromatic Aberration" control may not fix it. In that case, use the Defringe controls in the Manual panel.
The amount values for "Purple" and "Green" decide how much colored fringing is removed. The Purple and Green hue sliders find the hue range of the fringe. Use the Fringe Color Selector eyedropper on the left side of the panel to sample the purple or green fringe you want to correct.
The specific steps: choose the Fringe Color Selector, click on the colored fringe area, and let Lightroom pick the right settings and correct the fringe. Or adjust the sliders manually.
A finer way to remove chromatic aberration is to use a brush and mask. Carefully paint over the fringing until the colored lines disappear.
One quick ad. Many photographers choose Lightroom for editing and color grading. But editing inside Lightroom's native interface can feel cramped. It's easy to miss small details, and that can affect the final result.

That's why we recommend TourBox. In addition to letting you map your commonly used shortcuts and functions to its physical buttons and dials, its built-in, highly customizable Dynamic Panel lets you step away from Lightroom's native panels, drag panels freely, work in full-screen color grading, and stay focused on the image itself.

TourBox simplifies every step of photo editing. It's ergonomically designed and makes editing faster and more comfortable than before. If you're interested, visit our Photo Editing page to learn more.
Conclusion
In this blog, we explain what chromatic aberration is, how it can affect your photos, and what you should do about it. The good news is modern tech can cut chromatic aberration a lot. For most everyday uses — travel, portraits, and landscapes — you will hardly notice it.
But in extreme cases (very wide apertures, very high magnification, cheap lenses, strong backlight) it can still show up. In those situations, you need to stop down the aperture, use better lenses, and fix it in post.