What Is Exposure Compensation in Photography?
If you're new to photography, you've probably had this happen: when you share photos you just took on social media, someone might comment that your shots are underexposed or overexposed.
Most new photographers only know they need to fix this by lengthening or shortening the exposure time, or widening or narrowing the aperture. But half the time, this just leaves you more confused about exposure than before.
The truth is, your camera has always had an important setting that hints at how to fix this — it's called exposure compensation. Let's break down what that is.

In this article, you will learn:
- What Is Exposure Compensation?
- Why Use Exposure Compensation?
- When to Use Exposure Compensation?
- How to Use Exposure Compensation?
- Conclusion
What Is Exposure Compensation?
First, let's get one thing straight: exposure compensation isn't a verb or an action. It's a noun. It's a setting that measures how bright or dark your final photo turns out.
We can see the world because light hits objects and reflects back to our eyes. Pure white reflects 100% of the light that hits it, while pure black absorbs all light,reflecting 0%.
Now, the gray in between? It doesn't reflect 50% of the light like you might guess. Scientists measured it precisely, and the actual middle gray (the true balance between light and dark) reflects just 18% of light. That's why it's called "18% gray."
Here's how this matters for your camera: When it's in auto mode, it uses its light meter to set the aperture, shutter speed, and ISO. Its goal? To make every photo 18% gray — not too bright, not too dark, "just right." If we put a number on that "just right" brightness, the exposure compensation for that photo is 0EV.
Most of the photos you take will use 0EV, and that makes sense. When they set 0EV as the baseline, they picked the most common scenario. So it works for most everyday shots.
But real-life scenes don't all fit that 18% "neutral gray" rule. Here's what happens when they don't:
- Large Bright Scenes (snow, wedding dresses, white walls): The camera tries to "fix" the brightness to 18% gray, so it lowers the exposure. This turns bright whites into dull gray (that's underexposure).
- Large Dark Scenes (nighttime, black clothes, dark still lifes): The camera overcorrects to hit 18% gray, so it boosts the exposure. This turns deep blacks into grayish mush (that's overexposure).
- Backlit Scenes (like someone facing away from the sun): The camera focuses on the bright background, so the main subject — say, a person's face — ends up dark and underexposed.
That's where exposure compensation comes in. It lets you break the camera's habit of sticking to neutral gray. You manually adjust the exposure so the photo's brightness matches what you want.
To sum it up simply: Exposure Compensation (EC) is a key manual tool. It lets you tweak the final exposure on top of what the camera's auto metering (AE, Auto Exposure) suggests. This fixes the camera's "mistakes" (overexposure or underexposure) so the photo is as bright as you intend it to be.
Why Use Exposure Compensation?
Like we said, 0EV works most of the time, but there are cases where it doesn't. That's when you need to step in and adjust manually.
Take snow, for example. Your camera doesn't "know" it's looking at snow. It just sees something really bright. If you use 0EV, the snow won't look white. It'll look gray.
Same with night scenes: the camera sees darkness and tries to brighten it up, so 0EV will make the night look gray instead of dark. And that's not what we want.
So here's the fix: When shooting snow, increase the exposure compensation to make the snow look white. When shooting night scenes, decrease it to keep the darks deep and true.
Here's a critical rule for new photographers: Exposure compensation has nothing to do with how bright the scene is. It only matters how bright you want the finished photo to be. This is super important. Don't forget it!
When to Use Exposure Compensation?
From what we've covered, you can probably guess: You only need to adjust exposure compensation in specific or unusual situations.
- If your main subject is bright (like snow or a white shirt) and takes up a lot of the frame, increase exposure compensation to show its true brightness.
- If your main subject is dark (like a black coat or a night sky) and covers most of the frame, decrease it to keep its dark color from looking gray.
We already talked about snow and night scenes, but let's use another example: taking photos indoors near a window during the day. The outside is bright, so the camera will automatically darken the exposure to balance it out. That means you (standing by the window) will end up looking dark in the photo. To fix that, just increase the exposure compensation.
Exposure compensation also helps you set the mood. Want a cheerful, bright vibe? Boost the exposure compensation to make the photo lighter. Going for something somber or moody? Lower it a bit to darken the shot.
A photo's brightness often tells viewers what the photographer was trying to say. In that way, exposure compensation is a key setting for putting your own intent into a photo.
How to Use Exposure Compensation?
You can adjust exposure compensation on most cameras, except fully automatic ones. If your camera only has an AUTO mode, you're out of luck here.
Exposure compensation only works in three modes: Program (P), Aperture Priority (A), and Shutter Priority (S). In Manual (M) mode, you can't adjust it directly, but you can still control exposure by tweaking the aperture, shutter speed, and ISO yourself.
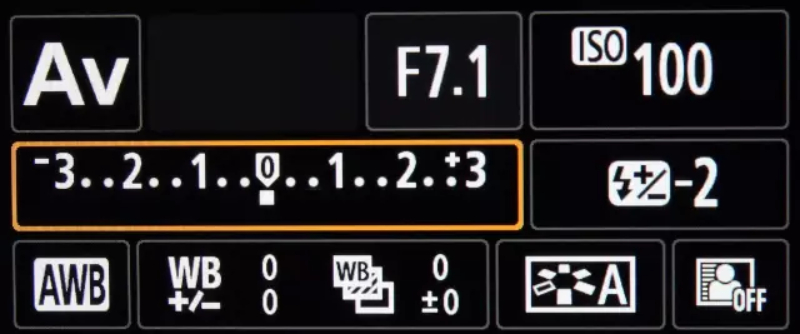
On most cameras, exposure compensation shows up as either a scale or a number. By default, it's set to 0EV.
- Higher-end DSLRs usually have two dials. In P, A, or S mode, one of these dials is dedicated to adjusting exposure compensation, super easy.
- Entry-level cameras typically only have one dial. In P mode, this dial controls exposure compensation directly. For A or S mode, hold down the exposure compensation button (it looks like a circle split diagonally — half black, half white — with plus and minus signs) and turn the dial to adjust.
Want a brighter photo? Turn the dial toward the plus (+) sign — the more you increase it, the brighter the shot gets. Need a darker photo? Turn it toward the minus (-) sign — the more you decrease it, the darker it gets.
Here's a tip: Even ±1EV makes a big difference in how bright or dark your photo looks. You don't need to crank the number up very high to get the effect you want.
Let's use a real example to make this concrete:
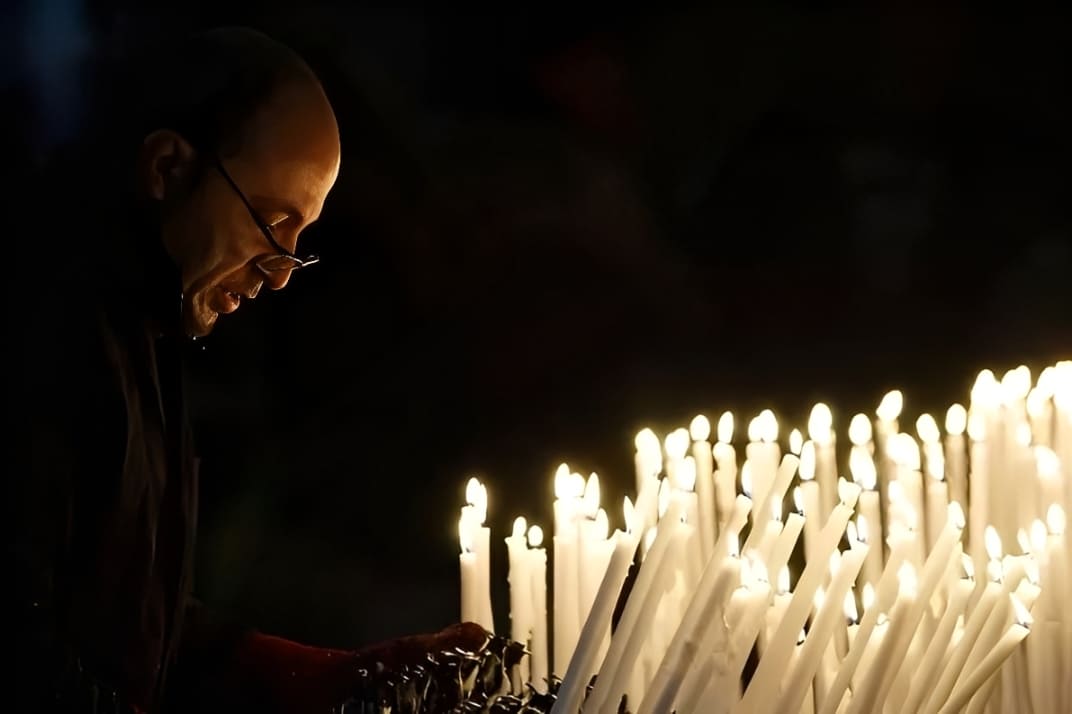
This photo was taken inside Milan's Duomo Cathedral. It was pretty dark inside, so the camera would've naturally tried to brighten the shot on its own. If we'd let it meter automatically, the candles would've been blown out to pure white, no detail at all.
But what we wanted was to see each individual candle and its flame clearly. We also only needed just enough light to make out the people's faces (no need for them to be super bright). So when we took the photo, we lowered the exposure compensation. This shot was set to -0.7EV.
One last note: All the tips and examples here assume you're using your camera's most advanced metering system. That's things like Canon's Evaluative Metering, Nikon's Matrix Metering, or Sony's Multi-pattern Metering. For beginners, our advice is to start with these systems first. They're the smartest options and work well for most situations.
Conclusion
In this article, we covered what exposure compensation is in photography and how to use it when you're shooting. Exposure compensation is a super basic concept in photography, plus it's easy to understand and get the hang of. Chances are, if you just try it out a few times while you're taking photos, you'll figure it out in no time.
Of course, adjusting exposure while you shoot isn't the only way to fix a photo's brightness. You can also tweak exposure during post-processing, and post-processing is a huge part of photography. But here's the thing: when editing or color grading photos, photographers often spend a ton of time on repetitive, inefficient tasks.
That's why we want to recommend TourBox, a creative controller that really cuts down on the steps for photo editing and color grading. You can map all the common shortcuts and actions from your photo editing software to TourBox's physical knobs and buttons, which makes things way easier.

On top of that, TourBox has smarter color grading panels too. They make your color grading workflow much more intuitive and efficient.

If you want to learn more about how TourBox can help with your photo post-processing, head to our Photo Editing page for all the details.