What Is Soft Proofing in Lightroom Classic?
Have you ever encountered a situation where the printed photos didn't match what you saw on your computer screen? Colors and tones were off, and it left you feeling frustrated?
Don't worry, that's where Soft Proofing in Lightroom comes to the rescue!
In this tutorial, we'll delve into what soft proofing is in Lightroom and how you can use it to ensure accurate and stunning print colors in your photos. So let's get started and unravel the mysteries of soft proofing!

In this article, you will learn:
- What Is Soft Proofing in Lightroom?
- How to Use Soft Proofing in Lightroom?
- Final Thoughts About Soft Proofing in Lightroom
What Is Soft Proofing in Lightroom?
In simple terms, Soft Proofing is a feature that helps you address the issue of your edited photos looking different in other places (such as on your computer, phone, or in print) compared to how they appear in Lightroom.
Soft Proofing allows you to simulate the printing or output effects on your screen and provides checks and warnings for target color spaces and monitor color spaces.
Soft Proofing primarily serves two functions:
- Simulate Output Effects
- Check Monitor Color Space
1. Simulate Output Effects
Since Lightroom uses the default 16-bit ProPhoto RGB color space, there can be color variations when viewing on a screen, exporting as sRGB images, or printing with a printer.
Soft Proofing enables you to preview the photo's appearance by simulating the color performance of specific output devices. By editing your photos in the "Proof Preview" view, you can minimize color discrepancies in the final output.
Enabling "Destination Gamut Warning" highlights any areas that exceed the target color space.
2. Check Monitor Color Space
Enabling "Monitor Gamut Warning" highlights any areas that go beyond your monitor's color space. This allows you to determine if your display can accurately represent all the colors in your photos.
The concepts we've discussed above may seem a bit difficult to grasp. Don't worry, though. In the next section, we'll dive into how to use Soft Proofing in Lightroom, which will help you better understand what Soft Proofing is all about. So, stay tuned and we'll make it clearer for you!
How to Use Soft Proofing in Lightroom?
There are three ways to enable Soft Proofing in Lightroom Classic.
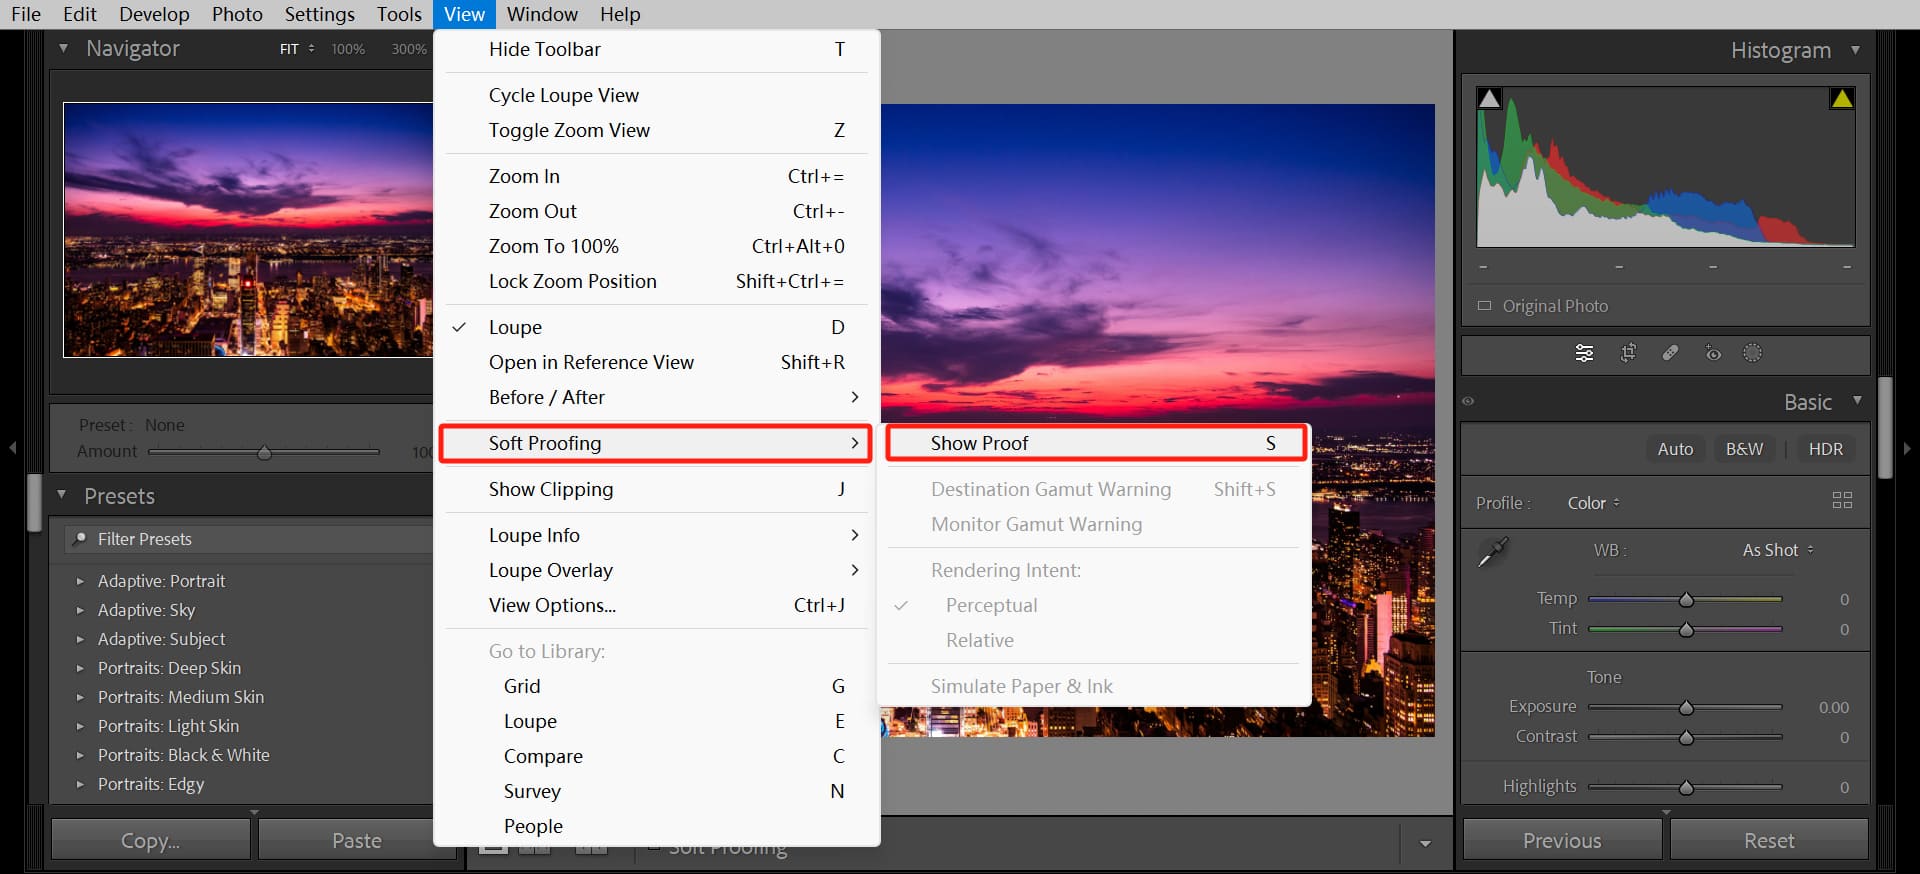
The first method is to navigate to the top menu bar in Lightroom Classic and select "View" > "Soft Proofing" > "Show Proofing."
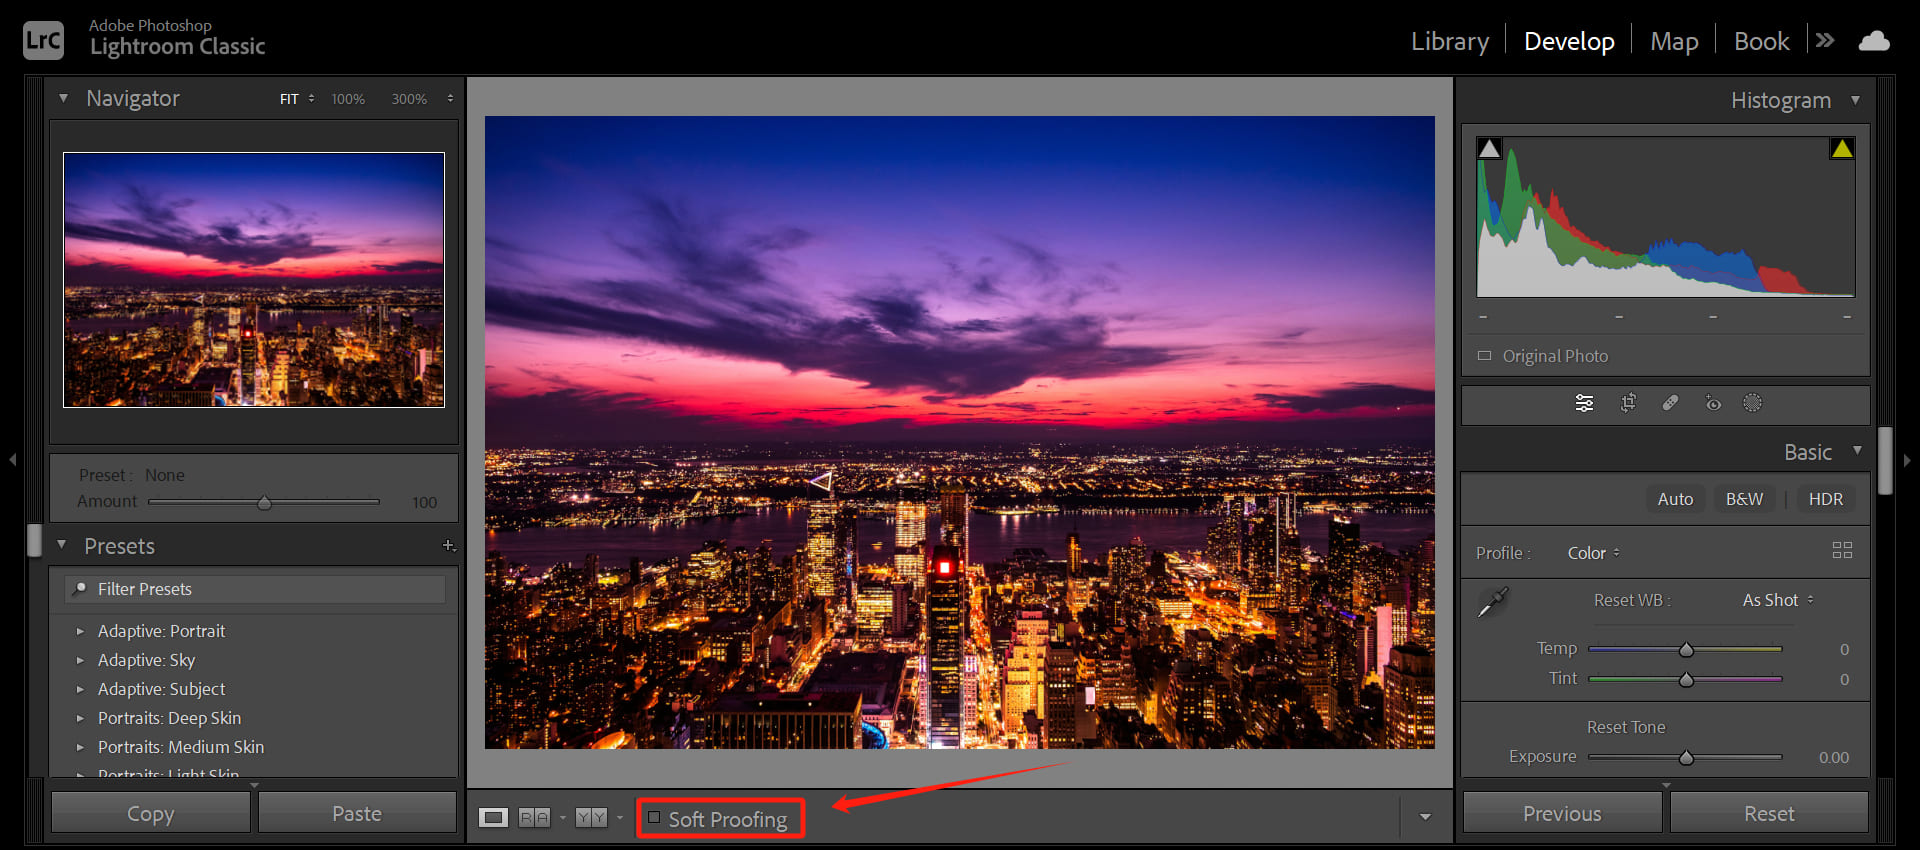
The second method is to check the "Soft Proofing" option in the toolbar below the preview photo panel in the Develop module.
The third method is to use a keyboard shortcut. Enabling Soft Proofing in Lightroom is as simple as pressing the "S" key on your keyboard.
Once you've enabled the Soft Proofing feature, shift your attention to the Soft Proofing panel that appears on the right side of the Lightroom interface.
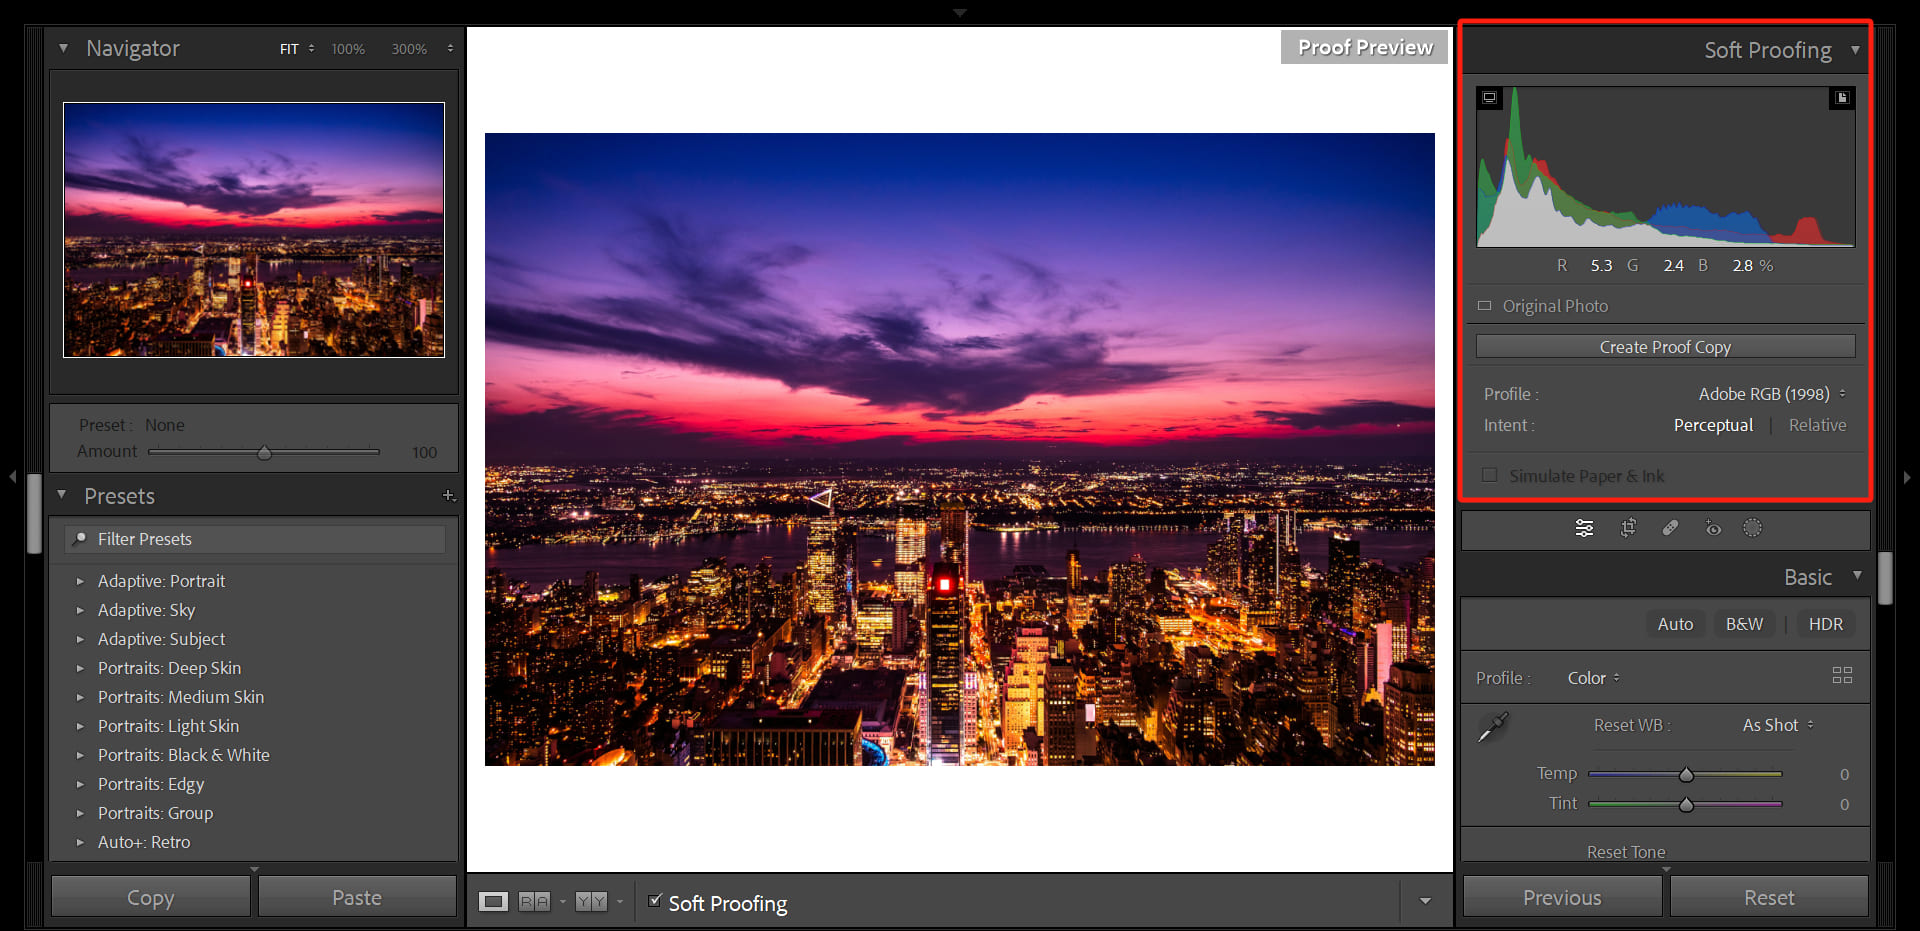
Editing your images in the Soft Proofing view ensures that there won't be significant color deviations in the final output.
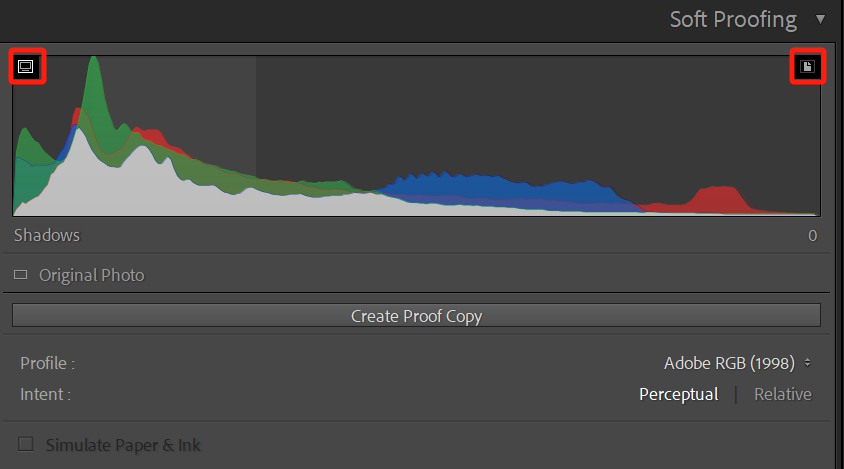
You can click on the "Show/Hide Monitor Gamut Warning" button in the top left corner and the "Show/Hide Destination Gamut Warning" button in the top right corner of the histogram in the Soft Proofing panel to instantly see any potential color deviations.
These buttons allow you to visualize and identify areas where color discrepancies may occur. By analyzing the color-highlighted regions, you can make further adjustments to minimize these color deviations and ensure your colors look their best.
So, here's the difference between these two buttons:
- Show/Hide Monitor Gamut Warning: When enabled, Lightroom will highlight areas that go beyond your monitor's color space. This indicates that these colors may not be accurately displayed on your particular monitor.
- Show/Hide Destination Gamut Warning: When enabled, Lightroom will highlight areas that exceed the target color space. This indicates that these colors may not be accurately reproduced in the output or print and need further adjustment.
Next up is the "Create Proof Copy" button. Pressing this button allows you to create a virtual copy to store the adjustments you make in the Soft Proofing panel.
In the Soft Proofing panel, you can make two adjustments: Profile and Intent.
1. Profile
In the Profile dropdown menu, you can select a profile, which represents the target color space.
For example, if you're exporting the photo for web sharing or viewing on a mobile device, you can choose sRGB IEC61966-2.1.
If you're preparing the photo for printing, you can select the profile for your printer from the "Other" option. This allows you to quickly preview how the photo will look after printing.

2. Intent
In the Intent dropdown menu, you can choose the rendering intent, which determines how colors are transformed.
- Perceptual: This intent maintains the visual relationship of the image, making it suitable for photos and images with gradients. Perceptual adjusts all colors to appear more natural when converted to the target color space.
- Relative: This intent preserves color accuracy and is suitable for images that require precise color matching. Colors that exceed the color gamut will be adjusted to the closest possible match in the target color space.
- Simulate Pater & Ink: This option is used to simulate the effects of paper and ink during printing, including the color of the paper and the ink absorption characteristics. Enabling this option allows for a more accurate preview of how the image will look when printed. Note that this option may not be available if you don't have a printer installed.
Great job! By now, we believe that you have a good understanding of what Soft Proofing is and how to use it in Lightroom.

Final Thoughts About Soft Proofing in Lightroom
By enabling the Soft Proofing feature, you can preview your images before exporting them, allowing you to have a better understanding of how they may appear when printed or viewed on other devices.
Without Soft Proofing, it's challenging to predict how your photos will turn out when printed or viewed on different devices.
Therefore, when you're color grading in Lightroom, activating Soft Proofing is crucial to ensure that you achieve high-quality images on your output devices and avoid any color inaccuracies.
Product Recommendation:
Imagine this: you've just finished a photoshoot outdoors and captured hundreds, even thousands, of photos.
When you import them into Lightroom Classic, despite it being an excellent photo editing software, managing and editing such a large number of photos can be a daunting task.
But if you have TourBox, a creative tool loved by photographers and digital artists alike, things become much simpler.

TourBox simplifies every step of photo management, color adjustment, and editing. With TourBox, you can control everything with just one hand, accomplishing complex and tedious operations with fewer actions.

Check out our photo editing page to learn more about TourBox and how it can revolutionize your workflow.