Alpha Channels: How to Create, Import, and Use Them Like a Pro?
Have you ever worked with images on a transparent background in Photoshop or other design software? Or spent a lot of time tweaking selections to get that perfect cutout? If so, there's an easier way — using the Alpha channel.
The Alpha channel is a powerful yet often overlooked tool in image editing. It can help you handle complex tasks with ease. In this article, we'll explore what the Alpha channel is and how to add and use it in Photoshop.

In this article, you will learn:
- What Is an Alpha Channel?
- Practical Uses of the Alpha Channel
- How to Create an Alpha Channel in Photoshop?
- How to Load an Alpha Channel as a Selection?
- How to Use an Alpha Channel in Photoshop?
- Best Formats for Saving Alpha Channels
- Conclusion
What Is an Alpha Channel?
Think of an Alpha channel as a "transparency map" for your image. Imagine a sheet of clear plastic: some parts are fully transparent, some are slightly hazy, and others are completely opaque.
That's exactly how an Alpha channel works in image editing. It invisibly records the transparency level of every pixel, deciding how each one appears in the final image.
Here's how it works in detail: the Alpha channel uses black, white, and shades of gray to control transparency:
- Black (fully transparent): The pixel is "invisible" and doesn't show up at all.
- White (fully opaque): The pixel is fully visible with no transparency.
- Gray (semi-transparent): The pixel is partially visible. The closer it is to white, the less transparent it is; the closer it is to black, the more transparent it becomes.
In other words, the white areas in an Alpha channel represent the selected parts, while the black areas represent unselected regions. You can modify the channel using tools like the Brush Tool, adjustment commands, or filters.
To make this easier to understand, we created a circular selection in the image and saved it as an Alpha channel. You can see the saved Alpha channel in the Channels panel (we'll explain the steps in detail later).
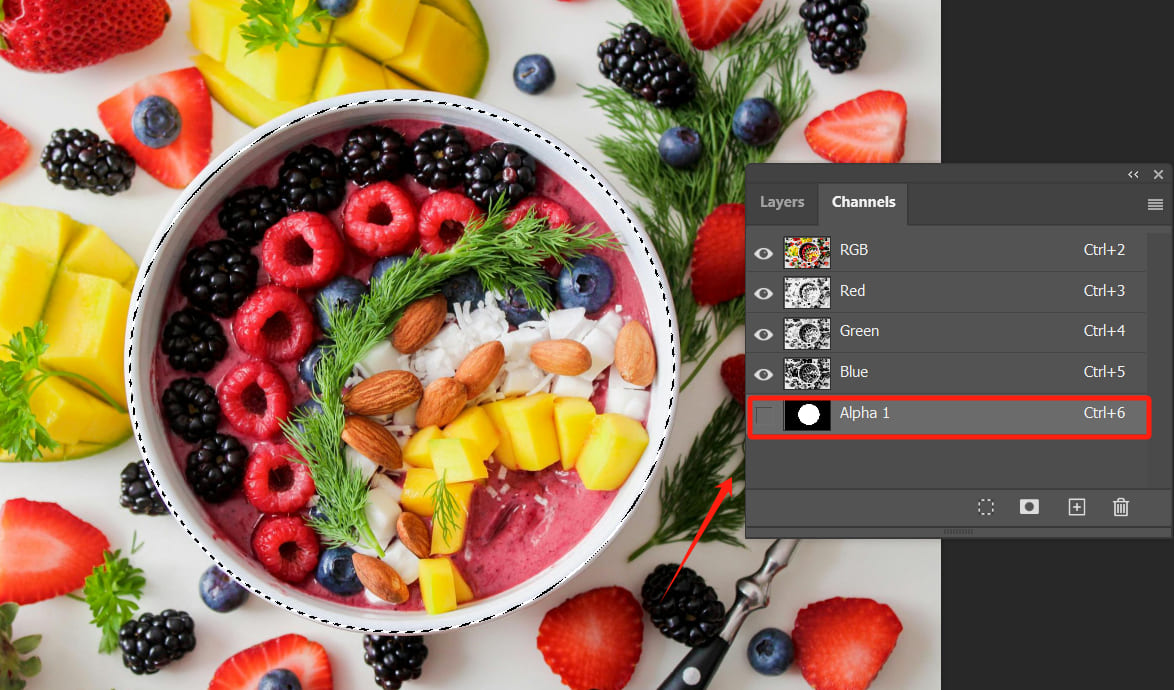
In the channel, the inside of the circle is white (indicating the selected area), and the outside is black (indicating the unselected area).
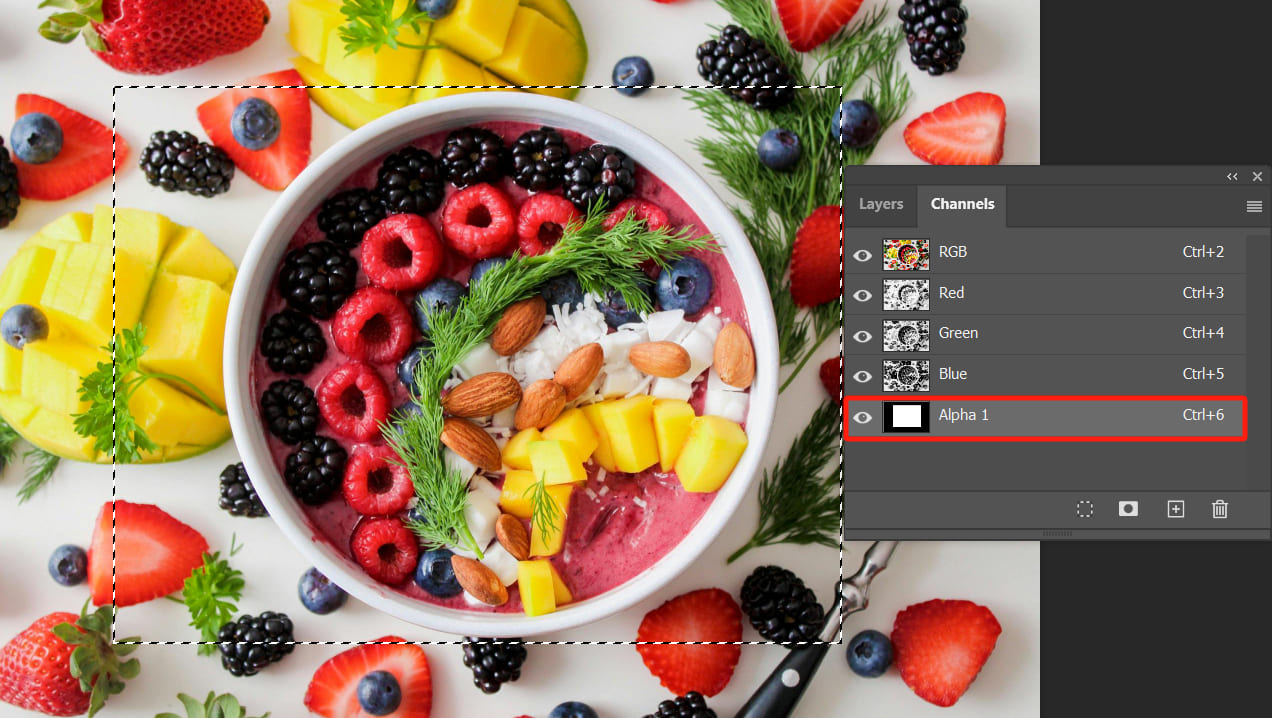
Next, we used a white brush to draw over the channel and turned the circular selection into a rectangle. After loading the updated selection and switching back to the RGB channel, you'll notice the selection has changed from a circle to a rectangle.
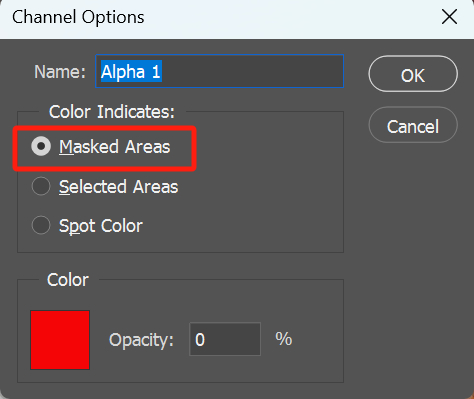
If you notice that in Photoshop, the selected areas in your Alpha channel are black and the unselected areas are white (the opposite of what we described), it could be due to one of these two reasons:
The selection might have been inverted from the start.
Open the Channels panel, click the hamburger menu in the top-right corner, and select Channel Options from the dropdown. In the Channel Options window, make sure Color Indicates is set to "Masked Areas."
You might be interested:
Unraveling the Power of Photoshop Channels: A Comprehensive Guide
Practical Uses of the Alpha Channel
- Creating Transparent Backgrounds: When exporting an image with a transparent background — like a website icon or game asset — the Alpha channel records which parts should be transparent and which should stay visible. This lets the image blend seamlessly into any background.
- Handling Complex Edges: For tricky cutouts like soft, feathered edges (think wedding veils, hair, or mist), the Alpha channel ensures the edges transition smoothly, making the result look more natural.
- Adding Special Effects: In film production, Alpha channels are widely used to layer effects like flames, smoke, or explosions. They make sure the effects blend perfectly with the background.
How to Create an Alpha Channel in Photoshop?
There are three ways to create an Alpha channel in Photoshop. Let's break them down one by one:
Method 1: Duplicate a Color Channel
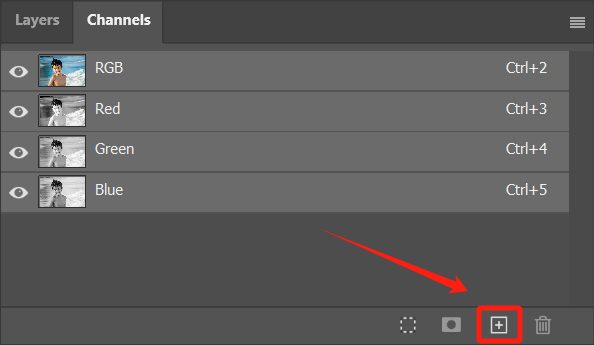
In the Channels panel, drag one of the color channels (like Red, Green, or Blue) down to the Create New Channel button at the bottom.
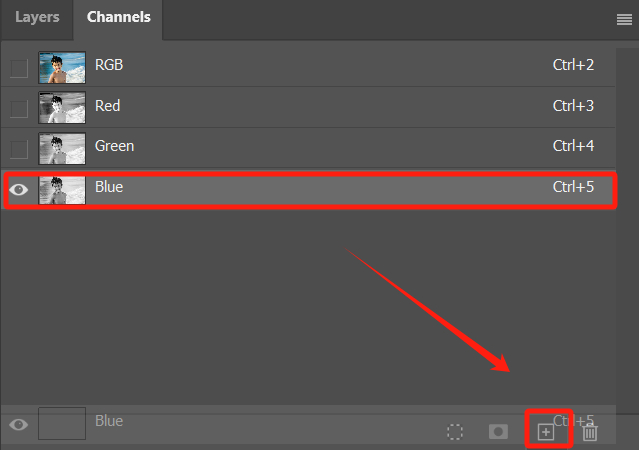
This method is often used as the starting point for cutting out subjects with complex edges. Look for the color channel with the most contrast, then use it to create your Alpha channel.
Method 2: Create a New Blank Alpha Channel
Simply click the Create New Channel button at the bottom of the Channels panel. This will create a new Alpha channel that's completely black, meaning nothing is selected.
Method 3: Save a Selection as an Alpha Channel
If you've made a selection in your image, you can save it as an Alpha channel:
- Go to the top menu bar, click Select > Save Selection.
- Or, right-click on the selection and choose Save Selection from the context menu.
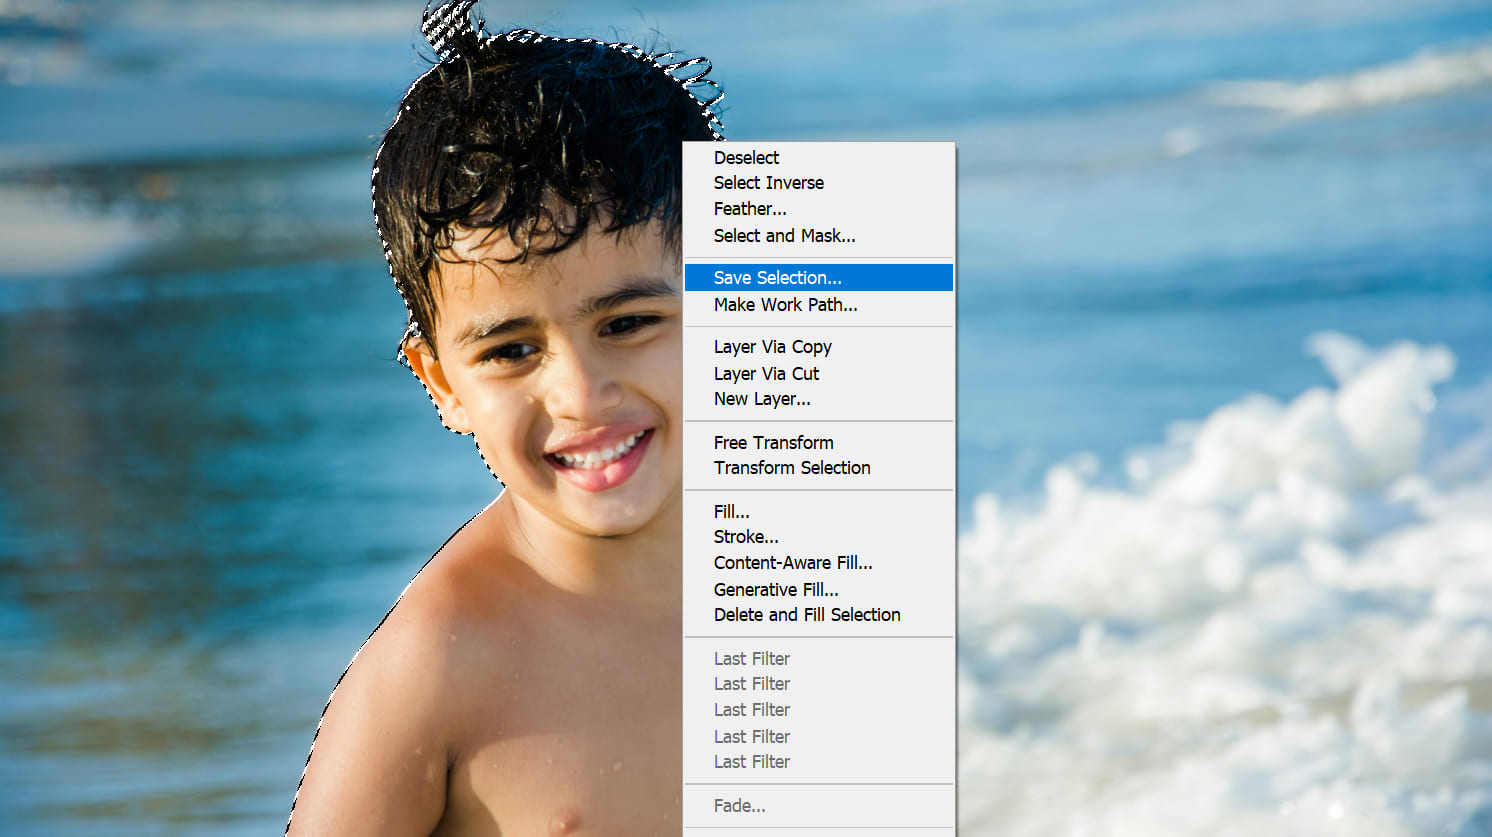
Both options will bring up the Save Selection dialog box, where the default operation is New Channel.
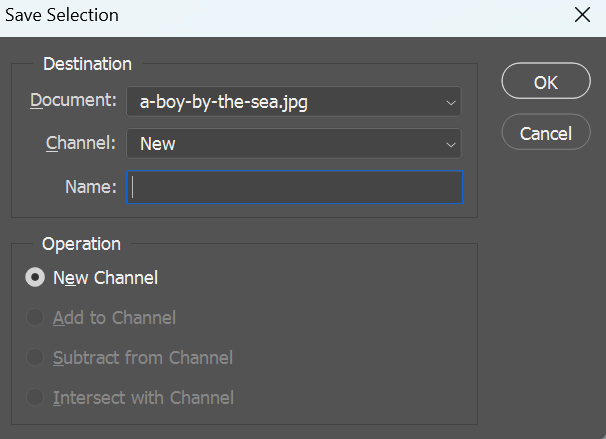
If there are other Alpha channels in the Channels panel, you can use the Operation section to decide how your current selection interacts with existing Alpha channels. This is essentially a Boolean operation between selections.
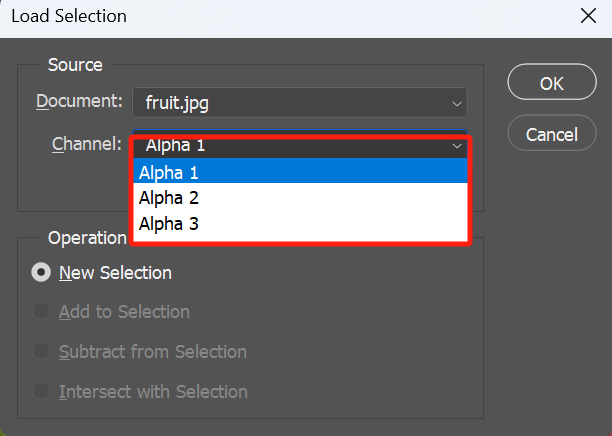
How to Load an Alpha Channel as a Selection?
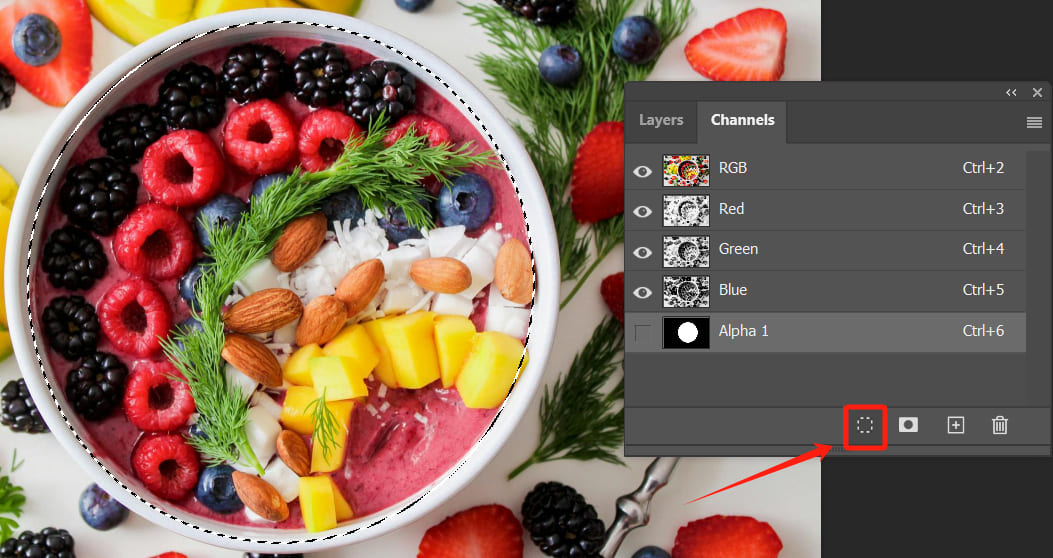
The easiest way is to go to the Channels panel, hold down Ctrl (Windows) or Command (Mac), and click on the thumbnail of the Alpha channel. This will instantly load it as a selection.
Alternatively, you can click the "Load channel as selection" button at the bottom of the Channels panel to achieve the same result.
For a slightly more involved method, you can right-click anywhere in the Photoshop workspace and choose "Load Selection" from the context menu.
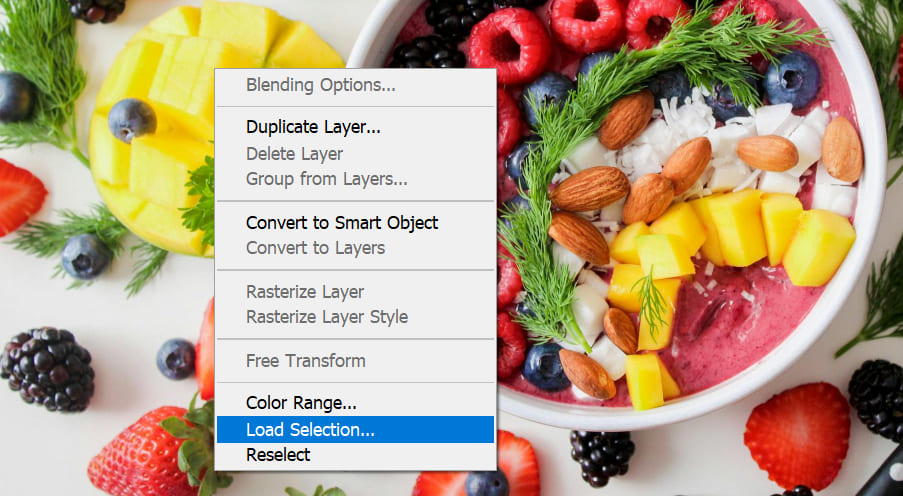
In the Load Selection dialog box, simply use the dropdown menu under "Channel" to select the Alpha channel you want to load.
How to Use an Alpha Channel in Photoshop?
An Alpha channel is essentially a black-and-white grayscale image based on pixels. Most Photoshop tools, adjustments, and filters can be used to edit Alpha channels.
For example:
- Drawing tools like the Brush Tool, Dodge Tool, Burn Tool, and Smudge Tool.
- Adjustment commands like Levels, and Curves.
- Filters like Gaussian Blur, Minimum, and Maximum.
Let's walk through a specific example to see how to use an Alpha channel in Photoshop.
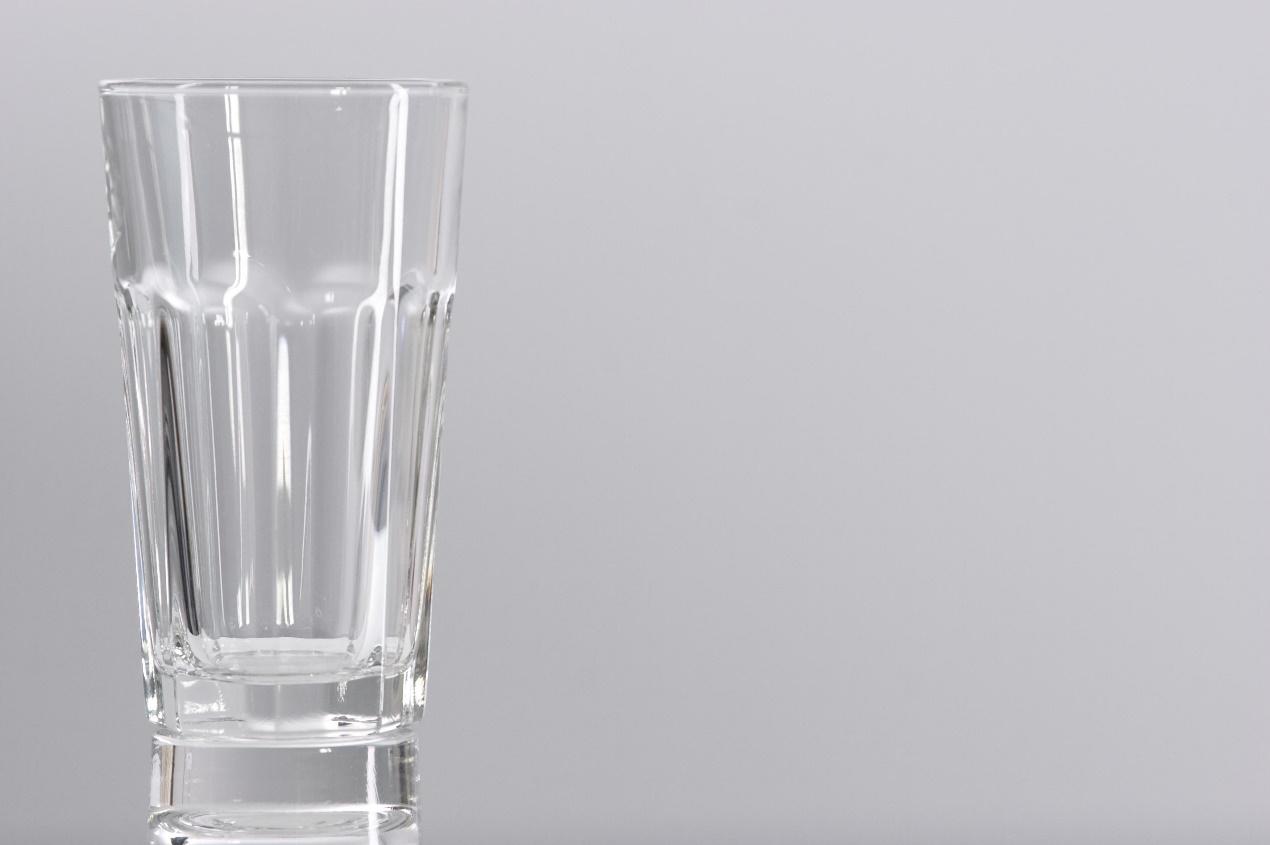
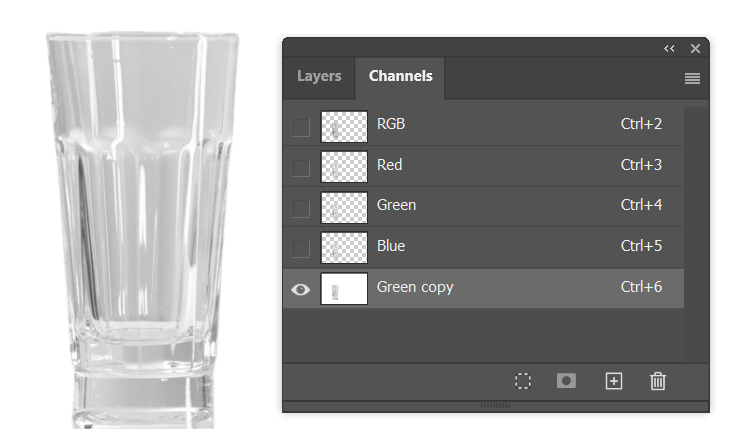
We'll start with an image of a glass cup. At first glance, you might think it's easy to cut out. Just use the Quick Selection Tool or something similar to select it. It seems fine at first, like this:
But when we add a background to check the result, it's a disaster.

This is where the Alpha channel comes in handy. With just a few simple steps, you can extract a transparent glass effect effortlessly.
Let's quickly review how to load an Alpha channel:
When you hold down Ctrl (Windows) or Command (Mac) and click on a channel in Photoshop, it creates a selection based on the channel's grayscale values.
Here's how it works:
- White areas: Fully selected (100% selection strength). These represent pixels with a brightness value of 255 (completely opaque).
- Black areas: Not selected at all (0% selection strength). These represent pixels with a brightness value of 0 (completely transparent).
- Gray areas: Partially selected based on brightness. The closer to white, the stronger the selection; the closer to black, the weaker the selection. For example, 50% gray equals 50% selection strength.
In simple terms, the more white an area is, the more it's selected. Black areas are excluded, and gray areas create a gradual transition.
Now, let's take a look at the image of the glass. You'll notice that each channel contains similar color information, with lots of gray tones due to the original image.
This is why simply using tools like the Object Selection Tool or other selection methods often results in an unnatural look when you place the glass on a new background. After all, glass is transparent, and its transparency needs to be reflected properly.
You might think lowering the layer's opacity would make the glass look transparent, but when you try it, the result also looks unnatural.

This is where loading the Alpha channel as a selection can quickly solve the problem.
The glass image contains a lot of gray tones, and since an Alpha channel selection captures the gradation between white (fully opaque) and black (fully transparent), it's perfect for creating the effect we need.
However, we can't directly adjust the brightness of the color channels because it would alter the image's colors. Instead, we can duplicate one of the channels to create a copy.
This copy becomes an Alpha channel, and adjusting it won't affect the image's colors.
Here's how:
- Duplicate any channel to create an Alpha channel.
- Hold down Ctrl (Windows) or Command (Mac) and click the Alpha channel to load it as a selection.
- Click the RGB channel to reactivate the full-color image and make sure the Alpha channel isn't selected.
- Go back to the Layers panel and add a layer mask to the glass layer.
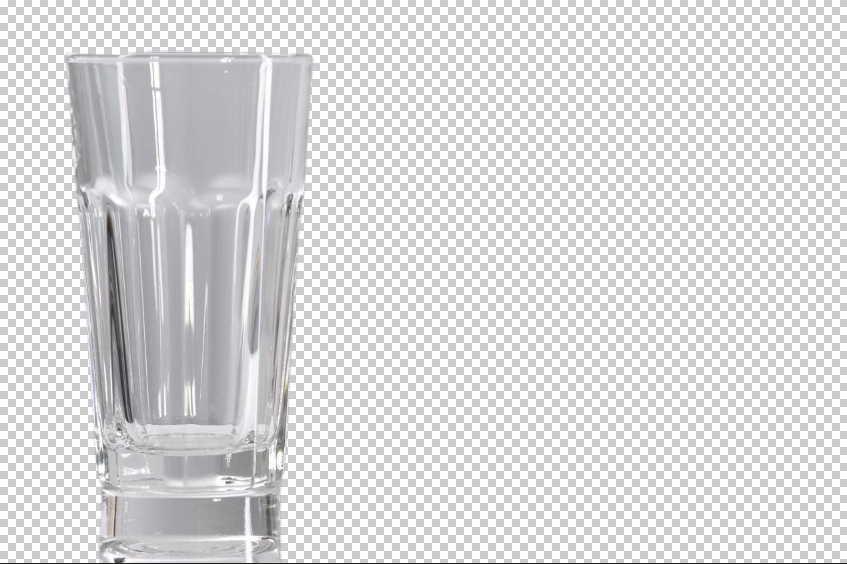
That's it! Now combine the glass with a background, and we can notice the transparency looks natural.

For further refinement, you can use a white brush on the layer mask to bring back details at the bottom of the glass.
Here's the final result. Looks great, doesn't it?

Best Formats for Saving Alpha Channels
When working with images, selections are temporary — they disappear when you close the file or save it in certain formats. But Alpha channels are different. They can be saved with the file, making it easy to continue editing later.
Which File Formats Support Alpha Channels?
- Supported formats: PNG, Targa, TIFF, and PSD: These formats can save Alpha channels, preserving transparency or complex selections.
- Unsupported format: JPEG format doesn't support Alpha channels and is best for saving basic image information only.
How to Choose the Right Format?
- If your file has layers: Use PSD (Photoshop native format). It supports layers and multiple Alpha channels, making it ideal for future edits.
- If your file is flattened (single layer): Go with TIFF. It supports multiple Alpha channels and uses lossless compression (like LZW) to reduce file size without affecting image quality.
Conclusion
In photo editing, efficiency and a smooth experience are just as important as creativity. If you often work on image post-processing, we recommend trying TourBox, a creative console designed specifically for creators.

TourBox is shaped like a game controller, offering a comfortable and intuitive grip. Tasks like adjusting layer opacity, switching layers, tweaking brush settings, or fine-tuning parameters — while simple, can be tedious.
With TourBox, you can handle them effortlessly with one hand, and much faster than using a keyboard and mouse combo.
TourBox isn't just for Photoshop. It's compatible with other image editing software too. If you want to improve your workflow and enjoy a seamless editing experience, check out our photo editing page to discover more about what TourBox can do.

For those who love working and creating on an iPad, give the TourBox Elite Plus a try — it's bound to be your perfect creative companion!