How to Use Layer Masks to Create Stunning Effects in Photoshop?
Are you feeling confused about the concept of masks in Adobe Photoshop? Are you unsure about the different types of masks and their specific uses?
Masks, including Layer Masks, Clipping Masks, Quick Masks, and Vector Masks, are among the most powerful tools in Photoshop, but they can also be the most misunderstood.
Understanding and effectively using masks can transform your Photoshop workflow and open up a world of creativity. Masks allow you to hide, reveal, and manipulate specific parts of your artwork without making permanent modifications.
In this comprehensive guide, we will unveil the mysteries of Layer Masks, one of the four types of masks, providing clear explanations, practical examples, and step-by-step tutorials.
Whether you're a digital artist, photographer, or graphic designer, mastering the use of Layer Masks is a fundamental skill that can elevate your work to new heights.
Are you ready to unlock the full potential of Photoshop Layer Masks? Let's delve into this incredible tool together.

In this article, you will learn:
- What Is a Layer Mask in Photoshop?
- How to Add a Layer Mask in Photoshop?
- The Principle of a Layer Mask in Photoshop
- How to Use a Layer Mask in Photoshop?
What Is a Layer Mask in Photoshop?
In Photoshop, a Layer Mask is a powerful feature that allows you to control the transparency and visibility of specific areas within a layer. It acts as a non-destructive tool, allowing you to hide or reveal portions of a layer without permanently erasing or deleting any pixels.
We all know that in Photoshop, layers have a property where the layer above will block the layer below. The purpose of a Layer Mask is to allow the content of the underlying layer to show through without damaging the original elements.
Let's imagine it like this: imagine two sheets of paper, one black and one white, stacked together with the black paper on top. If you want to see the white paper underneath, you have to create a hole in the black paper.
Now, you might think, why not just remove the black paper or look at it from the bottom? Well, let's pretend these sheets are Photoshop layers, and they can only be stacked but not moved around.
But if you create a hole, doesn't it damage the black paper? And once you've made the hole, can you still make adjustments?
A Layer Mask is a tool that allows you to protect the black paper from damage, create holes, and even adjust the size and position of those holes later on. It provides a way to preserve the integrity of the layer while also allowing for precise modifications.
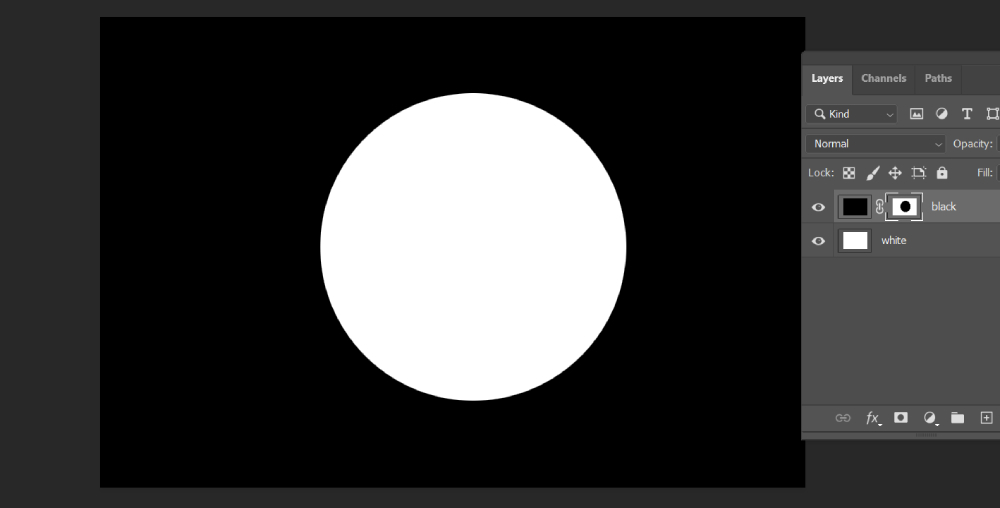
Let's take a look at the image below. In Photoshop, we have created two layers. The black layer on top is blocking the white layer underneath. However, using a Layer Mask, we can selectively reveal parts of the white layer, allowing it to show through.
Let's switch to a different set of assets and zoom in on the layers panel in Photoshop. You can observe that next to the layer thumbnail of "Layer 2," there is a black and white rectangle.
This rectangle represents the Layer Mask that we have created.
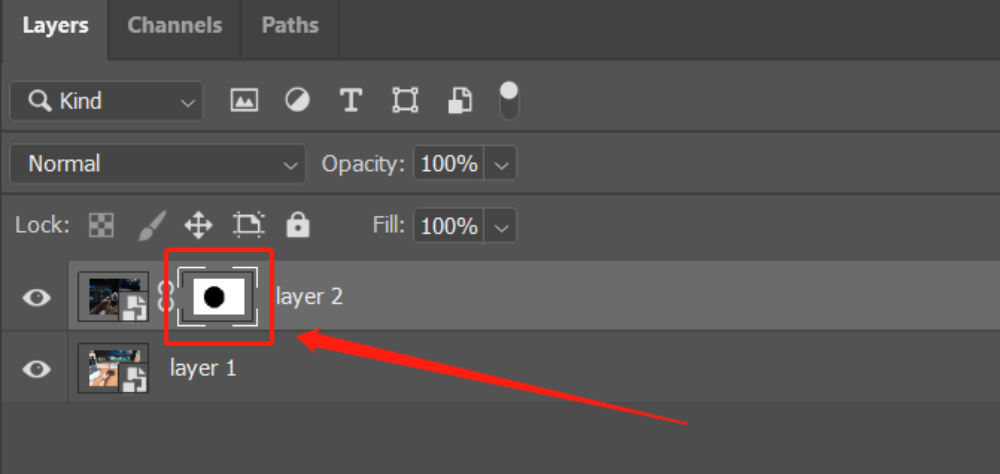
A Layer Mask is essentially a grayscale image that is associated with a particular layer. The white areas of the mask indicate the visible portions of the layer, while the black areas indicate the hidden portions.
You can paint on the Layer Mask using black, white, or shades of gray to selectively control the opacity of different areas within the layer.
By utilizing a Layer Mask, you can create seamless blends, apply selective adjustments, combine multiple images, and achieve complex compositions with precision and flexibility.
It provides a way to edit and refine specific parts of an image without affecting the rest, making it an essential tool for non-destructive editing in Photoshop.
How to Add a Layer Mask in Photoshop?
Adding a Layer Mask is a straightforward process, and the key is to apply the Layer Mask to the desired layer where you want to create a hole.
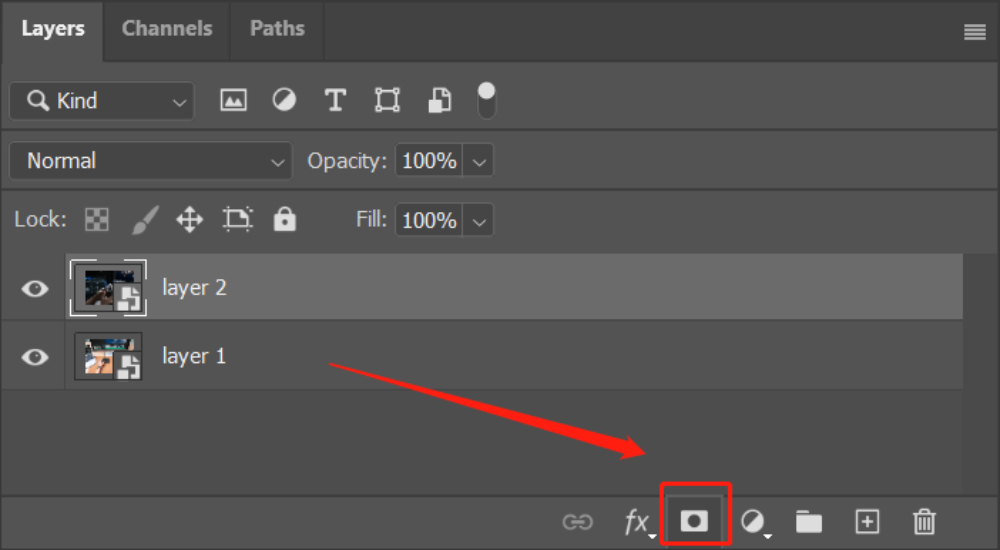
First, select the layer to which you want to add a Layer Mask. Click on the small icon highlighted in the red box in the image below to add a Layer Mask to that layer.
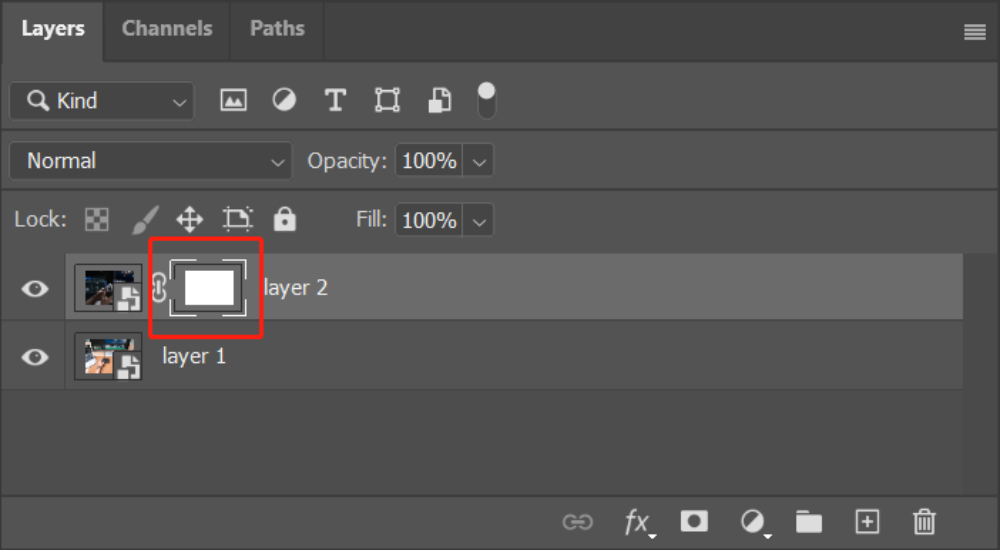
You will notice that a white rectangular thumbnail appears next to the layer thumbnail you selected. This represents the newly added Layer Mask. Make sure to select this Layer Mask (it's essential to have the Layer Mask selected to perform any operations on it).
Next, choose the selection tool and use it to outline the area you want to hide (where you want to create a hole). Remember to set your foreground color to black.
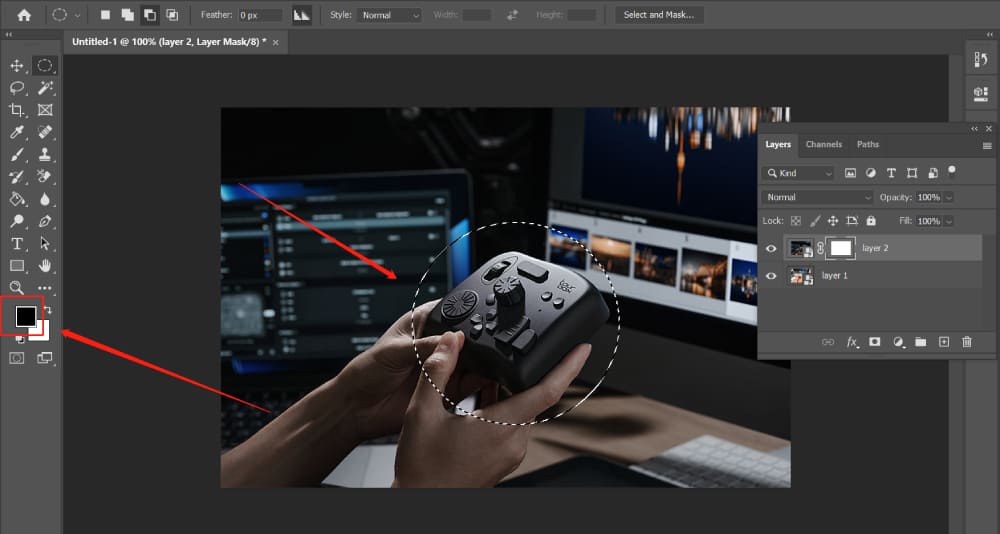
Right-click within the selected area and choose "Fill" from the pop-up menu, or use the shortcut Alt+Delete (Command+Delete on Mac) to fill the selection with black, completing the process of creating the mask.
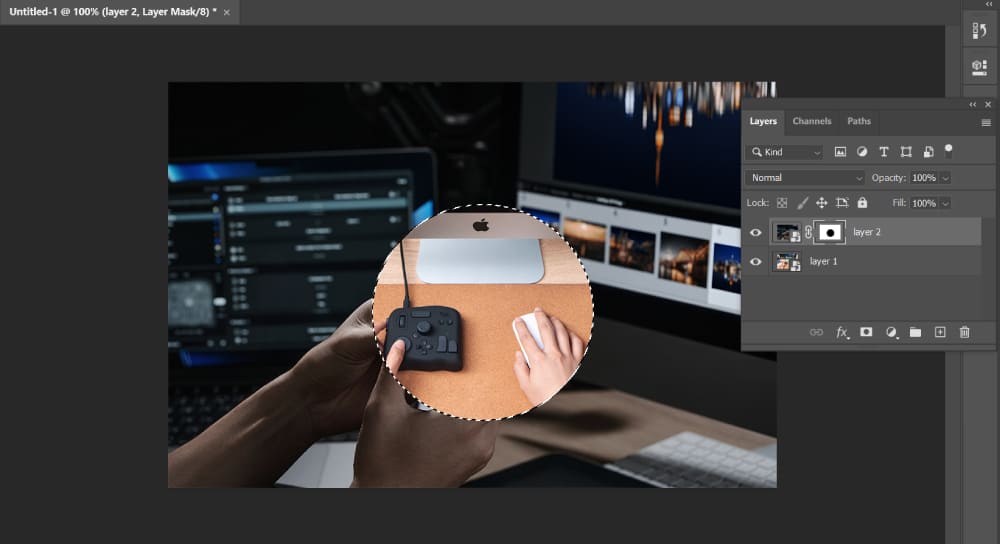
How to make a Layer Mask in Photoshop is a straightforward process. However, do you know the underlying principle behind Layer Masks? Let's continue reading to find out.
The Principle of a Layer Mask in Photoshop
The principle of a Layer Mask can be summarized in one sentence: black reveals, white conceals.
This means that on a Layer Mask, if you want the underlying image to show through, you fill it with black. If you don't want the underlying image to show through, you fill it with white.
Let's continue with the previous example: If you want to create a hole, you use black. If you make a mistake and want to fill the hole, you use white.
Select the layer to which you have already added a Layer Mask and perform the masking. Choose the Layer Mask that you just created. Use the selection tool to roughly outline the area you masked earlier; it doesn't need to be precise.
Change the foreground color to white and follow the steps for filling the color. Fill the selected area with white, and you will notice that the previously masked image reappears.
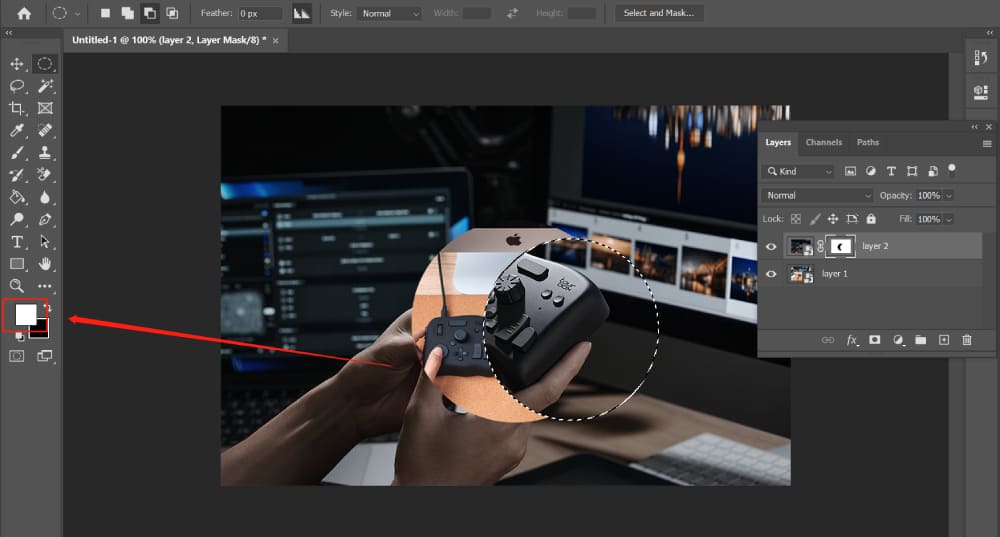
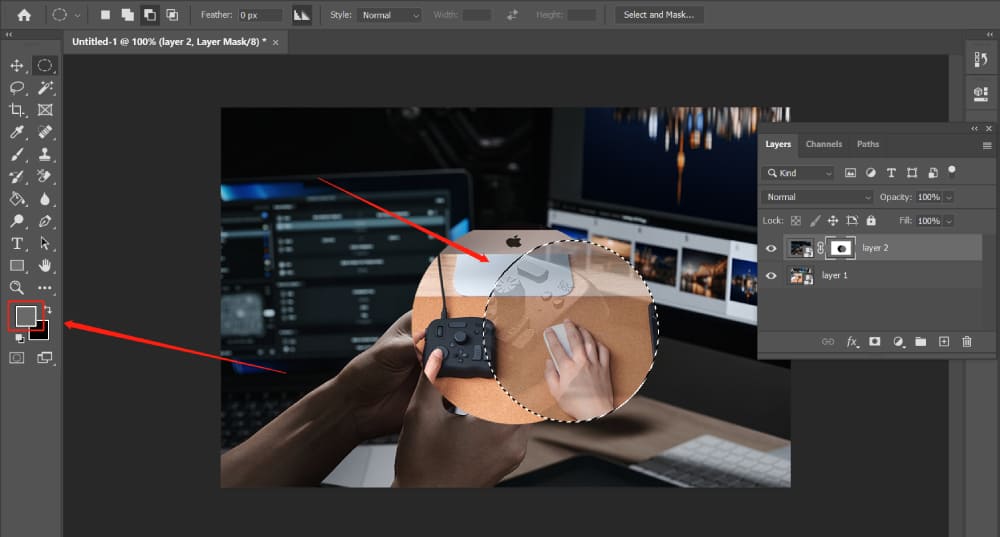
Now, what if you want to achieve a semi-transparent effect? The answer is to use shades of gray.
By applying a Layer Mask to a layer, you can selectively hide or reveal portions of that layer. Painting with black on the Layer Mask hides the corresponding areas of the layer while painting with white reveals them.
Shades of gray on the Layer Mask create varying levels of transparency, allowing for smooth transitions between hidden and revealed areas.
In essence, the Layer Mask acts as a stencil or barrier, determining which parts of the layer are visible, transparent, or hidden.
It provides a non-destructive method to modify the visibility of specific elements within a layer, giving you precise control over the composition and blending of multiple layers in Photoshop.
How to Use a Layer Mask in Photoshop?
Layer Masks are one of the most powerful tools in Photoshop, serving as the backbone of countless creative photo compositions.
The core of a Layer Mask's utility lies in its ability to facilitate seamless blending between different elements, allowing disparate components to coalesce into a harmonious whole.
In this section, we'll dive deep into the art of using Layer Masks for blending.
1. The Philosophy Behind Layer Masks
Before we delve into the practical applications, it's important to understand the underlying philosophy of Layer Masks. Simply put, a Layer Mask is a tool for revealing, concealing, or partially displaying different layers.
It's about control - the control to dictate how and where your layers interact, the control to experiment without the fear of making irreversible changes, and the control to bring your creative vision to life.
2. Using Layer Masks for Blending
When it comes to blending, think of Layer Masks as your canvas, and your brush tool as your paintbrush. Your aim is to paint a picture where the edges between your layers are indistinguishable.
For example, let's consider the landscape image shown below, and we want to change the sky in the picture.

As we add resource materials, two layers are stacked together, creating a clear boundary and distinct layering between them.
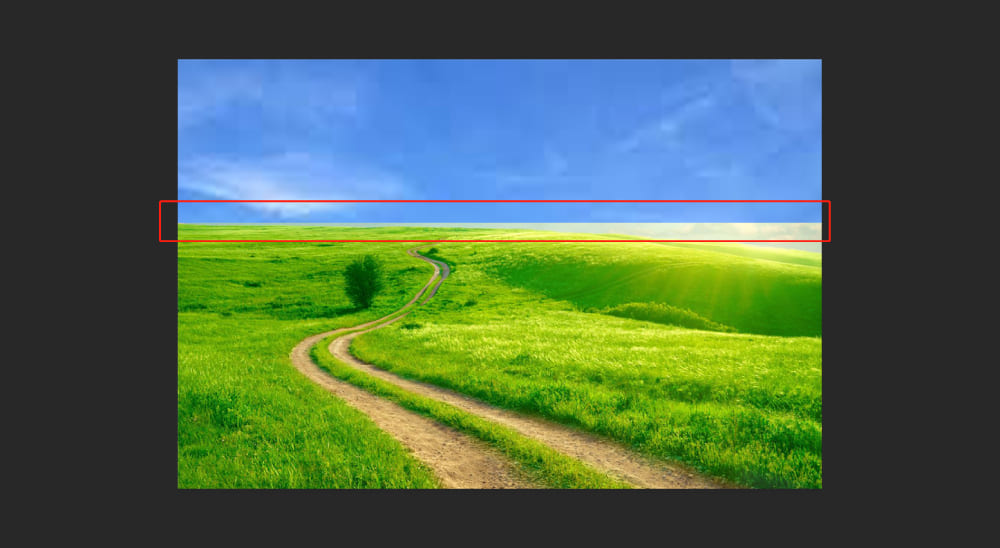
Based on the principle of layer masks we discussed earlier, we can achieve the desired effect by setting the foreground color to gray and using a soft brush to paint over the area where the two layers intersect.
Alternatively, if we set the foreground color to black and adjust the brush opacity, flow, and smoothing accordingly, we can also achieve the same effect by freely erasing and painting.
Let's take a look at the image blending effect we have created using this simple Layer Mask technique.

Here are some key ideas:
- Gradients: Use a gradient on your Layer Mask for a smooth transition between layers. This is especially useful for blending skies or creating vignettes.
- Brush Technique: The brush tool allows for precision when revealing or hiding parts of your layers. Use a soft brush to blend the edges of your elements seamlessly.
- Opacity and Flow: Adjusting these settings on your brush tool can add subtlety to your blending. Lower values allow for gradual buildup, creating more natural transitions.
3. Experiment, Experiment, Experiment
There's no set formula for using Layer Masks. It's a tool that thrives on experimentation. Here are some tips:
- Non-Destructive: Layer Masks are non-destructive. This means you can alter your mask without affecting the original layer. This freedom allows you to experiment without fear of losing your original work.
- Adaptive: Layer Masks are not set in stone - they can be adjusted and changed as needed. This allows you to adapt your mask as your composition evolves.
- Practice: Like any tool, proficiency comes with practice. The more you use Layer Masks, the more intuitive the process becomes.
Just like the example mentioned in our previous tutorial, we apply the principles of Layer Masks in Photoshop to create seamless image composites.
Since our goal is to achieve a natural blend between two images, this often requires constant adjustments of brush size and parameters to strive for the best result.
Such intricate tasks are commonplace in Photoshop workflows, demanding meticulous attention to detail.
Fortunately, TourBox provides a productivity-enhancing solution that allows creators to focus more on the art of creation itself. With TourBox, repetitive and time-consuming operations in Photoshop become effortless.

Artists can effortlessly fine-tune brush sizes, adjust settings, and navigate the software, all intuitively controlled at their fingertips.
By incorporating TourBox into your Photoshop workflow, you can take your efficiency to a whole new level and streamline your creative process. Spend less time on mundane tasks and invest more energy into artistic creation.
Embrace the infinite possibilities offered by TourBox, unleash your creativity, and take your image-compositing work to the next level.
In conclusion, Layer Masks are integral to creating seamless and believable blends in Photoshop. They give you the control to dictate how your layers interact, offering endless opportunities for creative expression.
So, start experimenting with Layer Masks and watch your compositions come alive!