Mastering Vector Masks in Photoshop: A Comprehensive Guide
Are you tired of struggling with pixel-based masks in Photoshop that leave your images looking less than perfect? Do you find yourself wishing for a more precise and flexible way to hide or reveal parts of your images?
Welcome to the world of Vector Mask—an often overlooked, yet incredibly powerful feature in Photoshop. In this tutorial, we'll demystify Photoshop Vector Mask and show you how it can take your photo editing skills to the next level.
Stick with us, and by the end of this tutorial, you'll be wielding Vector Mask with confidence, ready to bring a new level of precision and flexibility to your work. Let's dive in and unlock the potential of Vector Mask together.

In this article, you will learn:
- What Is a Vector Mask in Photoshop?
- How to Use Vector Mask in Photoshop?
- How to Convert Between Layer Masks and Vector Masks?
- Tips and Final Thoughts About Photoshop Vector Mask
What Is a Vector Mask in Photoshop?
In the realm of Photoshop, masks serve as powerful tools, allowing us to conceal or reveal sections of an image without permanently altering it.
However, when we talk about masks in Photoshop, the first thing that typically comes to mind is Layer Mask, leaving Vector Mask often underappreciated and overlooked.
So, what exactly is a Vector Mask?
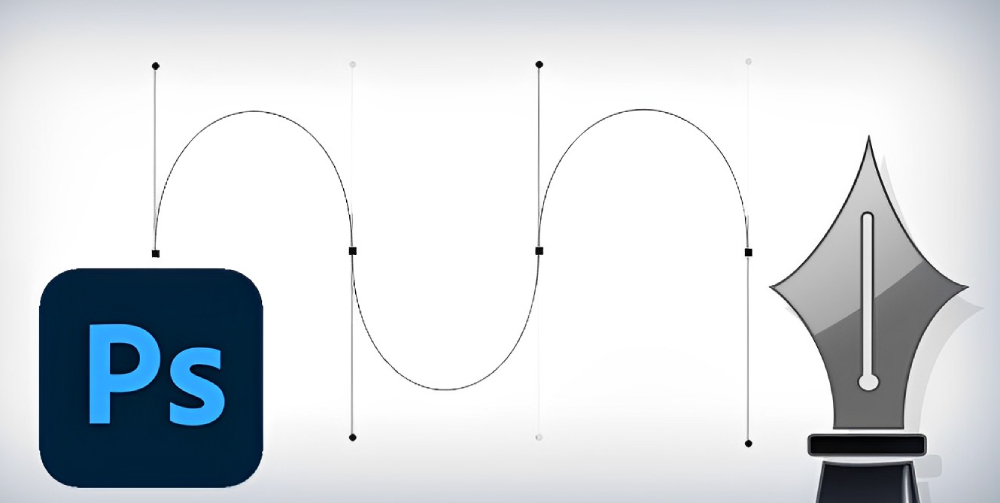
Unlike Layer Mask, which is pixel-based, Vector Mask uses mathematical lines and curves, or 'paths', to create a mask. These paths are created using the Pen tool or any of the Shape tools, and they offer a level of precision that pixel-based masks can't match.
When you apply a Vector Mask to a layer, anything inside the path is revealed, while everything outside is hidden. The beauty of Vector Masks lies in their non-destructive nature—you can edit and adjust them as much as you want without losing any image quality.
This is quite different from pixel-based masks, where changes can degrade the mask if you're not careful.
One of the standout features of Vector Masks is their ability to produce clean, hard edges, making them perfect for working with shapes or illustrations with straight lines and curves.
They're also resolution-independent, meaning that no matter how much you scale or resize them, they'll always retain their quality.
However, Vector Masks aren't always the best choice for every situation. They might not be ideal when working with more complex images, like those with fuzzy edges or a lot of detail.
But when you need precision—especially for graphics, logos, or any hard-edged imagery—Vector Mask is your best friend.
How to Use Vector Mask in Photoshop?
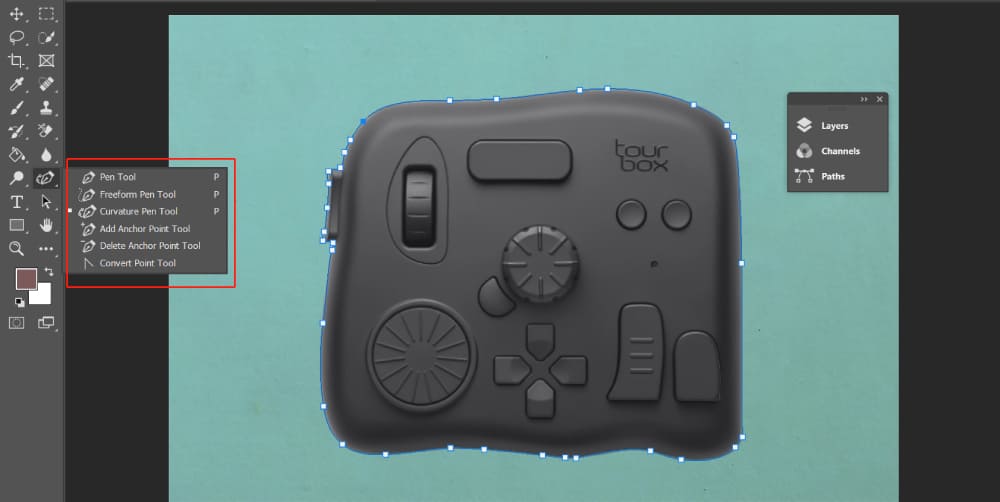
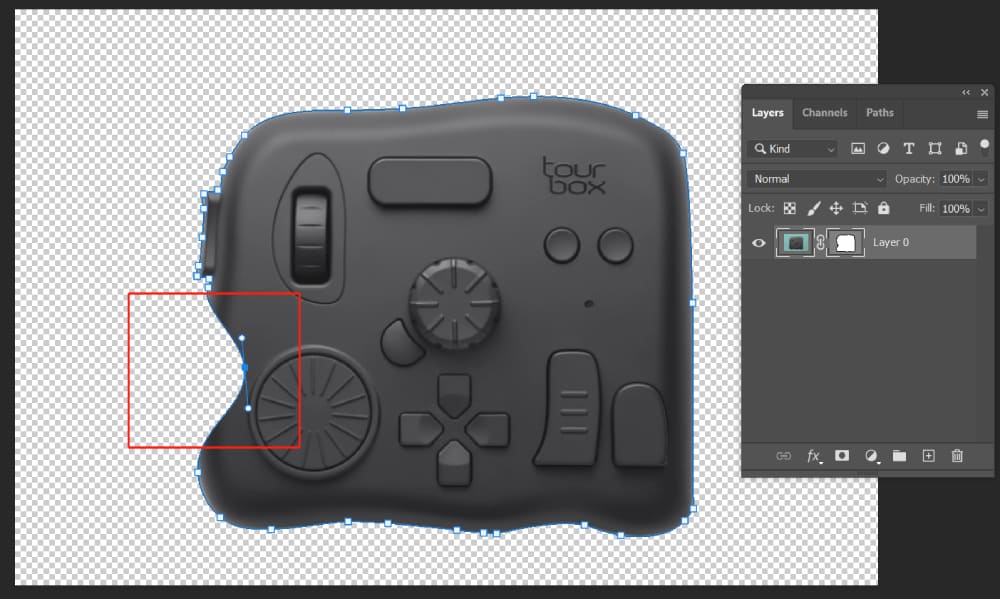
Let's dive into the practical application of Vector Masks in Photoshop. For this tutorial, we'll use an image of TourBox as our example, and demonstrate how to create a selection using the Pen tool and Vector Masks.
First, you'll need to open your project, and then select the Pen Tool. To access the Pen Tool, you can find it within the Toolbar, or simply press 'P' on your keyboard.
There are various types of Pen Tools available, including the Freeform Pen Tool and the Magnetic Pen Tool, each with its unique characteristics. Choose the Pen Tool that best suits your project.
The paths created by the Pen Tool are vector-based, making them resolution-independent. This means they can be scaled up or down without losing any quality—a significant advantage when working with graphics or images that require resizing.
After using the Pen or any Shape tool to create a path around the area you want to mask, there are two methods to create a Vector Mask:
- Use the Menu Bar
- Use the Layers Panel
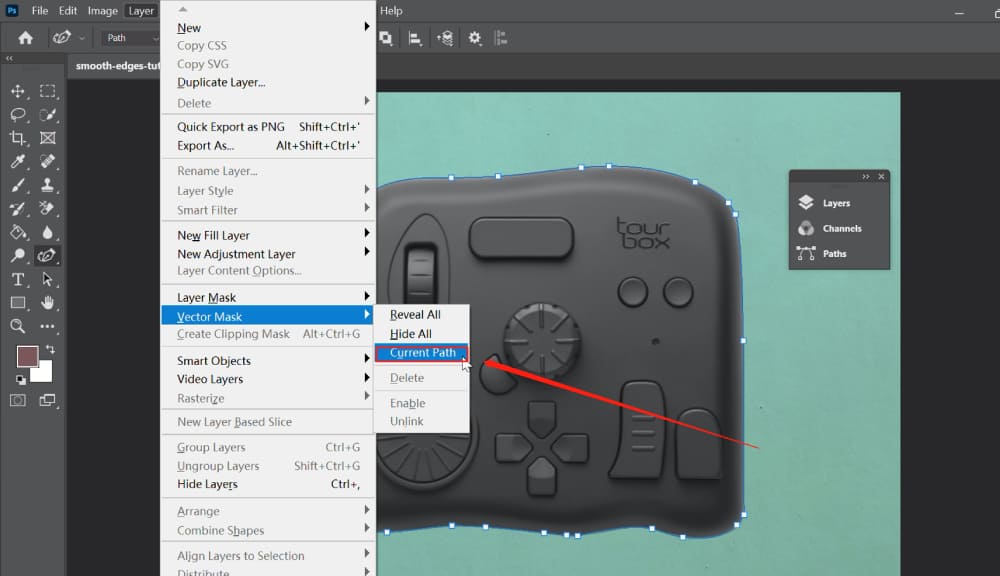
Method 1: Use the Menu Bar
The first method to create a Vector Mask involves using the menu bar at the top. Navigate to "Layer", select "Vector Mask", and then click on "Current Path".
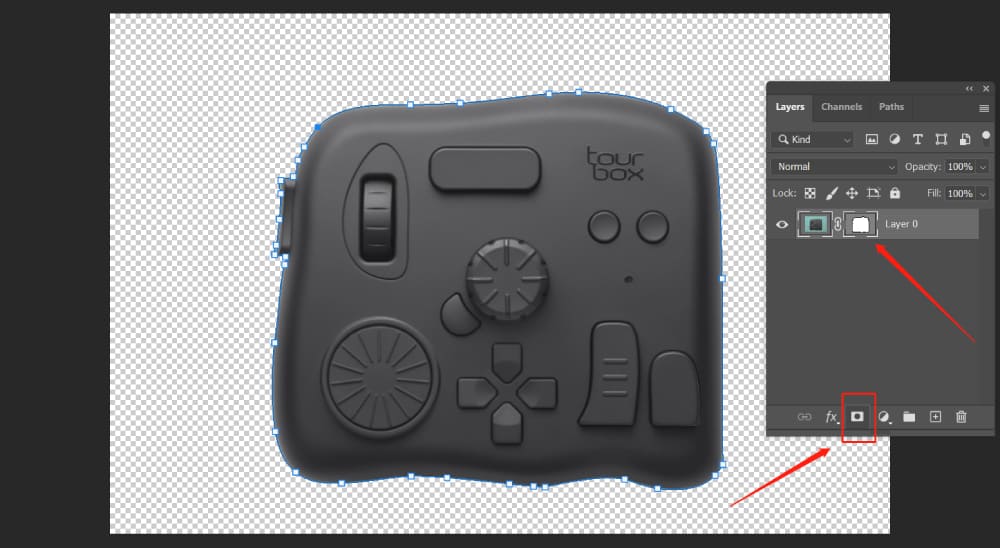
You'll notice that your object is cut out from the background, and a gray mask appears next to the current layer in the Layers panel. This is your Vector Mask.
Method 2: Use the Layers Panel
The second method to create a Vector Mask is directly through the Layers panel. Go to the Layers panel, where you'll find the option to add a mask at the bottom. The icon looks like a rectangle with a circle inside.
Hold down the Ctrl key (or the Command key on a Mac) and click on it. Just like that, a Vector Mask is created on your selected layer. (If you don't hold down the Ctrl or Command key, you'll just create a regular Layer Mask).
Now, you may be wondering, what makes Vector Masks so special? The answer lies in Vector Graphics. Unlike raster (or pixel-based) graphics, vector graphics use mathematical equations to create shapes.
This means they don't have pixels, so they can be scaled up or down without losing any quality. This is why Vector Masks, which are based on vector graphics, can give you those crisp, clean edges that are independent of resolution.
The most notable feature of Vector Masks is their precision. As they're based on paths, not pixels, they can create sharp, clear lines that are perfect for masking geometric shapes or complex objects with straight edges and curves.
And because they're non-destructive, you can tweak and adjust them as much as you want without degrading the image quality.
Let's continue with our previous example. If you're not particularly comfortable with the use of the Pen Tool in Photoshop, or you don't have the patience when using it, you may find some flaws in your image.
In this case, you can choose the Pen Tool again, hold down the 'A' key on your keyboard, and select the area you want to modify. Making adjustments at this stage is relatively straightforward.
You can alter the shape of the selection, making as many changes as you like until you're satisfied with the result.
As we've consistently emphasized, Vector Masks operate based on vectors, not pixels. Therefore, any changes you make to the shape of the vector image won't affect the quality of the picture. This adjustment process is impressively smooth.
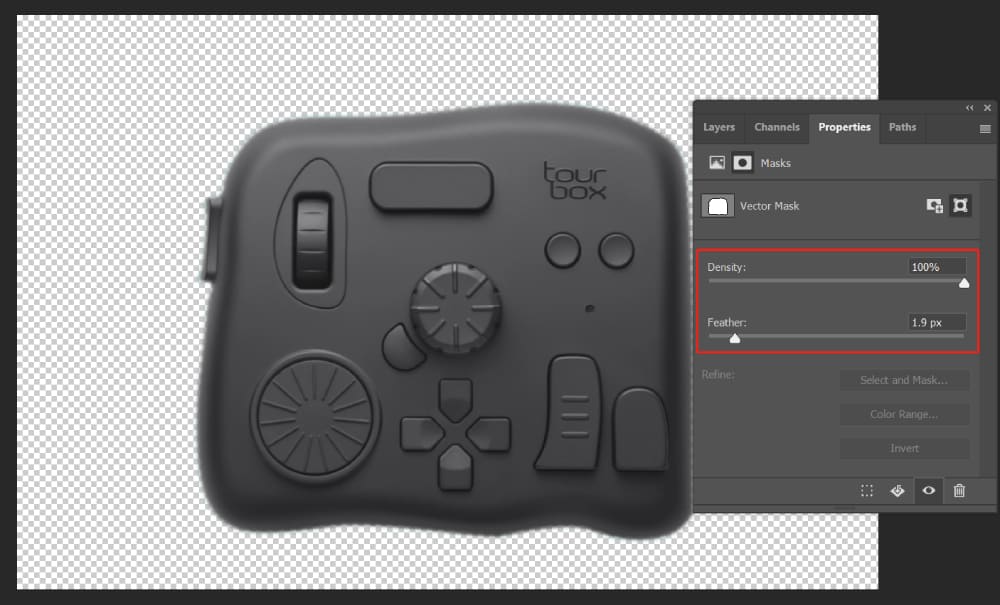
Alternatively, you can double-click on the Vector Mask in the Layers panel to open its Properties panel. Here, you can adjust the density or feather values of the selection, observe the changes, and choose the parameters that best suit your needs.
Stay tuned for the next part, where we'll dive deeper into the techniques for converting between Layer Masks and Vector Masks.
How to Convert Between Layer Masks and Vector Masks?
You've now got something called a Vector Mask. It's all about those sharp, clear lines because it's based on mathematical paths, not pixels. On the other hand, a Layer Mask is pixel-based and comes in super handy when you're dealing with gradients or subtle transitions.
But now, let's say you want to switch that Vector Mask over to a Layer Mask, to take advantage of the characteristics Layer Masks offer. The steps are pretty straightforward.
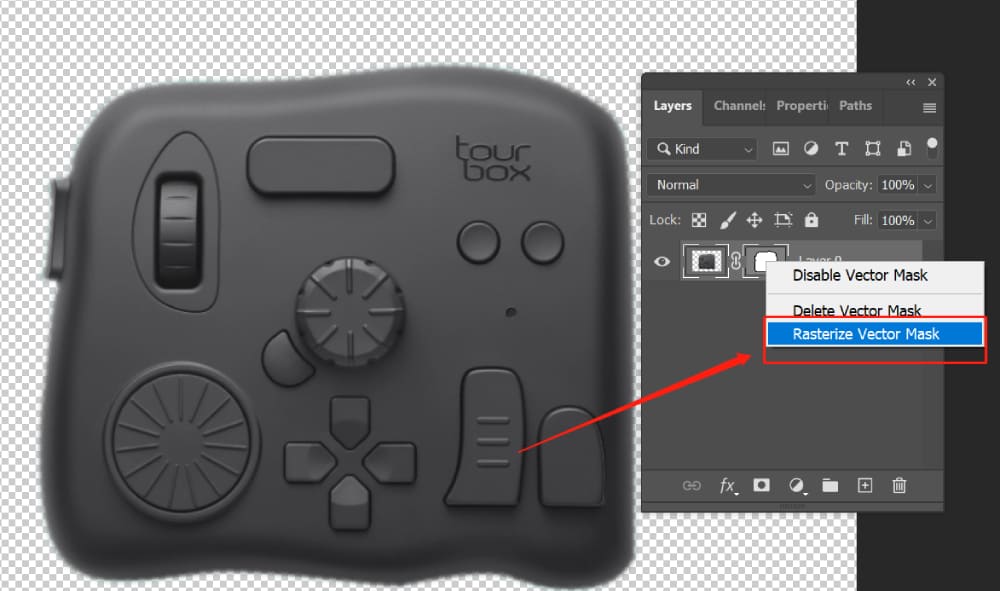
All you need to do is right-click on the Vector Mask in the Layers panel and select "Rasterize Vector Mask."
At this point, a regular Layer Mask is established, and you can use black and white brushes to draw. Display and hide patterns as needed.
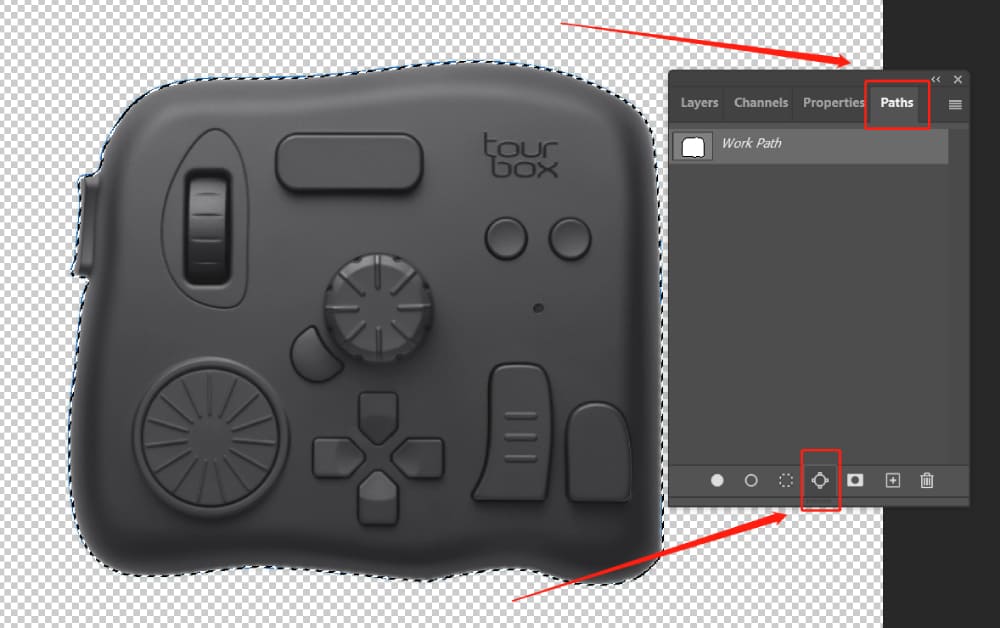
Conversely, if you want to turn a Layer Mask into a Vector Mask, the steps are a tad more complex, but still pretty simple. First, hold down the Ctrl or Command key and click on the Layer Mask in the Layers panel. You'll see the selection is selected.
Then, head over to the "Paths" panel, click on "Make work path from selection" at the bottom, and voila! Your Layer Mask has been successfully switched to a Vector Mask.
Tips and Final Thoughts About Photoshop Vector Mask
Let's wrap up our tutorial with some handy tips for using vector masks in Photoshop. Once you get the hang of these techniques, you'll be editing with surgical precision.
- Precision is Key: Remember, vector graphics are all about those crisp, clean lines. So take your time, be precise, and nail that path!
- Use Shorter Paths: Break your path into shorter segments. It's easier to manage and you'll get better results.
- Combine Vector and Layer Masks: Don't limit yourself to just one type of mask. Combining vector masks with layer masks allows for more nuanced edits.
Product Recommendation:
If you spend a lot of your day in Photoshop, you gotta check out TourBox. It's a nifty little console designed specifically for digital artists. It's got knobs, wheels, and buttons that you can program to do all your favorite Photoshop commands.

From adjusting brush sizes to switching tools to zooming in and out, TourBox makes it all a breeze. It's like having a second keyboard, but one that's totally optimized for Photoshop.
So go ahead and give TourBox a try. It's a game-changer, and we think you're gonna love it. It's like a secret weapon for digital artists—a tool that helps you work smarter, not harder.