How to Export a GIF in DaVinci Resolve?
Exporting GIFs is finally supported starting with DaVinci Resolve 18.5. This handy feature makes it easier for editors, colorists, and content creators to create reference images, article illustrations, and more.
The exported GIFs are also of great quality, making this tool super useful.
In this article, we'll show you some tips on how to export GIFs in DaVinci Resolve.

In this article, you will learn:
- How to Export a GIF in DaVinci Resolve?
- How to Export a GIF in DaVinci Resolve Versions Before 18.5?
- Conclusion
How to Export a GIF in DaVinci Resolve?
Exporting a GIF in DaVinci Resolve is simple, but make sure you're using version 18.5 or higher. If you're still on version 18.1, 18, or earlier, unfortunately, the GIF export feature isn't available.
Here are the specific steps for exporting a GIF:
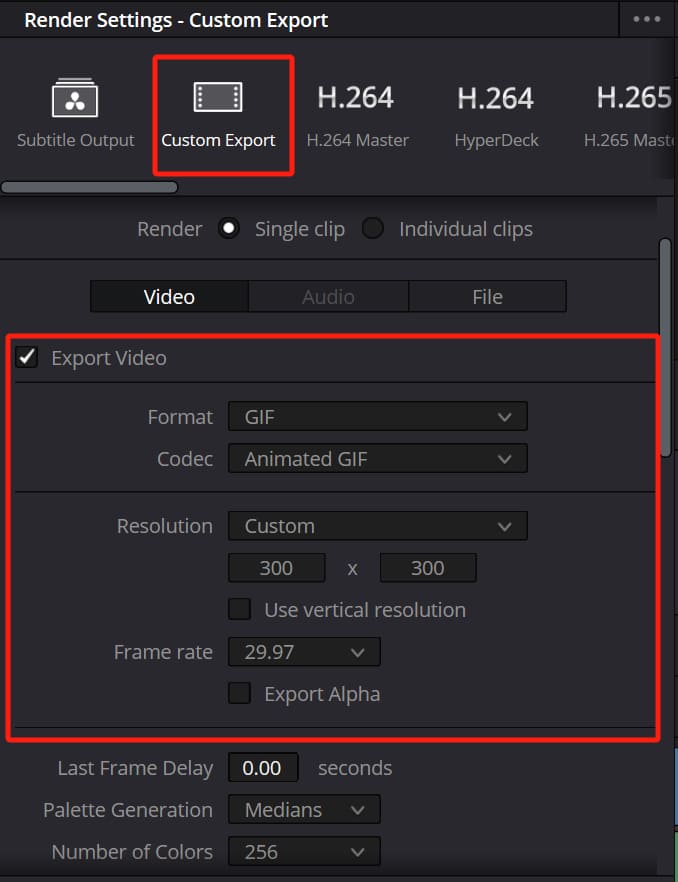
- Once you're in DaVinci Resolve, go to the "Deliver" page. In the "Render Settings" panel, click on "Custom Export," and make sure the "Export Video" checkbox is checked.
- Next, select "GIF" from the "Format" dropdown menu, and choose "Animated GIF" in the "Codec" option.
- Then, set the resolution and frame rate as needed. For example, common resolutions are "300 x 300" or "1280 x 720," and a frame rate like "23.976" or another suitable value.
- After you've adjusted the settings, click "Add to Render Queue," then hit "Render All" on the right of the Deliver page. Your GIF will be exported successfully!
For a smoother export process, it's a good idea to set the timeline resolution before you start editing.
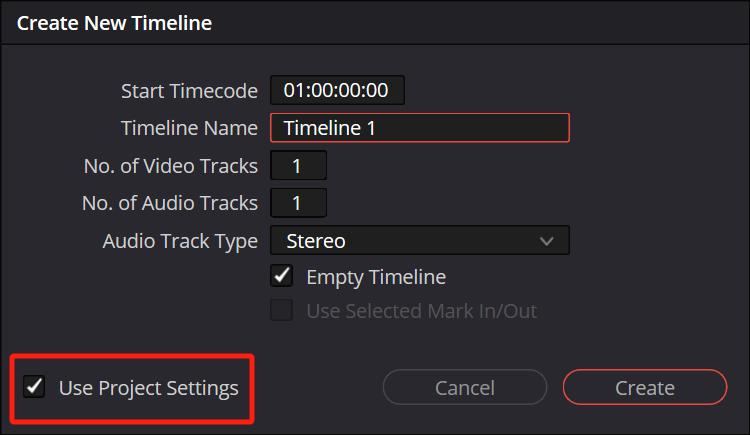
On the "Edit" page, press "Ctrl/Command + N" to open the "Create New Timeline" window. Uncheck "Use Project Settings."
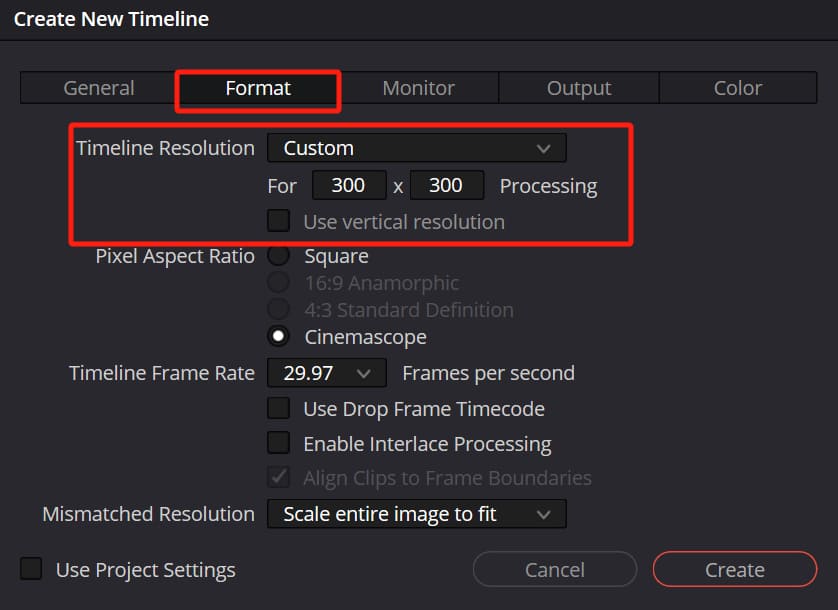
Switch to the "Format" tab, select "Custom," and manually enter the resolution you want, like "300 x 300." This will prevent any resizing issues during export and save you time.
Keep in mind that high resolutions and longer durations will increase the file size, so GIFs are usually set to lower resolutions and shorter lengths.
For example, a GIF with a resolution of "300 x 300" and a duration of 70 seconds will only be 1.7 MB.
Further Reading:
So, depending on your needs, adjusting the resolution and duration will help you balance quality and file size, making your GIF easier to share and store.
With these simple settings, you can easily export high-quality GIFs in DaVinci Resolve for your creative projects and content displays!
How to Export a GIF in DaVinci Resolve Versions Before 18.5?
In DaVinci Resolve versions before 18.5, like 18.1, 18, 17, and 16, there is no direct option to export GIFs.
However, you can still create GIFs by exporting your project as a video file (like MP4) and then using other tools to convert it into a GIF.
After finishing your edits and color grading, go to the "Deliver" page, then click on the "Custom Export" section.
In the "Video" tab, select "MP4" from the "Format" dropdown, and choose "H.264" from the "Codec" dropdown. Set the frame rate you want, like "23.976." Then, start rendering the file.
Once you have the MP4 file, you can use online tools to convert it into a GIF. There are many tools available on the internet, and here's one example:
- Go to this website: https://image.online-convert.com/convert/mp4-to-gif
- Upload your video file.
- If needed, adjust the settings under "Optional Settings."
- Click the "Start" button, then download your GIF file.
- This method allows you to create GIFs even if you're using an older version of DaVinci Resolve!
Conclusion
Following these steps, you should be able to easily export a GIF in DaVinci Resolve, regardless of whether you are using the latest version or an older one.
With these skills in hand, you can swiftly transform your creativity into lively GIFs, perfect for social media, website displays, or any other projects.
If you aim to enhance efficiency during video editing, TourBox comes highly recommended.

It's a creative console designed for creators, aiding in smoother operations with software like DaVinci Resolve, saving time and enhancing the creative process.
Whether it's video editing, color grading, or detailed manipulations, TourBox can make your workflow more seamless.

We hope this tutorial proves helpful to you.