How to Fix the DaVinci Resolve Media Offline Issue?
The issue of 'media offline' is a common stumbling block for many newcomers to DaVinci Resolve. Unlinked clips, strangely encoded materials, inconsistent frame rates - the causes behind 'media offline' are diverse and myriad.
Trying to figure it out on your own can be both time-consuming and exhausting.
In this tutorial, we've compiled a variety of scenarios that can lead to 'media offline' in DaVinci Resolve, along with their respective solutions. We'll guide you through each step of the process.
Whether you're a novice or a seasoned user of DaVinci Resolve, this checklist will help you quickly identify the root of your offline media DaVinci Resolve issue. Without further ado, let's get started!

In this article, you will learn:
- Scenario Ⅰ: Source Material Has Been Moved or Deleted
- Scenario Ⅱ: Materials Offline Immediately After Import
- Scenario Ⅲ: Random Frame Offline or Flickering Issue
- Scenario IV: Audio Sync Issues During Playback
- The Ultimate Universal Solution
- Final Thoughts About DaVinci Resolve Media Offline
Scenario Ⅰ: Source Material Has Been Moved or Deleted
'Media offline' issues can occur in DaVinci Resolve when the materials you've imported lose their connection to the original source files on your hard drive.
This typically happens when you've unknowingly moved the source files to a different folder or disk.
This represents the most common 'Media Offline' scenario in DaVinci Resolve. So, when you encounter 'Media Offline' while using DaVinci Resolve, your first step should be to recall whether you have moved or deleted any source materials.
The solution is straightforward:
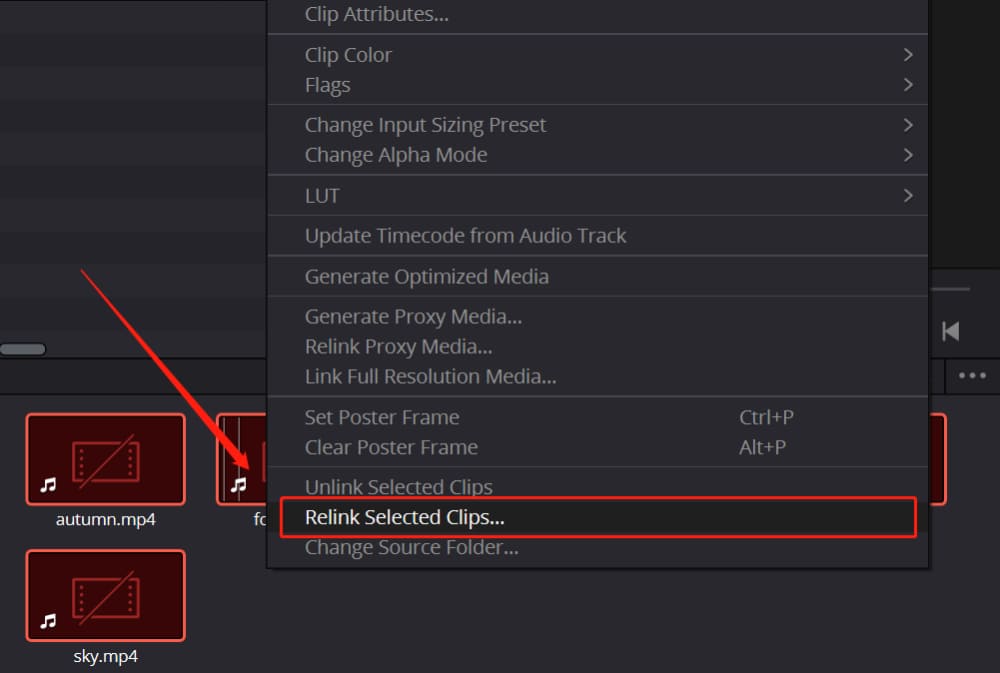
- Go to the Media Pool page and select all the offline materials.
- Right-click on any of the clips and choose 'Relink Selected Clips.'
- In the dialog box that appears, navigate to the folder that contains the original source media, and click 'Select Folder.'
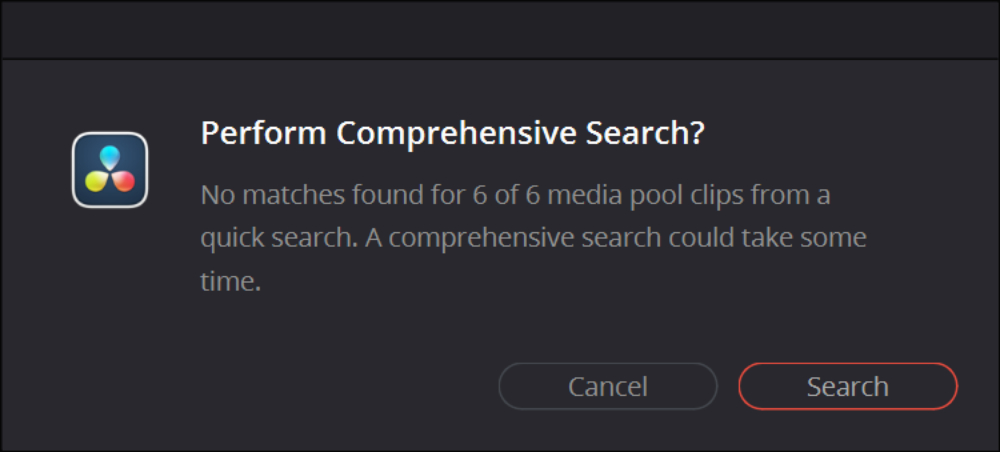
If some clips can't be relinked for unknown reasons, DaVinci Resolve will prompt you to perform a 'Comprehensive Search' in subsequent dialog boxes.
If there are still a few clips offline, generally, you need to expand the search scope, such as moving to the parent folder or even the entire hard drive.
When you unintentionally move or delete any source material, it's highly likely that you haven't properly managed your media in DaVinci Resolve. Don't underestimate the importance of organizing your media clips.
However, organizing assets effectively in DaVinci Resolve is not an easy task, especially when your project has a multitude of chaotic media clips. This is where TourBox, the creative tool, can come in handy.

Check out our video editing page or watch the video below to understand how TourBox can assist you in simplifying every step of video editing and keeping your assets well-organized.
Scenario Ⅱ: Materials Offline Immediately After Import
Sometimes you may encounter this situation: you can import materials, but they immediately show as offline. If you drag these materials onto the timeline and try to play them, you'll find that although the visuals are offline, you can still hear the audio.
This problem is often related to the materials being encoded in H.265 or HEVC. You'll likely be familiar with this situation if you're an action camera or drone enthusiast.
Devices like GoPro and DJI Mavic encode high-resolution, high frame-rate materials (such as 4K 60FPS) into highly compressed H.265.
Mirrorless cameras like the Fuji XT3, Fuji XT4, and Sony a7S III also use H.265 encoding in some of their high-quality in-camera formats.
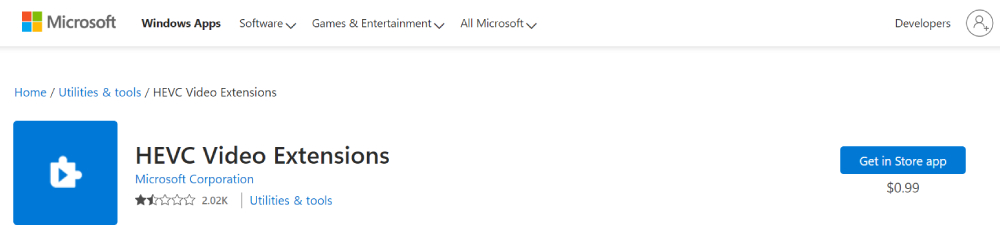
This issue seems more like a problem with the Windows system. We need to install the Windows HEVC extension to successfully decode the H.265 materials.
Here is the Solution:
- Go to the Microsoft Store and search for the HEVC extension, then click on 'Buy' (yes, it's paid, and although it's not expensive at just $0.99, it's quite frustrating, which is why you'll see a barrage of negative reviews).
- Download and install the extension, restart your computer, and then open DaVinci Resolve. You should be able to decode H.265 videos now.
One thing to note here: while both the free and studio versions of DaVinci Resolve support H.265 decoding, only the DaVinci Resolve Studio supports GPU acceleration.
Therefore, if you have a good system setup but still struggle with H.265, you might need to upgrade to the DaVinci Resolve Studio. This should make handling H.265 materials no longer a problem.
Scenario Ⅲ: Random Frame Offline or Flickering Issue
Sometimes, after importing H.265 clips, some random frames (not the entire clip) will show 'media offline' errors when refreshing or dragging the timeline for playback.
This type of error often occurs with H.265 materials shot on mobile phones (such as iPhones), typically at 4K 60FPS.
This issue doesn't occur with the free version of DaVinci Resolve. However, users of DaVinci Resolve Studio may encounter this problem because it involves compatibility issues with GPU acceleration.
Here is the Solution:
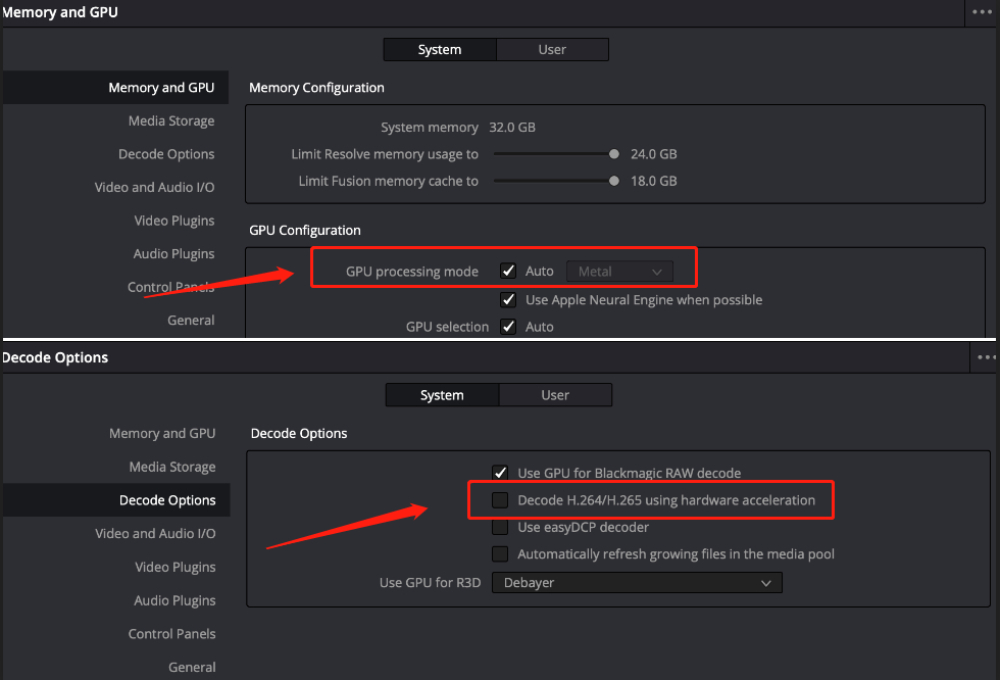
- In DaVinci Resolve Studio, go to "Preferences" > "System“ > ”Memory and GPU“ page. In the GPU processing mode option, don't select CUDA or OpenCL, instead choose 'Auto'.
- Then, proceed to the 'Decode Options' page, and make sure the 'Decode H.264/H.265 using hardware acceleration' option is not checked.
- Open DaVinci Resolve Studio again, go to the Timeline and check if the materials are displayed correctly.
In addition to the above steps, we still recommend updating DaVinci Resolve and your GPU drivers to the latest versions. This issue may very well be resolved in a future DaVinci Resolve update.
Scenario IV: Audio Sync Issues During Playback
Sometimes, after importing all the clips, they immediately go offline, but there are no issues with the audio (this is the same scenario as described in Scenario Ⅱ). Alternatively, the imported video might experience audio sync issues during playback.
This situation can be quite perplexing.
Actually, these are common issues after importing Variable Frame Rate (VFR) materials. Smartphones and game recording software like OBS and NVIDIA ShadowPlay record videos in VFR format.
On the other hand, DSLRs, mirrorless cameras, or professional camcorders record video clips at a constant frame rate.
All post-production software, whether it's DaVinci Resolve or Premiere Pro, operates based on constant frame-rate video materials.
So, converting VFR materials to constant frame rate videos is the fundamental solution to these kinds of issues. This involves two steps:
- Detect if the material is VFR
- Use software to convert it
We'll need two tools for this. One is Mediainfo, used to check the type of frame rate. The other is Handbrake, which can convert VFR (Variable Frame Rate) materials to CFR (Constant Frame Rate) materials.
How to Detect Frame Rate:
- Download Mediainfo. This is a very handy free software that can display a wealth of metadata.
- Open Mediainfo, click on "View", and change from "Basic" to "Tree".
- Select the file you want to check from the sidebar, or simply drag and drop it, to view the metadata.
- Locate the 'Frame Rate Mode' section, and you can clearly see whether the video is CFR (Constant Frame Rate) or VFR (Variable Frame Rate).

How to Convert Frame Rate:
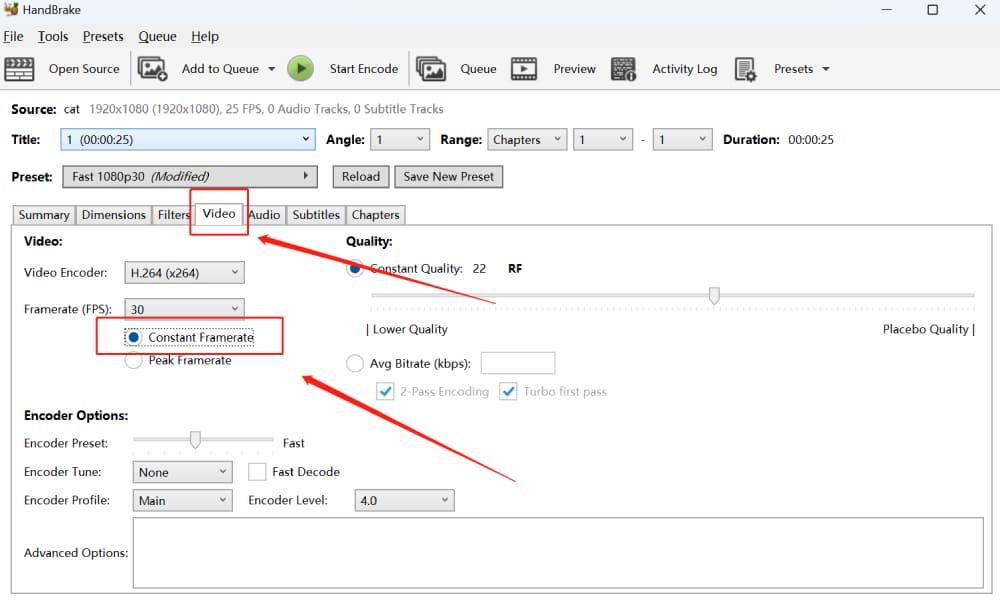
- Download and install Handbrake. Open the software, select the file from the sidebar, or simply drag and drop it.
- Choose the required resolution and frame rate Preset, then in the Video Page below, confirm the frame rate and select 'constant frame rate'.
- Click 'Start Encode' at the top to begin regenerating the video file.
- After the re-encoding is complete, open Mediainfo to check the frame rate mode. By now, it should have been adjusted to a constant frame rate.
However, some videos may still exhibit variable frame rates even after re-encoding. In such cases, you should try encoding with different frame rates. For example:
- For a 30FPS video, try re-encoding at 29.97 to see if it becomes constant.
- Similarly, for a 60FPS video, try re-encoding at 29.97.
The above steps should solve the majority of variable frame rate issues. Once we re-import the re-encoded video materials into DaVinci Resolve, we shouldn't encounter audio sync or offline frame issues anymore.
The most important point to emphasize is that if we take note of this issue during the preliminary stages and set all shooting modes to a constant frame rate, we will save a lot of precious time and won't have to deal with such issues in post-production.
The Ultimate Universal Solution
Perhaps following the above steps didn't resolve your issue with media offline. In that case, the ultimate solution is: transcode your materials.
You can use any transcoding software to process materials that appear offline. The target encoding can be roughly divided into two categories:
- One category includes highly compressed and universal encoders, such as H.264, Mpeg-4, etc. These are highly compressed encoders, but decoding these video files requires your computer to have strong computational power.
- The other category includes encoders that are friendly for post-production, such as DNxHD (for Windows platforms) or Prores (for Mac platforms). They will take up a lot of disk space, but are easy to edit and color grade.
We recommend using the FFmpeg open-source command-line tool. If you're having trouble using FFmpeg, you can also search for other transcoding software on Google and try using them.
Final Thoughts About DaVinci Resolve Media Offline
The above are all solutions to the DaVinci Resolve media offline issue. When you face any problems related to offline materials, you can first check the following:
- Whether DaVinci Resolve has been updated to the latest version. (This can solve some problems related to codecs)
- Whether the latest GPU driver (preferably the Studio version) is installed and compatible with DaVinci Resolve.
- The encoding of your materials, such as H.265, H.264, etc., and the format of your materials, such as .mp4, .mkv, etc.
- Whether the video was shot using a smartphone or screen capture software. (which may generate variable frame rate videos)
- Whether the video materials can be played in media players like VLC.
Taking into account all of the above information can help you quickly find the root cause of the media offline issue, allowing you to utilize the various solutions discussed in this article.
Product Recommendation:
As we near the end of our journey, we want to reintroduce you to a tool that can significantly enhance your video editing experience: TourBox.
TourBox is a creative tool designed specifically for image and video processing software. It is compatible with various software, including but not limited to DaVinci Resolve.
Whether you're a professional editor or just starting out, TourBox can help you streamline your workflow and make the editing process more intuitive.

Customizing TourBox according to your specific needs is a breeze. With just one hand controlling TourBox, you can accomplish various tedious operations with fewer actions, greatly boosting your efficiency.
In video editing, every second counts, and TourBox ensures that none of your seconds go to waste. You're sure to love the operational experience it brings.
We conclude our article on DaVinci Resolve Media Offline here. We hope this article has addressed the issues you've encountered.